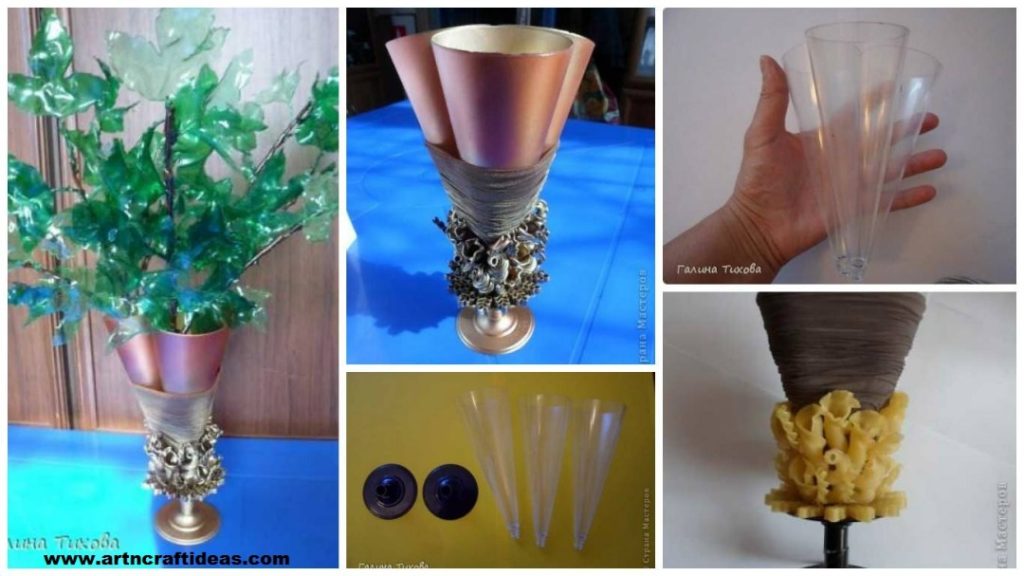
DIY Vase of branches made from plastic bottles
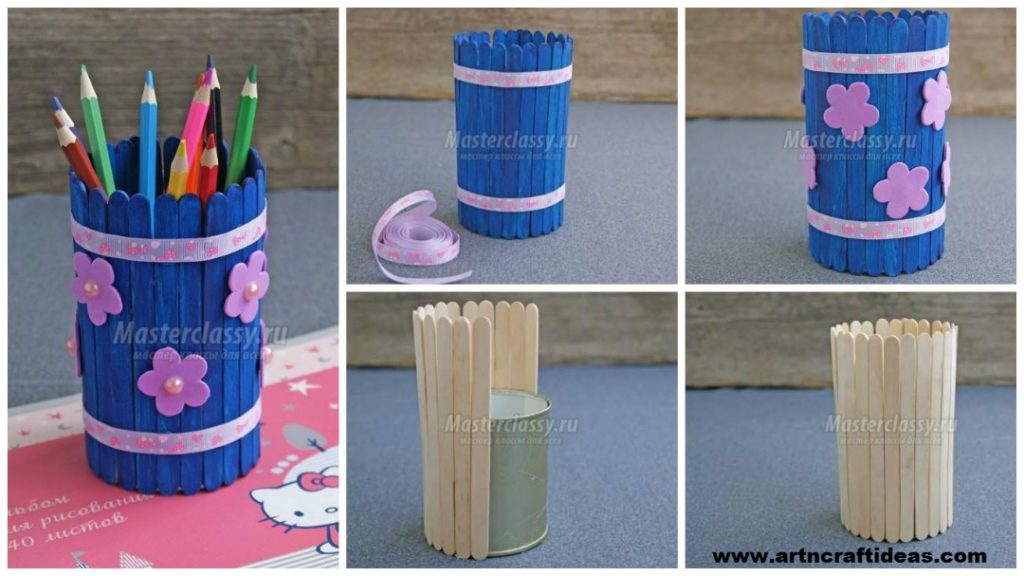
I made a vase of disposable glasses, decorated with an elastic tip and pasta; branches made from plastic bottles.

To work on a vase I need: 3 disposable glasses, PVA glue, elastic sock, shaped pasta Melt glue and spray enamel.

Three wine glasses pile up as follows:

Elastic socks are well soaked in glue PVA

I put it on the bottom glasses, doing drapery and leave to dry.

Two wine glasses on the stand Thermo glued together, as shown in the photo

When the glue is dry, begin to decorate curly pasta, pasting them Melt adhesive.

Next pasting glasses to the stand

Now paint aerosol paints. The upper part of the color “Old Copper” bottom – paint brown

Then everything is slightly enamel.

Here is a vase I got

For making branches receive a green plastic bottle, neck and bottom cut off.

For work, I need the middle part.

From paper-cut stencils for the leaves.

Stencil cut out leaves from the middle of the plastic bottle.

Stencil cut out leaves from the middle of the plastic bottle.

Over a candle flame gives the sheet shape. It is important to remember that the candle flame must not touch the sheet workpiece. Sheet form gives hot air instead of a flame. The work should be carried out in a well-ventilated area!

Leaf stalk spirals, softening it over a candle.

These are the leaves I did.

For the manufacture of the branches take a plastic bottle of brown color and cut it in a spiral to form a strip approximately 1,2sm

I twist the strip in a spiral, softening it over a candle flame.

To connect the two branches together, the end of one branch in a candle flame and quickly presses it with pliers to the other branch.

In the same way, I attach the leaves to the branch.

These are the branches and leaves I did.

I put twigs in vases cell.

So, enjoy The result of my work.

courtesy: stranamasterov

How to Make a Pencil Holder with Popsicle Sticks
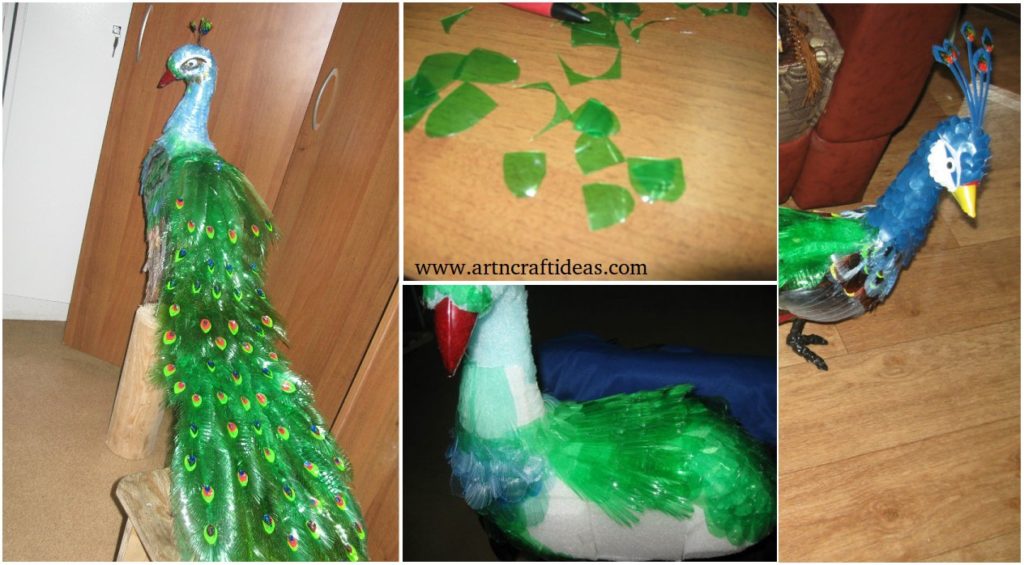
We suggest you try this because instead of just throw the “unnecessary” thing (empty can), you get a very desired, such as pencil holders.
We offer to make an unusual decor banks wooden sticks. We have created such a lovely pencil holders and in this master class, we want to tell you how it’s done.

Required Material:
Wooden Sticks (flat). These can be sticks for ice cream or bamboo garden labels.
Acrylic paint.
Can.
Narrow rep ribbon.
Polubusiny.
5.List porous rubber 2mm thick.
Brush.
Thermal adhesive gun.
Scissors with pointed ends.

Before you begin decorating the banks, it is necessary to process the upper edge. All sharp protruding bulges need a hammer or other heavy object, or a file to file. Once the edge is processed, you can begin to work on the decor. In this master class, we used a bank, circle the walls which is 25 cm., Respectively, it took us 25 pieces of sticks, the width of 1cm.

With glue gun glue sticks to the can, one after another. Trying to glue them as close as possible to each other.

Sticks must be chosen as the curves, which may adversely affect the results of our work can be found more or less equal since some of them are,

Thus, sticks plastered all we can.

Since the bank we use, almost half below the height sticks, its inner part is almost not visible, so it does not have to decorate.

Further, all sticks painted blue acrylic paint. The paint dries quickly, covers well the wooden surface and after drying it does not stain your hands.

The next step was that we pasted jar at the top and bottom of the narrow rep ribbon. To do this, we have also used the glue gun.

Decorating element has been decided to make a flower out of foam rubber. For this paper, we have drawn template-harvest and cut it.

With a paper flower to a sheet of foam rubber, the sharp end of the scissors we circled outline. On a soft rubber surface was a clear trail that is easy to cut out the desired shape us.

According to this principle, we have prepared a sufficient number of flowers.

With hot melt glued to the wooden surface florets banks.

The middle of the flowers issued by gluing pink.

Once all the glue dries, the jar is ready for use. From it came out very nice pencil holders. Try it and you make the decor tin cans with their own hands and finally get an exclusive little thing desired.

courtesy: masterclassy

DIY Beautiful Peacock Design from plastic bottles
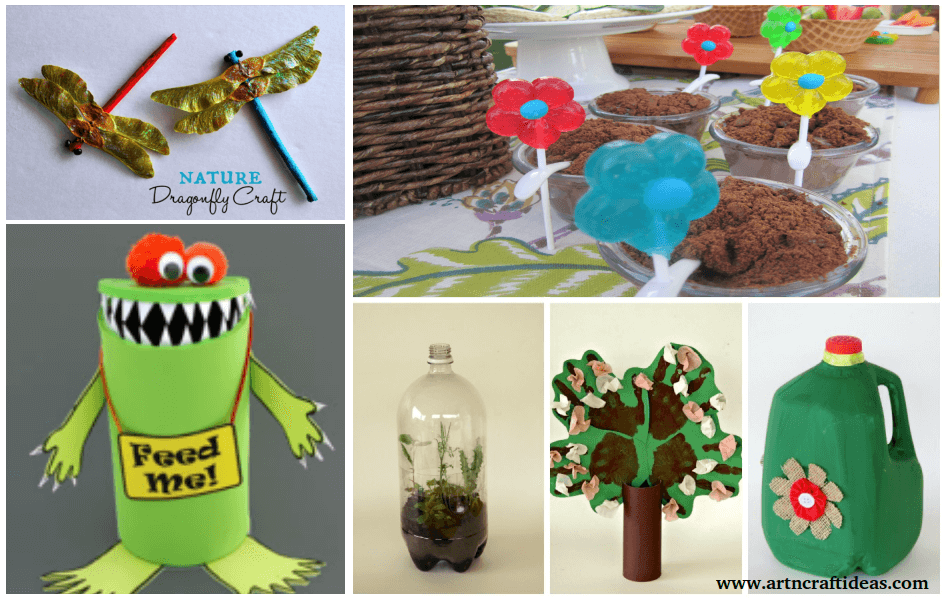
This tutorial shows how to make beautiful peacock design from plastic bottles….which adds beauty to our home.

In many countries, the peacock was considered a royal bird. Image peacock symbolizes happiness, beauty and nobility. We decorate our infield solar bird peacock. Miracle bird are made of plastic bottles.

Feathers cut from colored plastic bottles.

Need a sufficient amount so on packages pile up feathers preform.

Feathers cut into different sizes.

Sort by shape and size of the work-piece to the tail and breast.

Getting to the manufacture of small feathers.

The trunk is cut out of the synthetic foam. It is easy when working and does not crumble.

Peacock torso to attach to churbachok legs.

Bottle of red beak cut shape for the peacock.

Let us plumage birds. Sheathe colored plastic breast.

Incrementally glue feathers to the bird.

Feathers secured by an adhesive gun with silicone rods.

Alternate dimensions and color blanks when attaching feathers.

On the back of a miracle bird glue over the length and texture feathers.

The photo shows two kinds of preparations for feathers.

In the course of work.

Side view.

Feathers for tuft of plastic cut into thin strips.

Glue series of pieces on the neck.

On the head of the oval continue plumage details.

The beauty of the peacock begins to emerge.

We make beautiful eyes.

For the manufacture of wings use abrasive mesh. Her fasten the feathers.

Fasten feathers to the grid.

When creating anchoring wing preform in length, ranging from smallest to largest.

Getting to the creation of the tail.

Peacock’s tail, including all colors of the rainbow, was seen as a symbol of wish fulfillment.

We are putting all the parts of poultry. And the bird of paradise and settled in your garden!

That miracle bird on the face!

Hope you like this tutorial.

We would love to hear your thoughts in the comment section below. And be sure to like us Facebook for more ideas!

Thank you for visiting our website. Keep Creating with Art & Craft!

RECYCLED Craft for World Environment Day
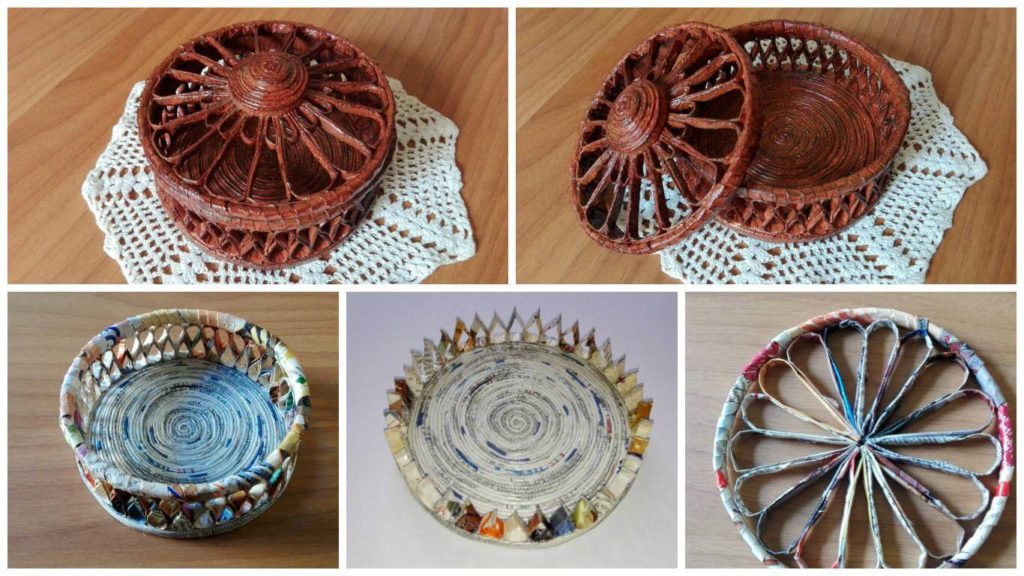
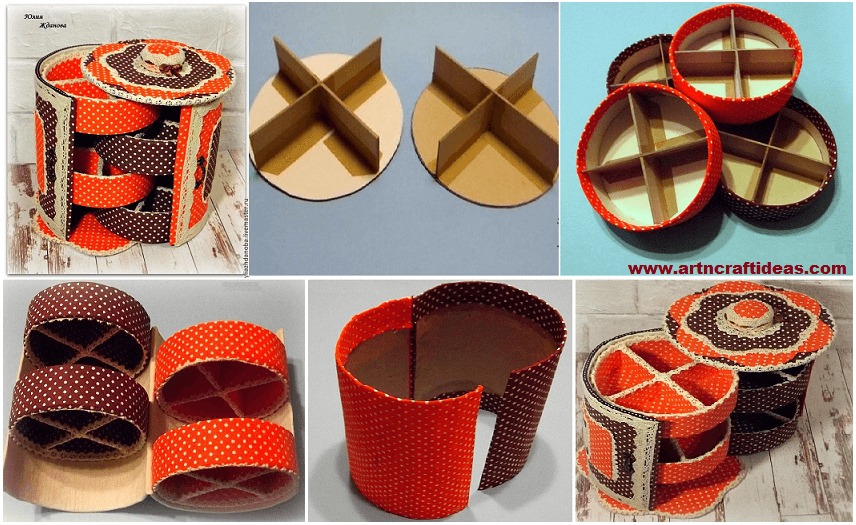
World Environment Day on the 5th of June, | Preschool Activities, crafts, lesson plans, coloring pages suitable for toddlers, preschoolers and kindergarten. it’s the day organizations and individuals the world over raise awareness on various topics related to our environment. This year, the theme is ‘Seven billion dreams. One planet. Consume with care’. The focus is on making our general consumption intelligent, without harming the planet and leaving behind resources for future generations.

Here are list of creative Environment Day Crafts:

1. Environment Day special Earth Sign Craft (Tutorial)

Supplies:

  • Blue construction paper
  • Glue
  • Dirt
  • Grass
  • Rocks
  • Flowers
  • Twigs

2. Let your little ones get in touch with the earth and search for natural materials to make these quaint little dragon flies.

Required Material:

  • small twig
  • 2 maple tree propeller seeds (dried out)
  • aqua colored paint (or choose a color of paint you would like to use)
  • glitter glue (color of your choice)
  • paintbrush
  • small black beads or stones
  • paper plate
  • tacky glue or glue gun (glue gun requires adult assistance)

3. You can’t celebrate environment day without keeping your surroundings clean!! Let this cute frog trash can help you; you can also use plastic canisters instead of milk jugs.

What you will need:

  • Empty Oatmeal Canister
  • Craft Foam
  • Matching Acrylic Paint
  • Construction Paper
  • Pom Poms
  • Wiggle Eyes
  • Glue, Sharpie Marker, Printer Paper, Yarn and Scissors

4. This gorgeous papier-mache globe requires just a balloon and lots of newspaper! A perfect way to remind us of the planet whose resources we’re using!

This activity is appropriate for: 1st – 4th grade / 6 – 10 years

You will need:

  • A round balloon
  • Recycled newspaper
  • Bowl of water-flour mixture (one part flour for two parts water) or use starch
  • Continent Outlines Template
  • Superbright Liquid Tempera Paint – 1 Gallon
  • All-Purpose Paintbrush Assortment – Set of 30
  • Washable Fine-Tip Markers – Class Pack

5. The best kind of music is the natural kind! Caress the wind with this one-of-its-kind recycled key wind chime.

You’ll need:

  • at least 5 old keys
  • a piece of drift wood or stick
  • string or fishing line
  • optional: acrylic paint

6. You won’t believe that this gorgeous flower arrangement is made out of nothing but egg cartons and paint! Recycling was never so pretty!

Raid your recyclables to create these six fun kids crafts made of paper towel rolls, egg cartons, recycled cereal boxes, and empty plastic bottles.

7. Spring Flower Pot Pudding Pie Dessert Embrace the flower power of  World Environment Day

Ingredients:

  • 6 Ripe Has Avocados
  • 3/4 cup of cocoa powder
  • 6 tablespoons of honey
  • 2 teaspoons of pure vanilla extract
  • 2 tablespoon of coconut milk
  • 2 cups of chocolate graham crackers

8. On World Environment Day, Mr. Potato Head dresses up as Mr. Recycle Head, and he looks great!! Repurpose an old can and other craft supplies to make this little guy!

Spread the fun out a little bit.

9. DIY Tissue Tree Craft for Environment Day

In honor of Environment Day, we are “branching out” and making a tissue paper tree. We came across Projects for Preschoolers post and just loved the idea.

Supplies you need:

  • Tissue paper
  • Cardboard tube
  • Glue
  • Single piece of paper as background

10. Who knew that you can turn rocks, yes plain rocks, into something as cute as these painted rock lady bugs! Just be sure to get smooth rocks to be safe.

You’ll need:

  • smooth round rocks
  • red paint
  • black paint or a permanent black marker
  • jiggly eyes
  • tacky glue

11. If you’ve got lots of little toys floating around but your kids don’t want to throw them away, here’s an idea – save them from the landfills and make a toy wreath!

Supplies:

  • 18” wire wreath
  • truckload of small toys
  • hot glue gun
  • 5 or so glue sticks
  • heavy duty wire
  • strips of fabric

12. How they are going to change the world for the better.

You’ll Need:
  • 2 sheets of paper per child
  • blue and green paint
  • red glitter glue
  • a pencil
  • marker
  • scissors

13. Inspire your children to plant a tree in honor of Earth Day with this free printable kit!

You could use Non Toxic, V.O.C. Free Acrylic Paints For Kids from Nature of Art for Kids!

You’ll need:

  • White T-shirt
  • Acrylic paint

14. If you’re replaced your plain bulbs with CFL ones, don’t throw them away yet! Use them to make these super cute recycled hot air balloons! Be careful though, and be with your child throughout.

15. How to Help Save the Environment

How to Help Save the Environment. Taking steps to conserve and reuse is easier than you might think. You can do your part just by changing your daily habits. To help save the environment, try decreasing energy and water consumption.

Hope you like these environmental day craft ideas & tutorials.

Which one you like most?We would love to hear your thoughts in the comment section below. And be sure to like us Facebook for more ideas!

Thank you for visiting our website. Keep Creating with Art & Craft!

How to make round box with newspaper tubes
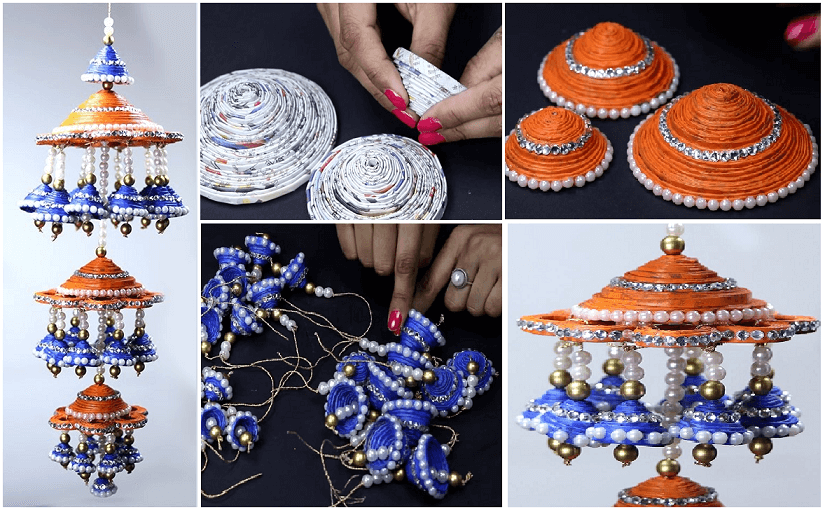
I continue with my boxes made with paper tubes, this time I made it round!

Here’s how I did it!
First you need a lot of paper tubes (see) .

I made the box below the coiling on itself the first tubes and continuing until you have a round of 15 cm in diameter. I smeared glue well to make it pretty tough.

From tubes, I cut 36 pieces 5 cm in length and I folded in half forming around and I glued together the two ends.

I spent well the glue on the rods and I left to dry them well. I have them so glued to the bottom of the box as seen in the photo below. Made a second round pasting them upside down. Always with the tubes I made a circle of top measurement of trash. I pasted above the rods and I did it to dry well. The basket is made.

Now for the cover.
I made another circle of measurement above the basket, I spent a lot of glue to harden well. I folded in half other tubes and I formed the petals, which I included in the circle before.

I give to all a nice pass elongated vinyl glue with a little water. I
let it dry well and then I painted everything with white acrylic paint mixed with glue. I again painted the box with the brown leather color I then soiled with a dry brush darker brown.

I really like and you?

courtesy: centomilaidee

DIY Beautiful Round Box For Small Items

Today I am sharing an idea about round box for small items…
Let’s check how to make round box for small items….

Required Material:
– beer and bookbinding, stationery cardboard;
– kraft paper;
– calico two colors, linen;
– linen lace;
– Clay time carpenter glue Moment Crystal;
– and in a good mood.
So:
To begin, cut out 4 binding cardboard circle with a diameter of 14 cm.
Then the walls – 8 pieces of 14 cm long and 4 cm in height, made exactly in the middle slot – 2 cm.

Kraftoovoy of cut paper strips them and sticking to the walls of the partitions, and then the bottom of the circular compartment boxes.

While I have dried out blank of cardboard cut beer four strips 4.5 cm in height and on one edge, immediately taped a piece of kraft paper.

Clay Moment Crystal greased edge circle and the free edge of the kraft paper, as well as edge strips, and then wait 5 minutes and began to stick to the sidewall of a circle, pressing firmly.

For a reliable fixation of the bottom, further cut a strip of kraft paper.

Pull – stationery cardboard or cardboard can be taken for children’s creativity or cardboard boxes from under cereals, etc., this board is sufficiently dense and holds its shape well, despite the fact that it is thin. Cut first bottom fabric and cardboard, all of pasting glue torque Joiner, evenly distributing the glue on all the surface of the workpiece using a foam roller.

While the bottoms dry, do sidewalls, as you can see in the photo, only sizing the bottom sidewall, top left free.

Combine pasted bottom sidewalls with the edge of the bottom and also pasting, the free edge of the fabric, are folded inwardly and incised, pressed tightly and land.

Made of thin cardboard, cut into triangles and paste them with a cloth edge is left free, they will bend to the side walls side.

Coat with glue and insert the bottom of a down, watch for so that the edge of the fabric smoothly bent on the side cover.

Then cut from paperboard blanks angle when corners are taped, executes a circular sidewall.

The upper edges – decorate linen lace.

Now came the turn of the box base. In order to bend the flat surface, taken as a basis for a 5-liter bottle from under the water, her twisted and bonded masking tape – cardboard. Then take a beer carton, it is soft enough to be folded, cut two pieces of 20 cm, width 48 cm, are coated with glue, glue them to each other and cardboard becomes very soft until it is dry – wrapped around the bottle, then we must make sure that it does not twisted, I fix the cut masking tape and land hairdryer.

When the base is dried, cut it into two equal parts and their light flux paste inside, leaving 0.5 cm on the extension and immediately all land hairdryer, preventing disintegration cardboard.

Once the base is dry, mark, as I stand round branch boxes between them, should be a gap in the 0.5-0.7 mm from the edge – top and bottom have to retreat to 0.2 mm.

I do another perform – is the front, it will be wider than the inner 2 cm, to pane came to each other. Tissue base I consist of two parts, I joined them on the sewing machine.

Round shelves are glued to the bottom – on the glue Moment Crystal.

When the foundation is well dries, cut two pieces for the bottom and the lid, they have me consists of halves, pasted them on the glue Moment Crystal. I fasten the handle to make it convenient to push the box.

It remained for the small – decoration and cover the bottom of the box. I fix them as the glue Moment Crystal.

And casket stands ready, at the very domes sitting small needle bed, with a coquettish bow of satin ribbon.

Casket opened and closed

I wish you creative inspiration 🙂
courtesy: livemaster

DIY Easy Straw Flower (Tutorial)

Straw flower crafts and Straw weaving. … at Family Fun.

Required Materials:

  1. 8 straw
    2. Scissor
    3. Glue gun
    4. Cotton balls wrapped with white plastic carry bag
    5. Glass beads or mustard seeds
    6. Iron wire 0.3 mm and needle
    7. Iron wire for the stem
    8. Flower tape
    9. Green paper

Hope you like this tutorial.

How to Make Newspaper Wall Hanging Craft
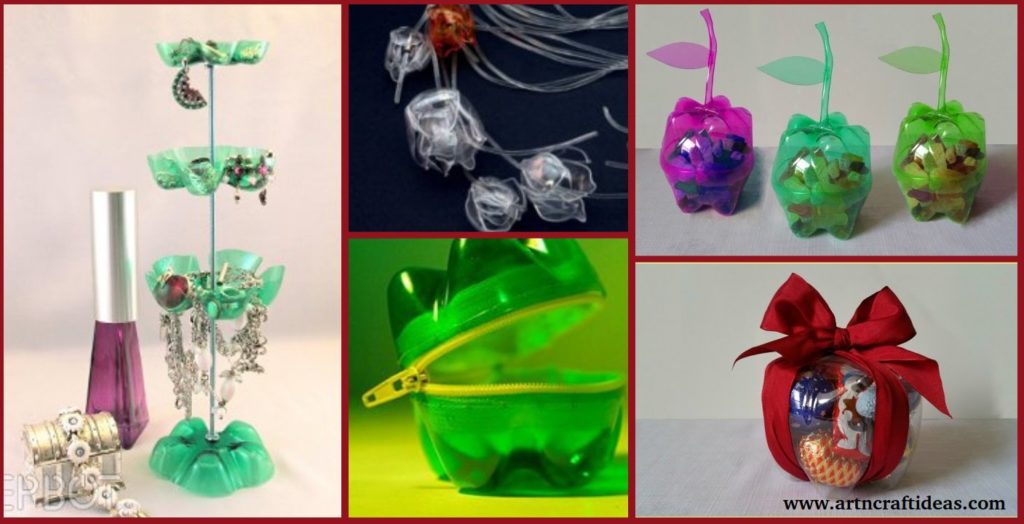
This is one of the most beautiful things made by waste material and among best hanging decor ideas. You can make your own party decorations in this manner with newspaper crafts. Just follow the step by step directions shown in this craft tutorial. Soon you’ll be able to make these hanging decorations from the ceiling and receiving compliments for your creativity in homemade party decorations. So, gather your old waste materials and get ready for some creative things to do with the newspaper. If you want more best out of waste projects or other old newspaper crafts, check out other tutorials as well on Crafting Hours!

Wall hanging using old newspapers from this best out of waste

DIY Creative Ways To Reuse Old Plastic Bottles
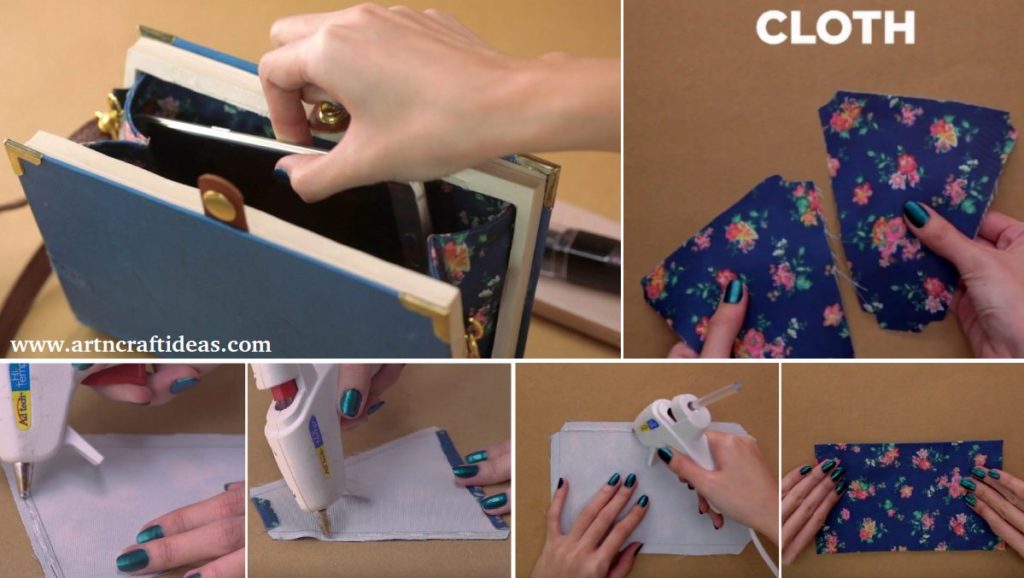
Summary: Crafts from plastic bottles with their own hands for children. Articles made of plastic bottles to testify.Articles made of plastic bottles for kindergarten, photo. Flowers from plastic bottles. Craft ideas from plastic bottles.
What can be made of plastic bottles? In this article, we will tell you which articles made of plastic bottles can be made with the children with their own hands. Plastic bottles – versatile material for the manufacture of handicrafts.We’ll tell you how to do:

  • Toys of plastic bottles
  • baby articles made of plastic bottles
  • a vase of plastic bottles
  • plastic bottles of flowers
  • decorations from plastic bottles
  • boxes of plastic bottles
  • crafts for the garden of plastic bottles
  • crafts for the garden from plastic bottles

1. Crafts from plastic bottles. Toys of plastic bottles

Catamaran of plastic bottles

Combining two plastic bottles together with electrical tape, you can make catamaran toy dolls.

Articles made of plastic bottles for children – Fountain

On a hot summer day, you can imagine the best entertainment for children than playing with water in the fresh air.From the usual plastic bottles can be made informative toy for experimenting and playing with water at the cottage or on the beach.

Proceed in the bottle with the help of a sharp object several holes. In the photo below the hole done by the middle of the bottle, but, in fact, it is better to place them at the bottom of the bottle. In this case, it will be used the maximum amount of water from a bottle. Plug the hole with his hand and fill the bottle with water up to the top. Replace the cap. Take your hand off the holes. Surprisingly, water is poured from a bottle through the holes.

Now slightly loosen the lid and you’ll see how the water begins to flow through the holes of the bottle. It enters through the neck of a plastic bottle air displaces the water from the bottle.

This toy can be used as a washstand in the country.

Articles made of plastic bottles for children in papier mache.

From plastic bottles, you can make interesting crafts for children in papier mache. Boys, for sure, will interest a homemade aircraft out of a plastic bottle, and the girls will be able to make a home zoo.

The principle of the manufacture of toys from plastic bottles in papier mache next. First of cut and whole bottles up the framework for future crafts. All held together by duct tape. From cardboard cut out and also attached with tape or duct tape further details.

After this you should pick or cut into small pieces of paper. It can be as plain paper for printers, and a special crepe paper for children’s crafts. Dilute PVA adhesive with water in a ratio of 1: 1. Then, by dipping each piece into a dilute glue, attach it to the frame of the bottles. Thus cover your crafts 4-6 layers of paper.

When the glue dries, paint the and decorate your crafts from plastic bottles.

How to make a plane out of plastic bottles >>>>

Of plastic bottles by hand. cow >>>>

Kids crafts from plastic bottles. Tropical fish >>>>

Kids crafts from plastic bottles. crocodile >>>>

And a few more links to workshops for the manufacture of articles made from plastic bottles for children:

Elephant >>>>
Leo >>>>
Giraffe >>>>
Zebra >>>>

2. Plastic bottle crafts with their hands. Vases made of plastic bottles

The easiest way to make a vase out of a plastic bottle – it’s just cut off her top and decorate. It is desirable since iron-round edge in homemade vases. So it will be nice and safe.

To round off the edges of vases from a plastic bottle, put it on top of a sheet of paper and bring a hot iron (paper need to plastic is not stuck to the sole plate). Sharp edges bottle wrap of high temperature. Caution – Keep the iron for a short while and always check that there is a piece of paper. link >>>>

We would like to invite you to do creative crafts vase. For its production, you will need a few plastic bottles. You can use a large bottle (1.5 liters) and 4 small bottles (0.5 liters). For the manufacture of vases of plastic bottles you will need glue for plastic or glue gun. Instructions for making vases bottles cm. Link >>>>

You can make a nice case of felt for the plastic bottle. Insert the bottle inside the case – a bowl of plastic bottles ready!

link >>>>

Beautiful, “air” a bowl of plastic bottles can be made if you first hold a cropped bottle of fire, to give it a shape. Then make numerous holes therein a soldering iron. Only foods in it all the same it is better not to keep!

And another idea of ​​how to quickly and easily make a vase out of a plastic bottle.

3. Crafts from plastic bottles photo. Flowers from plastic bottles

Production of colors from a variety of materials to date is one of the most popular types of craft and needlework.From conventional plastic bottles, you can make original artificial flowers by hand.

Detailed master class on making flowers from plastic bottles cm. Link >>>>  For the manufacture of articles made of plastic bottles to you, in addition to plastic bottles in different colors, also need the candle and glue gun. However, instead of the glue gun can be used simply glue. Attention! Pridelnyh Be careful when working with fire!

Separate instructions for how to make the stems of flowers from plastic bottles can be found at the link >>>> To do this, cut a plastic bottle in a spiral to get a narrow strip of plastic. Then twist it over the fire.

4. From plastic bottles with their own hands. Boxes and boxes of plastic bottles

Take two bottoms of plastic bottles and glue between the zipper glue gun or glue for plastics. Purse-box for coins ready!

Lightning to the bottles as possible and sew.

Decorate a flower box, made also from plastic bottle. How to make flowers from plastic bottles, we described above.

link >>>>

From plastic bottles can make a beautiful box-pack for a small gift to a loved one.

Mother or grandmother, who know how to crochet can make a comfortable and practical boxes of plastic bottles for storage of children’s books.

Detailed instructions for the production of articles made of plastic bottles cm. By link >>>>
Link-2 >>>>

5. Crafts from plastic bottles master class. Ornaments from plastic bottles

Who would have thought that out of plastic bottles can be made stylish jewelry! Bright, fashion bracelets or delicate, airy necklaces.

Bracelets from plastic bottles

Cut out of the bottle plastic ring the desired thickness. Wrap it colored yarn or elastic fabric, lace or obkleyte obsheyte thread. Stylish, summer decoration is ready!

Link-1 >>>>
Link-2 >>>>

You can still buy cheap beads and primotat them to a plastic ring colored yarn.

Detailed master class on making of handicrafts made of plastic bottles cm. Link >>>>

Earlier we talked about how to make stems for flowers from plastic bottles. These beautiful spiral can be used for the manufacture of jewelry made from plastic bottles.

Of plastic bottles on the same principle as the flowers, you can make a beautiful necklace. Cut out bottles of various shapes petals and leaves. Hold them for a short time over the fire, so they took shape. Put them on the line.

Examples of designer jewelry from plastic bottles can be viewed at the link >>>>

And from the bottom of a plastic bottle can make a stand for jewelry.

For the manufacture of articles made of plastic bottles with their own hands, you will need, in addition to themselves bottles, metal threaded rod and nuts and washers.

link >>>>

6. Plastic bottle crafts for garden. Articles made of plastic bottles to give

From plastic bottles, you can make a lot of useful things for the garden. For example, the vase from plastic bottles. To learn how to make a vase out of plastic bottles we mentioned earlier in this article. For other ways to make a vase with his own hands, read the link >>>>

Donyshkovyh of plastic bottles turn out beautiful decorative apples and pumpkins. To do this, cut the bottoms of two bottles, and paint them with acrylic paint, and then hold them together. You can do without the paint, put in articles made from plastic bottles cut into strips of crepe paper.

link >>>>

link >>>>

Continuing the theme of “Plastic bottle crafts for questioning” will tell you about one of the handicrafts plastic bottles for your country house – the “head” of plastic bottles and caps on them. We hope you find a place for these handsome in your home.

link >>>>

link >>>>

link >>>>

For the following articles made of plastic bottles to testify will need a very large number of bottles.

link >>>>

To make curtains of plastic bottles for the holiday home, you need to cut the bottoms of bottles and staple them together fishing line or silk thread. Bottoms of bottles to be cut along the edge so as to obtain such blanks having the shape of a flower. The edges of such preforms can earn a little sandpaper or sear over the fire, that was not hooked on the cut.

Awl, warmed over a fire, pierce holes for threading the fishing line or thread. Nodules fix the position of the pieces on the filament, so they do not bunch up. Work laborious and delicate, but such a curtain does not require financial outlay.

Here is another useful application of plastic bottles in the household.

Useful articles made of plastic bottles to give – a homemade broom. Broom from plastic bottles – a necessary thing in the private sector, especially at the time of leaf fall.

7. Crafts from plastic bottles for kindergarten

The bottom of the plastic bottle, if dip it in the paint, leaving beautiful footprints on paper in the form of a flower.Such an original way you can paint, for example, a blossoming cherry branch. How else can you draw with the fingerprints, read our article “Playing with colors. Fun prints” .

Hope you like these tutorials.

How To Make A DIY Book Clutch Tutorial – Step by step

As a bookworm myself, I’ve always had a hard time letting go of books, even the ones I didn’t really like, or have outgrown. Good thing I found a way to breathe new life into them – by turning them into DIY book clutch!

Adorable DIY Book Clutch For Your OOTD!

Recycling different items to create something entirely new is one of the tenets of crafting! I personally get more creative when faced with old items I’m about to throw away. It also saves me from spending too much on gifts for family members or new purchases. I’ve even started upcycling my old clothes, from draft stoppers to skater skirts! But my favorite has to be turning old books into cute DIY book clutches, since I’m a self-proclaimed bag lover. Do you want to learn how? Read on below!

Required Material:

  • Old Book
  • Mod Podge & Brush
  • Rice Paper Craft Sheets
  • Glue Gun & Glue Sticks
  • Cutter
  • Bag Strap
  • Leather Bag Clasp
  • Cloth – any design you prefer

Step 1: Wrap The Book With Rice Paper

Insert the rice paper at the back of the front cover, middle of the book and at the back of the back cover. Make sure you’re covering the fore, top and bottom edges of the book and do this on both sides.

Step 2: Paint The Book With Mod Podge

Using a brush, paint the edges of the book with Mod Podge so the pages would stick together. This would be the fore, top and bottom edges. Do this for both sides and let it dry for two hours.

Step 3: Trace A Rectangle

Remove the rice paper. Then, open the book on its first endpaper and draw a border. Use your ruler to measure the borders,  at least 3/4″ on all sides. Start tracing the rectangle using a precision knife or cutter. Do the same on the end leaf of the back cover.

Step 4: Remove The Pages

After cutting out the rectangle from the first page, hollow out the book.

TIP: This would be easy because of the cutout, but if you start to have a hard time, just retrace the edges with a cutter.

Step 5: Paint The Inner Borders With Mod Podge

Now you have a hollow book split down the middle with two frames. Paint the inner borders of the frames, this means the book’s inner spine and the sides of its edges. Place a rice paper between the frames and leave it to dry for two hours.

TIP: Make sure not to put too much Mod Podge to prevent the pages from wrinkling. If several coats are necessary, let each coat dry up before adding another coat.

Step 6: Glue The Bag Clasp On The Inside Of Each Book Cover

Take an old snap bag clasp, and make sure the leather strip has two separate pieces – one for the socket and one for the stud. Glue the end piece of each strip on the inside of each book cover. Make sure they are perfectly aligned by testing out if you could securely close the leather clasp.

Step 7: Glue The Edges Of The Frame On Each Book Cover

Using your glue gun, glue the edges of the two frames on each book cover. This will create a solid hollow book. Press the covers with your weight to get them to stick!

Step 8: Cut The Cloth

Cut two triangular pieces of fabric. To achieve the shape above, trace a parallelogram inside these pieces of fabric, at least a centimeter away from the fabric edges. Afterward, cut the two corners of the triangle as well as its last corner. After cutting the last corner, cut two slanted squares at its base.

Step 9: Fold The Triangle Cloth

Using a glue gun, fold the fabric following the guidelines made by parallelogram traced earlier. Only fold the shorter sides of the fabric. Press these sides to make sure they’re secure.

Step 10: Glue The Two Triangle Cloths Together

Glue the two triangular cloths by using your glue gun. Attach these pieces of fabric with their wrong sides facing each other. Glue all of the sides together and don’t forget to smooth it over afterward!

Step 11: Create A Secure Fold

Flip the fabric piece upside down, with the shorter side at the bottom. Fold the fabric in half, unfold it and apply hot glue on the crease created by the fold. While the glue is hot, fold the fabric. This will result in a secure fold.

Step 12: Cut Two Rectangle Pieces Of Fabric

Cut two pieces of rectangular pieces of fabric. Draw a rectangle on the wrong side of the fabric, a centimeter away from the edges. Afterward, cut the corners of the fabric.

Step 13: Fold The Sides Of The Fabric

Apply hot glue on the sides of the fabric, outside the drawn rectangle. Following the guide, fold the edges and make sure they stick by pressing the fabric with your hands. Set this aside for later use.

Step 14: Cut A Long Rectangular Piece Of Fabric

Using the long rectangular piece cut earlier and a hot glue, cover the middle of the book. Secure it by applying glue on the back of the short sides.

Step 15: Make A Bag Strap

Insert the felt strip inside the d-ring and make sure that both ends are equal. Apply hot glue on the inner side of the felt strip and press the two ends together. Glue this at the inner corner of the book.

Step 16: Cover The Middle Of The Book

Using the long rectangular piece cut earlier, cover the middle of the book. Apply glue on the inner side of the spine, and then press the fabric.

Step 17: Glue Fabric On The Inner Edges Of The Book

Use the triangular pieces you set aside earlier as inserts. This will bind the frames together. Do this by gluing the strips of fabric on the bottom and top edge.

Step 18: Cover The Insides of The Book Cover

Cover each paste down of the book using the rectangular fabric you set aside earlier. Use glue gun to fix the fabric.  This will create a polished and unified look in the inner part of your book clutch.

Step 19: Add The Bag Hook and Strap

Finally, add an adjustable and detachable sling strap. And that’s it!

To get a more visual instruction, check out our video! 

Hope you like this tutorial.

Source: diyprojects