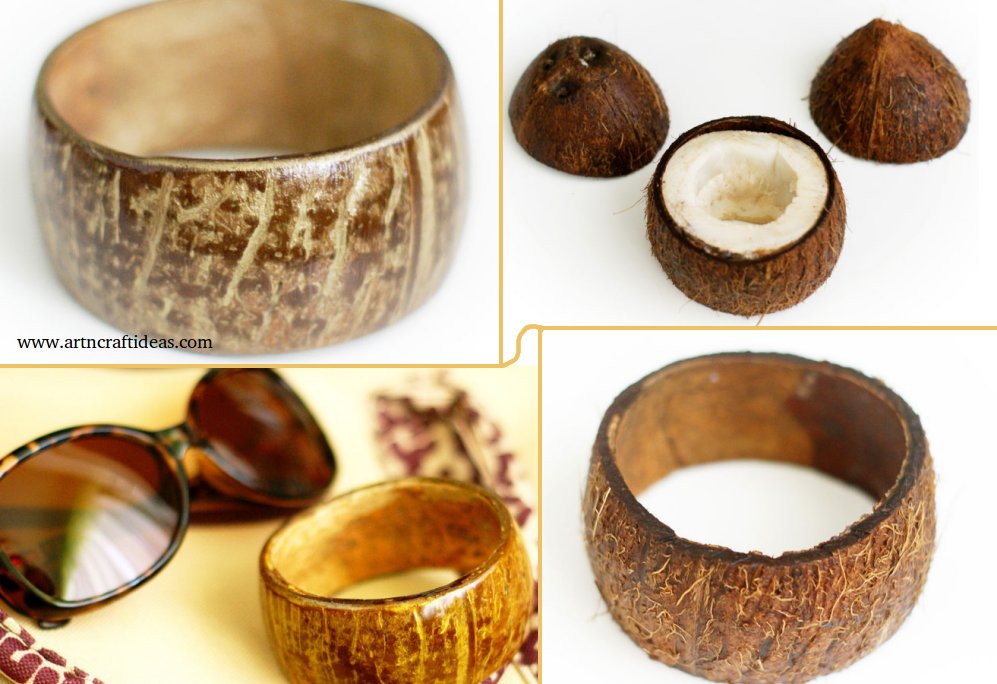
How to make feathered carnival mask

I propose to you today a DIY very easy to realize with your children, a mask bird colorful paper.

To realize it, you will need three times nothing:
A colored cardboard plate
Thick color paper
A decorated paper straw
A large round hole punch (3.3 cm diameter)
Slippers

Cut the cardboard plate into two equal parts so as to form the base of the mask.

Using a hole punch, make two round holes at eye level.

To make the feathers of the mask, use the template, place it on a sheet of colored paper and fold in half.

Make notches along the feather using scissors.

Glue the beak and paper feathers to the base.

Finish the decoration of the mask with sticks and fix the straw on the back of the mask.

Happy holidays with your kids and good carnival!

courtesy: madame-citron

Pump Lace Stitch Flower Embroidery Designs

Clothing is important as a commodity because it has worldwide appeal and plays a substantial role in the world economy. Fashion trends are a global phenomenon so wearing the right kind of attire plays an important role in everybody’s life. With this view several embroideries digitising companies have come up all around the globe to meet the current standards and a vast range of fashion wear. Digitising embroidery simply means creating fashionable and varied forms of embroidery by utilising computer generated software and applications. The digitising application is fed several stitch patterns or image files, which it stores, and processes into several files which are then read by embroidery machines to be sewn into perfect embroidered fabric. Embroidery digitising has vastly simplified the process of designing fashionable clothes, as the process employed is simple and requires minimum human intervention. The whole idea of creating your line of clothes seems much easier, faster and cost-effective than it used to be before. Today, people are actually thinking about designing their own clothes since the advent of digitising software and machines. The simple requirements of embroidery digitising are a computer-operated system, digitising machine and software, and design patterns. The designs employed can be self created or you can download the designs online or further manipulate them to give it your own personal touch. Embroidery digitising software can also be downloaded from the internet to help you in creating your own patterns. This way you can also boost your embroidery skills and come up with unique stitches that will never have common designs. With the simple instructions, anyone can learn the digitising techniques and it is far simpler than the complex hand embroidery techniques. Computerised embroidery has become popular over the years due to the low labour that is placed in its work and the high supply of quality clothes that are made out of it. Perfecting the art of embroidery manually is quite difficult but the digitised embroidery is almost always minutely perfect. Less effort and lack of wastage of time are added advantages. Manual embroidery requires an embroidery machine that is costly and but the cost of embroidery digitising is far less as anyone can easily buy the embroidery software and install them in their computer systems to create amazing embroidery patterns. The economics of selling yourself- designed clothes are also promising. Besides, one can also opt to sell their embroidery techniques, as there are several individuals and companies who seek quality embroidery designs and patterns. There are many websites and online manufacturers who are regularly using digitised embroidery to create fabulous clothes. A lot of websites also sell their digitised patterns and have uploaded their finished designs for consideration. Today people from various fields are actually thinking about creating their own clothes and selling it online since the inception of digitised embroidery has made it all very simple. All in all embroidery digitising can be a good source of income and beneficial to a lot of people in future.

How to make round box with newspaper tubes

I continue with my boxes made with paper tubes, this time I made it round!

Here’s how I did it!
First you need a lot of paper tubes (see) .

I made the box below the coiling on itself the first tubes and continuing until you have a round of 15 cm in diameter. I smeared glue well to make it pretty tough.

From tubes, I cut 36 pieces 5 cm in length and I folded in half forming around and I glued together the two ends.

I spent well the glue on the rods and I left to dry them well. I have them so glued to the bottom of the box as seen in the photo below. Made a second round pasting them upside down. Always with the tubes I made a circle of top measurement of trash. I pasted above the rods and I did it to dry well. The basket is made.

Now for the cover.
I made another circle of measurement above the basket, I spent a lot of glue to harden well. I folded in half other tubes and I formed the petals, which I included in the circle before.

I give to all a nice pass elongated vinyl glue with a little water. I
let it dry well and then I painted everything with white acrylic paint mixed with glue. I again painted the box with the brown leather color I then soiled with a dry brush darker brown.

I really like and you?

courtesy: centomilaidee

How to make a wide pearl bead bangle bracelet

Do you like wide bangle bracelet? Here, I’ll show you a tutorial on how to make a wide pearl bead bangle bracelet at home.

Step 1: Required Materials :

  • 16x8mm White Glass Pearl Beads
  • 8mm White Round Pearl Beads
  • 8mm Transparent Acrylic Beads
  • Blue Drop Beads
  • 8x6mm Clear Faceted Beads
  • 2mm Gold Aluminum Wire
  • 0.3mm Gold Copper Wire
  • Diagonal Plier
  • Stainless-Steel Scissor
  • Glue Gun

Step 2: Make the Frame of the Bangle Bracelet and Add Pearl Beads

1st, cut a piece of 2mm gold aluminum wire with a length about 55cm. Then, fold the gold aluminum wire into a rectangle and wrap the two open ends with 0.3mm gold copper wire. Twist the rectangle into a ring (as shown in the picture);

2nd, cut a piece of 0.3mm gold copper wire and wrap it on to one side of the circular gold aluminum wire(as shown in the picture). Then, thread a 8mm white round pearl bead and fix it onto the gold aluminum wire by wrapping the gold copper wire onto the gold aluminum wire. Repeat this step to add more 8mm white round pearl beads onto the gold aluminum wire (as shown in the picture);

Step 3:

3rd, repeat the above step to add enough 8mm white round pearl beads onto the gold aluminum wire on the other side;

Step 4: Add the Middle Pearl Flower

1st, cut a piece of 0.3mm gold copper wire and combine 5 16x8mm white glass pearl beads into a flower (as shown in the picture);

2nd, add the pearl bead flower into the middle of the bangle bracelet with 0.3mm gold copper wire;

Step 5: Add Blue Drop Beads and Transparent Acrylic Beads

1st, cut a piece of 0.3mm gold copper wire and add a blue drop bead into the bottom right space between the two 16x8mm white glass pearl beads by wrapping one end of the copper wire onto the nether side of the bangle bracelet and the other end onto the middle copper wire that combines the pearl flower with the bangle bracelet (as shown in the picture);

2nd, repeat the above step to add another blue drop bead into the left corresponding place;

3rd, cut a piece of 0.3mm gold copper wire and add two 8mm transparent acrylic beads into the top right space between the two 16x8mm white glass pearl beads by wrapping one end of the copper wire onto the upper side of the bangle bracelet and the other end onto the middle copper wire (as shown in the picture);

4th, repeat the above step to add two another 8mm transparent acrylic beads into the left corresponding place;

5th, repeat the first step to add a blue drop bead into the top right space between the two 16x8mm white glass pearl beads and another blue drop bead into the top left space between the two 16x8mm white glass pearl beads.

Step 6: Add White Pearl Beads

1st, cut a piece of 0.3mm gold copper wire. Then, wrap one end of the copper wire onto the nether side of the bangle bracelet and string 4 8mm white round pearl beads;

2nd, thread another 8mm white round pearl bead and wrap the copper wire onto the upper side of the bangle bracelet. Then, continue to thread 3 more 8mm white round pearl beads and wrap the copper wire onto the nether side of the bangle bracelet. In this way, a white pearl bead loop comes into being;

3rd, repeat the above step to add another white pearl bead loop beside the white pearl loop made just now;

4th, repeat the above steps to add two white pearl bead loops into the right corresponding place of the bangle bracelet.

Step 7: Here Is the Final Look of the Wide Bangle Bracelet

Wearing this wide bangle bracelet, you’ll surely stand out from the crowd. Store-bought bangle bracelets can be costly, but you can create your own stylish bangle bracelet at home for a fraction of the price. Come on and have a try!

courtesy: PandaHall

DIY Beautiful Round Box For Small Items

Today I am sharing an idea about round box for small items…
Let’s check how to make round box for small items….

Required Material:
– beer and bookbinding, stationery cardboard;
– kraft paper;
– calico two colors, linen;
– linen lace;
– Clay time carpenter glue Moment Crystal;
– and in a good mood.
So:
To begin, cut out 4 binding cardboard circle with a diameter of 14 cm.
Then the walls – 8 pieces of 14 cm long and 4 cm in height, made exactly in the middle slot – 2 cm.

Kraftoovoy of cut paper strips them and sticking to the walls of the partitions, and then the bottom of the circular compartment boxes.

While I have dried out blank of cardboard cut beer four strips 4.5 cm in height and on one edge, immediately taped a piece of kraft paper.

Clay Moment Crystal greased edge circle and the free edge of the kraft paper, as well as edge strips, and then wait 5 minutes and began to stick to the sidewall of a circle, pressing firmly.

For a reliable fixation of the bottom, further cut a strip of kraft paper.

Pull – stationery cardboard or cardboard can be taken for children’s creativity or cardboard boxes from under cereals, etc., this board is sufficiently dense and holds its shape well, despite the fact that it is thin. Cut first bottom fabric and cardboard, all of pasting glue torque Joiner, evenly distributing the glue on all the surface of the workpiece using a foam roller.

While the bottoms dry, do sidewalls, as you can see in the photo, only sizing the bottom sidewall, top left free.

Combine pasted bottom sidewalls with the edge of the bottom and also pasting, the free edge of the fabric, are folded inwardly and incised, pressed tightly and land.

Made of thin cardboard, cut into triangles and paste them with a cloth edge is left free, they will bend to the side walls side.

Coat with glue and insert the bottom of a down, watch for so that the edge of the fabric smoothly bent on the side cover.

Then cut from paperboard blanks angle when corners are taped, executes a circular sidewall.

The upper edges – decorate linen lace.

Now came the turn of the box base. In order to bend the flat surface, taken as a basis for a 5-liter bottle from under the water, her twisted and bonded masking tape – cardboard. Then take a beer carton, it is soft enough to be folded, cut two pieces of 20 cm, width 48 cm, are coated with glue, glue them to each other and cardboard becomes very soft until it is dry – wrapped around the bottle, then we must make sure that it does not twisted, I fix the cut masking tape and land hairdryer.

When the base is dried, cut it into two equal parts and their light flux paste inside, leaving 0.5 cm on the extension and immediately all land hairdryer, preventing disintegration cardboard.

Once the base is dry, mark, as I stand round branch boxes between them, should be a gap in the 0.5-0.7 mm from the edge – top and bottom have to retreat to 0.2 mm.

I do another perform – is the front, it will be wider than the inner 2 cm, to pane came to each other. Tissue base I consist of two parts, I joined them on the sewing machine.

Round shelves are glued to the bottom – on the glue Moment Crystal.

When the foundation is well dries, cut two pieces for the bottom and the lid, they have me consists of halves, pasted them on the glue Moment Crystal. I fasten the handle to make it convenient to push the box.

It remained for the small – decoration and cover the bottom of the box. I fix them as the glue Moment Crystal.

And casket stands ready, at the very domes sitting small needle bed, with a coquettish bow of satin ribbon.

Casket opened and closed

I wish you creative inspiration 🙂
courtesy: livemaster

DIY Easy Straw Flower (Tutorial)

Straw flower crafts and Straw weaving. … at Family Fun.

Required Materials:

  1. 8 straw
    2. Scissor
    3. Glue gun
    4. Cotton balls wrapped with white plastic carry bag
    5. Glass beads or mustard seeds
    6. Iron wire 0.3 mm and needle
    7. Iron wire for the stem
    8. Flower tape
    9. Green paper

Hope you like this tutorial.

DIY Easy Circle Zip Earbud Pouch Tutorial

How simple and how to make Circle Zip Earbud Pouch, and the amount of fabric and a zipper and can achieve the desired result.

Then a piece of cloth at the end of the zipper to form two layers so you can work on it hung

In this section, sewing machines sew around your layout. Of course, make sure the zipper tab in the middle and the other way around because we want to bring project, and vice versa

In this section additions to reverse the cut and design

Finally, have you managed to create a stunning hands-free bags. I hope you enjoyed this tutorial.

Source: erinerickson.com

How to make coconut shell bracelet – Step by step
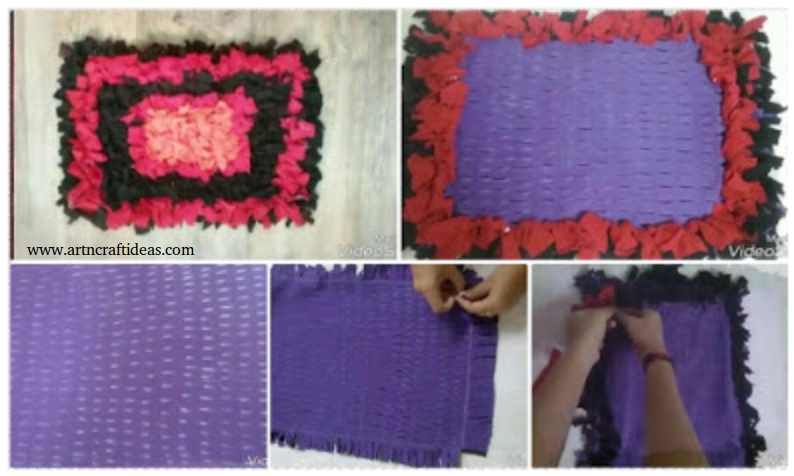
This tutorial shows how to make coconut shell bracelet. Making jewelry with their hands out of scrap materials is very economical. And if the material at hand and more natural, and the eco-friendly. Total – triple benefits: environmentally friendly, economical and exclusive decoration.

Materials and tools: coconut, jigsaw, sandpaper, paint in the tank, acrylic paint, lacquer furniture, brush.
Step 1: Select coconut
Should choose a coconut on the following criteria:
first of all pay attention to the size of a nut, as he later will have to be worn on your wrist;
the nut should be a regular shape, smooth surface, without any defects.
Step 2: Select the desired width of the band and we put two pencil circle perimeter.

Step 3: hacksaw or jigsaw make two cut severely on labels.

Step 4: delete the contents of the inner blank.

Step 5: treat an outer surface with sandpaper to obtain a smooth surface smooths cutting places.

Step 6: The cover the outer portion of the preform gold paint from the container.

Step 7: treat an outer surface with fine sandpaper. The structure has a hollow coconut-veins. After treatment, sandpaper the paint will remain only in the veins. Get a nice natural and unique pattern. Cover the outer surface of the preform acrylic lacquer.

Step 8: After drying acrylic lacquer cover furniture varnish in several layers to form a hard glossy surface.
Important! Furniture polish is quite aggressive, so if you put it in a layer of acrylic varnish, and paint directly on top, it will corrode it, and the whole picture will be erased.
I specifically did not varnish the inner surface of the bracelet. That, in addition to the beautiful natural pattern from the bracelet, was still and pleasant coconut flavor.

Source: liveinternet