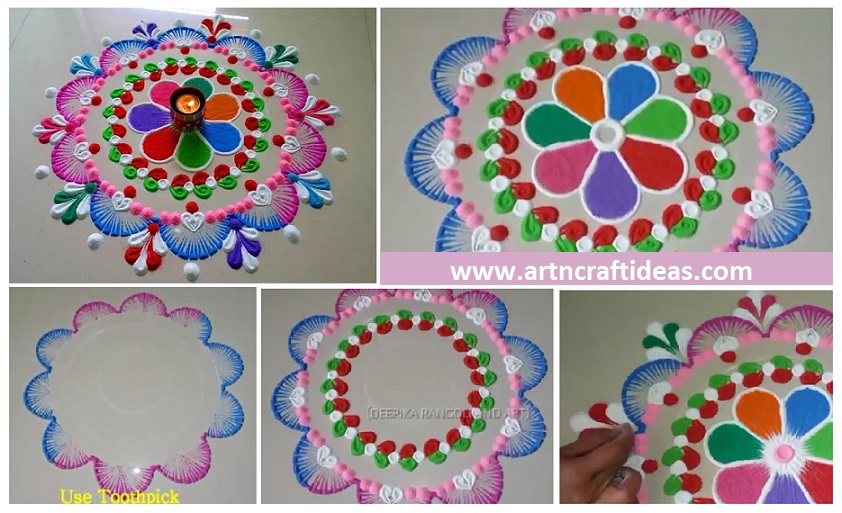
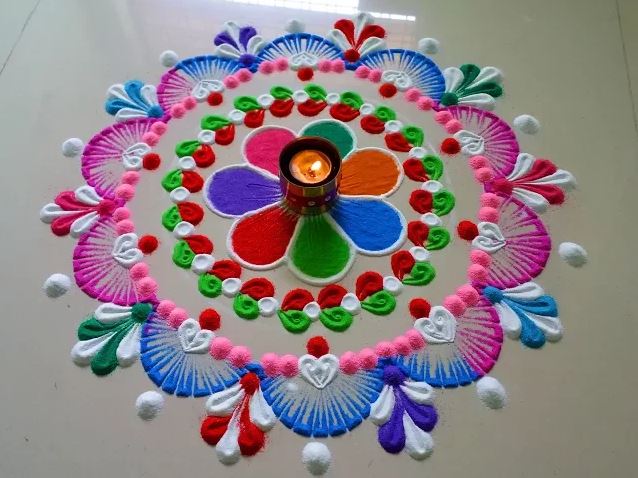
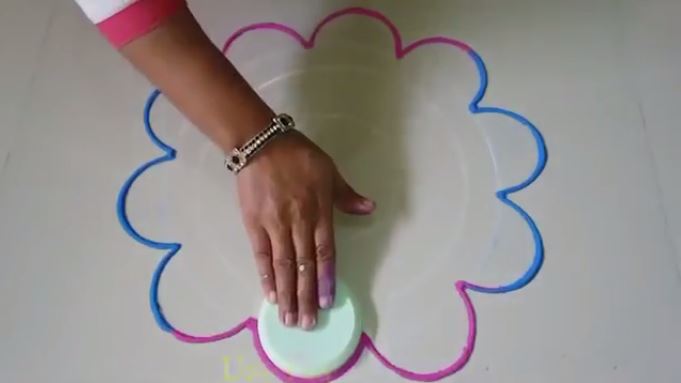
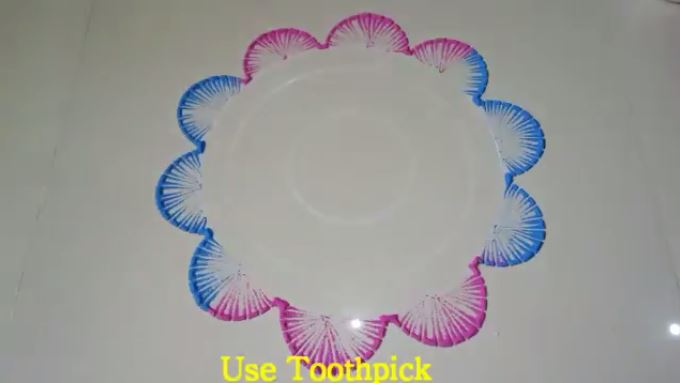
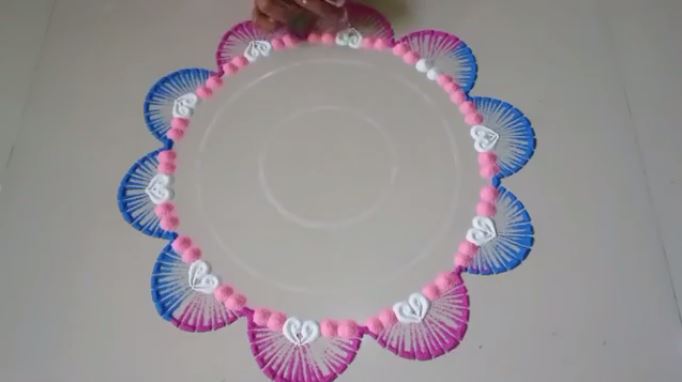
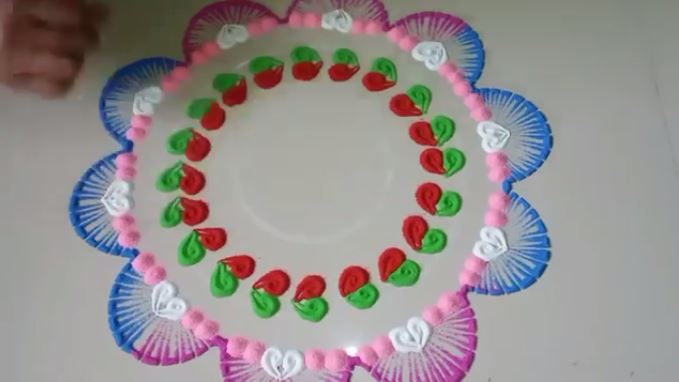
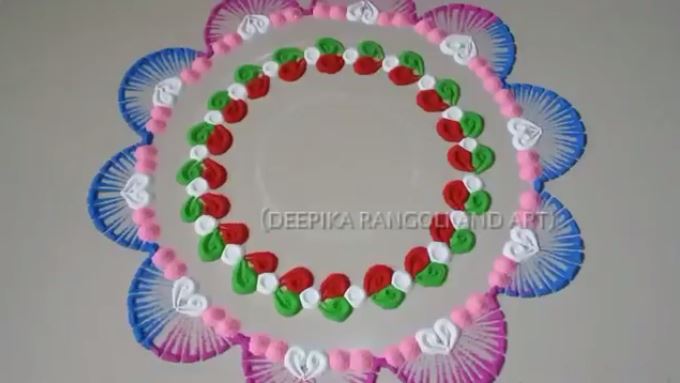
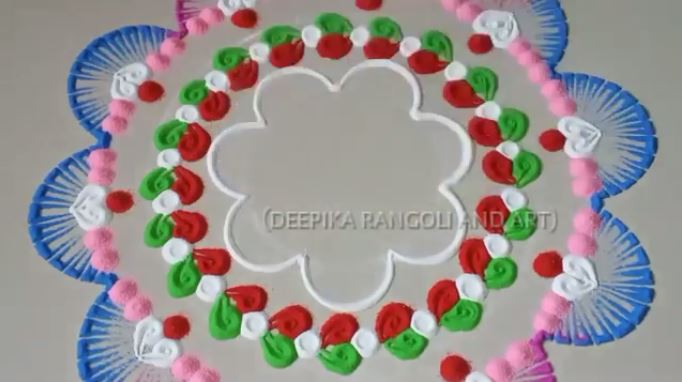
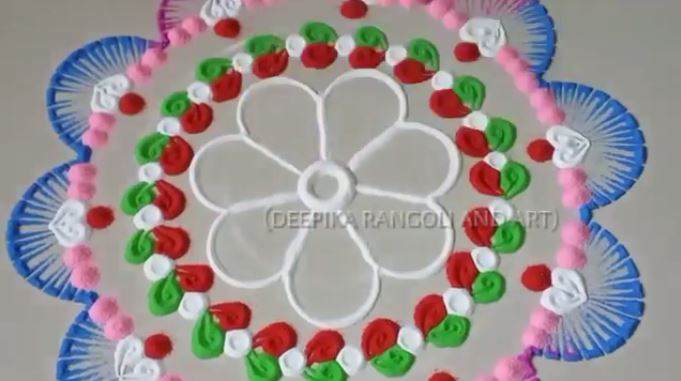
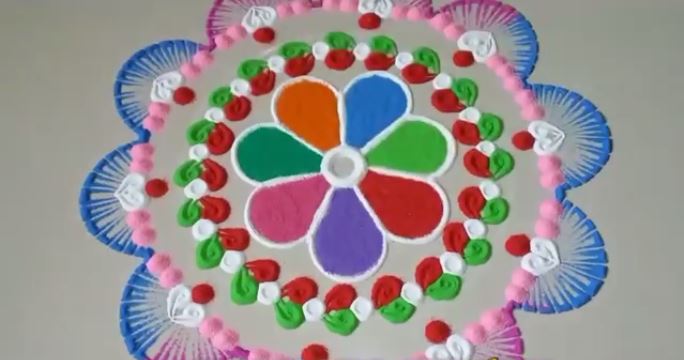
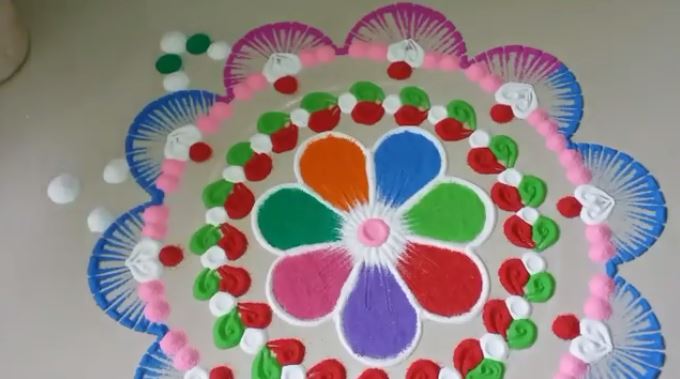
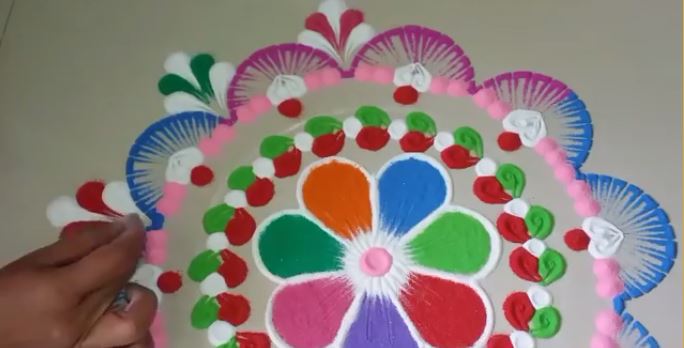
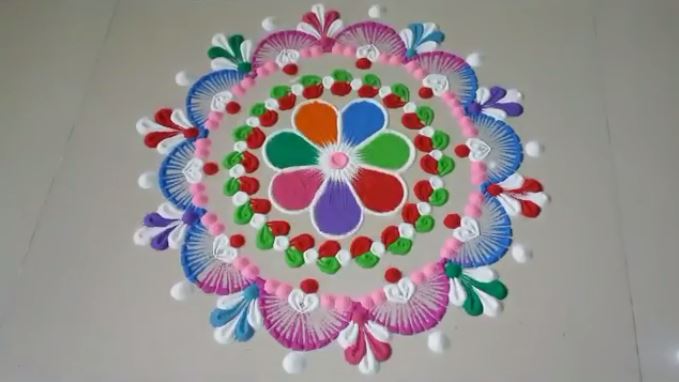
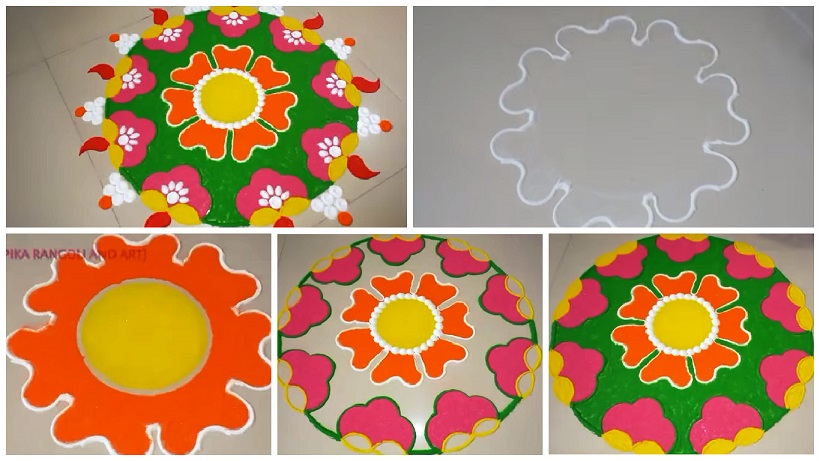
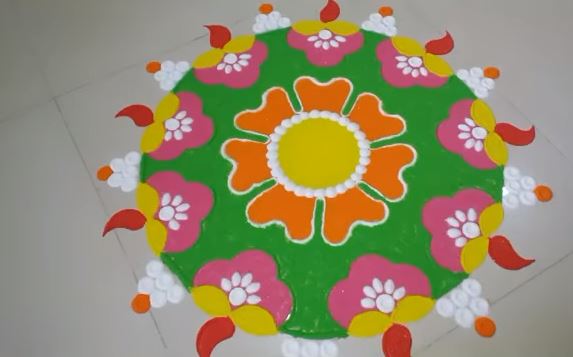
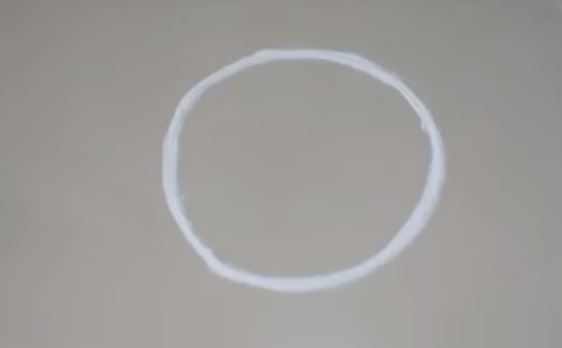
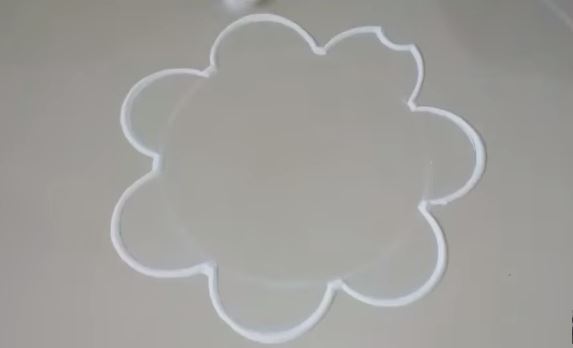
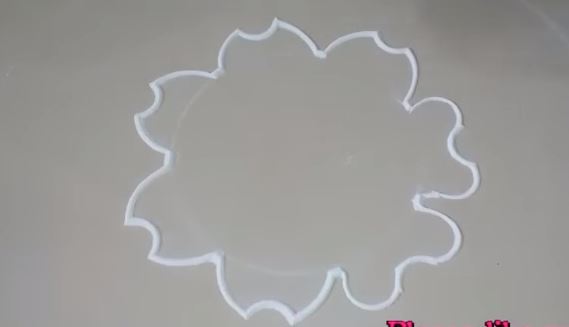
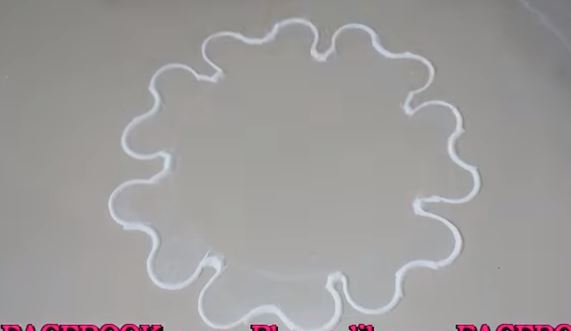
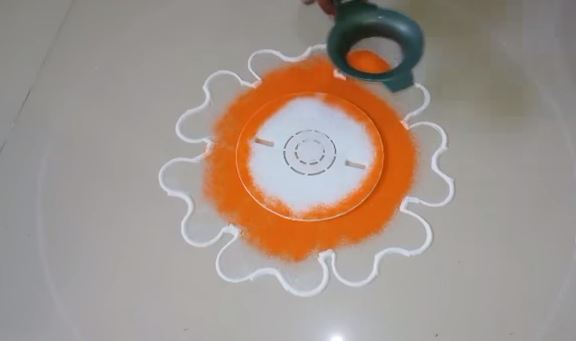
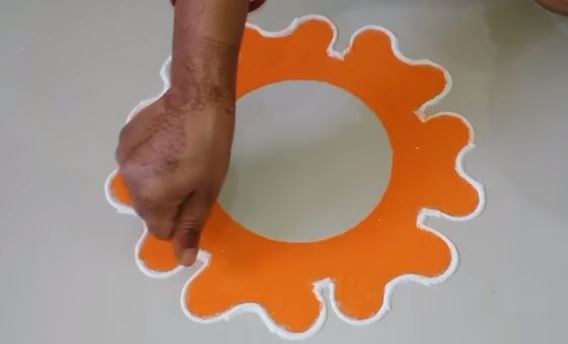
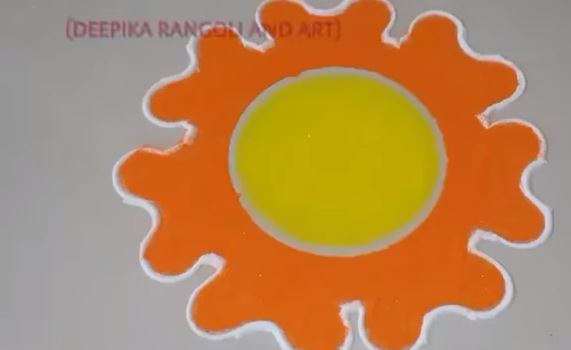
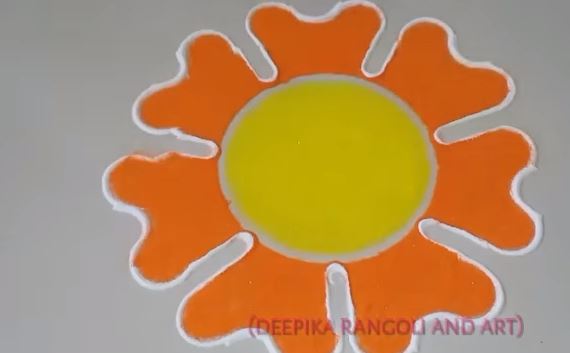
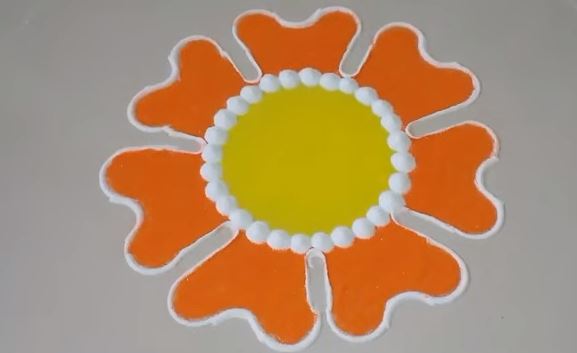
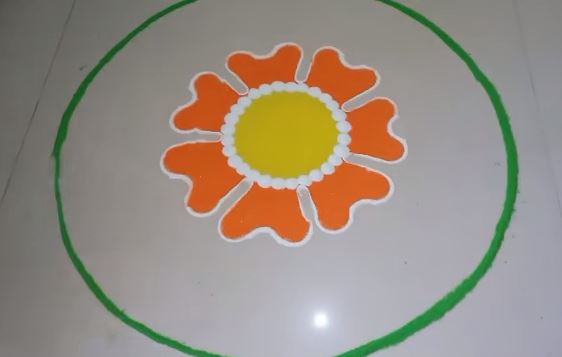
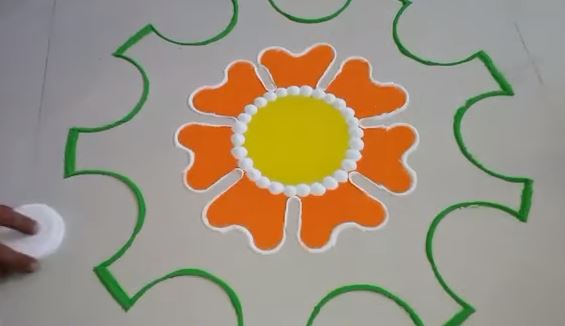
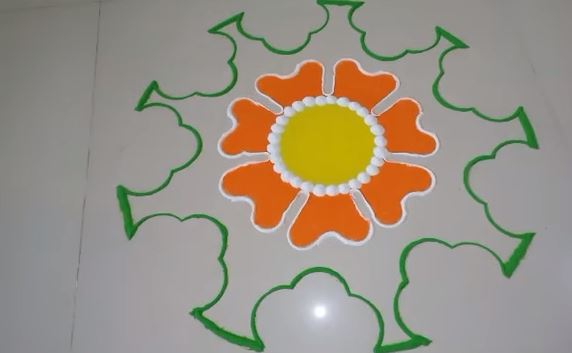
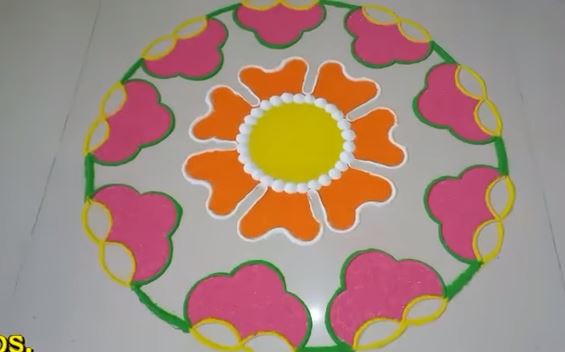
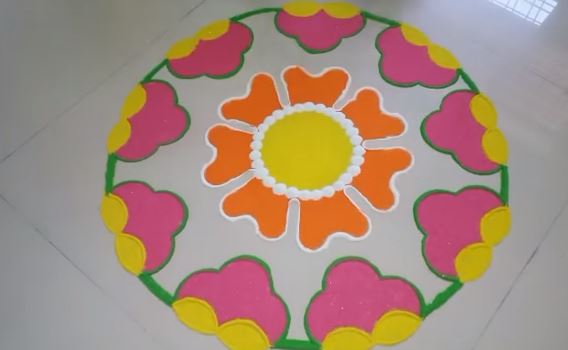
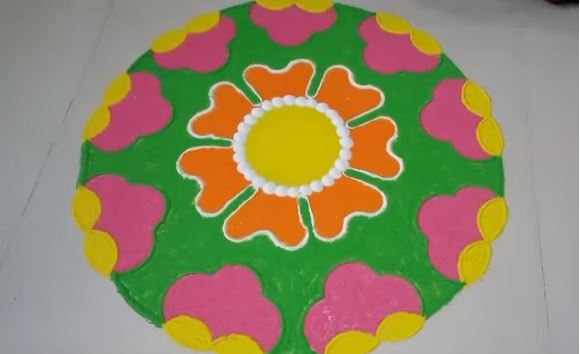
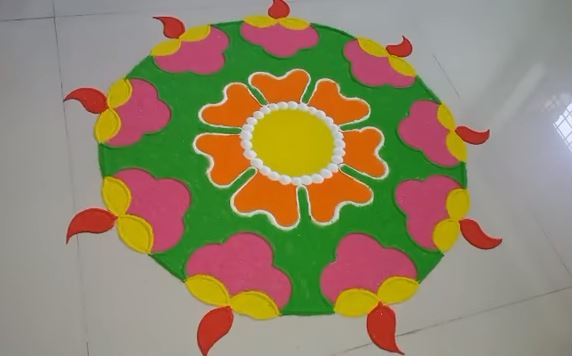
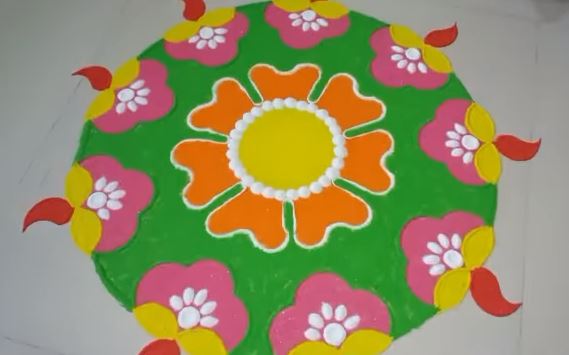
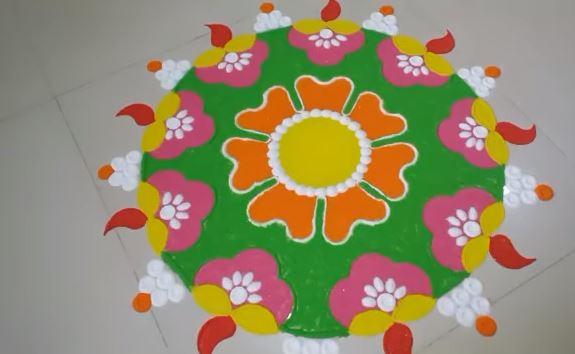
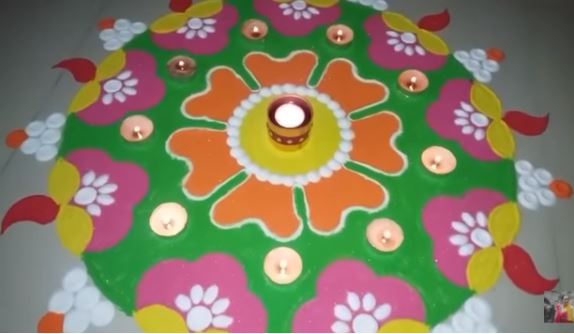
This rangoli design is easy and innovative. It uses simple shapes and colors to create a beautiful design. This design is perfect for beginners or those who want to create a beautiful design without spending a lot of time.
Simple innovative rangoli design by DEEPIKA PANT – Step By Step (Tutorial)
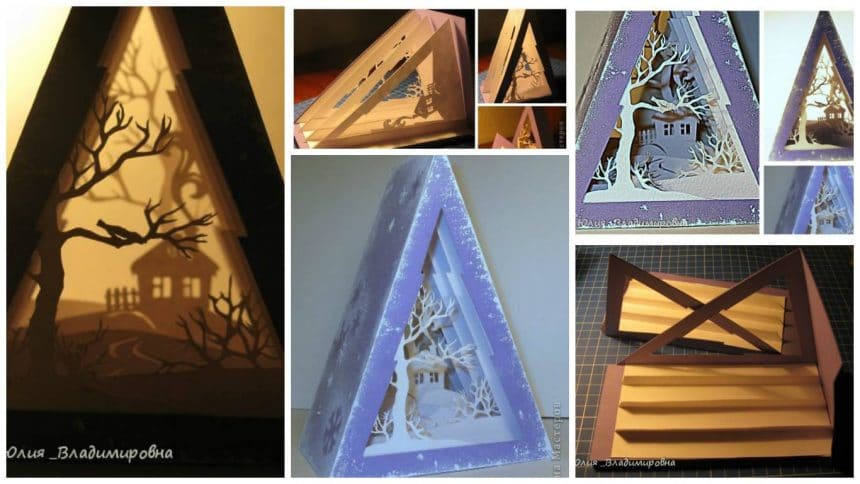
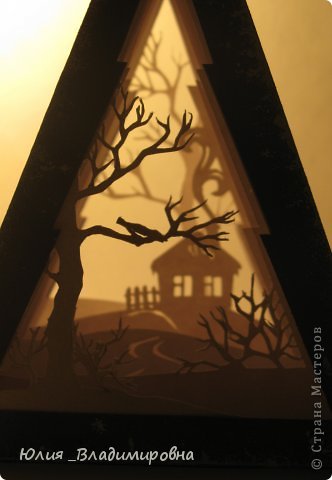
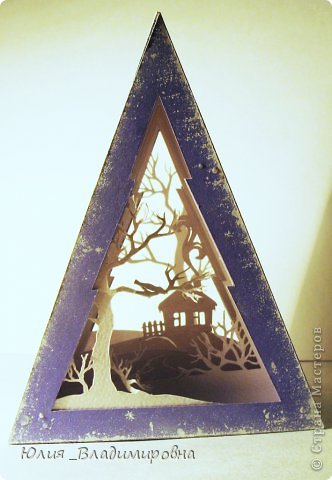
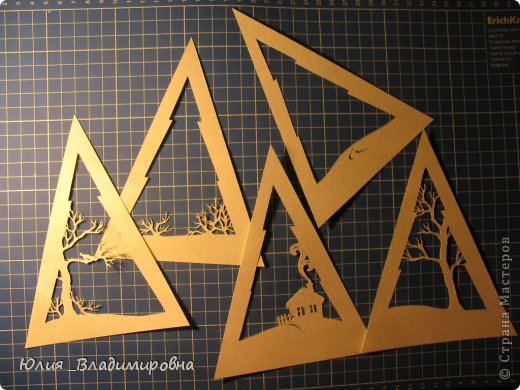
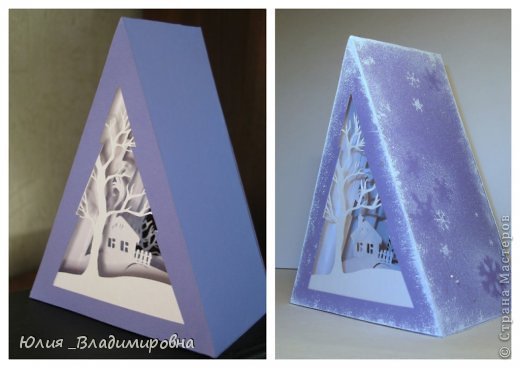
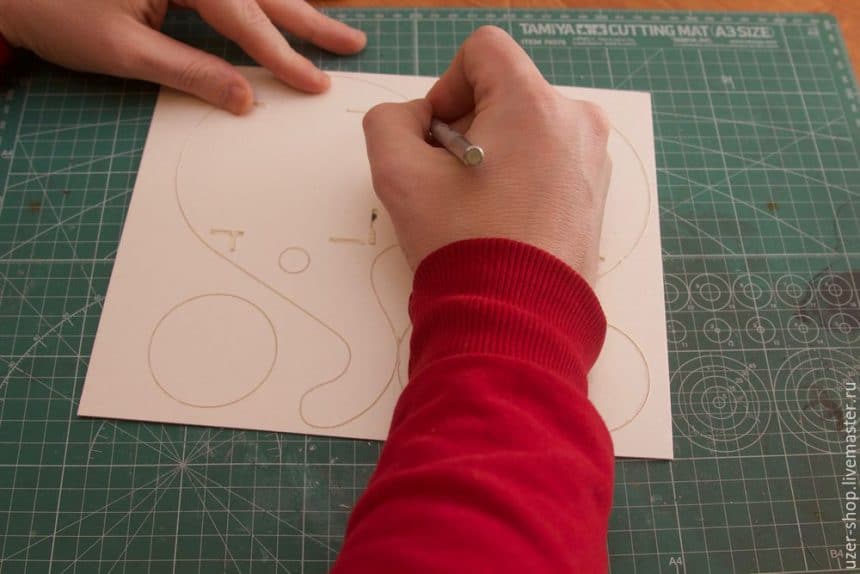
I hope that, in spite of a few non-standard shape, our tunnel take root in their family)) Honestly, it was conceived as one of the demonstration models for the lesson … In the process of work, I crept into the idea that it can be used as a toy on Christmas tree school.
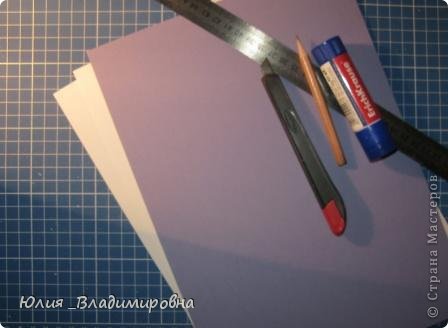
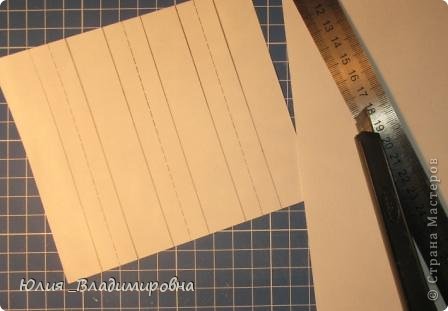
Required Material:
paper pastel A4 format (2 sheets);
watercolor paper A4 (3 sheets);
pencil;
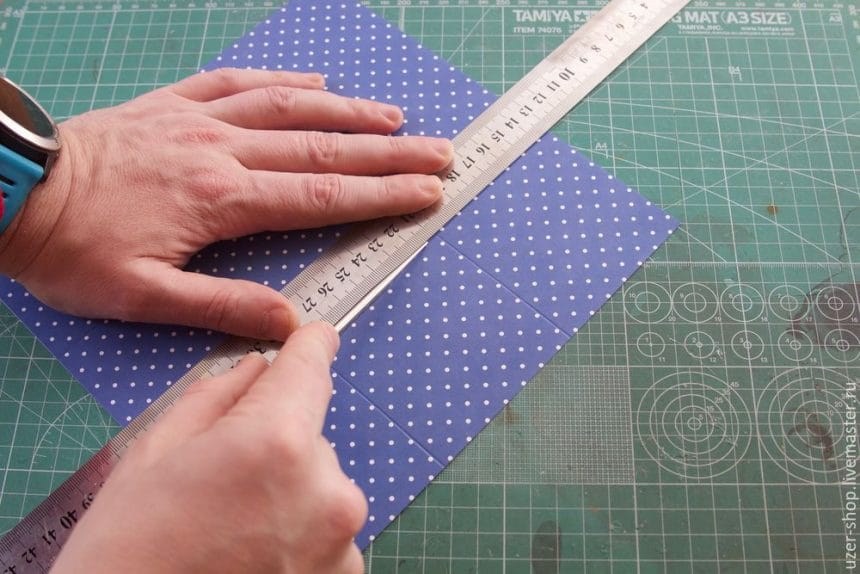
metal ruler;
knife breadboard (I prefer to cut their paper only);
glue…
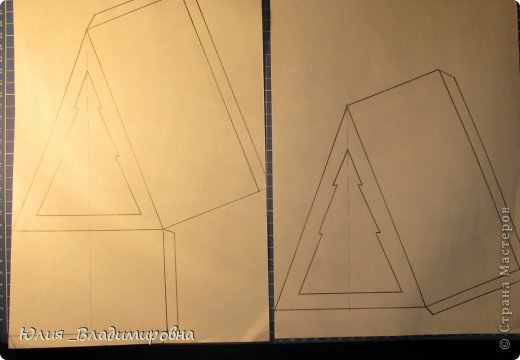
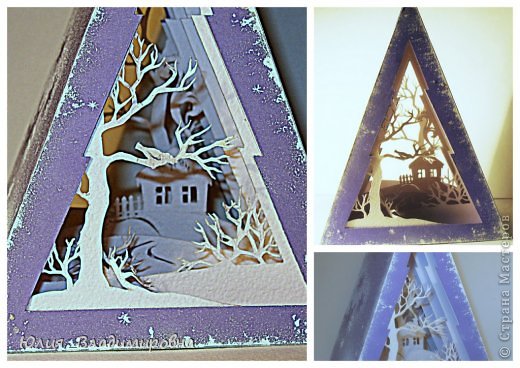
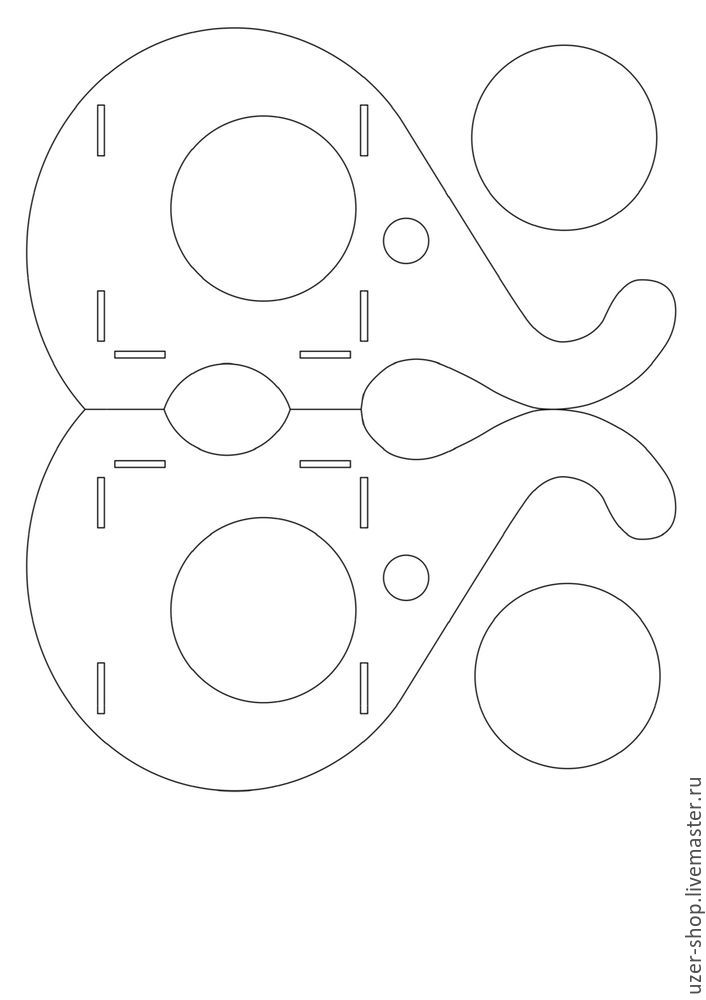
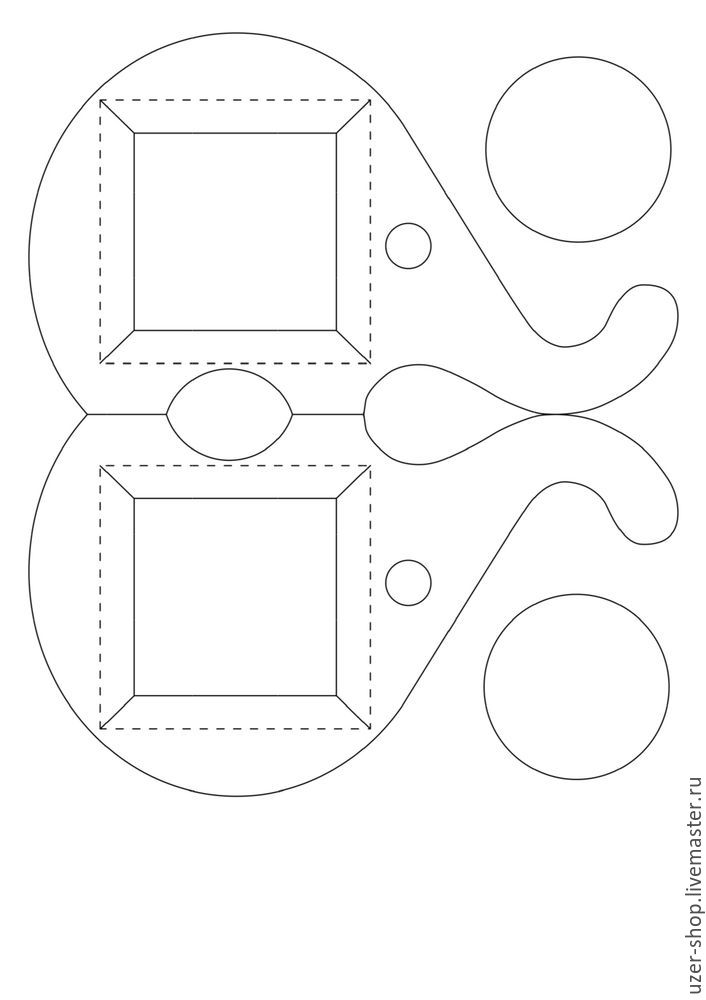
Dimensions pastel paper does not allow me to make a full scan of the sides of the tunnel … so … so … Drawing In the tunnel height of 16cm, width 15cm and 8cm glubina-
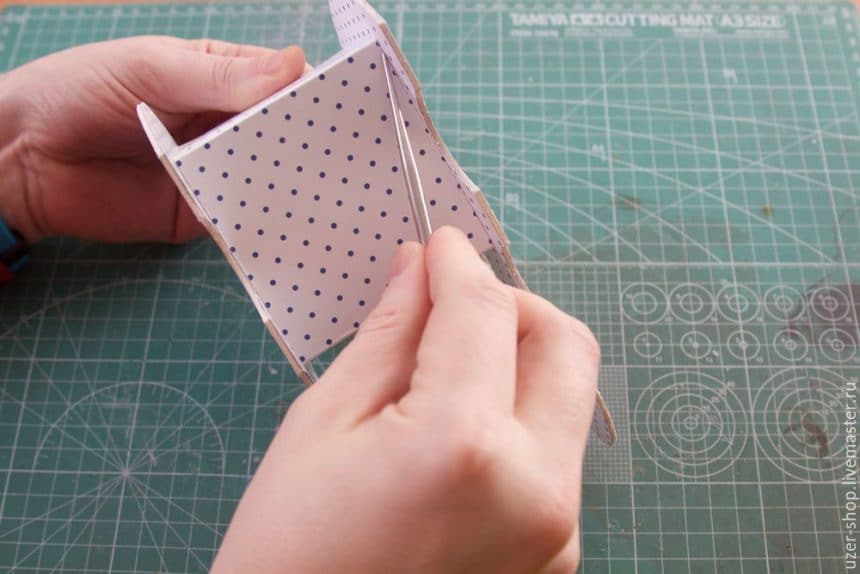
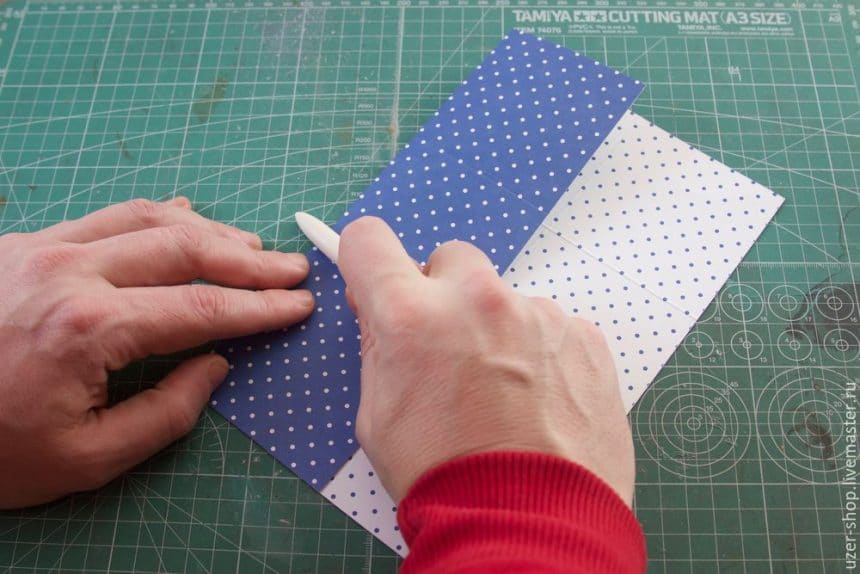
Like most of you, I spend soft easy on the fold lines with a knife … a bit … avoid creases when folded ….
Do … accordion intervals .s 19 (mm) x 10 (mm) x 10 (mm), -20 (mm) x 10 (mm) – 10 (mm), -20 (mm) x 10 (mm) x 10 (mm) -19 (mm) height … accordion must be less than (at least 8 mm) the height of the tunnel … a little again passers-by with a knife. There, where the diagram solid lines- the front side and the back where shtrihovye-.
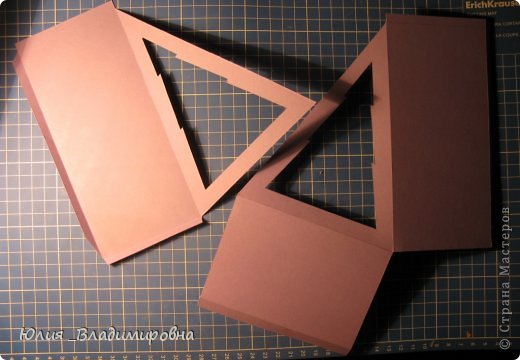
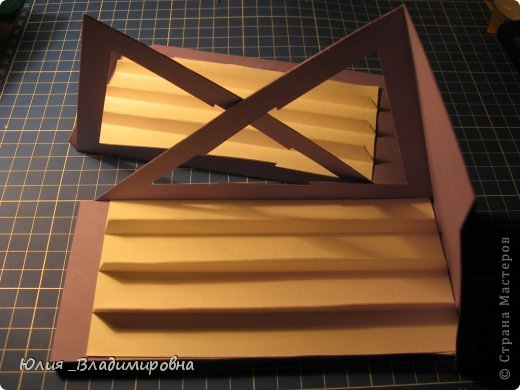
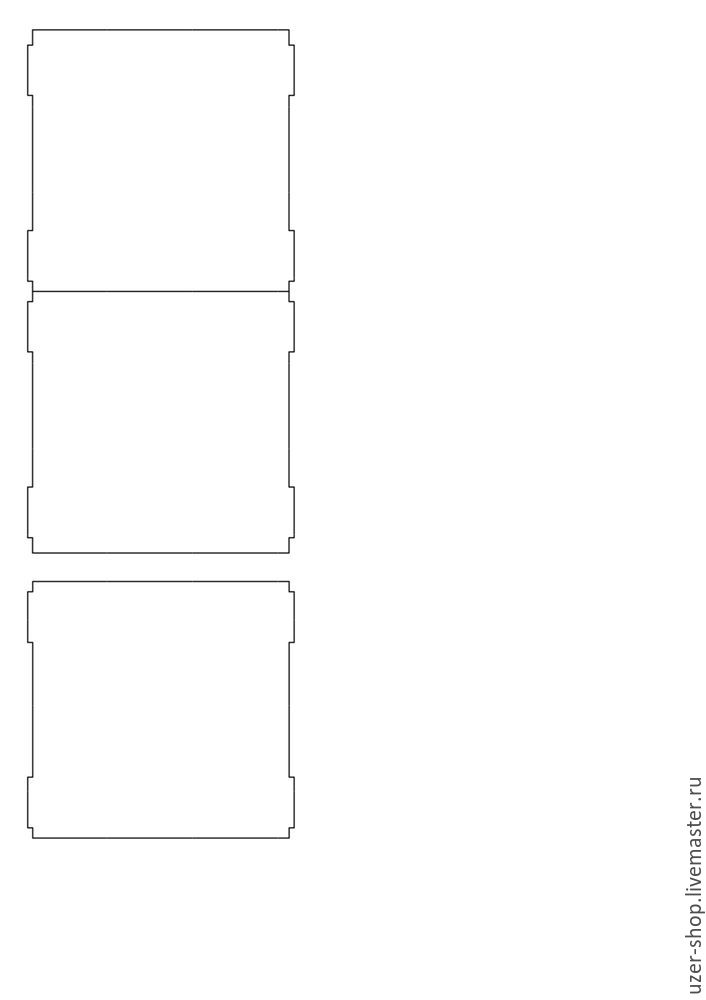
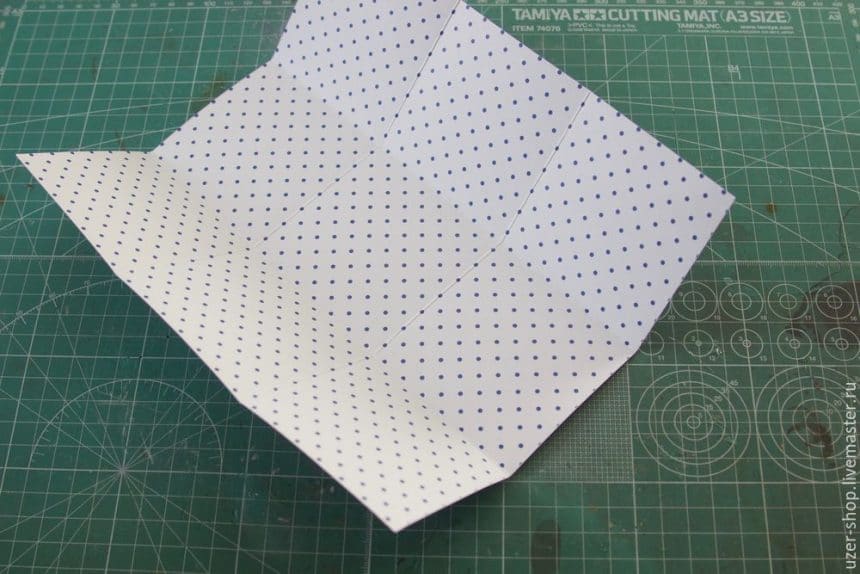
Folding and gluing an accordion.
Now insert a few … they are drawn spontaneously
Getting to the assembly)) Glue the sides of the accordion.
To glue edges accordion inserts, in accordance with the planned composition.
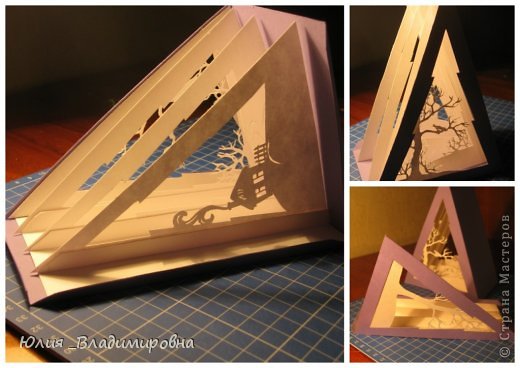
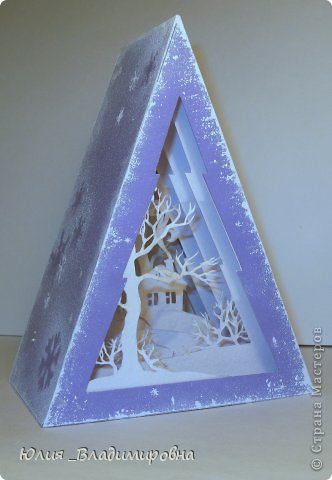
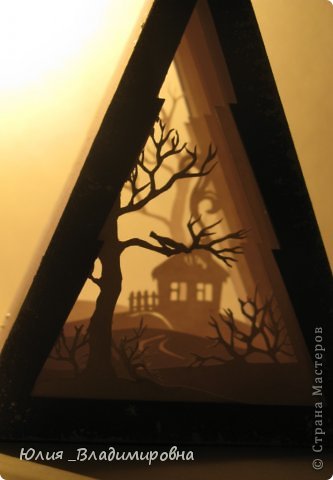
Hope you like this herringbone tunnel.
Image Source: pinterest.com
We would love to hear your thoughts in the comment section below. And be sure to like us Facebook for more ideas!
Thank you for visiting our website. Keep Creating with Art & Craft!
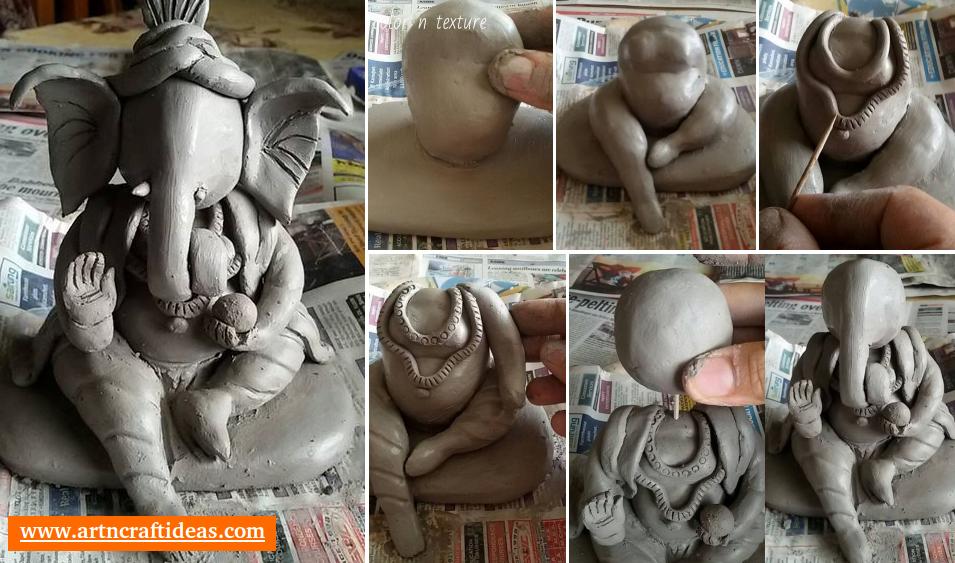
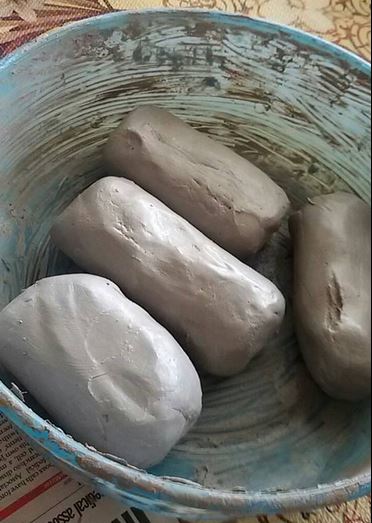
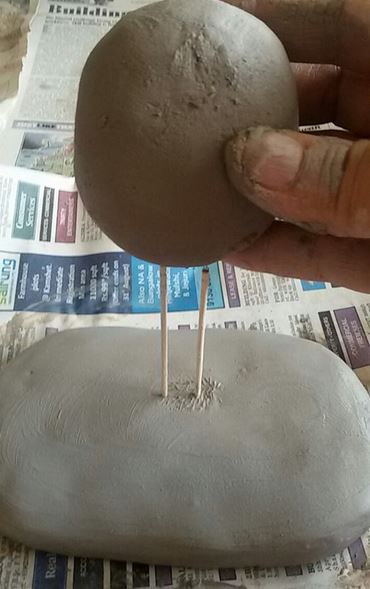
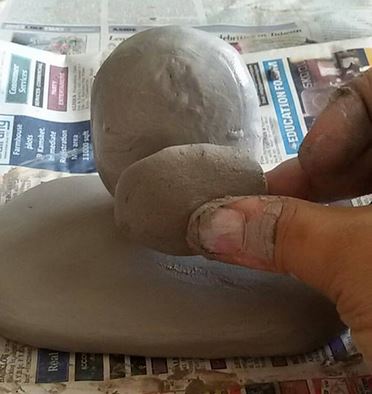
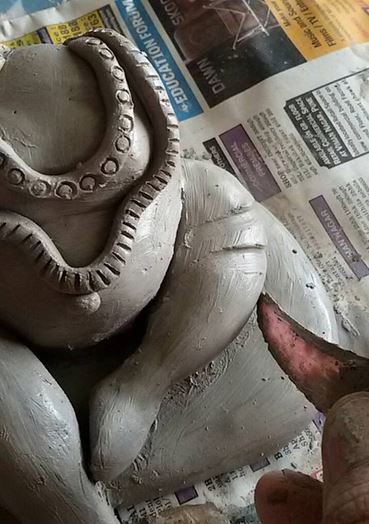
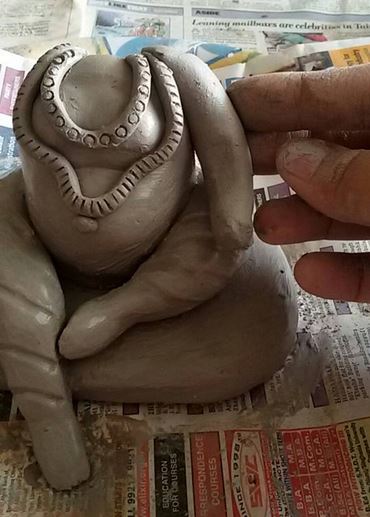
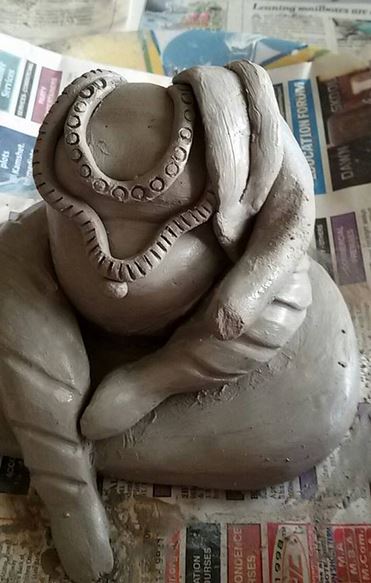
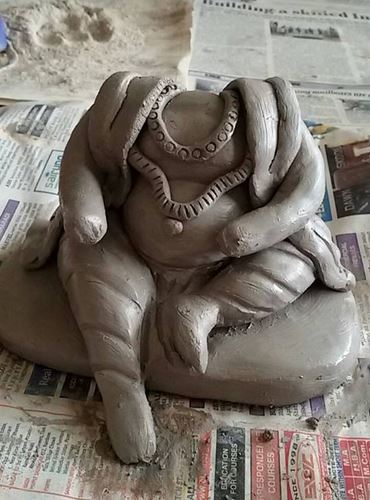
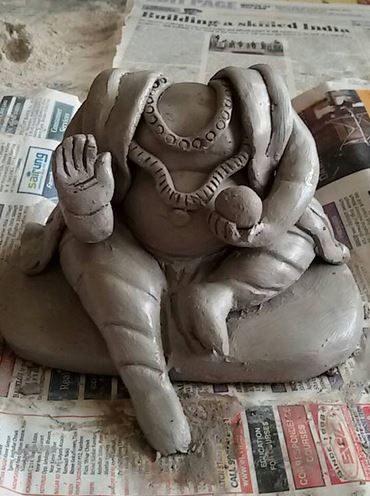
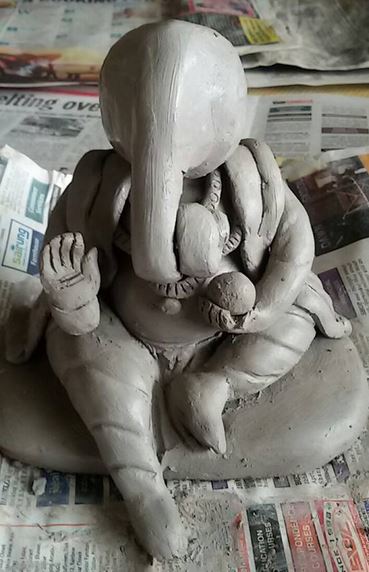
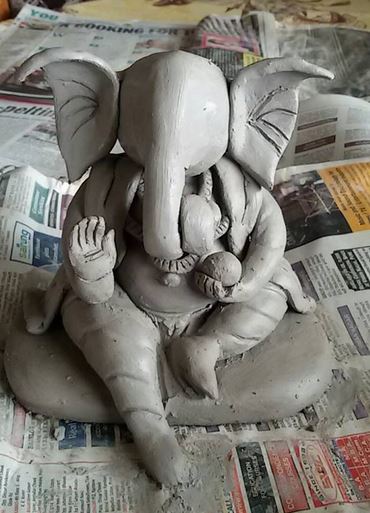
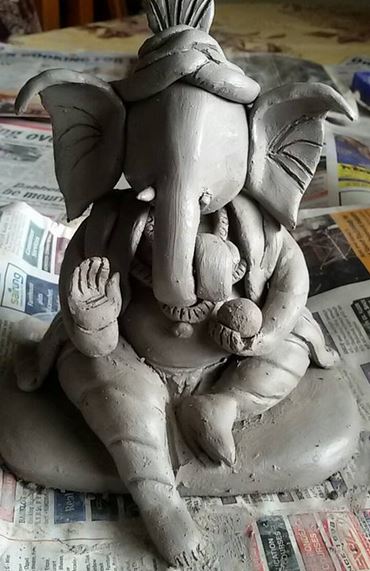
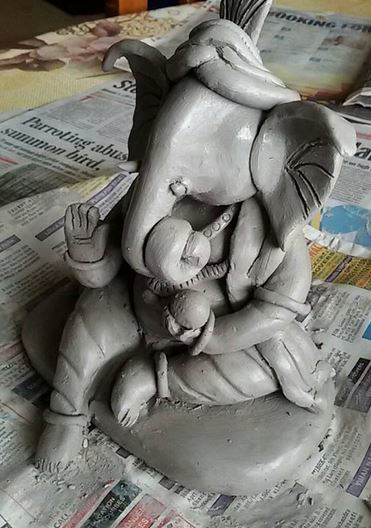
Ganesha is a much-loved God and making him out of clay is such fun! Here’s an easy, step-by-step tutorial for an eco-friendly Ganesh idol that you can make at home!
Indians celebrate Ganesh Chaturthi with great fervor and delight. Most of them bring Ganpati to their home. The Ganpati decoration at home begins well in advance. Traditionally made idols pose a threat to the environment. They cause lots of pollution and contaminate our water bodies. This year use eco-friendly materials to make Ganpati idol and non-toxic colors for decorating it.
Step by step instructions for making a Eco-friendly clay Ganesha at home
In India, the festival of Ganesh Chaturthi is celebrated with great pomp and show. On this day, Lord Ganesha is worshipped as the god of beginnings and remover of obstacles. The ten-day festival culminates on Anant Chaturdashi when Ganesha idols, which are made of clay, are immersed in water bodies.
Nowadays, there is a growing awareness amongst people to celebrate Ganesh Chaturthi in an eco-friendly manner. There are many ways in which you can make an eco-friendly Ganesha idol at home.
Hope you enjoyed this step by step making of Ganesh idol at home. Do try making one for yourself. But, remember to use Eco-friendly, non-toxic clay.
Watch Videos to Learn and Make Quilling Ganesh Idol at Home
Hope you like these Eco-friendly Ganesh Idol step by step tutorials.
Other Ways to Make Eco-friendly Ganesh Idol
One of the simplest ways is to make an idol out of paper mache. Paper mache is a paste made out of flour and water. To this paste, strips of paper are added. Once the paste dries, it hardens and can be moulded into any shape.
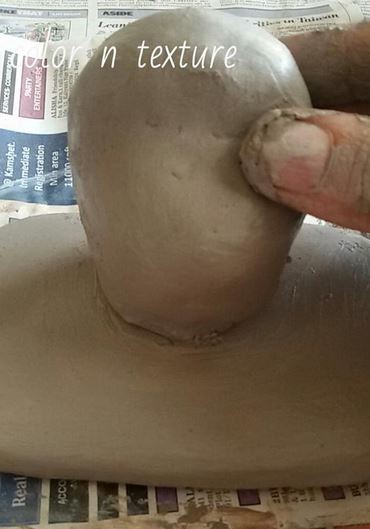
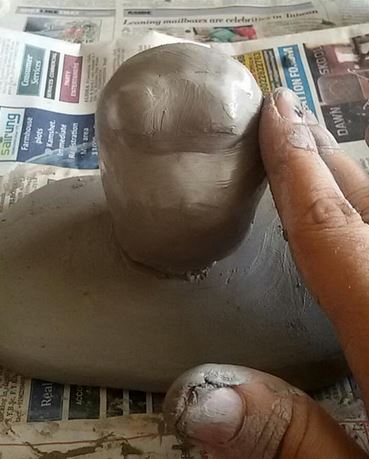
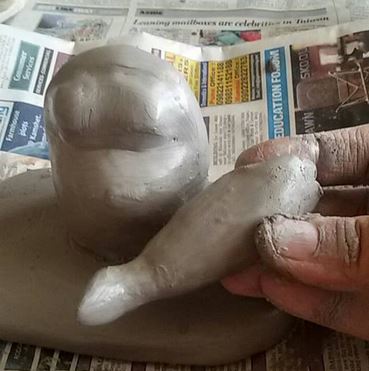
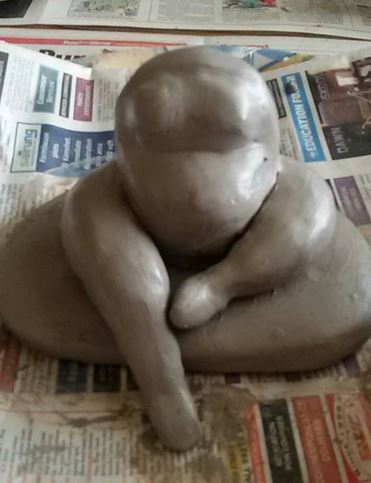
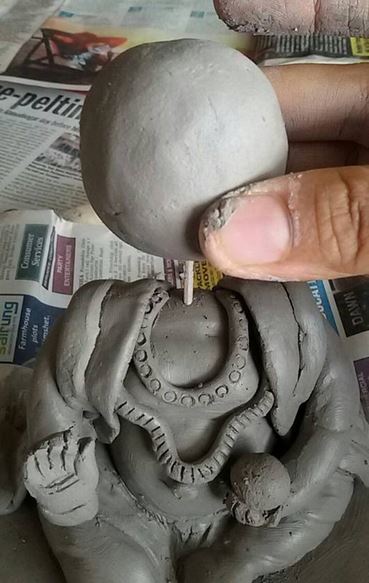
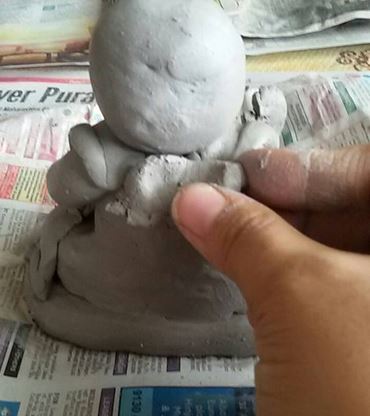
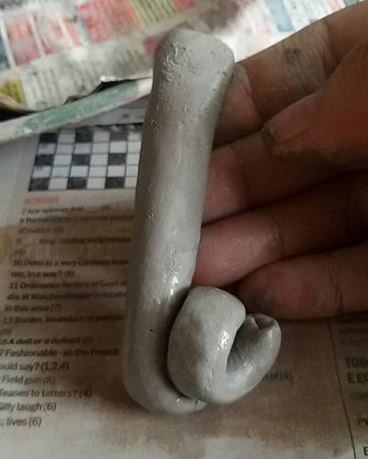
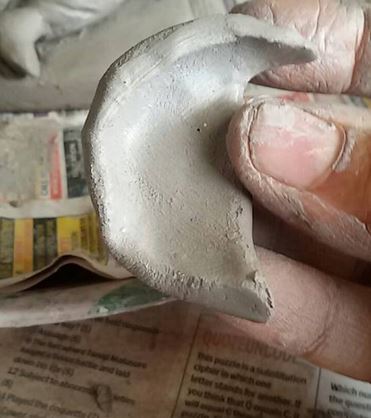
To make the idol, start by making a small ball out of the paper mache paste. This will form the head of the Ganesha idol. Then, make two smaller balls for the ears and attach them to the head. To make the trunk, roll a strip of paper mache paste into a coil and attach it to the head.
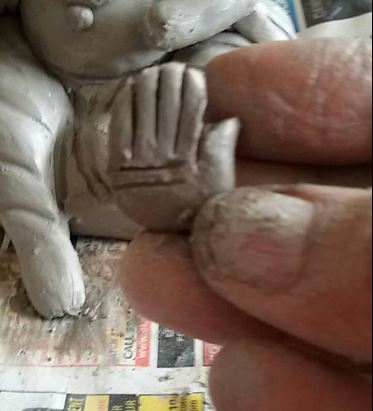
For the arms, take two strips of paper mache paste and roll them into thin cylinders. Attach these to the sides of the trunk. To make the hands, roll small balls of paste and flatten them. Make sure to leave a small hole in the centre of each ball. Attach these to the ends of the arms.
To make the legs, take two strips of paper mache paste and roll them into thin cylinders. Attach these to the bottom of the trunk. For the feet, take two small balls of paste and flatten them. Make sure to leave a small hole in the centre of each ball. Attach these to the ends of the legs.
Your eco-friendly Ganesha idol is now ready to be worshipped!
Another way to make an eco-friendly Ganesha idol is by using recycled materials. You can use old newspapers, cardboard, or even scrap fabric to make your idol.
To make an idol out of recycled newspapers, start by tearing the paper into small strips. Then, dip these strips into a paste made out of flour and water. Once the strips are coated with the paste, mould them into the desired shape.
To make an idol out of cardboard, start by cutting the cardboard into pieces. Then, use a hot glue gun to stick these pieces together. Once the pieces are glued together, mould them into the desired shape.
To make an idol out of scrap fabric, start by cutting the fabric into small strips. Then, dip these strips into a paste made out of flour and water. Once the strips are coated with the paste, mould them into the desired shape.
Your eco-friendly Ganesha idol is now ready to be worshipped!
Image Source: Homemakeover
We would love to hear your thoughts in the comment section below. And be sure to like us Facebook for more ideas!
Thank you for visiting our website. Keep Creating with Art & Craft!
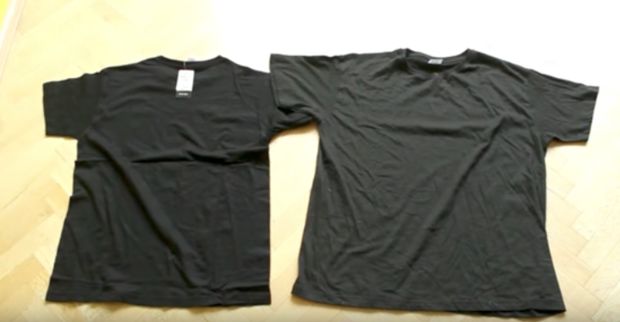
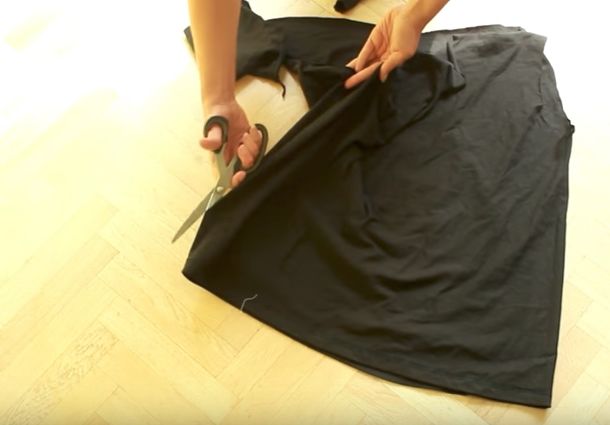
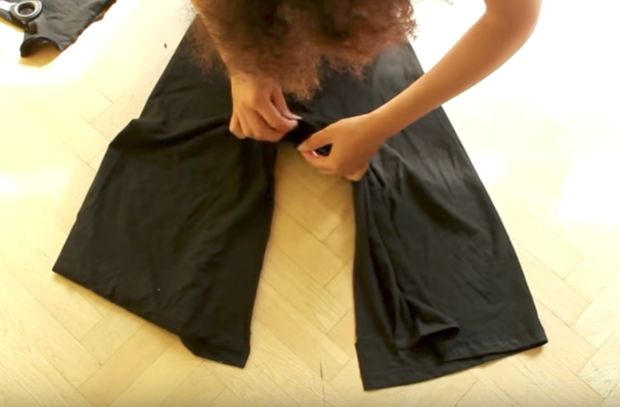
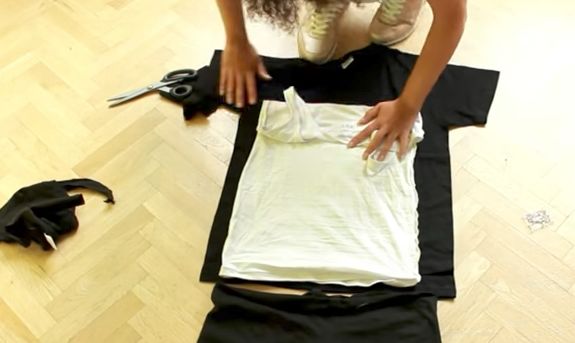
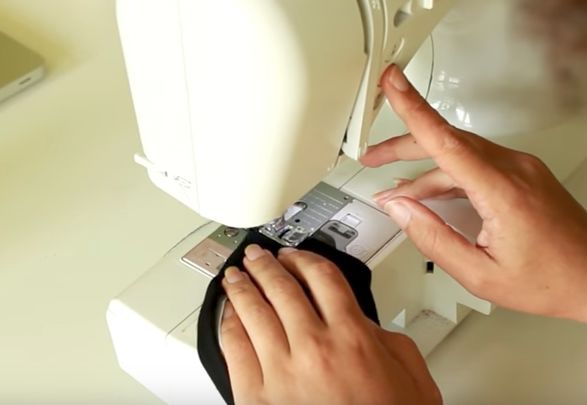
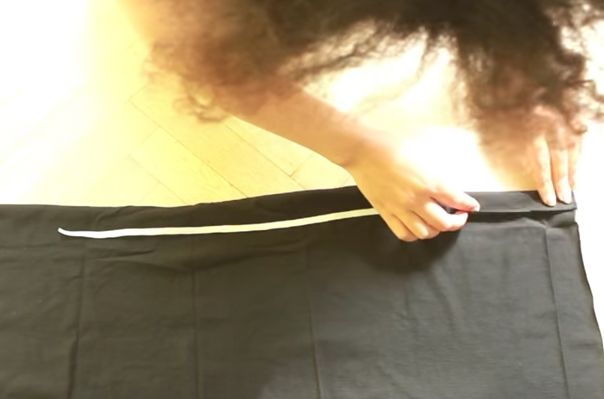
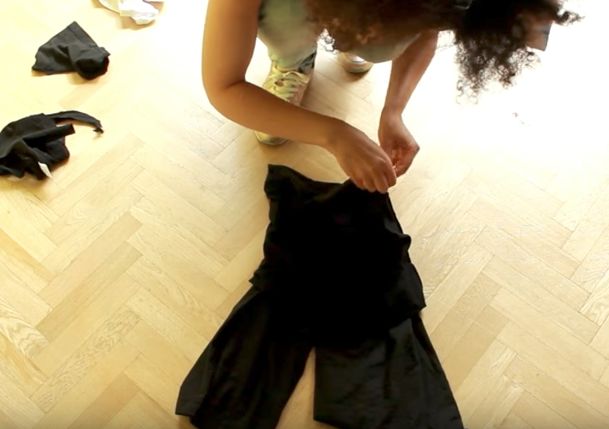
DIY Jumpsuit that you can make in 20min with 2 T-shirts!! T-shirts are a great DIY Tool to work with because there are so many creative ways to transform it
And we all have 1 or more old t-shirts laying around that we’re not using so let’s be creative and make beautiful DIY Clothes with it
Required Material:
2 T-shirts
pins
fabric scissors
paint brushes
paint palette
Palett Fabric Paint
elastic
thread
sewing machine (I use Brother DS140)
Step 1: You Need 2 T-shirts
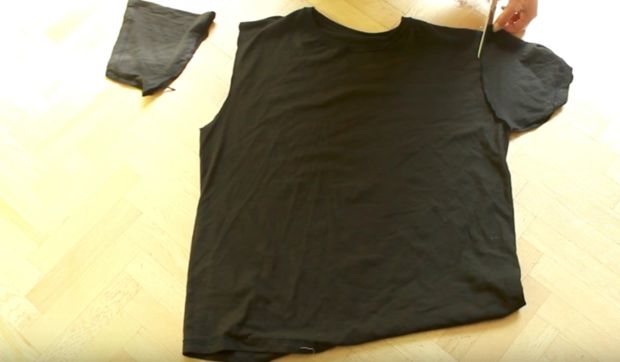
Step 2: Cut the Sleeves, Top and Side of Your Shirt
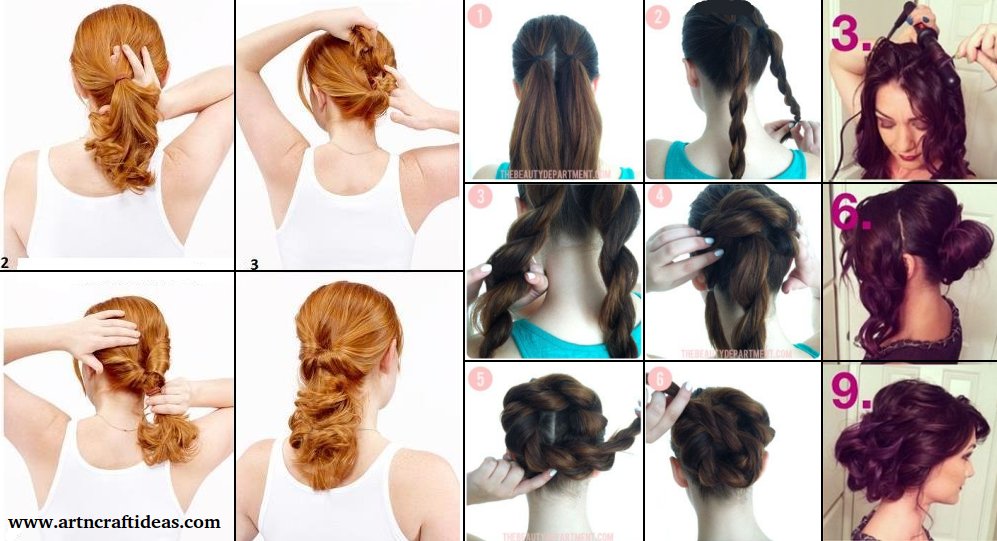
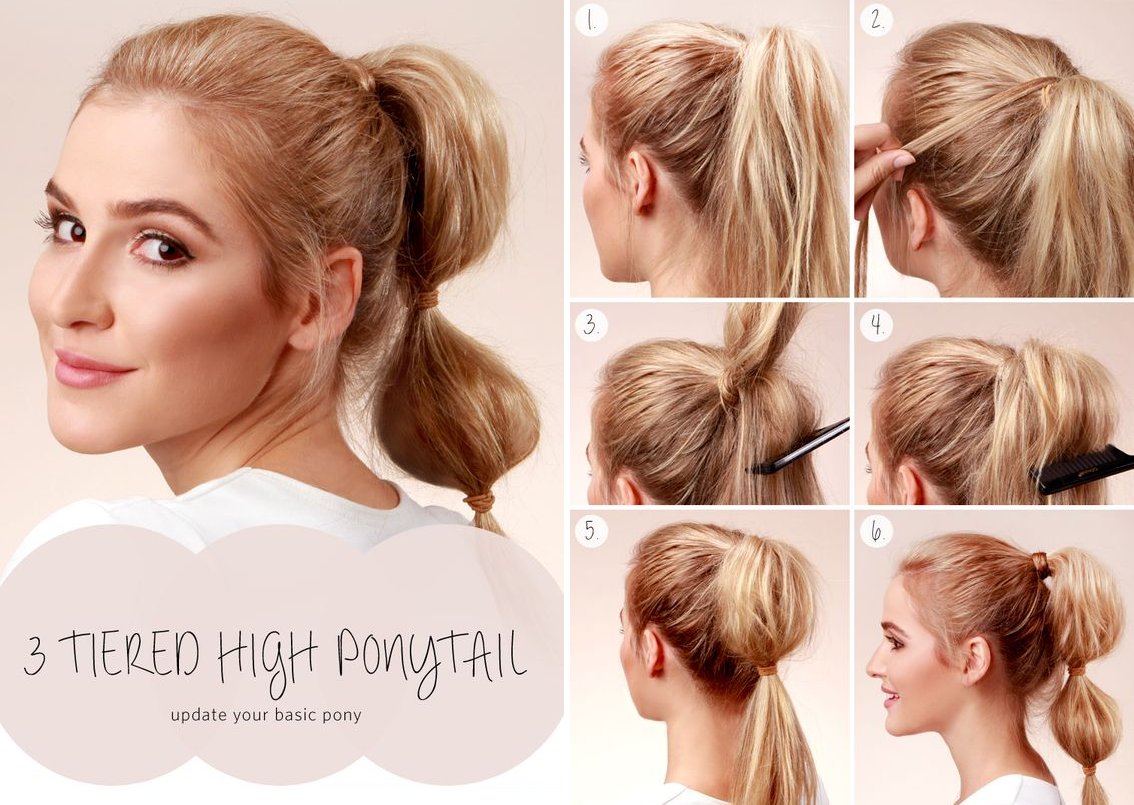
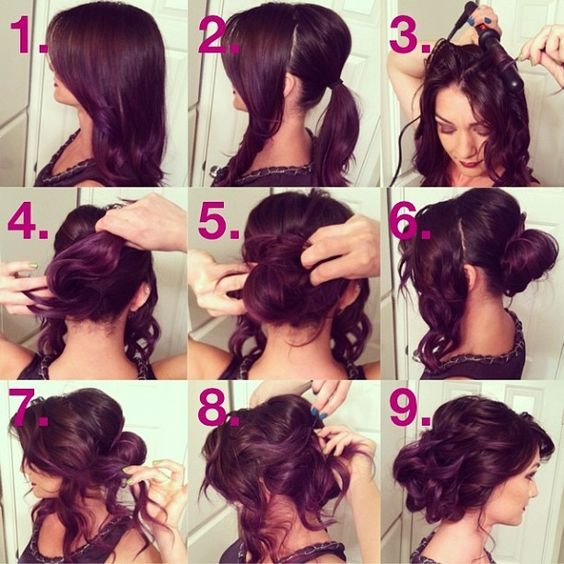
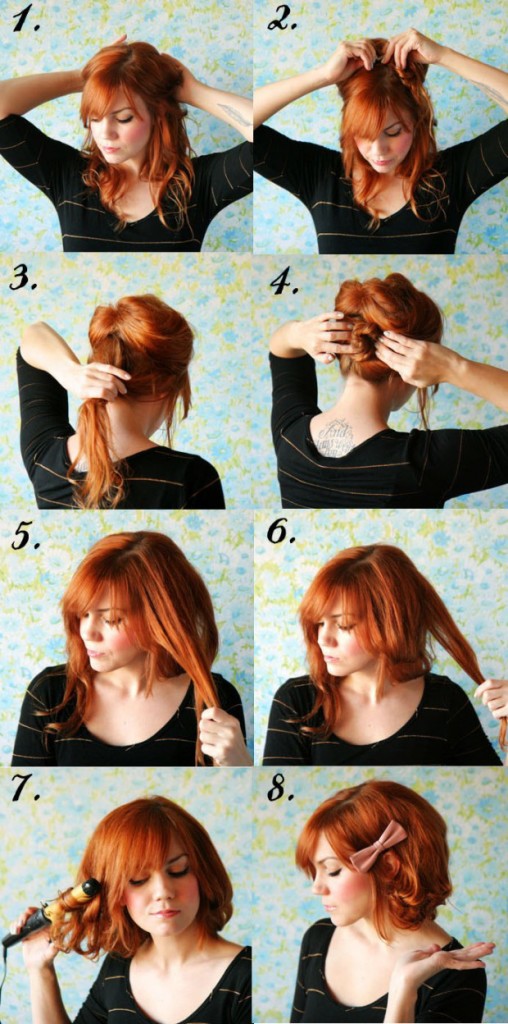
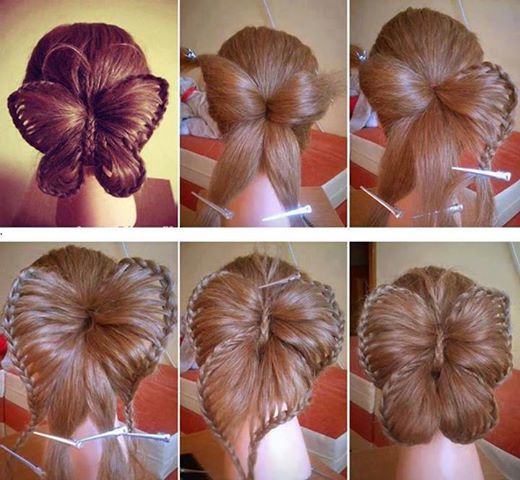
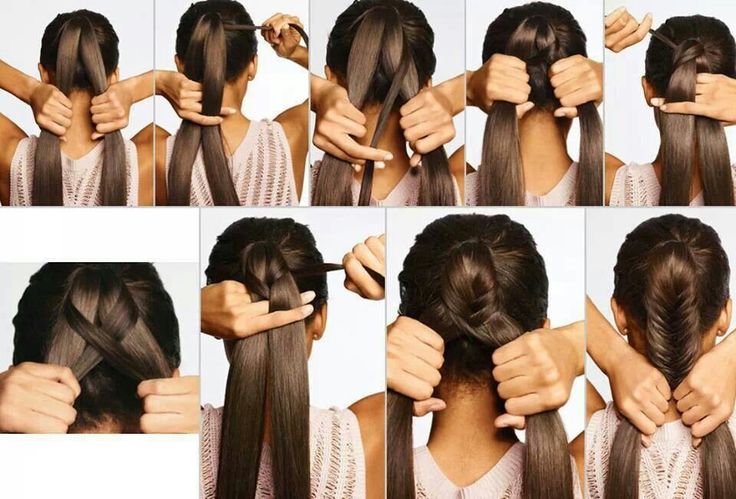
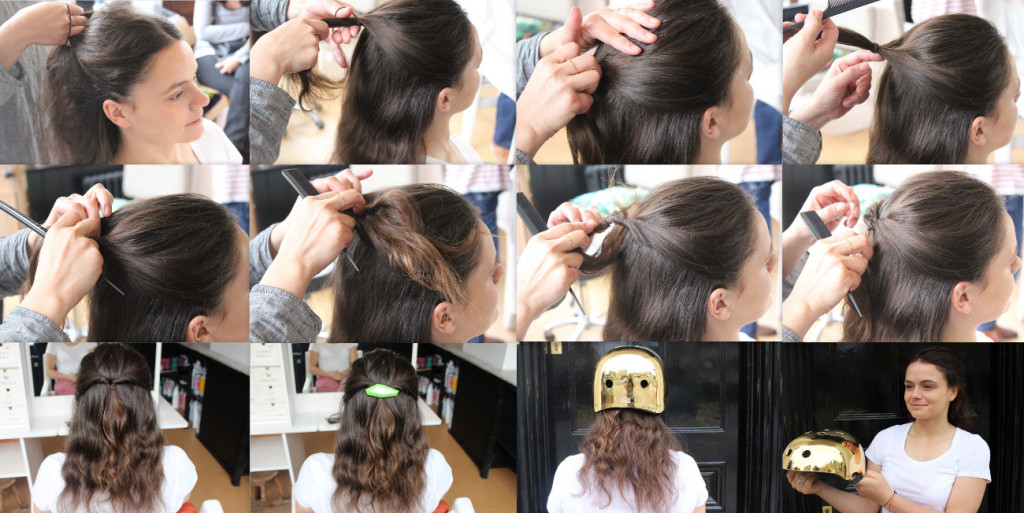
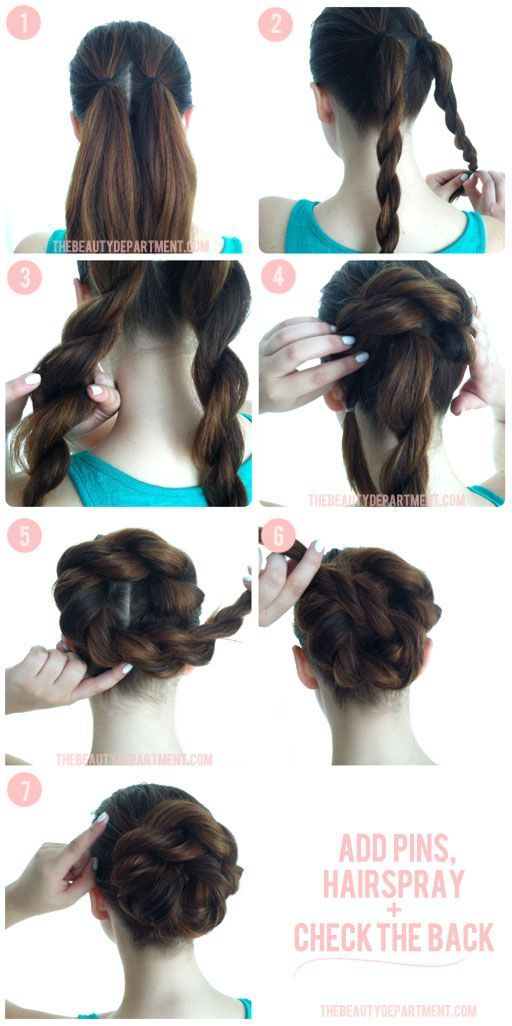
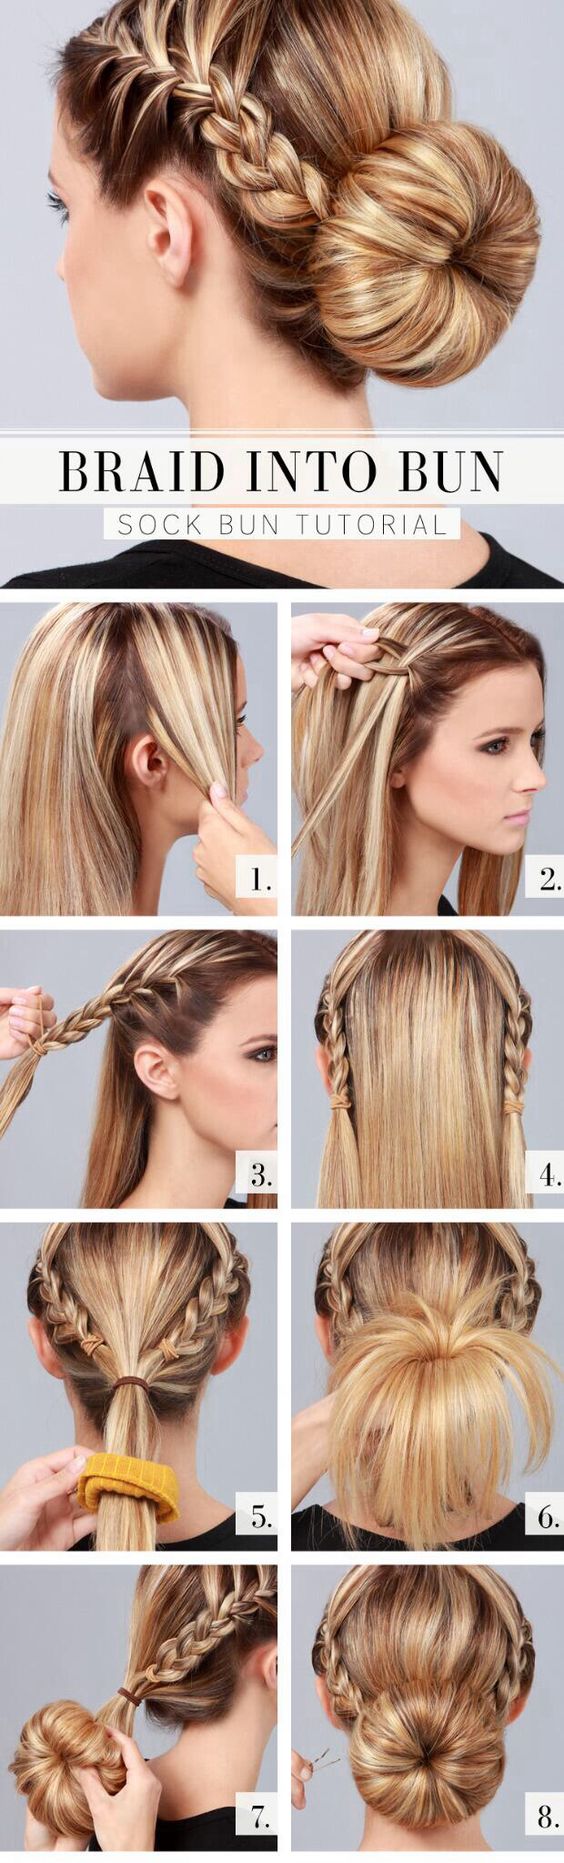
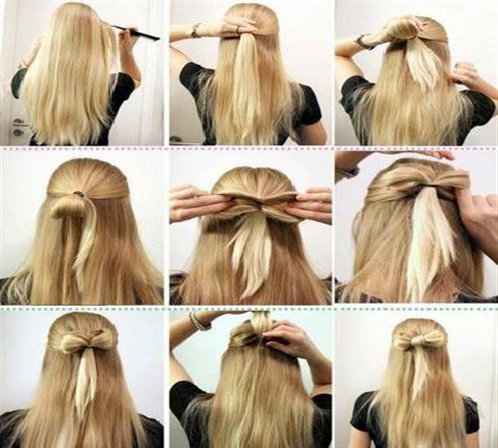
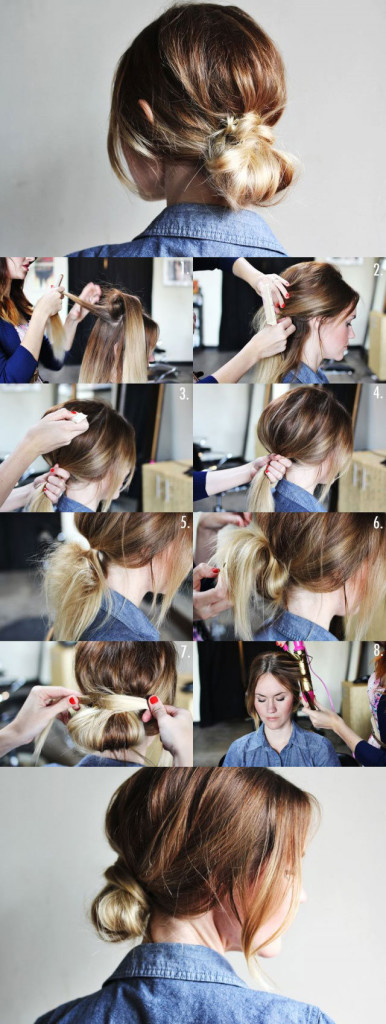
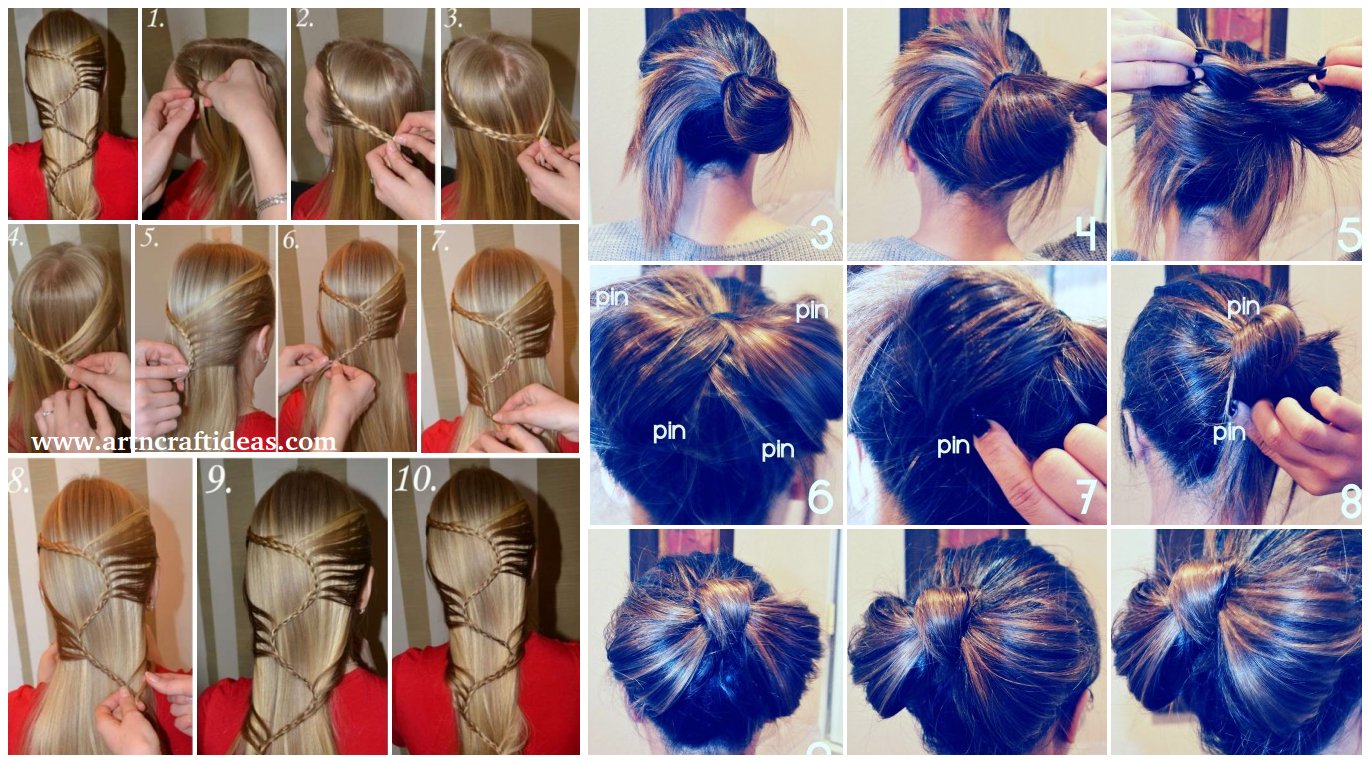
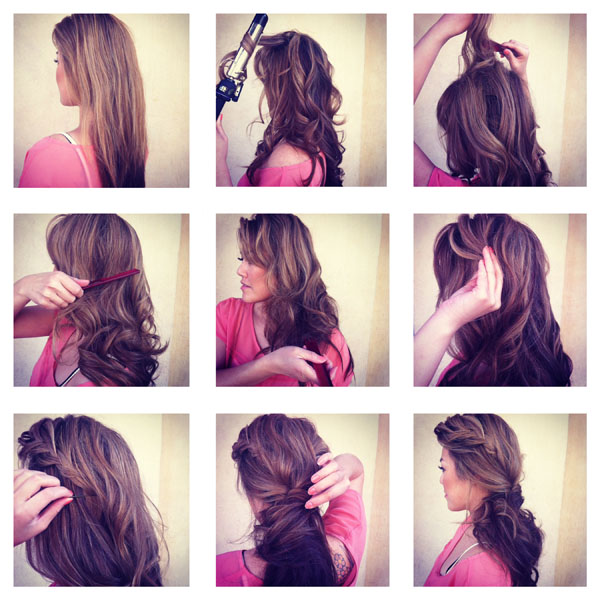
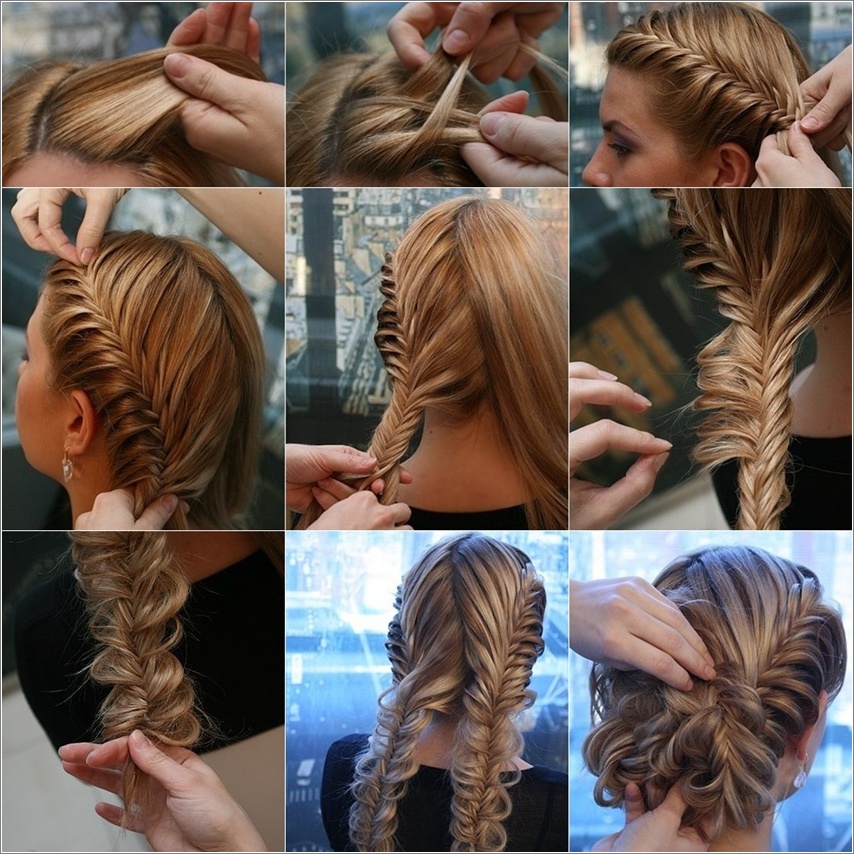
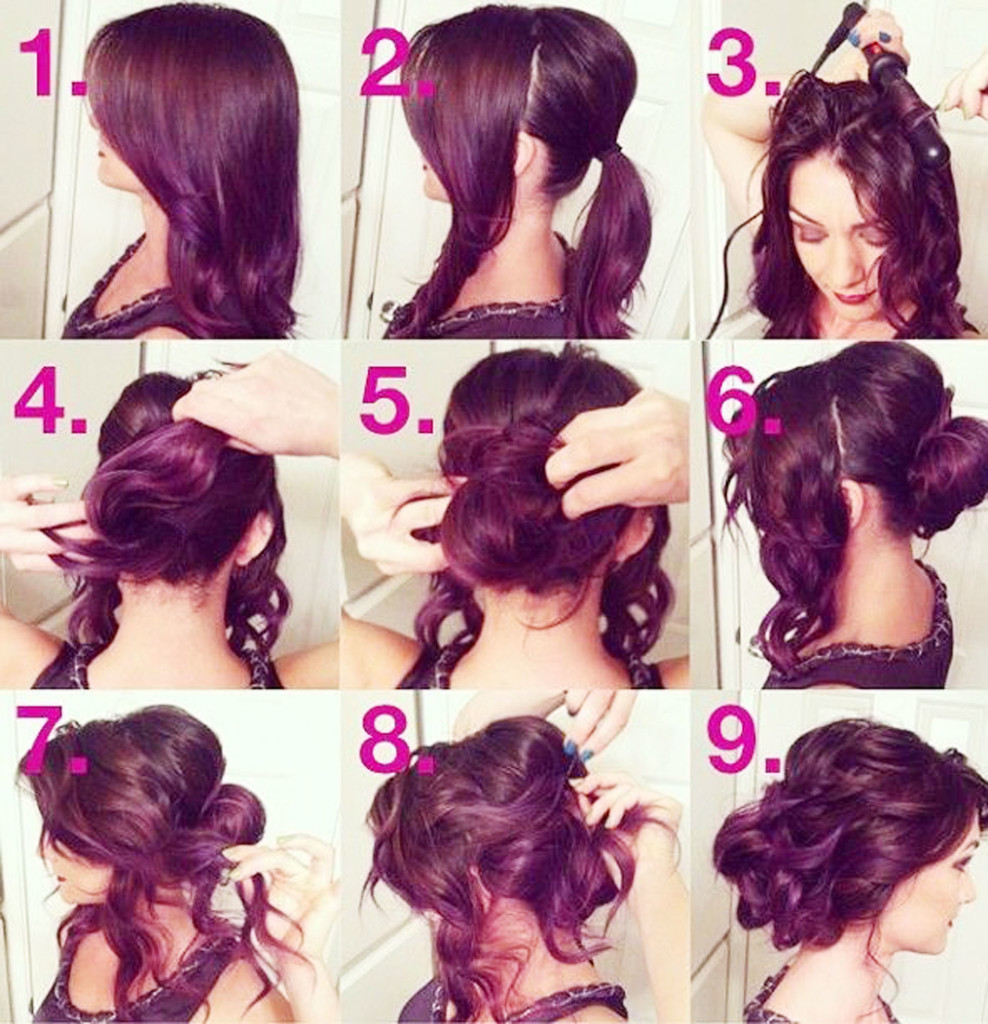
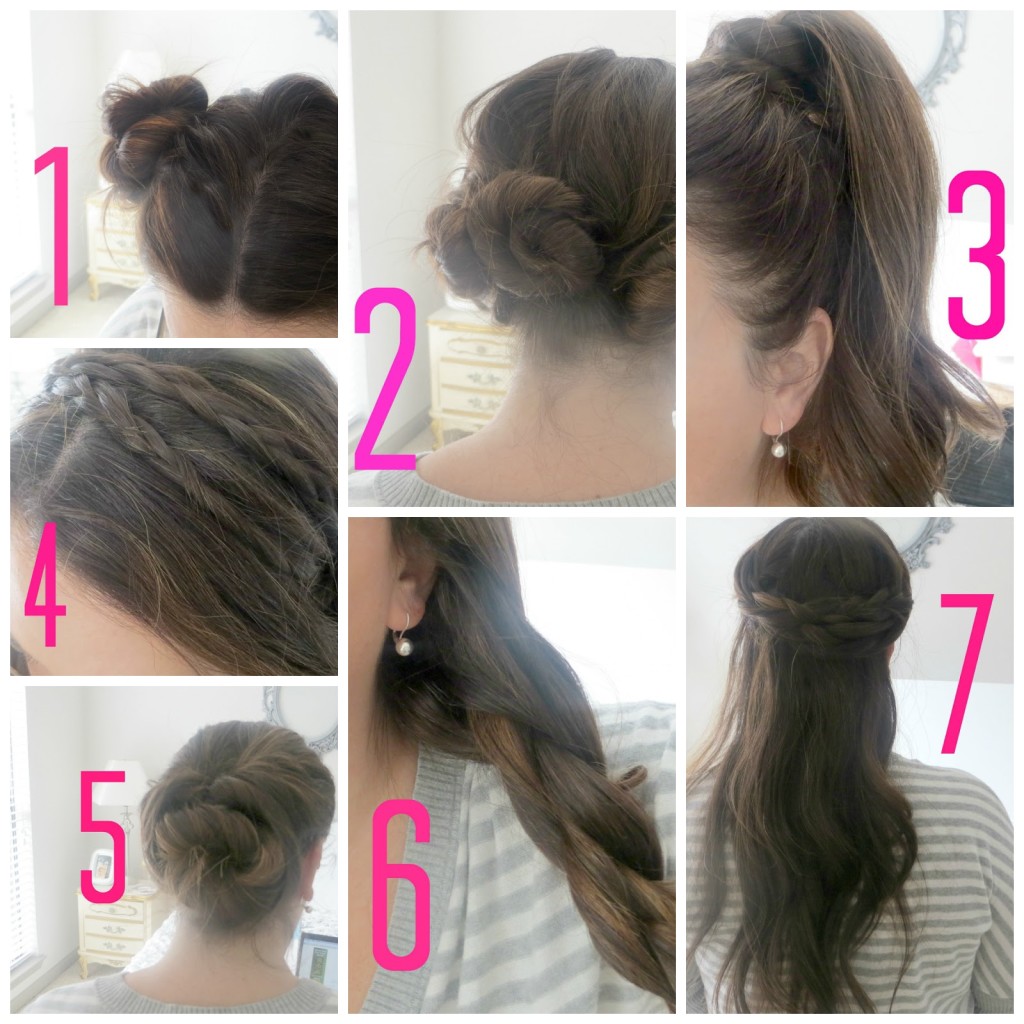
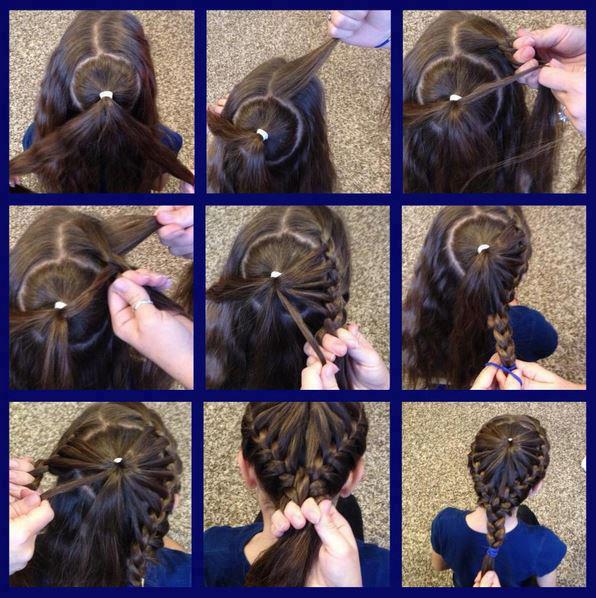
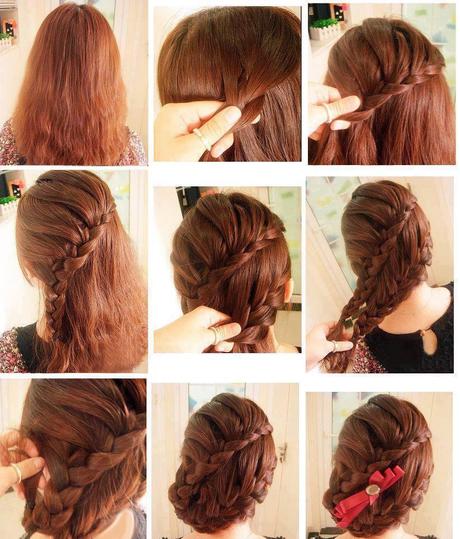
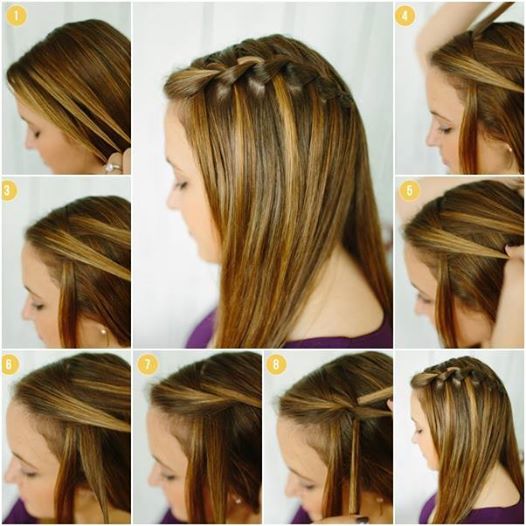
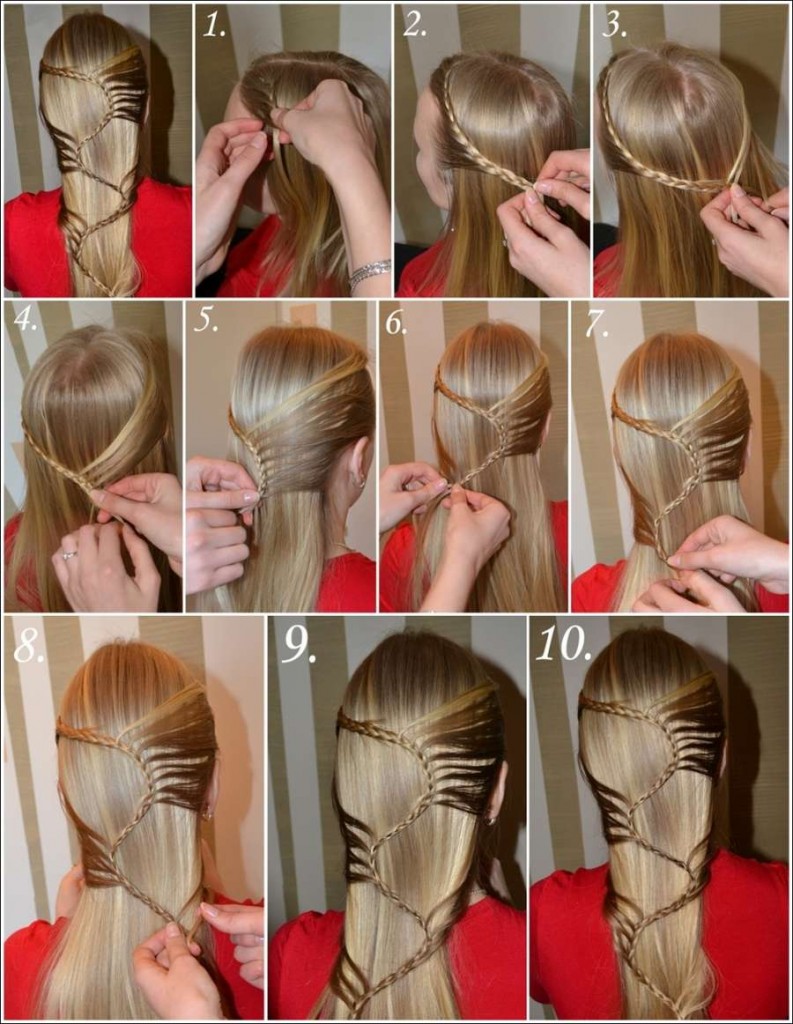
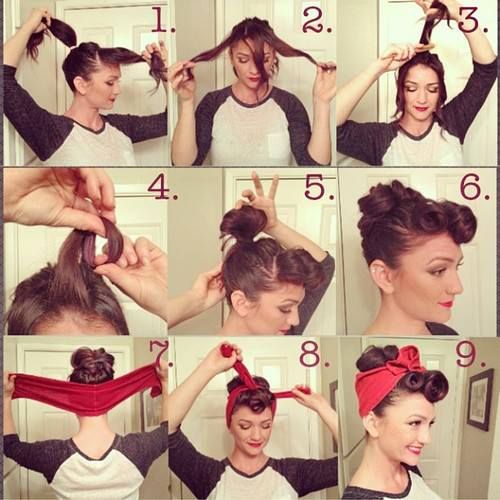
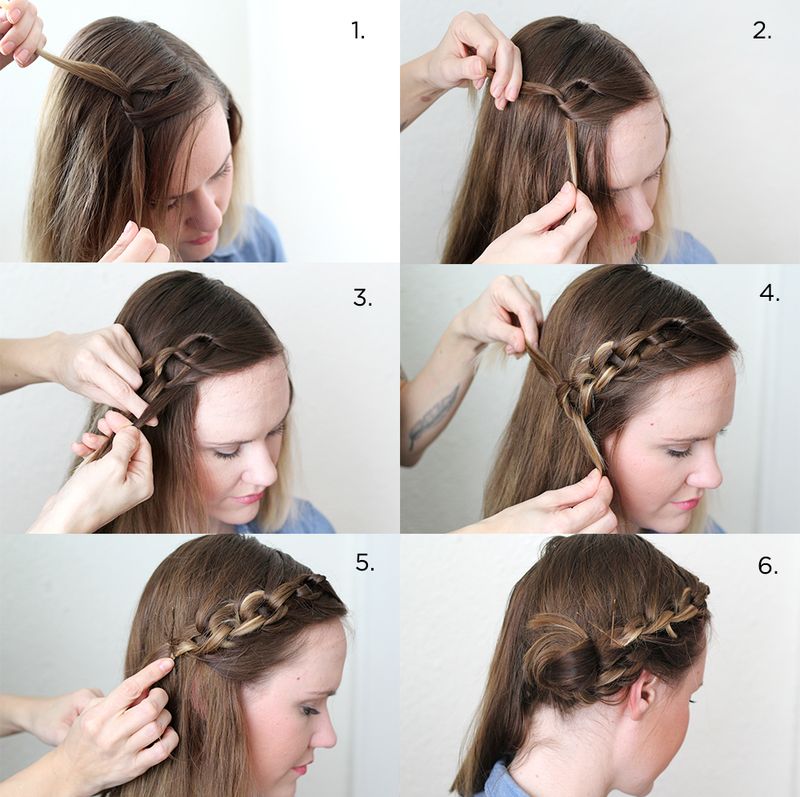
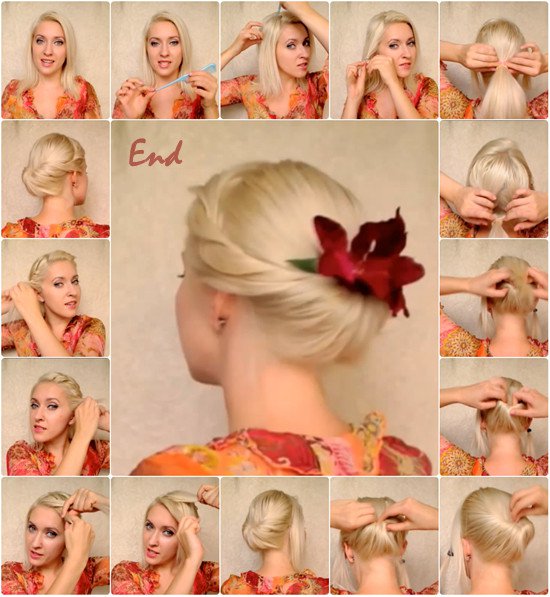
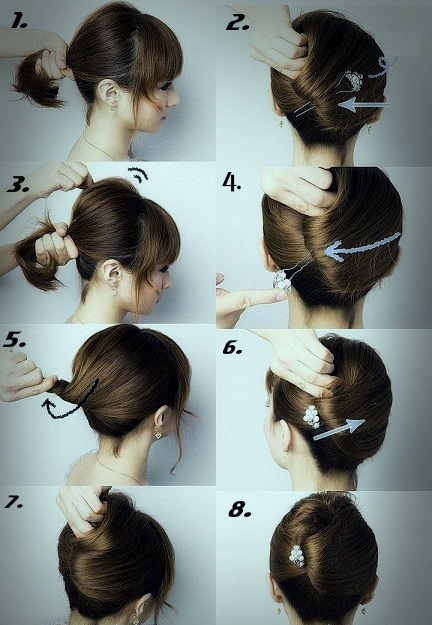
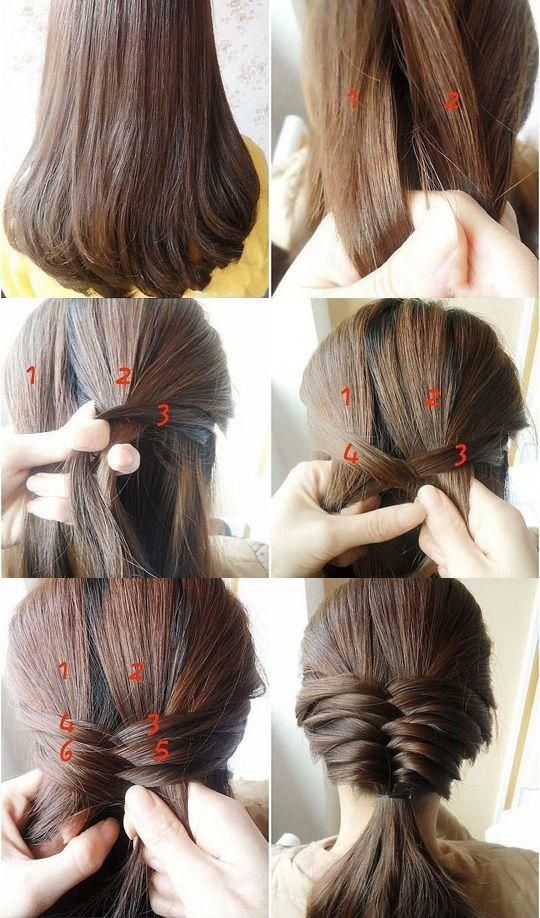
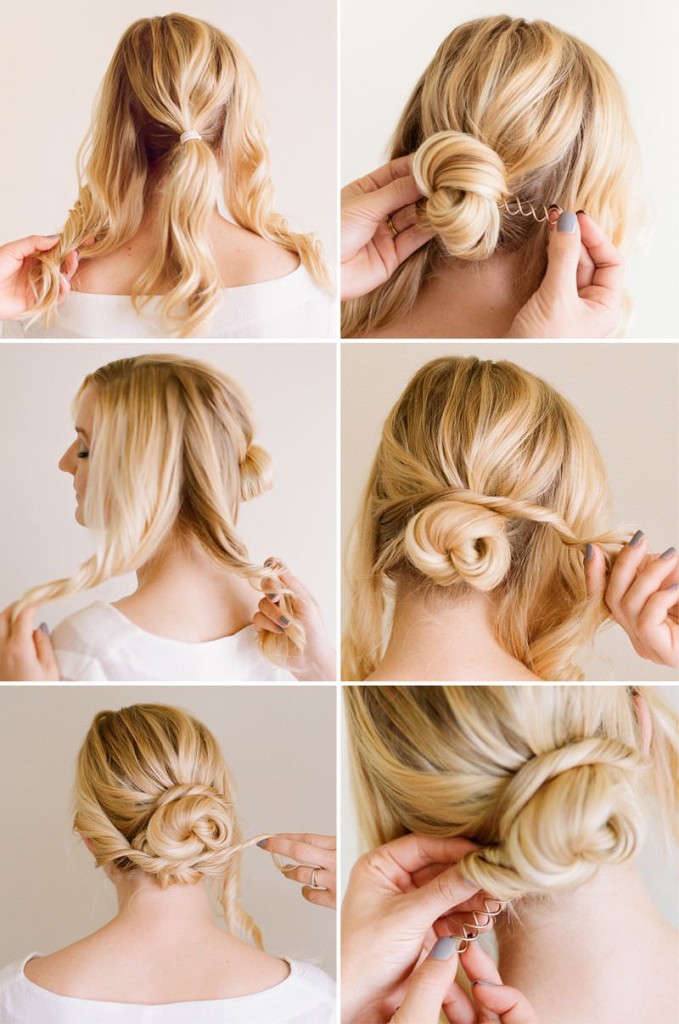
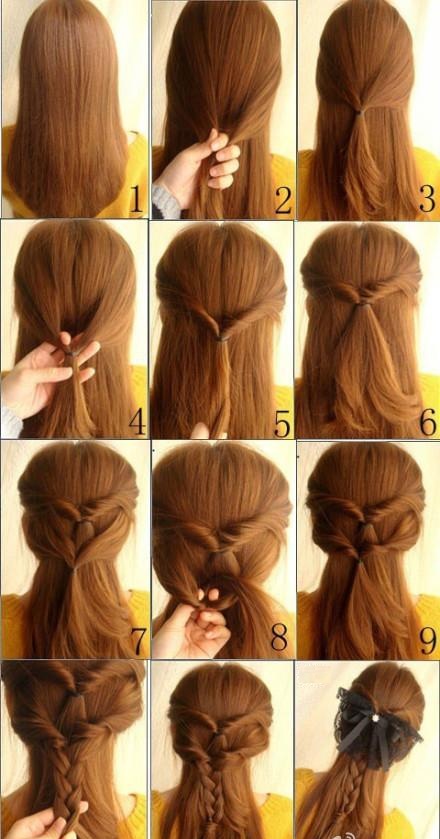
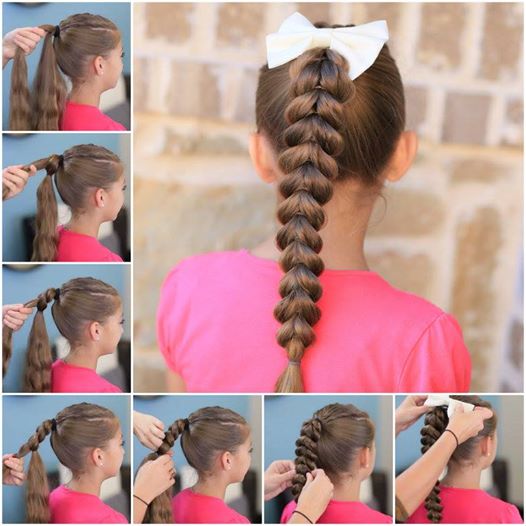
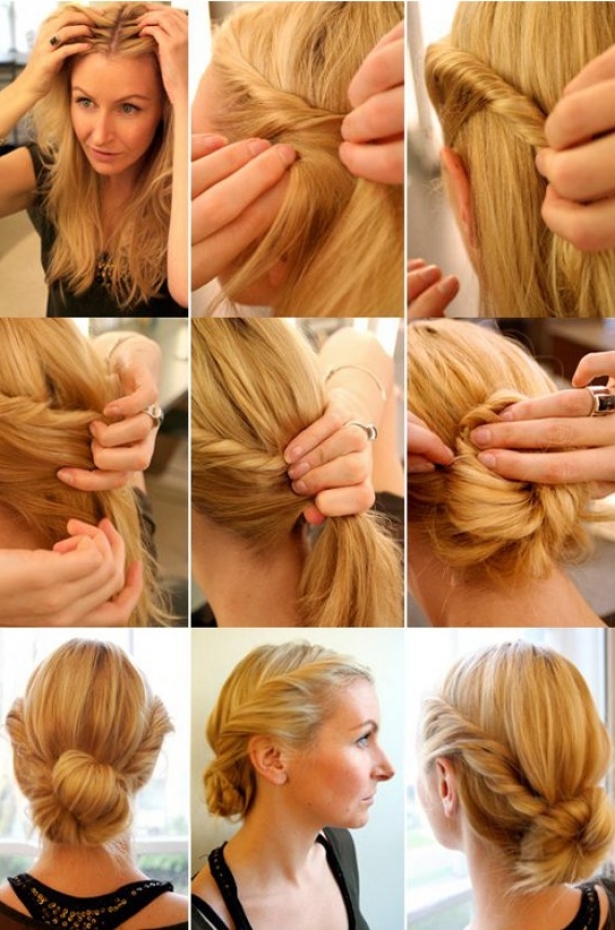
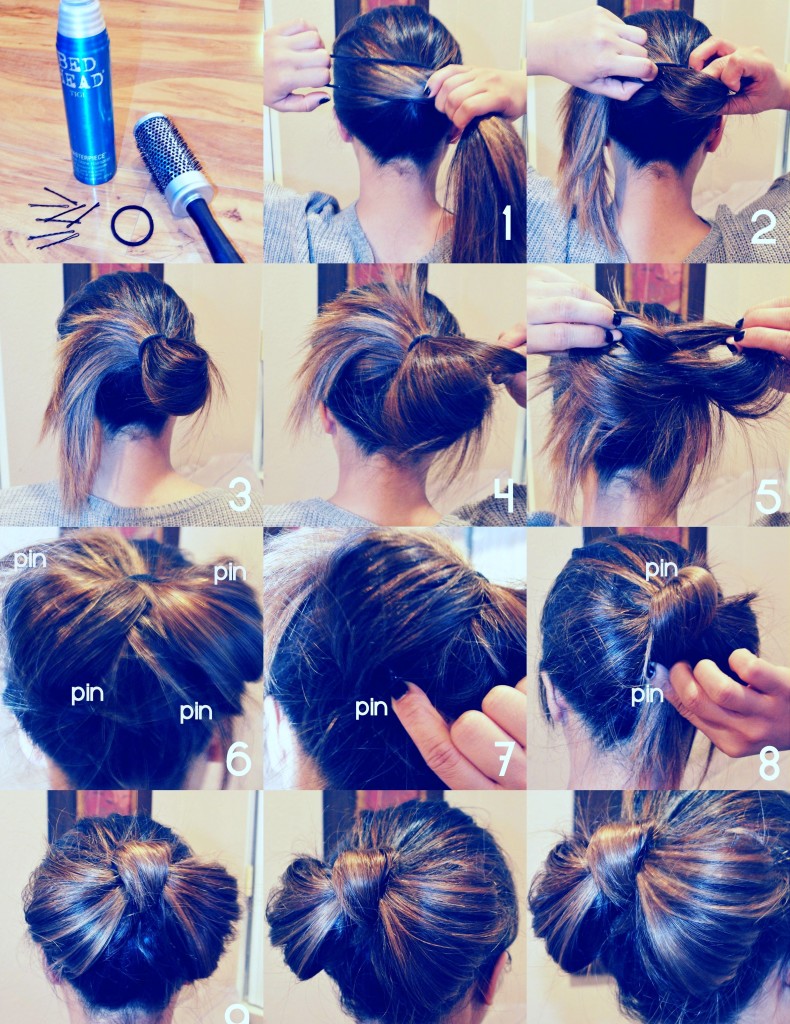
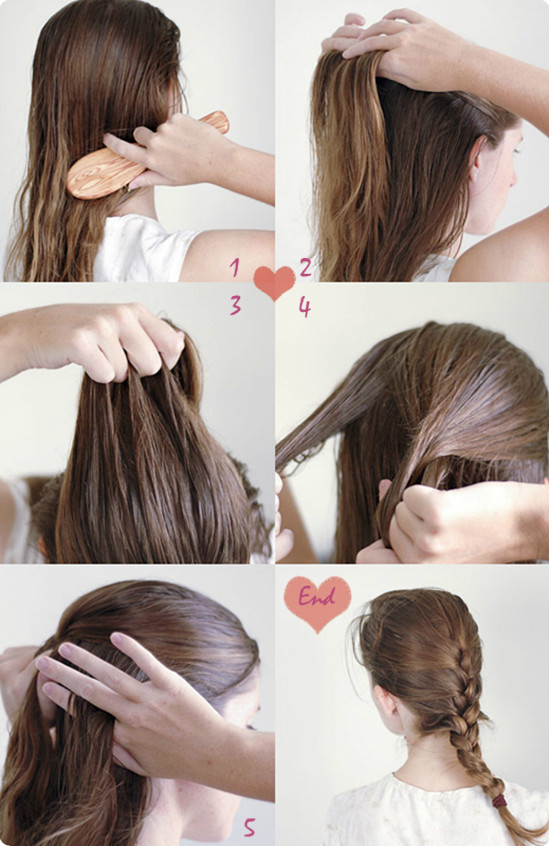
Latest Long Hair step by step hairstyles for Girls” is great collection of step by step hair cutting for girls of all ages. First of all pick the best suited hairstyle and then simply by following easy steps you can try totally new looks.
This is the best way of trying different haircuts at home without spending any cost. We hope you will enjoy this collection, keep sharing your thoughts and comments with us. Enjoy the collection!
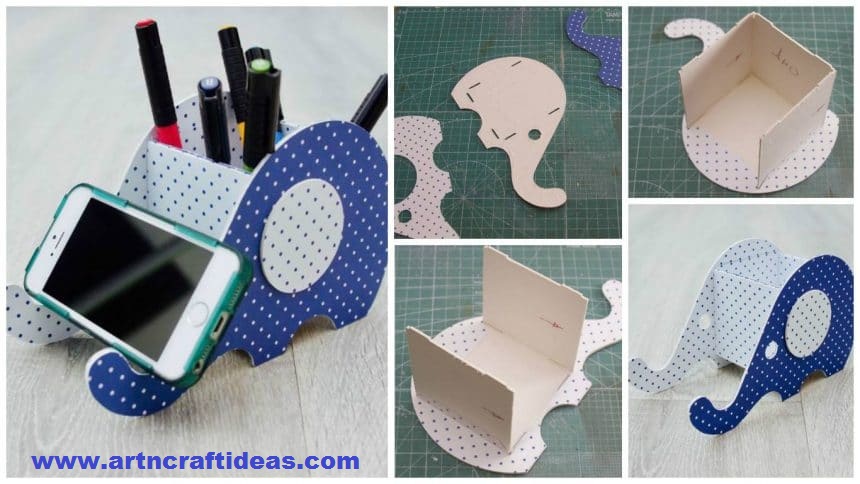
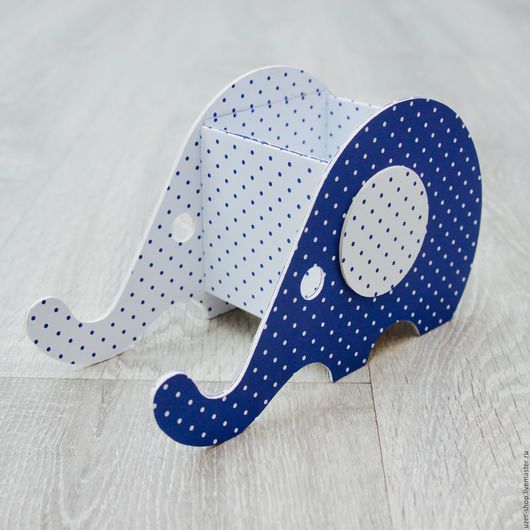
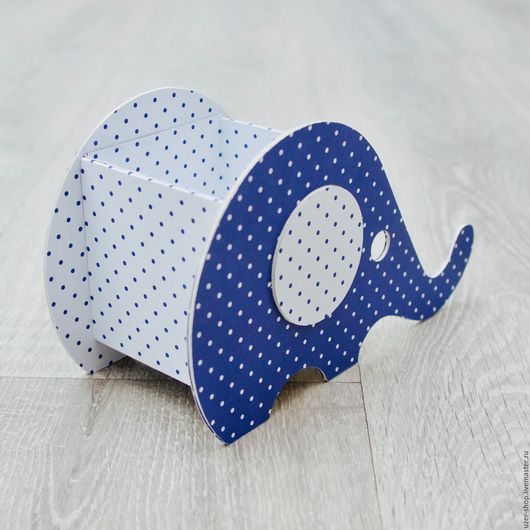
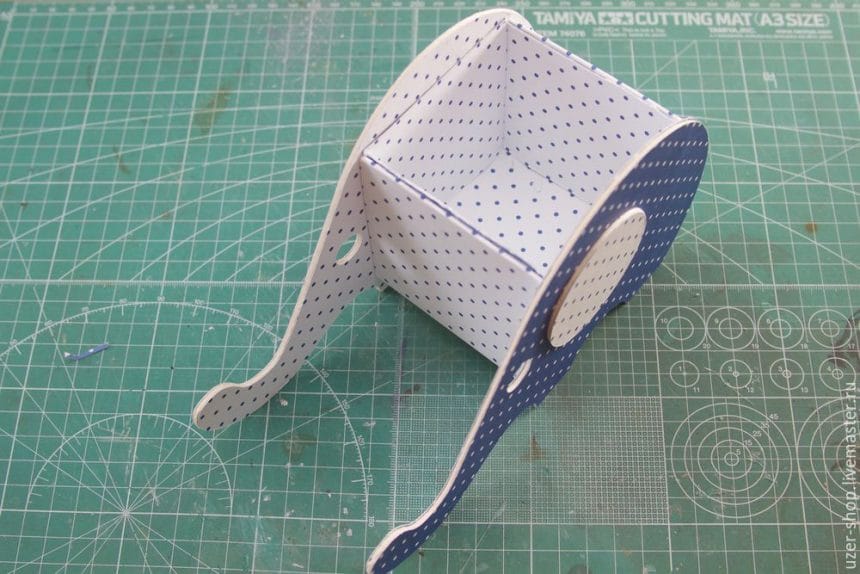
paper and cardboard stand-organizer “Elephant” for the tablet:
On our desktop, where the whole family is engaged in creativity, are always accessories. One of them – the tablet, usually show some series, a regular review of interesting gizmos, workshop or just playing music. In this master class you will learn how to create a stand for such a satellite creativity with his own hands.
So, let’s begin!
Required Material:
beer board thickness of 1.5 mm, a sheet of 250 × 300 mm (I had two sheets of 250 × 200 mm at hand);
beautiful sheets of paper, one of at least 9 “x9” (229 × 229 mm) and 2 A4 paper (I used 3 sheets of paper for scrapbooking 305 × 305 mm);
adhesive (for example, “Moment of Crystal”);
scissors;
line;
stick to scoring.
Additionally, to facilitate the manufacturing process, can be used:
board Creasing (preferably inch as customized sizes just under a);
model knife;
mat for cutting;
metal ruler;
plotter.
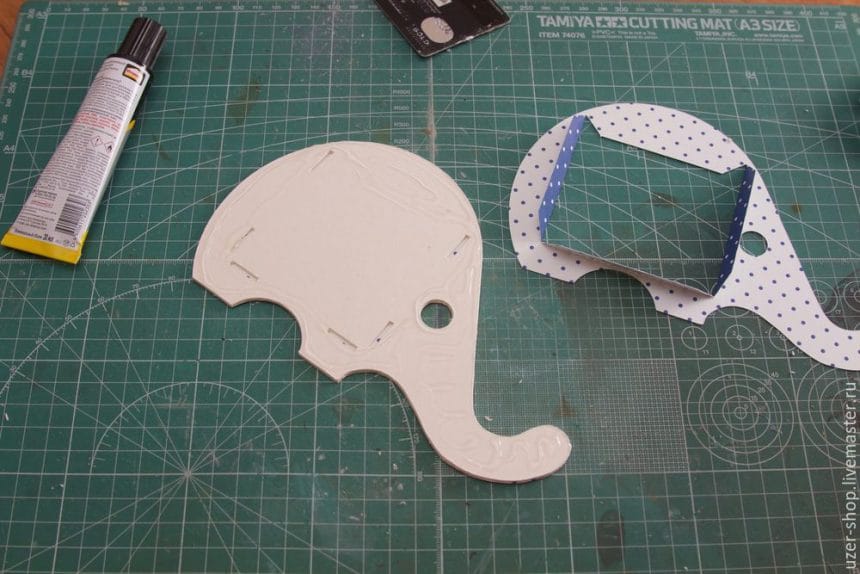
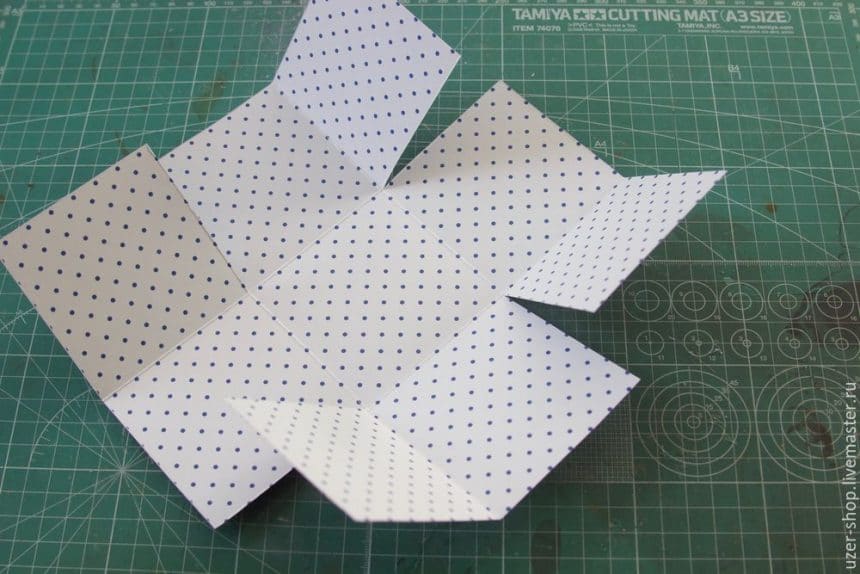
Now we need the sketches “Elephant.” To maintain the correct dimensions, the image should be printed on A4.
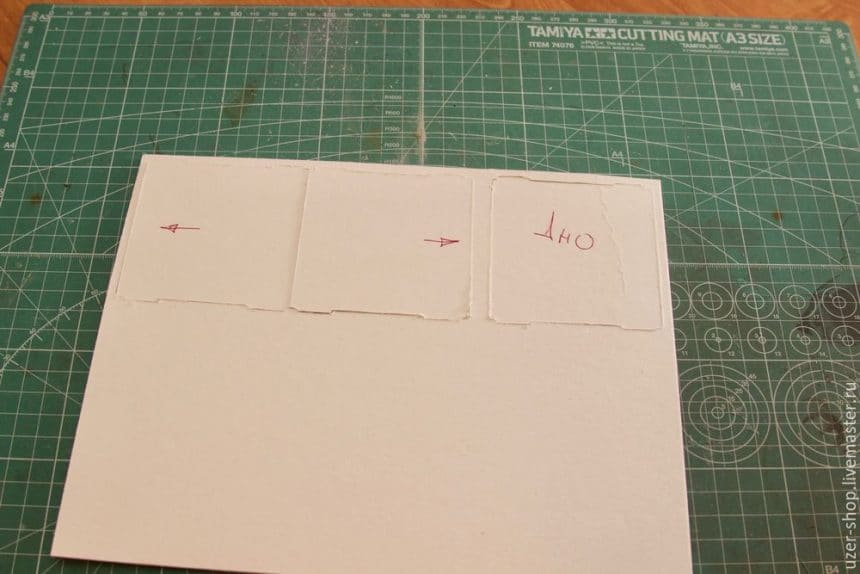
The first two designs for the board – this is the framework of our stand. Printed, pasted on a sheet of cardboard prepared and cut. it is not necessary to cut out on the first page of the ear at the elephant, it is there to guide. We cut out the details of the plotter. But there is a nuance, plotter companies Silhouette can cut through the cardboard beer 1.5 mm, even a knife for cutting deep. I cut the usual knife to the maximum depth, then dorezayu modeling knife.
On the second sheet of the boxes are arranged to the last detail. In the sidewalls have top and bottom. When cutting, it is desirable to label them, then to avoid confusion (see. Photo). The arrow indicates where the top.
The remaining two files can be printed directly on a beautiful piece of paper, which will hide the frame of cardboard. It is necessary to bear in mind that you need to print on the back side of the paper. And also cut out. The dashed line, in the diagram designated fold line.
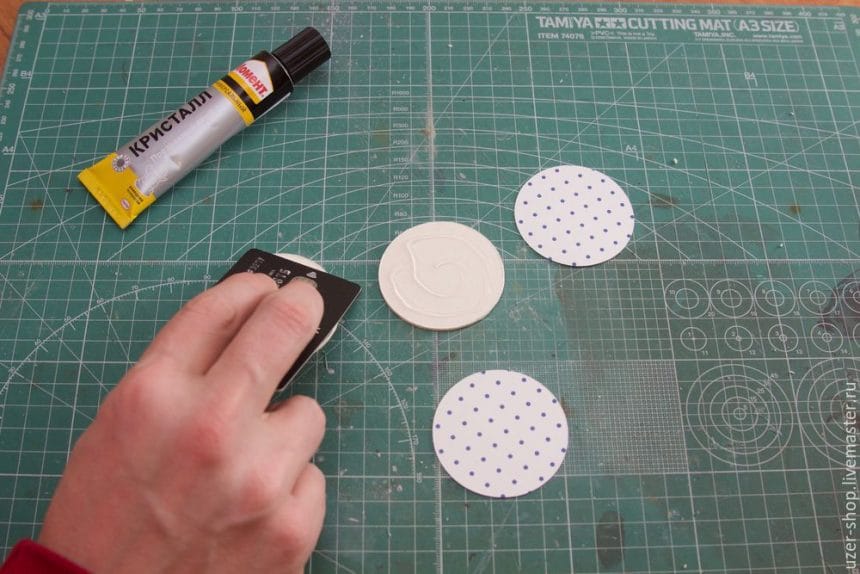
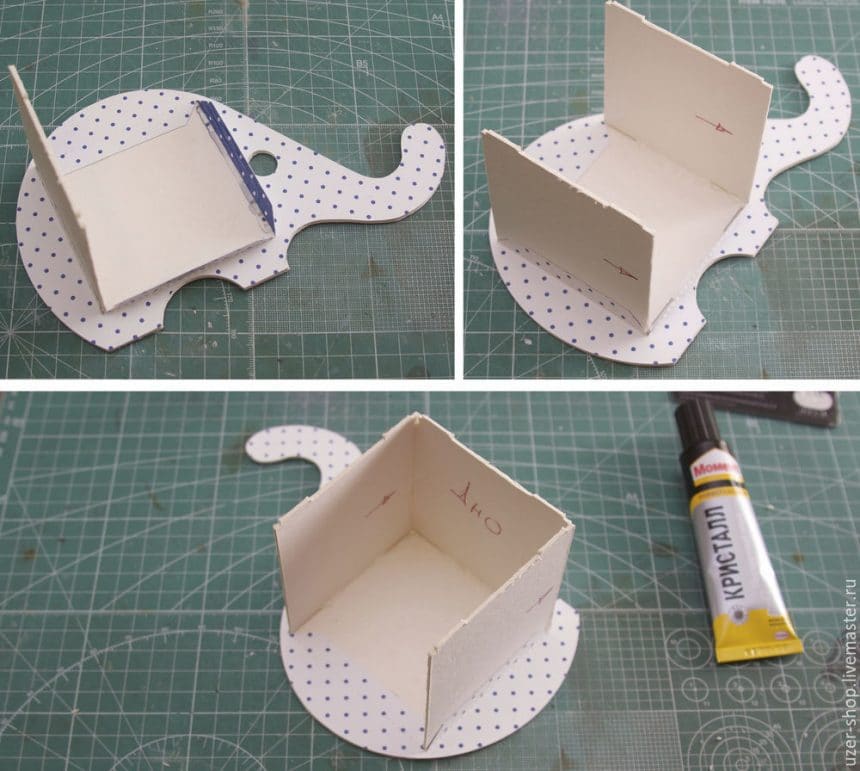
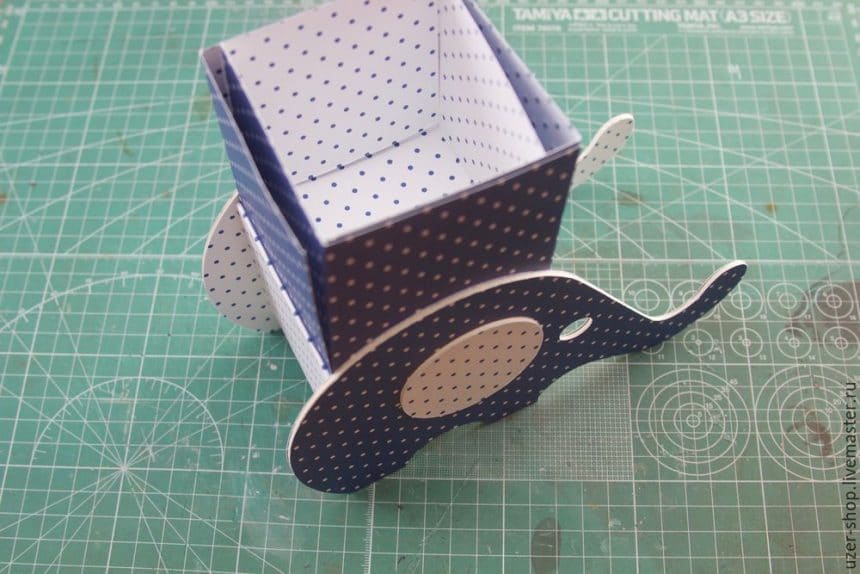
The first step will collect elephant ears. I prefer them to do different in color from the base color stand to emphasize their presence.
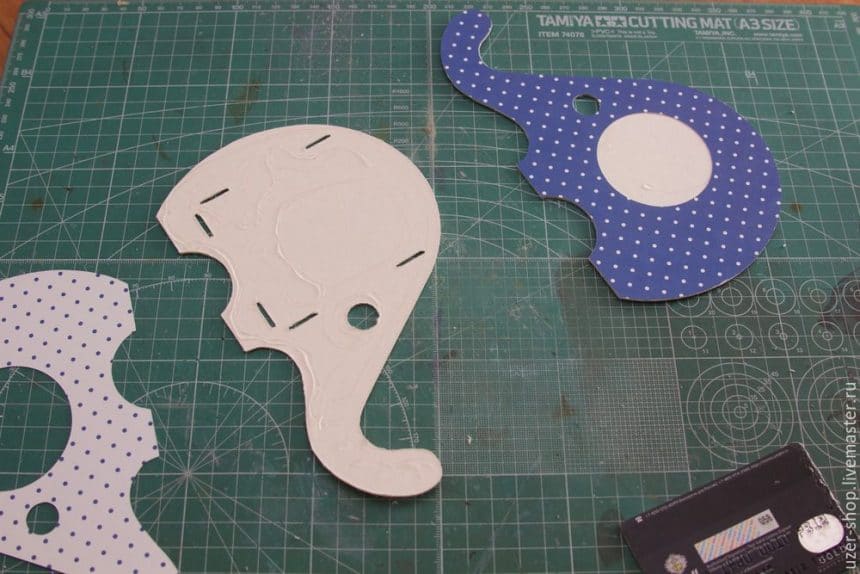
Apply glue and you can use an old credit card to evenly distribute 🙂 Ready ears are set aside, they give us is no longer needed. And go to the sidewalls of an elephant. First glue outer sides, those with the ear hole. By the way, about this hole … You can not cut, but I cut, because then it is easier to glue themselves exactly ears.
We give a little dry, and can be glued inside. Bends by first fold lines on each of the paper components. Do not forget that should have two mirrored parts, but not the same (see. Photo).
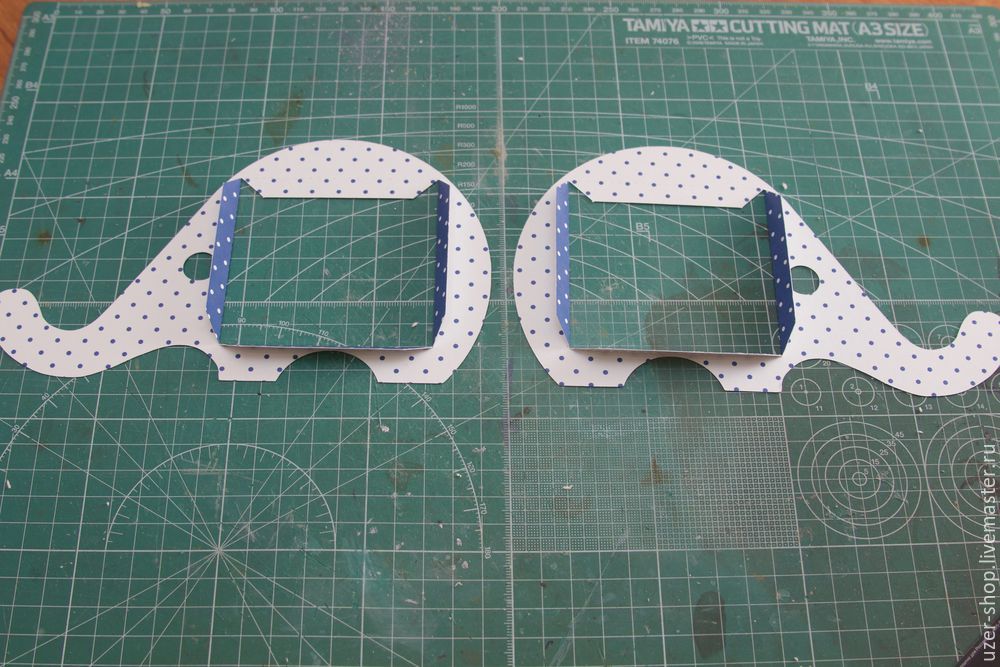
Now you can paste them. The adhesive can be applied to cardboard, guided by the slots for the side walls.
Then start collecting box. Glue all the pieces to one of the elephant’s side. First the sides and then the bottom. All parts have to enter the end of the slots.
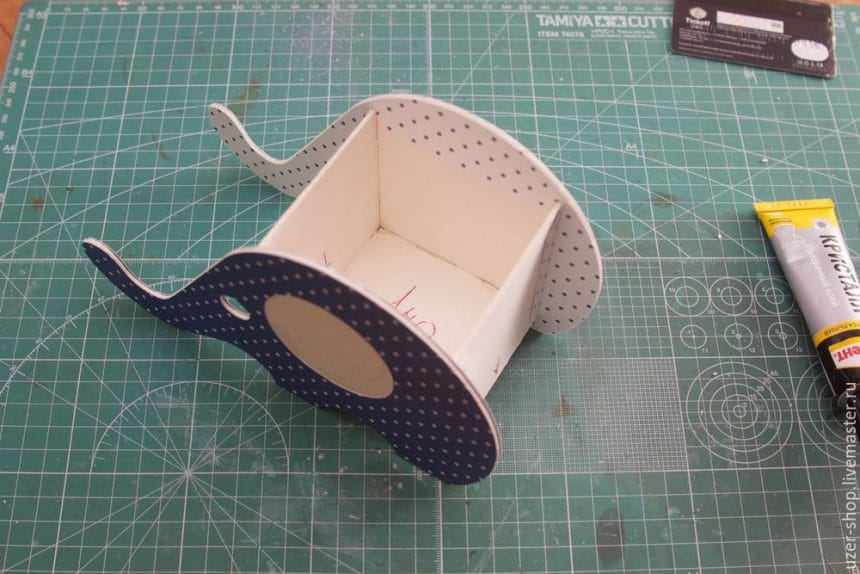
The attentive reader must have noticed the mistake. I became interested in photographing process and mixed direction sides. Later I will tell you what it will turn back to me. After we have collected this part of the box, it is desirable to quickly paste the second side of the elephant. The fact is that when the adhesive dries thoroughly, we will not be able to correct the symmetry of the sides. And this, in turn, will affect the stability of the finished stand. The slots for the connection, I specifically made with a small gap, this will allow us to align with the need of an elephant at this stage of assembly.
After a complete frame assembly elephant set on a flat surface. And make sure that all the legs and trunk rest on this surface.
If all is well, let it dry. So that will not shift anything in the further work.
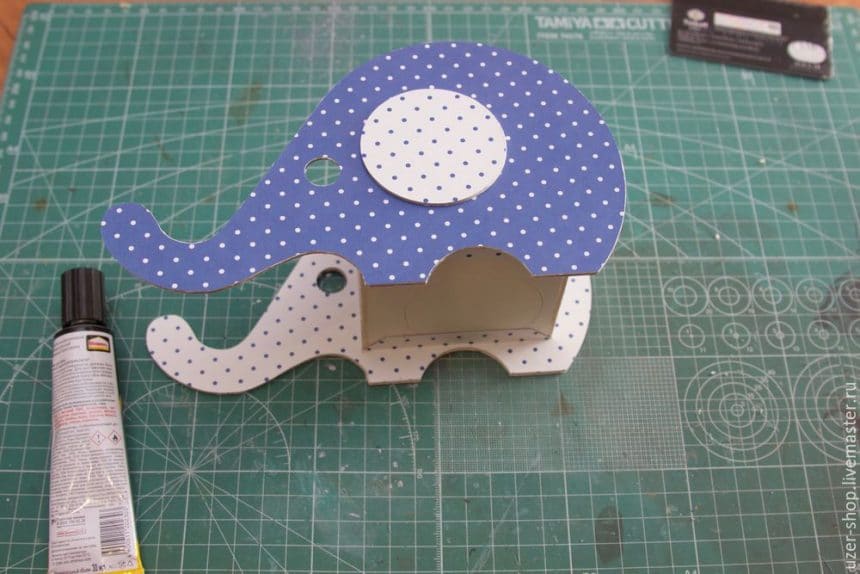
Dried up? Now you can paste the elephant ears.
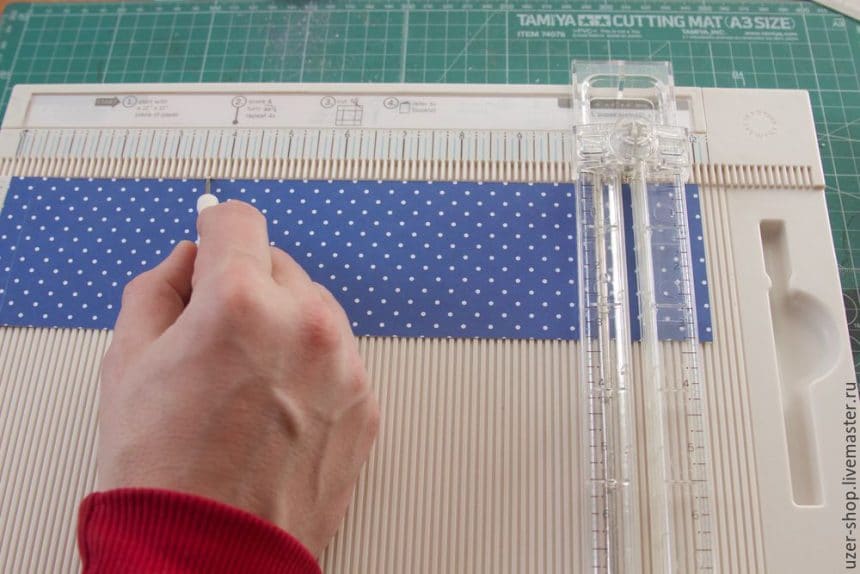
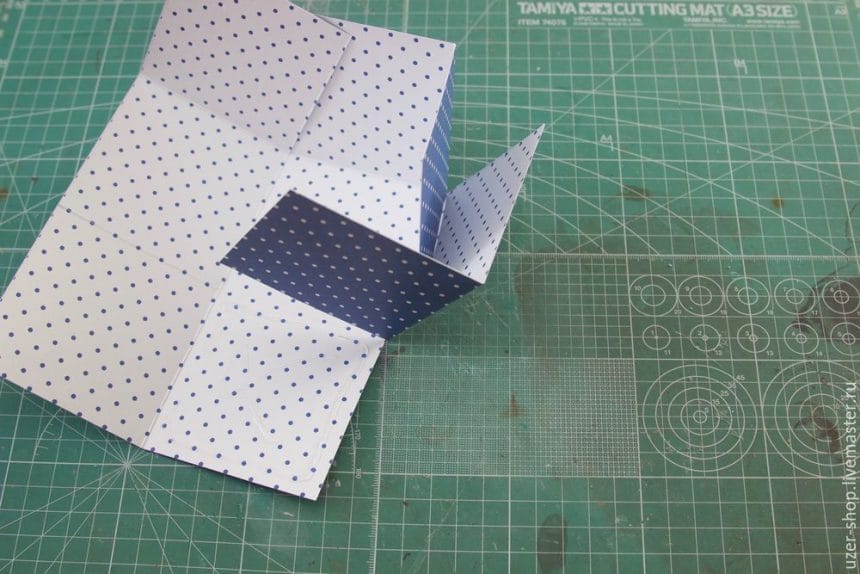
Next we will refine a box for small items. I used paper for scrapbooking 305h305 mm, left of it are two trim width of just over 3 “(about 8 cm).
I have already said before, the size of a box fitted with an inch, as we have in the presence of plaque for scoring from Martha Stewart.Dimensions in millimeters will be put in brackets, they can be rounded up to integers.
We need a long strip of exactly 3 “(76.2 mm) and long 10⅜” (263,5 mm). This will be the outer part of the box. Folds will be from any edge on ½ “(12,7 mm), 3⅝” (76,8 mm), 6¾ “(153,1 mm) and 9⅞” (229,5 mm).
Scoring can be done without the board on the mat for cutting
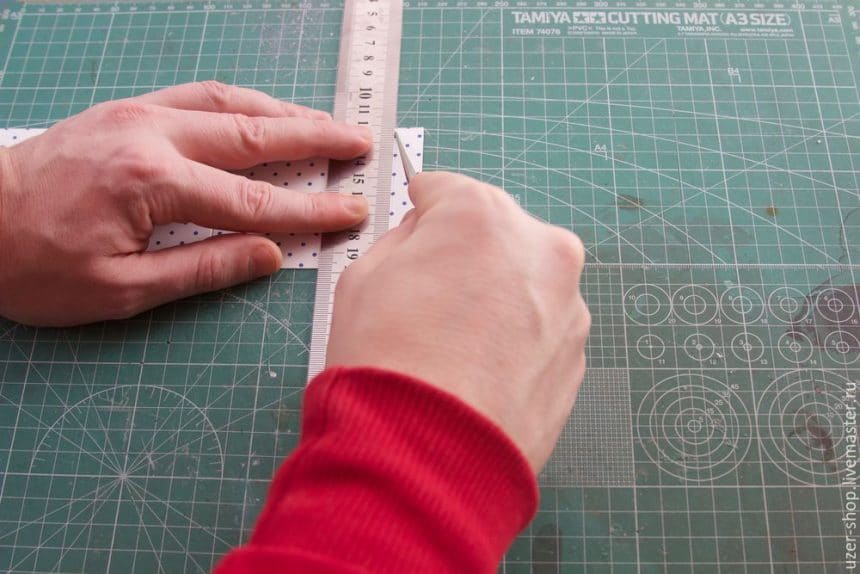
Corners need to slightly undercut, at about a 45 ° (cf.. Photo).
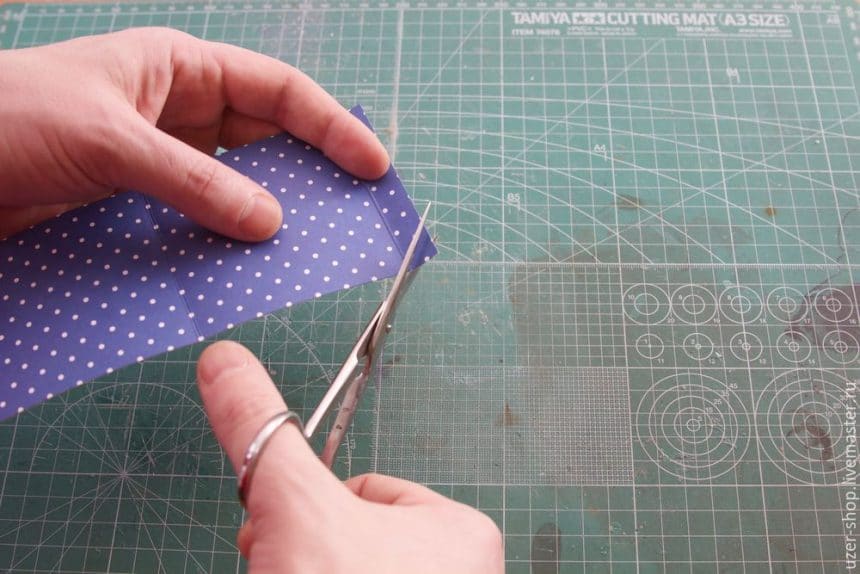
As a result, should get a band, wrap the entire outside of the box and curled inside edges … I recommend to try it before gluing. If everything is exactly the size, the band will go tight enough to not work nor any gaps. After that you can be glued.
At the edges, the corners glued strips is recommended to take a stick to creasing, or something similar, to press tightly against the edge to the frame.
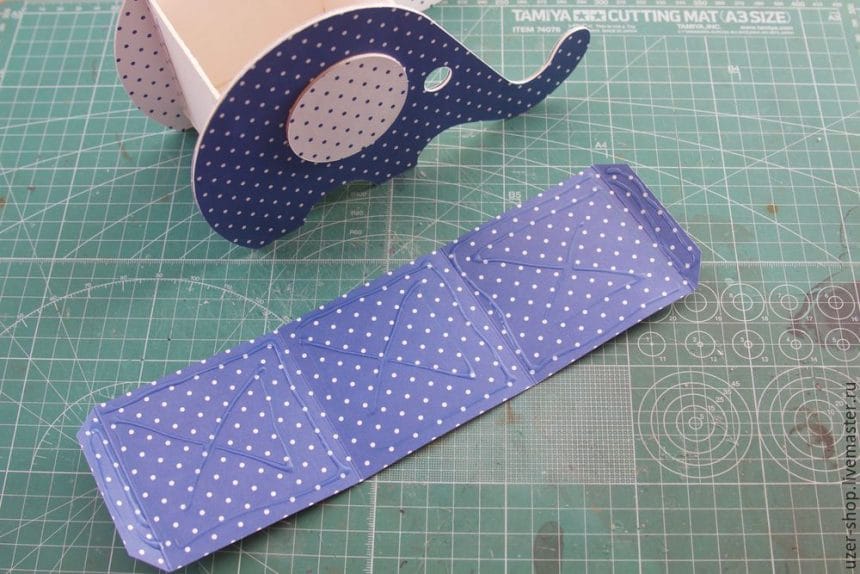
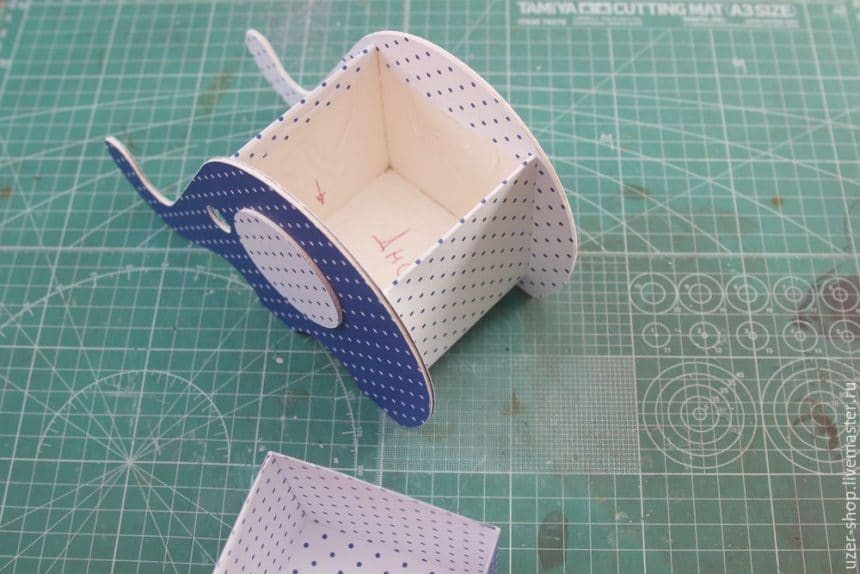
In any case, you can check the structure for alignment. If everything is in order, then put off to the side of an elephant and begin to make the inside, a decorative box. Here we need a sheet of 9 “x9” (228.6 x 228.6 mm), I will use the same sheet skrapbumagi, as well as for the whole elephant. Cut the desired size and outline the fold line at a distance of 3 “(76.2 mm).
Then we put on them and well ironed
As a result of these steps, the next work piece should get:
Now we make four incisions, like the following picture, so you can collect the box.
Assembled without glue box you need to try.
It also should include tight, but still go. After a successful fitting can be glued. As it is not extremely important, but I prefer to do all four sides equally (see. Photo).
Well and still collected a box to paste in our elephant. Glue is applied to the inside of the carcass. Otherwise, if you put glue on just glued box when installing it in place all of the adhesive remains on the outside and the risk to stain the whole elephant.
Now that’s what caused my inattention. Remember, I mixed up the direction of the sidewalls of the box? So, these walls have turned lower decorative portion and protruding edge. I had to trim it in place, and it is not very convenient and turned koryavenko. In the photo seen below, by how much.
Sam elephant is ready, you can exploit
Phew .. It seems to have coped. I hope that someone will come in handy. And if you like it, put the Huskies and subscribe. For this single respect, and a ray of goodness in your face
Step by Step Hairstyles for long hair are really helpful for girls if you’re about to attend a special event like birthday party or any other event, above all you found yourself having really short time to visit hairdresser then this article will be really helpful for you. Simply by following easy steps for your long hair, you can have really good looking and beautiful hairstyle in really short time.
Also it’s the easiest way to try different hairstyles and find out which one suits you the best and makes you look more beautiful. Our today’s article “Latest Long Hair step by step hairstyles for Girls” is having all the amazing and beautiful collection of latest hairstyles for girls of all ages. All you need to do is to follow each step closely as indicating in each hairstyle photo and get your favorite and stylish hairstyle in really short time.
You can also share this article with those girls who always love to get new hairstyles after sometime. Hope you like these step by step tutorials.
We would love to hear your thoughts in the comment section below. And be sure to like us Facebook for more ideas!
Thank you for visiting our website. Keep Creating with Art & Craft!