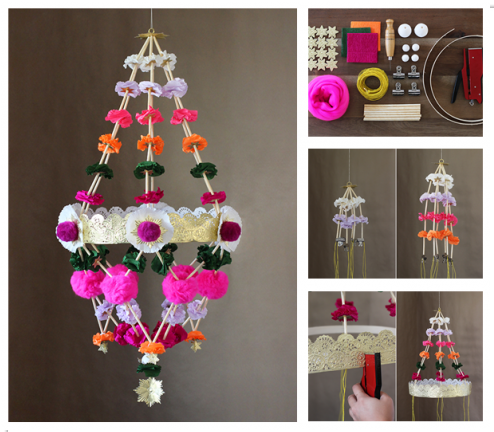
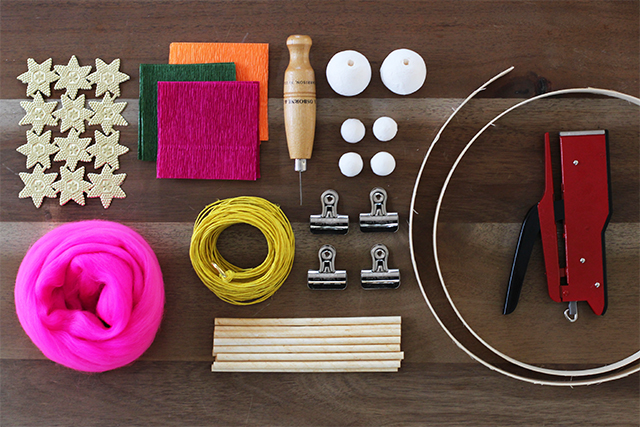
You’ll need:
- a basic pajaki kit (includes wooden hoop frame, paper straws, cotton beads, steel clips & thread with brass ring)
- assorted 180g crepe paper
- a few bundles of wool felt
- a sheet of mini Dresden rosettes
- a sheet of large Dresden medallions
- 2 strips of Dresden border
- a heavy duty stapler
- a pom pom maker
- a hot glue gun
- a large embroidery needle
- a small hole punch
- a pair of pinking shears (optional)
- scissors
 We’ll start by creating all the components that make up the pajaki. First up are the wool pom poms, which are my favorite new thing to make! Wool roving simply takes the place of yarn, and instead makes for a softer, fluffier pom pom. Depending on the size of the pom pom, you can just pull the roving apart, in pieces, and wrap it around the pom pom maker.
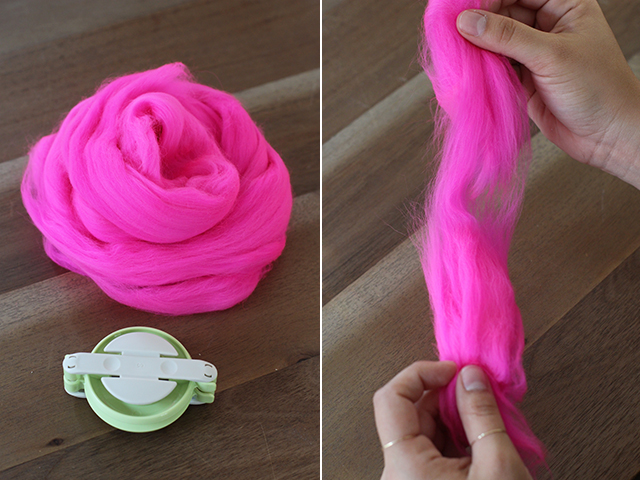 Wrap some roving around one side of the pom pom maker.
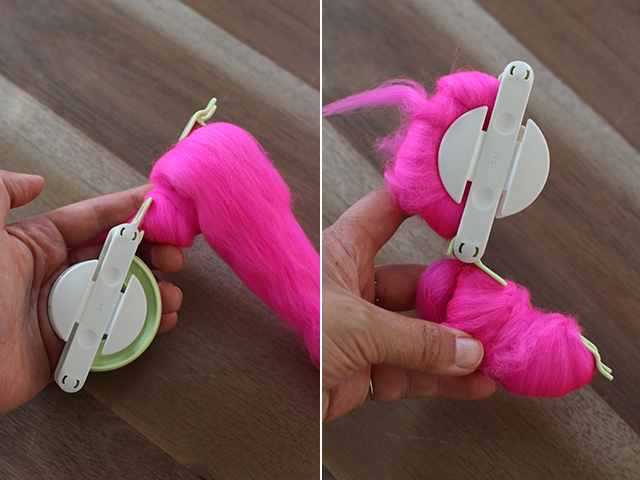 Now wrap the roving around the other side. Cut down the middle.
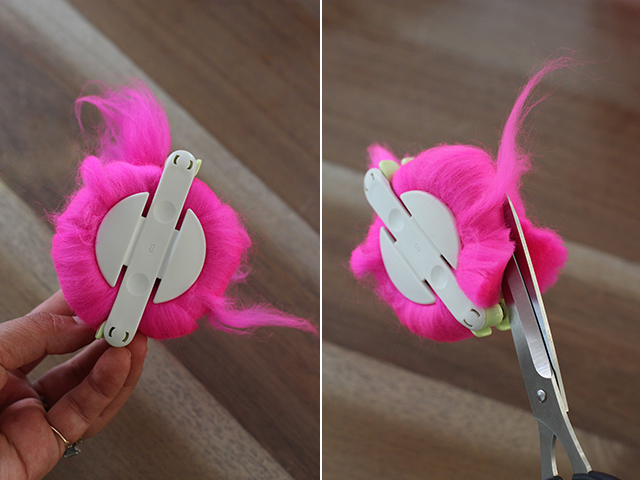 Take a piece of string and wrap it around the pom pom maker and tie in a tight double knot. Remove the pom pom maker from the pom pom.
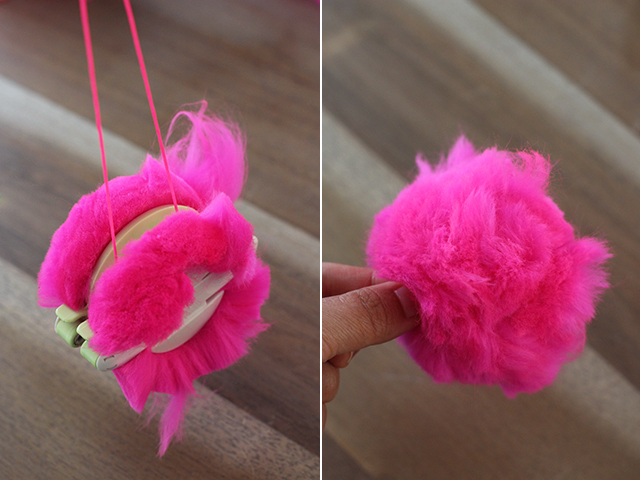 Trim and shape with a sharp pair of scissors and your pom poms are finished! You’ll need at least 6 large pom poms for the pajaki.
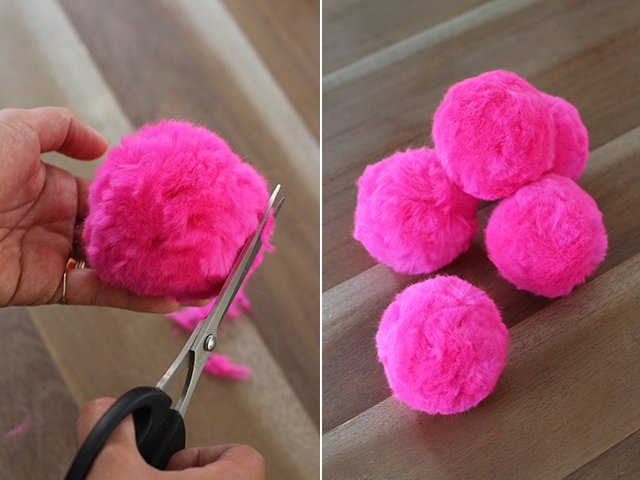 Next up are the flowers, which are made from a few sheets of crepe paper circles. Make a circle template, with a 1″ diameter. Fold a long strip of crepe paper into an accordion fold and using the template, cut the circle shape out. Use a small hole punch and punch out a hole in the middle of circles.
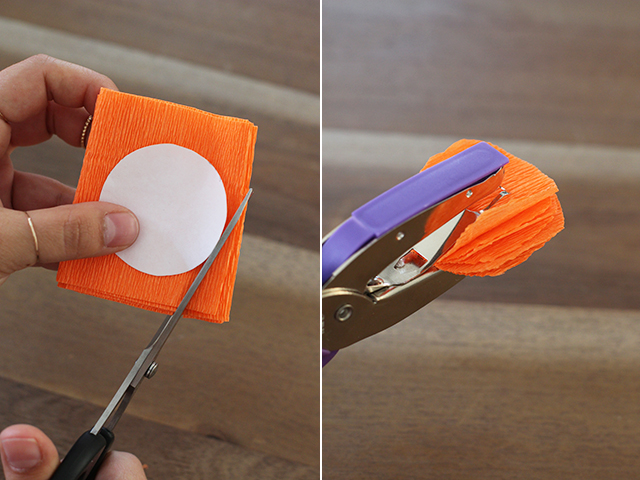 Using a forward and backward motion, stretch the crepe paper apart to create large ripples in the paper. You’ll need at least 250 circles for the pajaki.
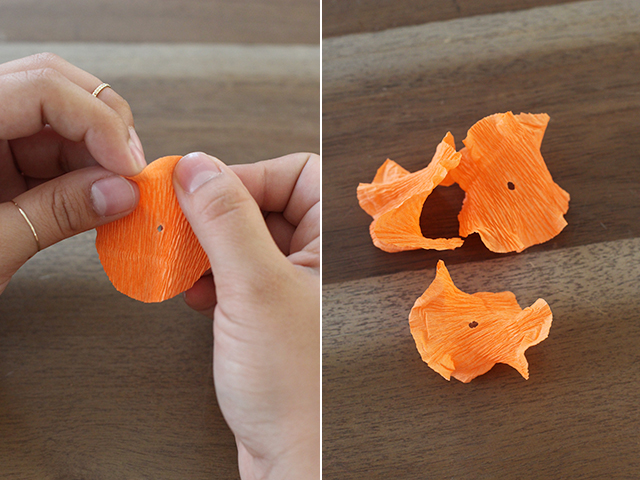 Next are the medallions, which are used on the border of the pajaki and totally optional. Cut a 5 x 1″ strip of paper, against the grain, with a pair of pinking shears. Stretch the paper to create ripples.
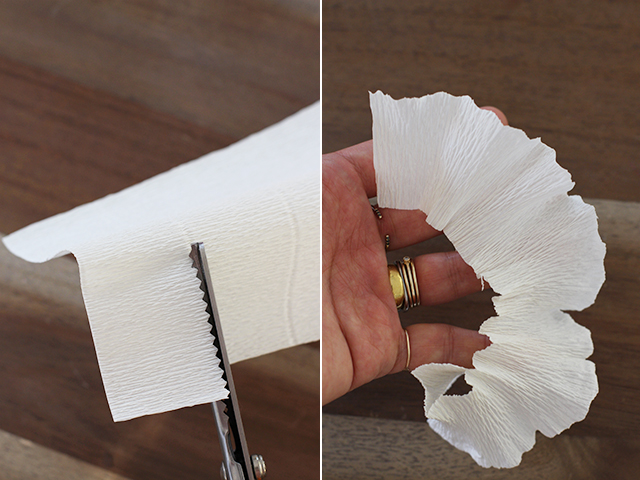 Pleat the paper and create a circle. Staple it closed along the seam and save them for later. You’ll need at least 6.
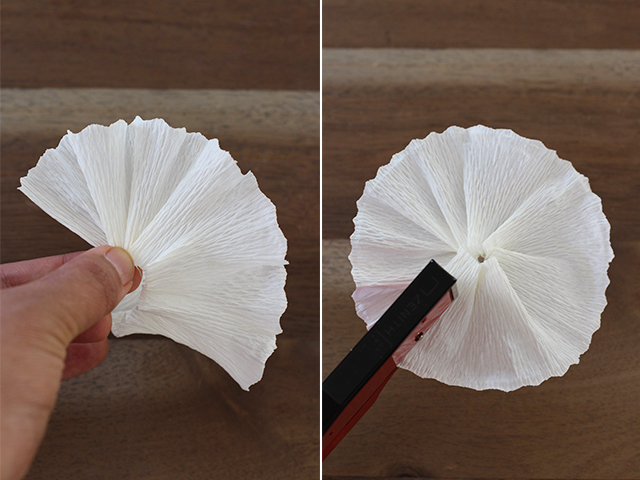 Punch holes in the middle of each mini Dresden rosette. Cut them out to prepare them for use. You’ll need approximately 40-60 pieces.
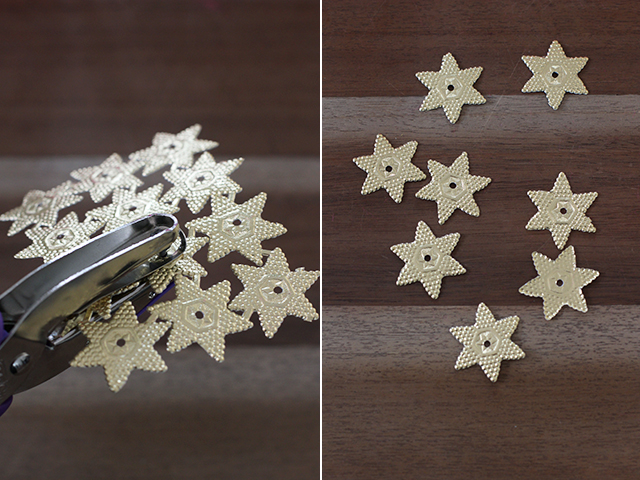 So now you should have ruffled crepe paper rounds in a variety of colors, 6 large pom poms, 6 medium pom poms, Dresden rosettes with holes punched through the middle, paper straws cut in half, 6 large crepe paper medallions and a few strips of Dresden trim.
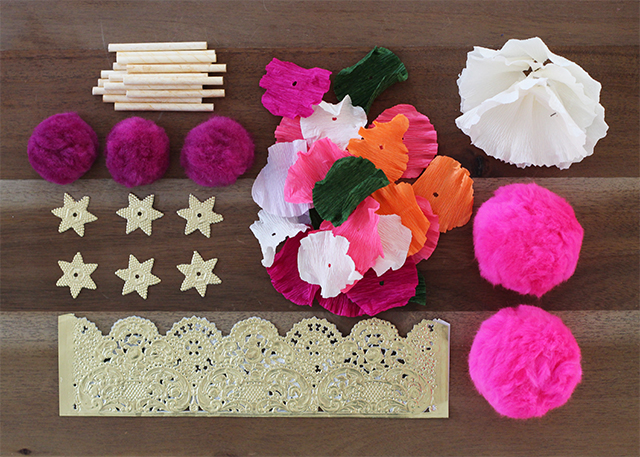 Start by hanging the hoop from the ceiling at eye height. This will make assembling the pajaki very easy. Once it’s hung, you will notice there are 12 strings hanging from it. Thread a large medallion onto all 12 strands, with the pattern facing down.
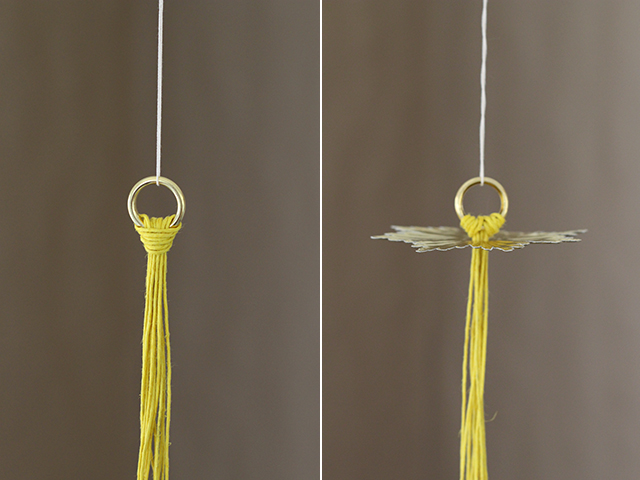 You will divide the 12 strands in to 6 sections by threading on a paper straw onto every 2 strands of string. Use the clips to hold every strand in place while you work. You should have 6 straws stemming from the top of the pajaki.
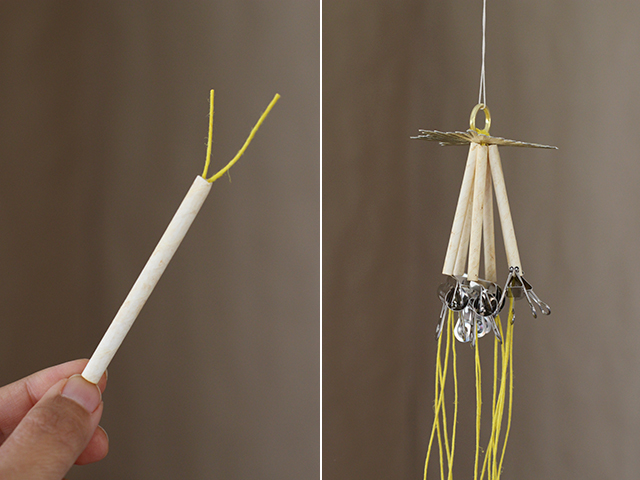 Then thread on 3 crepe paper rounds onto each of the six sections. Finish each set with a mini Dreden rosette, with the pattern facing down.
 Repeat these steps by continuing to add straws, crepe paper and rosettes.
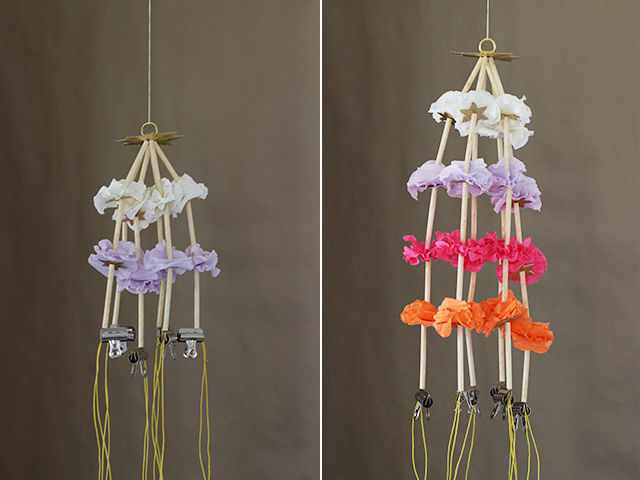 Stop after about 7-8 sections.
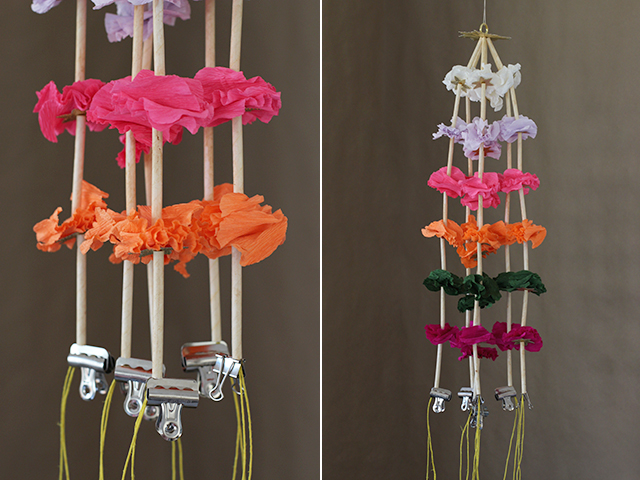 Take the wooden hoop frame and starting about an inch from one end, divide it into into 8″ sections with a hashmark. You should have approximately an inch leftover on both ends of the frame. Overlap the hoop to form a circle and so that the two hashmarks meet.
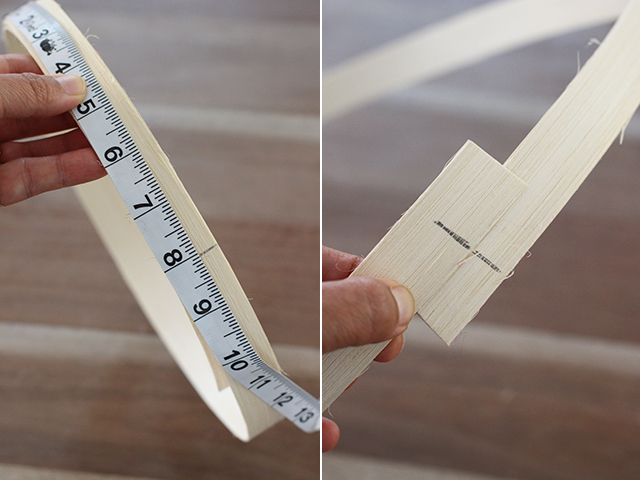 Staple it closed. Match each of the 6 double strands to the outside of the hoop, lining them up against the hashmarks.
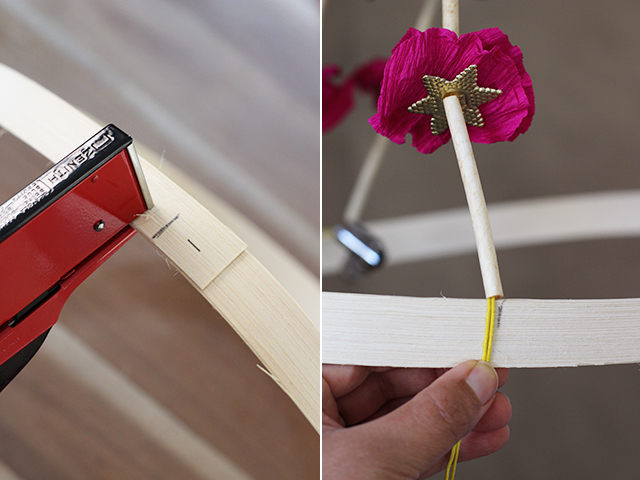 Make sure the straws and flowers are snug and tightened along the strands before stapling them to the hoop.
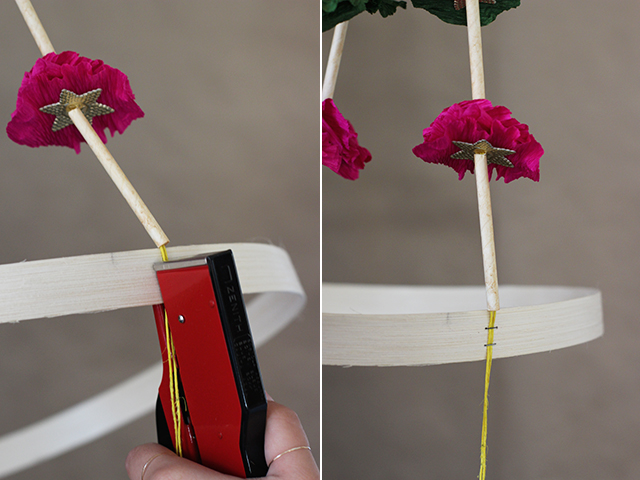 This is what you pajaki should look like thus far.
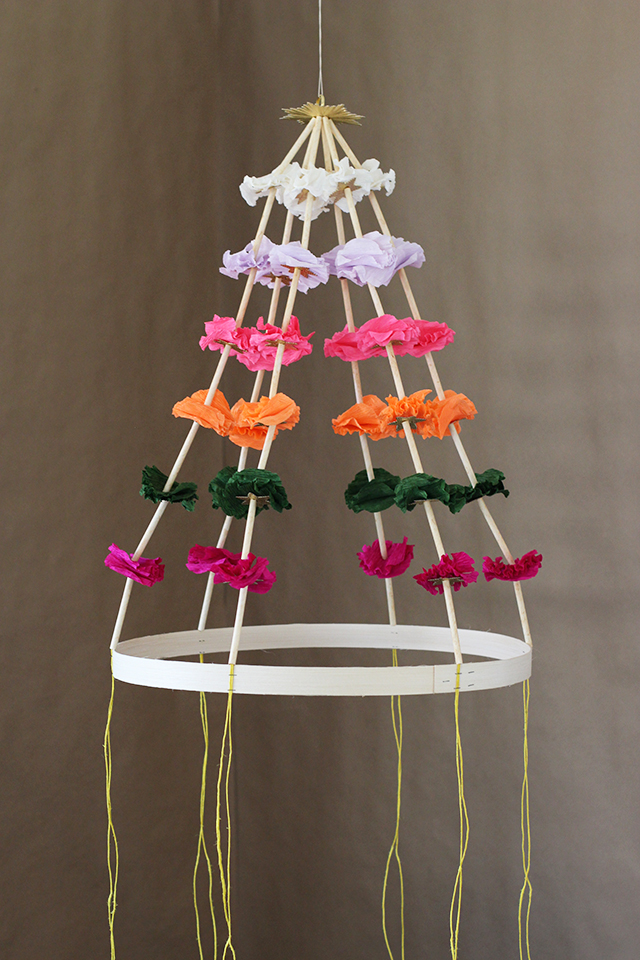 Now cover the wooden hoop by stapling on thick Dreden trim. It’s okay if the trim runs out – simply overlap them at the seam and continue stapling.
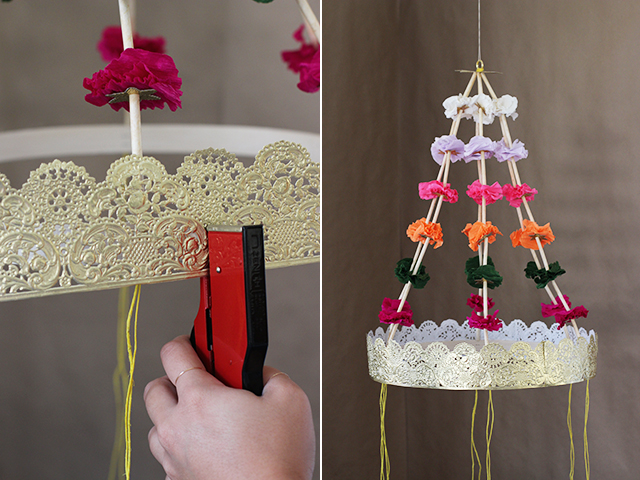 Staple on each of the crepe paper medallions to the 6 sections. Use a hot glue gun to attach the Dresdem medallion.
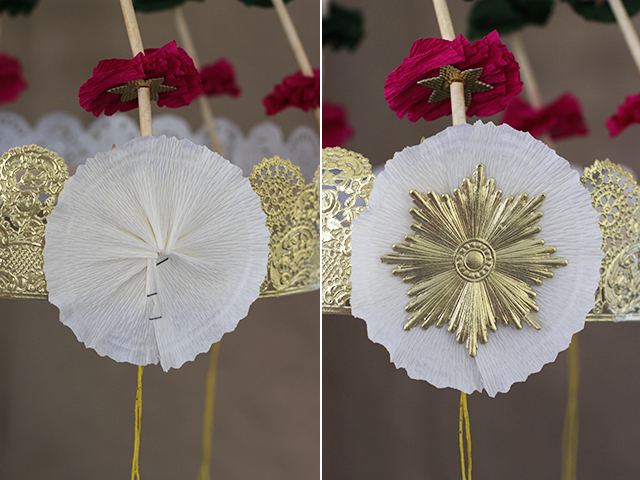 Now glue the pom pom to the center of the medallion. Again this step is totally optional and really, you can do anything to the center hoop like leaving it completely blank or omitting any of the components mentioned above.
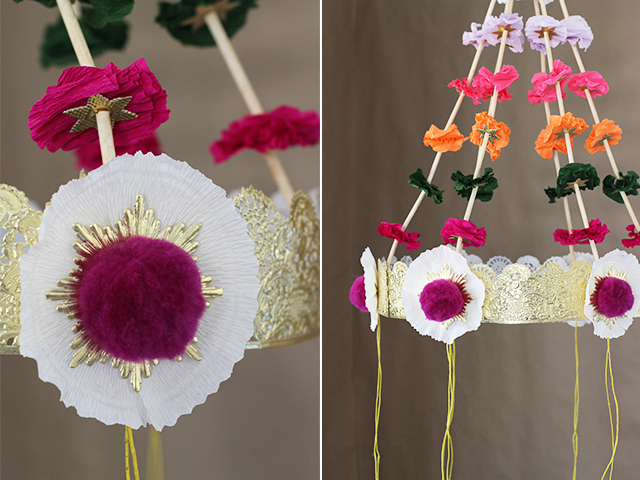 Now take each set of strings, and divide them in half with a paper straw and crepe paper flower on each strand. Bring the neighboring strands together to create a V shape.
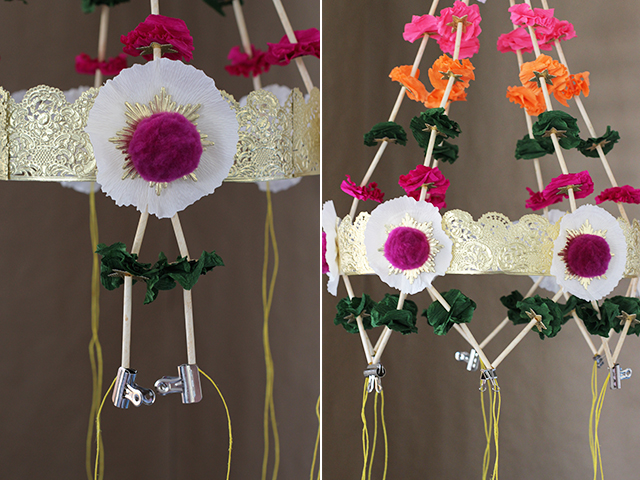 Thread each set of double strands onto a large embroidery needle. Thread the pom pom onto the needle.
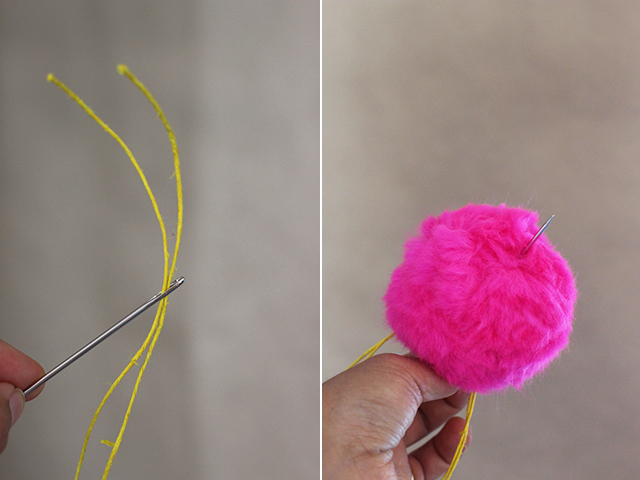 Pull the pom pom up. Again make sure all the straws are taut and evenly spaced.
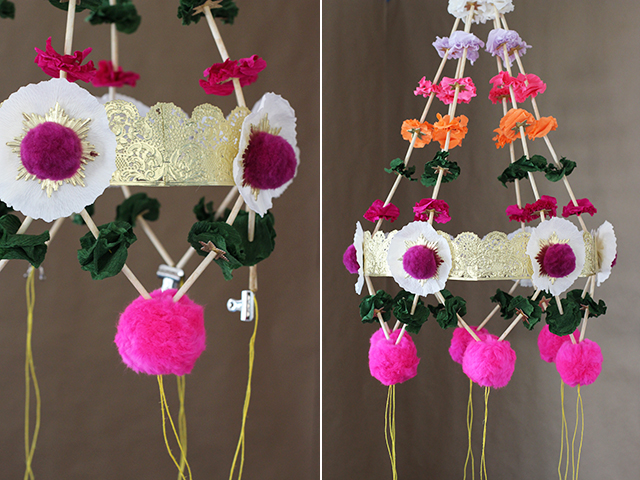 Divide each set again with paper straws, a set of crepe paper flowers and another straw, one on each strand. Put alternating colors on each set so that every other neighboring strand matches in color.
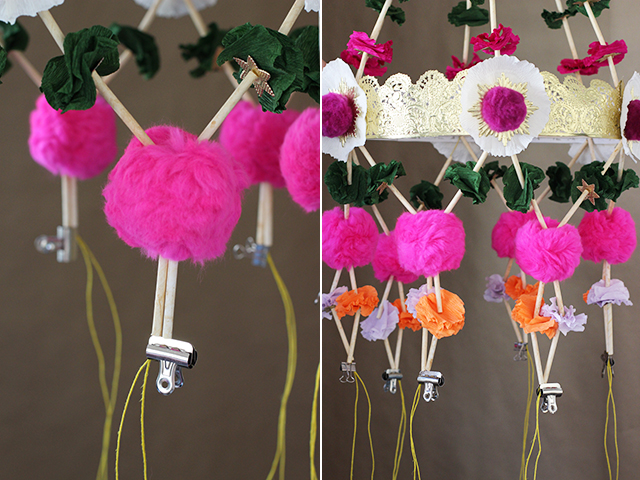 Pull the matching colors together to create a V and bring them all together in the center of the pajaki. String on a large cotton ball to keep it all in place. Adjust the tension and tie into a double knot. Finish it however you wish. I added some Dreden medallions and smaller cotton ball.
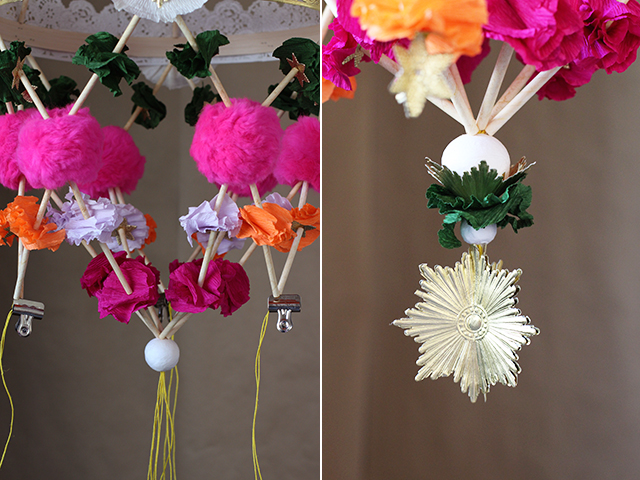 For the outside perimeter, bring the matching color strands together to create 3 Vs. Finish off each set with a small cotton ball, a crepe paper flower, a Dresden rosette and double knot. **Note that I decided to replaced 2 small straws with one large straw here. Remember, there is no real right or wrong way to do this. Play around with the pattern, formation and colors – it will all look beautiful in the end!
 Trim away the rest of the strings and your pajaki is finished!!!
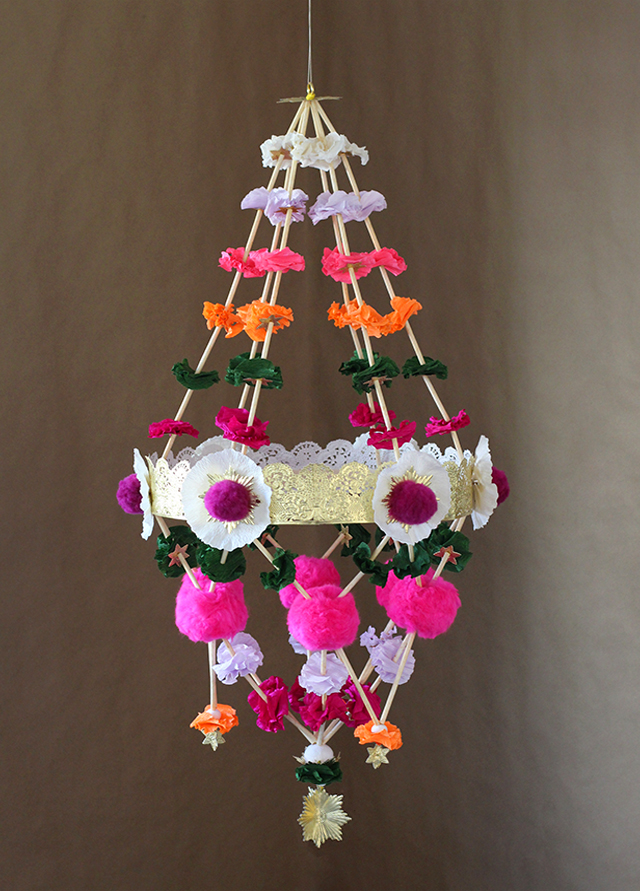 Hang it in a special corner and marvel at it from below. Have fun!!
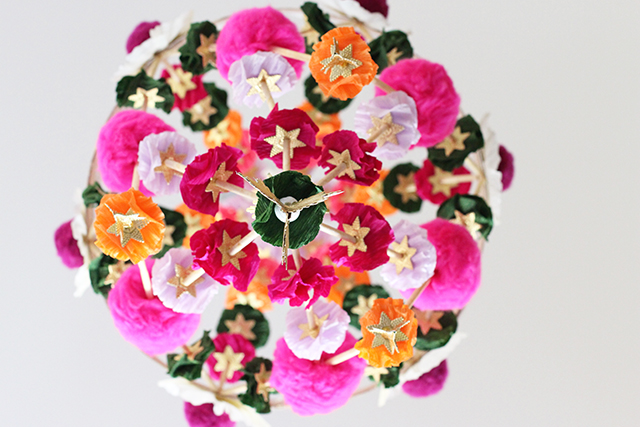 (images by HonestlyWTF)

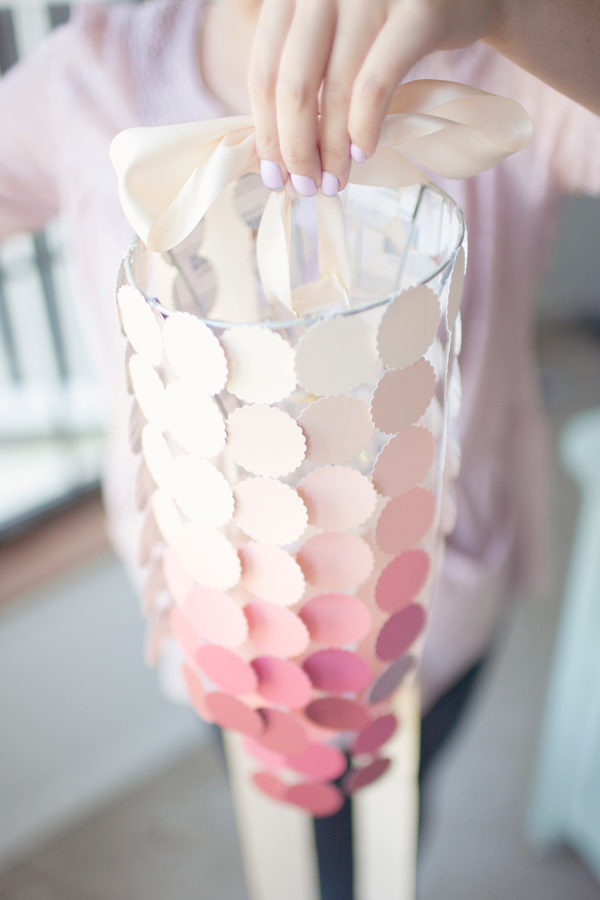
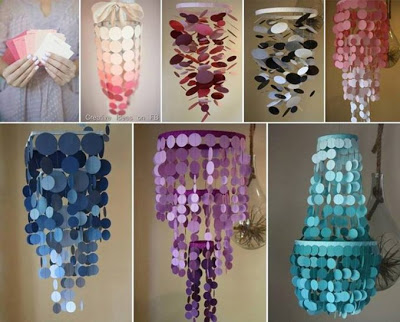
 You’ll need a whole bunch of paint swatches in your desired colours (seriously, emphasis on the whole bunch part). I picked a variety of blush, pink and red hues so I could get a fancy ombre look to my chandelier but I can only imagine how many different looks you could go for with your own chandelier. Using a scalloped paper punch you’ll need to punch about 40 -60 swatches into little medallions. Keep the medallions divided by colours in little saucers or cups like below.
 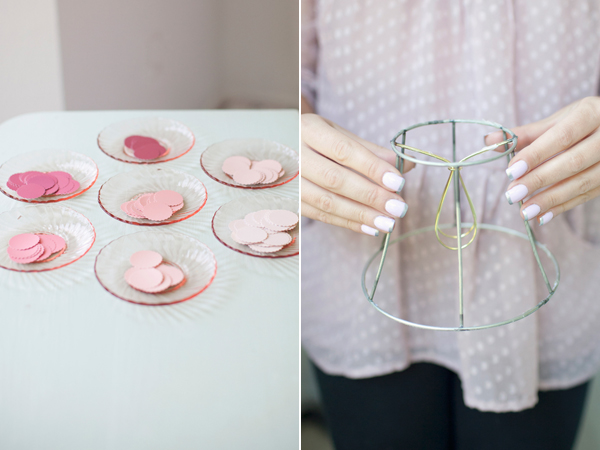 I bought my lamp shade (my chandelier base) from Lowes for about 5 bucks. Using an Exacto knife and super sharp metal scissors I carefully cut apart the fabric lamp shade, peeling away the pieces until the metal parts were as exposed as possible. When picking out a lamp shade I tried to pick out one where the bottom diameter is much smaller than the top. This will make your layers of paint swatch medallions hang better and thus look much better when the final product is done.
 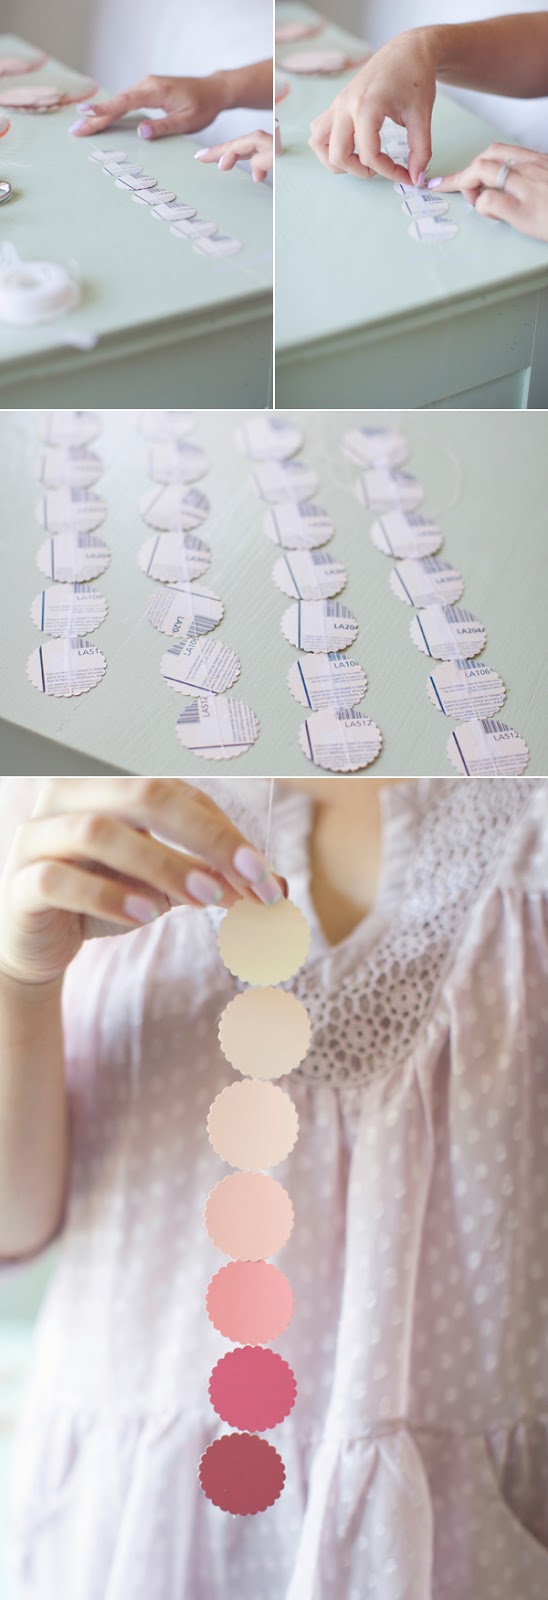 Lay out your paint medallions, coloured side down, in the desired order. Tape down a long piece of coloured thread along the middle of the backs of each medallion. Then using a piece of tape, cut down the center width wise, tape together the edges where one medallion meets the next. Without this final piece of tape, the medallions with rotate on their piece of thread, thus showing the bar codes, text and colour names usually located on the backs of the paint swatches. If that doesn’t bother you then this step isn’t necessary! Repeat this step until all of your chandelier strands are strung and taped together.
 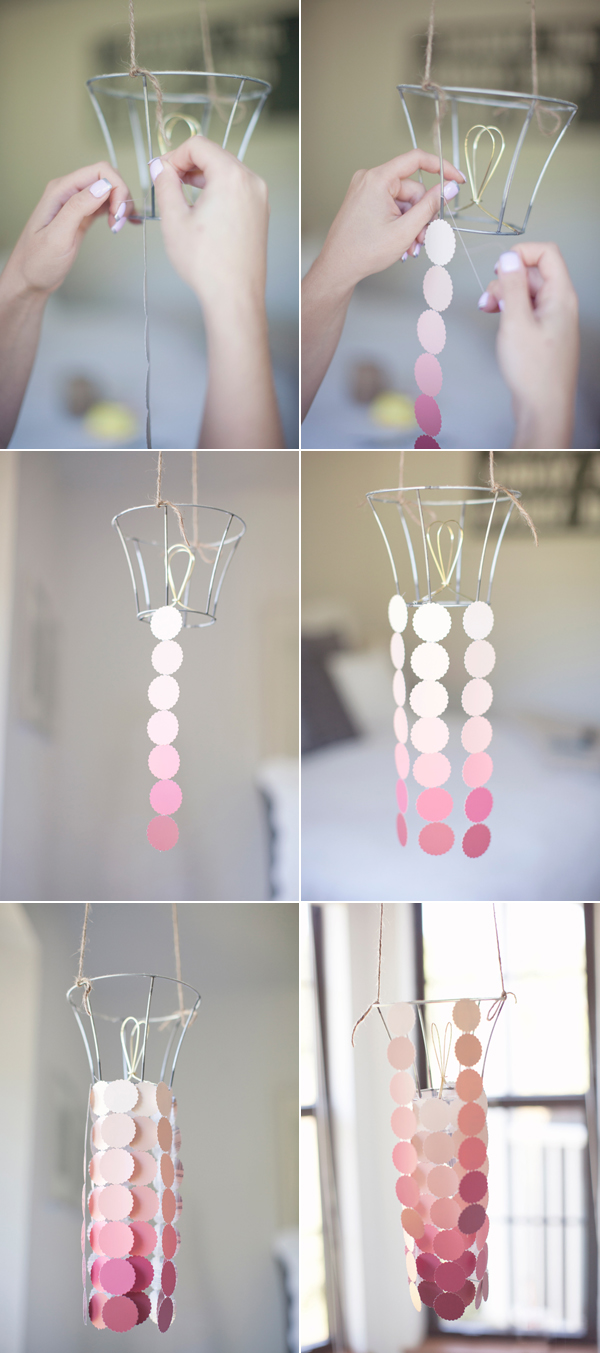 Flip your lamp shade upside down and fasten it somewhere where it can hang freely (I tied mine to the latch that opens and closes our air vent in our ceiling). Start stringing on your strands along the perimeter of the bottom of the chandelier until the entire metal base is covered. Then start stringing strands along the widest ‘top’ of your chandelier so that the lowest part of your strand hits the mid point of the bottom layer. Continue this all the way around until the entire chandelier is covered. Add a ribbon to the metal pieces (where the light bulb would pop in) and voila! You’re ready to hang this beauty!