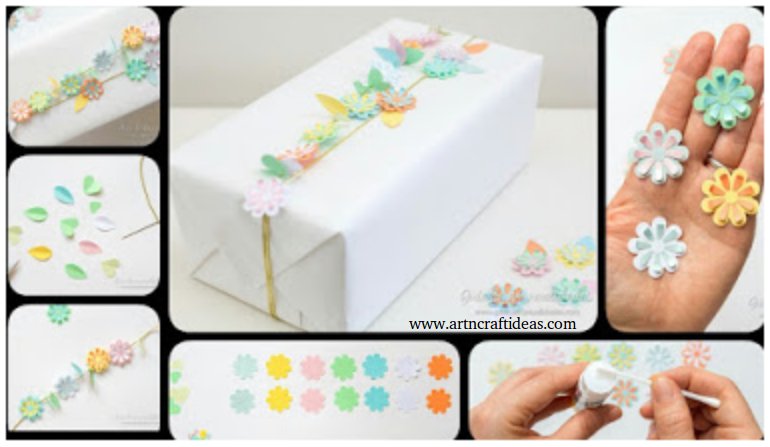
DIY Paper Craft: Paper Gift Bags/Goody Bags
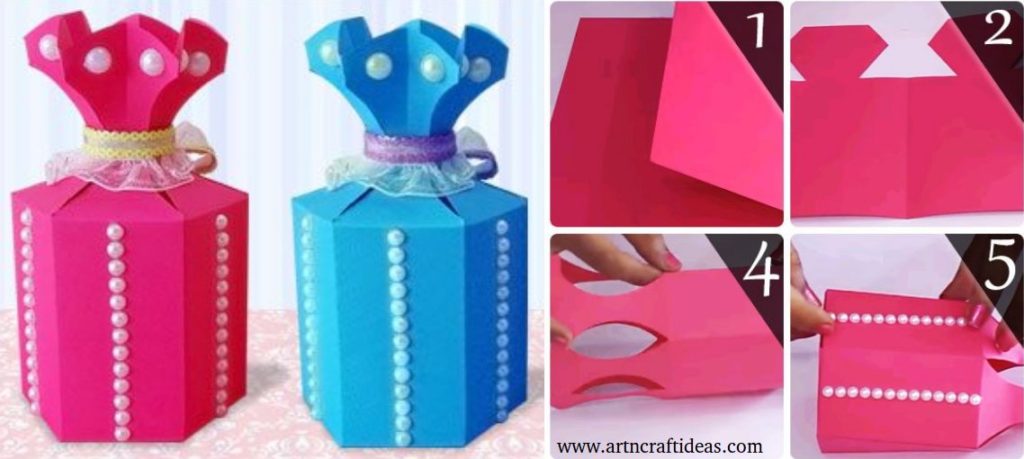
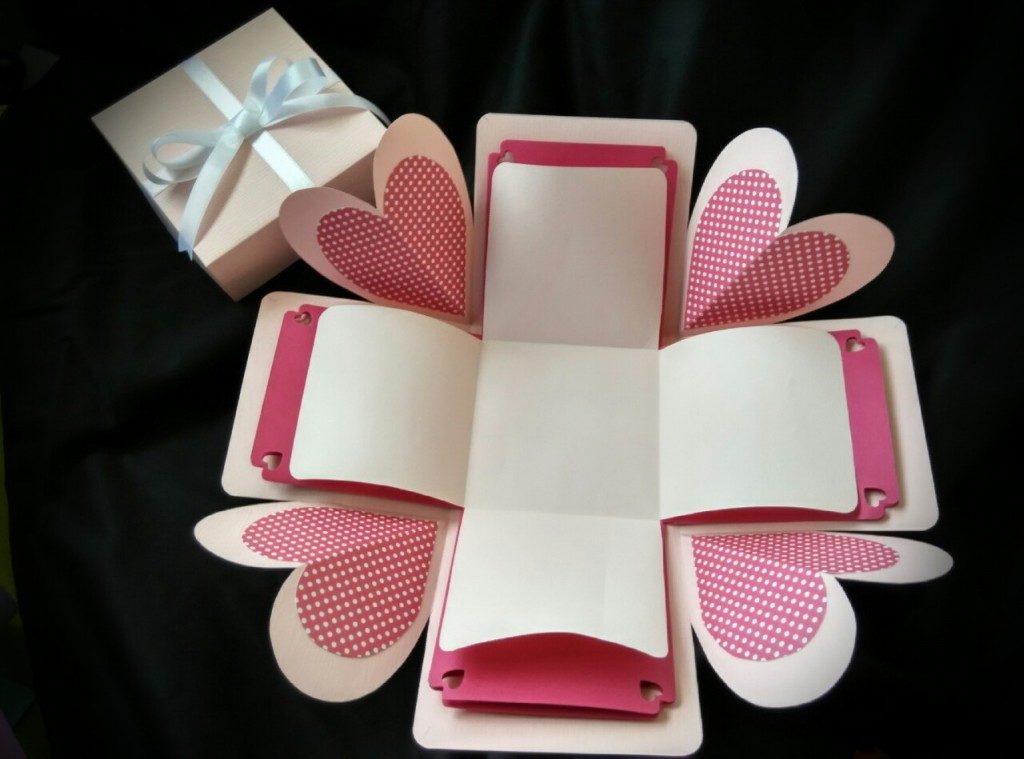
Paper gift bags are eco-friendly and hence everyone is promoting the use of paper bags. It can be a great gift box too for gifting small items in it.

However, very attractive handmade paper gift bag and box can be made at home itself. Below we shall make one such simple yet decorative gift box.

Required Material:

  • Colour sheet
  • Pencil
  • Ruler
  • Glue
  • Cutter
  • Decorative pearl laces and pearls
  • Scissors

Step by Step Procedure to Make Handmade Paper Gift Bag:

Have a look at this step by step video tutorial for making an paper gift bag.

Hope you like this cute paper gift bags tutorial.

Source: stylenrich

We would love to hear your thoughts in the comment section below. And be sure to like us Facebook for more ideas!

Thank you for visiting our website. Keep Creating with Art & Craft!

How to make a gift basket

I am sharing here an idea for dog lovers. A basket for keeping foods of dogs. Let’s start..

Required Material:

  • Mini dowels
  • Glue (white glue and hot glue)
  • Wooden beads
  • Twine
  • Sisal rope
  • Yarn
  • MDF
  • Door pulls (upcycled preferable)
  • Charm (optional)
  • Permanent marker – black
  • Black acrylic paint

Draw Your Image and Cut Base:

I started by drawing out the bone shape on paper. By folding the paper in half and only drawing out half the bone, you’ll get a more even shape once it’s cut out. I taped the paper pattern to a scrap piece of MDF and my husband cut around it with a jigsaw. He rounded the top edges perimeter with sandpaper to smooth the sharp edges and then painted it white. I marked the holes at 1/2″ increments about ½” in from the edge. My husband drilled out the holes with a drill press so I could insert wooden dowels into the holes. Using a drill press is a real time saver and each hole can be drilled to the same depth for consistency. The dowels act as the ‘ribs’ of the basket to support the weaving.

Glue Dowels:

I dabbed one end of each dowel into a bit of glue before inserting them into the holes.

Let Dry:

Once all the dowels were glued, I let it dry 24 hours. Then it’s time to start weaving!

Coordinate Colors:

Our friend’s new pup is tan and black, so I thought I’d match up the colour of the basket by combining the dollar store twine with some black yarn I had leftover from a knitting project.

Start at One End:

Tie a knot and attach the combined twine and yarn to the middle dowel at one end of the bone.

Start to Weave:

Begin weaving in and out around the entire shape.

Odd or Even: Determine If You Need to Change Direction:

When I got back to where I started, I continued in the same direction. Note that if you have an odd number of dowels, you’ll be able to keep going around and around. However, if you end up with an even amount of dowels, you’ll have to double back and turn around when you reach where you started. Have a look at the picture showing another basket that I made previously to see how to ‘double back’. You can see that towards the top, I looped around both dowels just to stabilize and hold the corner together.

Add a Decorative Element:

Our friend named the new pup Dot, so I added a charm with the letter ‘D’ to the front of the basket. At the exact centre of the basket, I opened up the link of the charm using two needle nose pliers and then squeezed it closed again around the twine and continued weaving.

Finish the Top Edge:

When you’re about an inch from the top of the dowels and you’re back to where you started, bring the end of the twine to the inside of the basket, but don’t cut it off. To finish off the top and create a nice edging, use a thicker piece of rope: fold it in half and loop it around the same dowel.

Add Thicker Rope:

Crisscross the rope around the dowels all the way around the perimeter of the bone until you’re back at the beginning again.

End the Edging:

To end the edging, bring both pieces of rope to the inside of the basket. You’ll use the end of the twine to wrap around the rope and finish it off.

Wrap Twine Around Rope:

Wrap the twine around the rope ends in a figure eight until it’s the length of the inside wall of the basket.

Glue Down to Inside of Basket:

Knot the twine and add some hot glue to secure the end to the back of the rope where it won’t be seen. Cut the end of the twine and the rope, then use hot glue to secure the rope to the inside of the basket so it blends in seamlessly. You can glue down the edge of the rope as well as putting a dollop on the base of the basket to keep the ends from lifting.

Top Dowels With Beads:

To finish off the top of the dowels, I blackened the ends with black marker then glued on some wooden beads.

The holes in the dollar store beads tend to be very inconsistent so I used my thin needle nose pliers to ream out the holes, making sure they would fit onto each dowel before I glued them in place. If you want to be picky about it, you can use a tiny wire brush to clear any debris from the holes before gluing on the beads. I added a dab of hot glue to the underside of a bead and then threaded it onto the dowel, continuing around until all the dowels were capped.

Add Grab Handles to Lift It:

In the planter basket I showed you above, I incorporated rope handles into that one so it could be lifted. Since this basket is much larger and heavier, I decided to repurpose some door pulls instead. They were originally saved from our old cabinets.

Upcycle Some Old Door Pulls:

The yellow oak with gold metal wasn’t going to work with my colour scheme, so I painted the handles to coordinate with the charm (I painted the oak black, then silver leafed and distressed the metal with more black). My husband gave them a quick spray coat of varnish in the garage, which we let dry, before I mounted them onto the basket.

Position Handles and Attach:

Measure to get both handles evenly positioned on each side the basket, ensuring you don’t cover up the charm on the front! You can insert toothpicks where you want the screws placed. I used some washers on the inside of the basket before feeding the screws through the weave of the basket. Use the toothpicks or thin needle nosed pliers to guide the screws through the weave and position the handles on each side. You’ll need a short screwdriver to attach the screws to the handles as the width is pretty narrow in the centre.

Finesse:

As a last step, shave off some of the longer sisal strands with scissors to neaten it up.

Fill With Dog Treats; Don’t Forget the Tick Collar:

The basket is now done and ready to fill with dog treats – and of course a flea and tick collar to protect the pup and keep her safe!

Give As a Gift or Keep for Yourself As a Dog Toy Organizer.

courtesy: Birdz of a Feather

Father’s day gifts: Military Diorama (Tutorial)

For the basis of our awesome fathers day gift we took a set of figurines of soldiers, and the rest is DIY. In the work used all that came to hand. It is the substrate for the laminate, picture frame, foil from a tube of mustard, a failed gypsum fill, and something else.

Under the cut are some photos of the intermediate stages and the result itself.

PS Criticism, advice, questions are welcome.

Actually the very basis for future dioramas. The wall material is the laminate substrate.

There already are lined walls, the plaster is applied and scattered debris. To «land» was not as flat, crumbled plaster. And secure it with the white glue (liquid PVA). For the base color used Tamiya paints. It also plays the role of a primer. The walls are already painted in their colors, but without the effects. Self-made barrel appears in the frame)))

Slightly aged wall, dented and painted barrel, added dust.

Then the final photos of our awesome fathers day gift from different angles.

courtesy: DIY is FUN

DIY Simple Flower Garland Gift Wrapping Tutorial

I love paper flowers gift wrapping and creations that we can do with them. That is why today I propose to make this colorful and delicate wreath of paper flowers to decorate and present our gifts. A lovely touch with us luciremos each time. And we can also use them to other kind of decorations. Armen a nice palette that already started with this idea?

We need:

  • Papers of different colors.
  • Stamping forms: flowers, hearts (optional).
  • Glue stick.
  • Hot glue gun.
  • Cutter.
  • Thick needle.
  • Fine gold or silver cord.
  • Scissors.
  • Or filigree quilling tool (optional).
  • Tweezers (optional).

For this idea you can combine the colors you like them according to the occasion. I preferred to use all pastel shades and build a harmonious combination with them.

As you can see, based on this idea are simple shapes such as flowers, leaves and some hearts. And to them I took some of the stamping of paper I have. Two forms of hearts and a special brand Ek Tools I love a big punch two flowers, leaf and flower center. But if you do not have this kind of die cutting, do not worry! They can make their own patterns with some paper or thin cardboard and achieve the same result.

The first thing to do is cut so many flowers, leaves and hearts in all colors you want to combine … a beautiful palette of colors!

Parted ways all groups, and seek the glue stick. A small clamp is ideal for this work, but if they have not matter.

Introducing the flower base in all its colors and combinations comnezamos arm … is the most beautiful part! Playing with colors:)

I give a humble tip for when working with paper and small figures. They can use a cotton swab to put the glue stick. You can also find these lines at small bars with special tips.

Once we set up all the flowers and their including centers, we give them a hint of movement. If you have a quilling tool or watermark (with which we wind paper) can use it to this step. If you do not have to seek a brush or similar with a small tip and roll up her tips of the petals of flowers.

See how nice stay! It’s a nice touch.

We seek now the leaves and hearts, we make a small cut in the cross cutter and bend a little. We spent the golden cord by the needle and prepare for starting assembly of the wreath.

We spent all leaves and hearts that we will combine with flowers.

And with the hot glue gun or liquid silicone paste flowers we started on putting together a nice string garland.

Here you can see how it looks on a gift package. It is a lovely touch not take long and it looks beautiful!

I hope you like and what they can do! ?

Courtesy: guiademanualidades

Easy Paper Quilling Photo Frame (Tutorial)

It requires the following ingredients:

  • A dense paper for background (at least 300g / m2)
  • Less dense paper for flowers (from 120 to 160 g / m2 – denser not desirable, tk strip of this size will not curl and smoothly obedient) two colors. In my case it is white, that will stand out, and a gentle shade of the background color, which will allow the flowers to our successfully combined with the main color and helps highlight the details.
  • Paper knife and steel ruler to cut strip. Use scissors to cut a tedious affair
  • PVA glue
  • A toothpick or other curler rolls

Cut into strips 30 cm long and 5 mm wide, the number pretends leaning on conceived plot. There are many clever ways to quickly cut, for example, cut a few layers of paper at a time, but this density (120 to 160), it is quite difficult. so long to not split hairs, I bonded with paper flowers tetrad piece of a cell and, Whack-Whack-Whack by moving the line of cells…

But first, make a frame, and best of all – for later.

We mark up our most dense leaf. It is recommended to prepare a detailed shemku on paper, not to cut too much, take into account all the dimensions. I look forward to photos 13×18, based on these dimensions, select the width of the box, my left and from the bottom a little bit wider. Zakrnchiv layout, cut out window for the picture, which should be slightly smaller than the photo

Now for the “pocket” into which the picture will be inserted. Photographic paper is very thick and has a substantial thickness, so that the frame is not deformed when it put them in the photo, we give the pocket a little bit width)) is glued to the back of the narrow strip of heavy paper, and now you can stick and “pocket” itself, which will not allow our shot to drop out of the frame.

Basis is ready.

We turn to the flowers. As you probably already know, the Demi demisoffice.com.ua/news/news_around_the_world/104 have a whole bunch of examples and lessons, which explores in detail and scale of the basic quilling techniques.
So, for the manufacture of the petal we need a paper strip, which by means of a split toothpick (or more noble instrument) is rolled into a tight roll of. A roll in turn unwound to a certain diameter, and then the end of the strip is fixed with white glue rolls and formed into the desired shape with the fingers. my hands to avoid dark spots then hurt at work. Particularly easy to get dirty cuts strips for the white paper is a disaster, it is easy to give very poor appearance.

For the manufacture of identical petals useful template to unwind rolls up to a diameter. Here is my first flower

Mnoe still really like the flowers of this form

and leaves, of course

In general, we turn your heart’s content, do not forget to create a variety of flora dimensions))
when the basic elements are ready, dispose of on the frame and prileivaem.
This is not the final version, but the meaning is, I think, is clear.

Now add the details and Circuits, until the composition does not seem quite complete

one last step – attach the back of the podstvku stability.

frame ready

Thank you for attention. I hope you will come in handy malenkty my lesson. I’d be happy reviews!

How to Make an Basic Explosion Gift Box
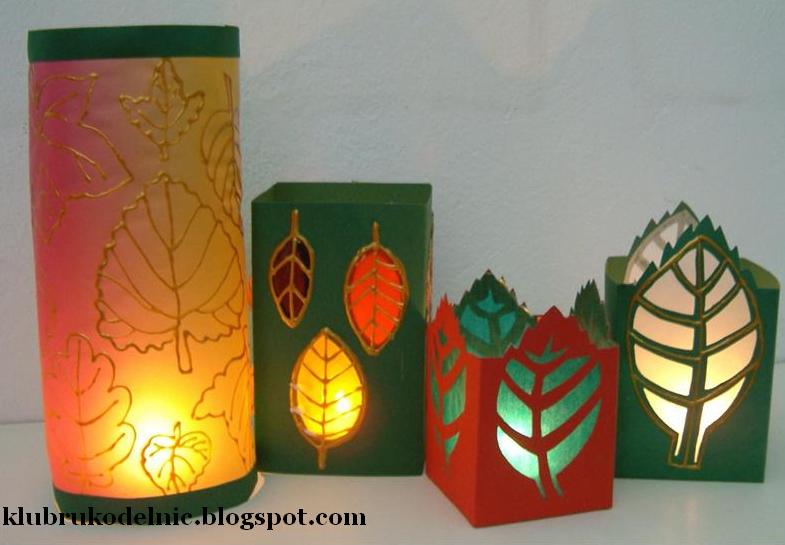
Basic Explosion Gift Box: Today, to share the basic gift box production process, need to prepare the material is very simple, but as long as coupled with your creativity, you can make a new full of full, unique gift box!

Required Material:

● ruler, crimping pen
● scissors, utility knife, cutting pad
● double-sided adhesive, round
● A sheet of 39 * 39CM paper is made as an outer layer
( the paper on the outer layer is as thick as possible).
• A sheet of 23.5 * 23.5CM is made of a sheet of paper
• A sheet of 36 * 36CM is made of medium
● A 33 * 33CM paper is made of inner layer
● Decorated pattern paper and ribbon

Step1.
Take the first 39 * 39CM paper to do the outer layer, each side is divided into three sections 13CM painted Jiugongge, four corners of the square to draw a line. Step2.
Take a 13 * 13CM paper on the folding cut a love as a model, in the four corners on the mark, the extra part of the cut off, folded in accordance with the fold line, coupled with the decorative love, the outer layer to do The. Step3.
Part of the cover to remove the 23.5 * 23.5CM paper, the inside of the 5 cm draw line, the figure will be removed part of the slash, in accordance with the polyline will be four sides stick together, the lid is completed.
Step4.
Then we have to do the middle part of the pocket, according to the size of the figure to draw a broken line, a good direction to cut four knives, after folding with double-sided adhesive bonding; bonding will find two grid side will grow a little, so the long sides of the cut, the middle also completed!
(you can also use the shape of a puncher for decoration)
Step 5.
Remove the 33 * 33CM paper, draw a pencil to draw each section of the 11CM Jiugongge, the four sides of the square to remove, and then chamfer chamfer; Finally, all the parts combination, and then tied to the ribbon, the basic The gift box is finished!
Source

DIY: Lanterns with autumn leaves create
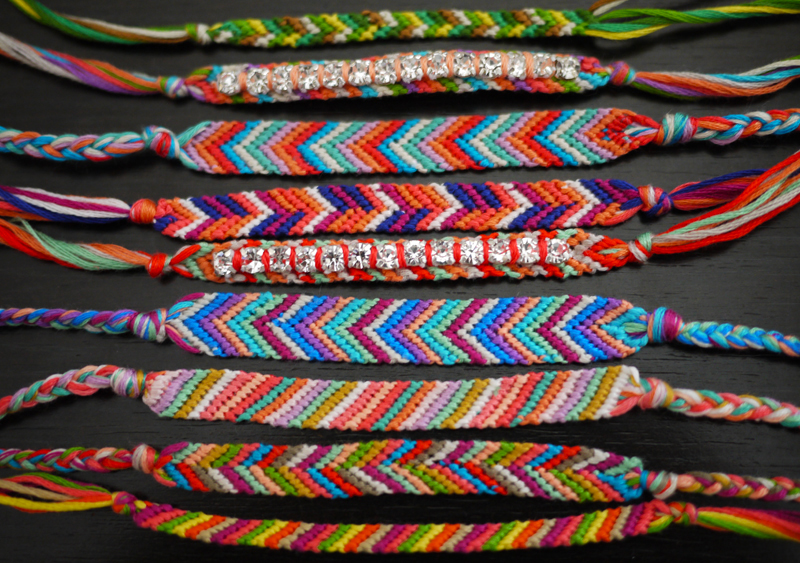
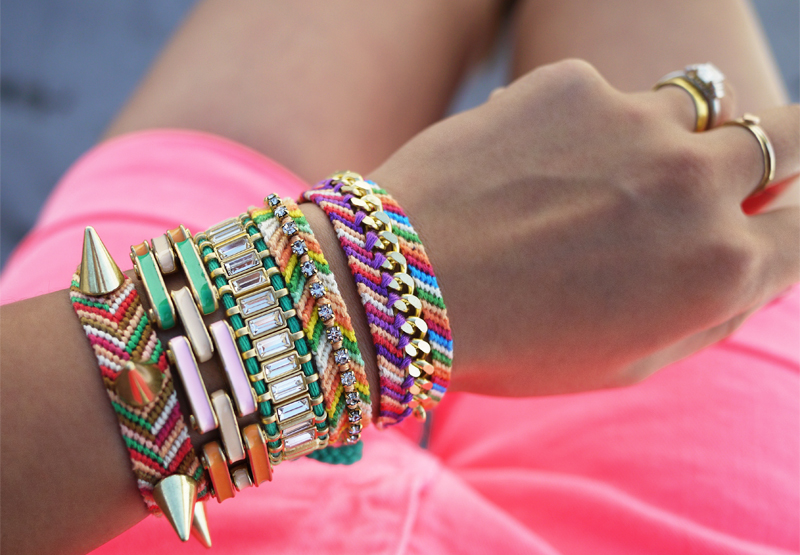
Lanterns with autumn leaves create a magic atmosphere not only in the evening. Call your children or grandchildren to get along with them made you. Made lanterns with your own hands you will later recall the time spent together whenever light a candle.

To work you will need:

– Color paper
– Green cardboard
– Transparent yellow paper
– pencil
– scissors
– glue
– Jars
– Leaves of different trees, which will meet for a walk

1. For the manufacture of simple ordinary flashlights need glass jars of different shapes and sizes, which should be well washed and dried. On coloured paper pattern or with the help of this tree leaf draw sheet form in two sizes.

Cut out them. Cut the leaves pasted on the bank. Another flashlight is made from a sheet of solid cardboard the size of 12h41 cm. Pencil-lane divided into four rectangles the size of 12×10 cm, one will see at the end of a seam for bonding the candlestick. On one rectangle draw sheet (sheet a pattern of living). We cut it so as you can see in the photo – a sheet skeleton consisting of veins. When the sheet is cut, smear “skeleton” of glue … and seal the entire rectangle yellow transparent paper on the inside. On the sheet of paper, draw coloured transparent outlines various contact collected leaves and draw them gold or silver paint. On the upper and lower edge of the solid stick the strips of coloured cardboard. When the paint is dry, glue the sheet into a cylinder. It will turn the flashlight, which can be inserted with a candle jar. Very nice these lanterns look at the window from the street, set between the panes.Source

DIY Beautiful Friendship Bracelet

Friendship bracelets are a great craft that you can take anywhere! They’re especially nice for people who have failed repeatedly at learning to knit and crochet. And as a bonus, I feel like learning how to make a friendship bracelet. And embellish your DIY friendship bracelets.

You’ll need:

  • embroidery thread
  • a safety pin or tape
  • a pair of scissors

Start by cutting several strands of embroidery thread at about 24 inches each. Make sure there are two sets of each color. Combine the threads and tie a knot, leaving at least 3 inches of slack. Tape it to a flat surface or safety pin it to a pillow. Separate the two sets, arranging the strands in a mirror-image pattern with the outside strands the same color and so on moving inwards. Start on the left side with the outermost color (shown here in red) and make a forward knot by creating a 4-shape over the 2nd color, loop it under and back through the opening. Pull up and to the right to tighten. Make the same knot twice over each color. Continue knotting over each color, towards the right, until the outermost color has carried over to the middle. This is one half of the chevron pattern. Now pick up the outermost color on the right side (show here in red) and make a backward knot, creating a reverse 4-shape over the 2nd color, loop it under and back through the opening. Pull up and to the left to tighten. Don’t forget to knot twice over each color! Continue knotting towards the left until the outermost strand reaches the middle. Tie a backwards knot with the two middle strands to connect the two halves. Did you remember to knot twice? The first chevron row is complete! Continue with the the next color, which is now the outermost strand . . . Remembering the color order is important for the first few rows but after the 3rd or 4th row, the strands will fall nicely in place. Finish it with a knot and a braid. For a striped bracelet, cut one set of colors and simply carry the outermost color all the way through to the right side. For an assymetrical chevron, mix the colors when dividing them into 2 sets. Be sure to count the number of strands so you know when to stop in the middle each time. For an embellished bracelet, take a small piece of rhinestone chain, glue it to the top of the bracelet and stitch embroidery thread between each rhinestone with an embroidery needle.Source

DIY Decorate Friendship Bracelets

Today we’re showing you three easy ways to embellish your DIY friendship bracelets that will get sparkly and shiny metallic upgrades for Summer.

To add rhinestones, you’ll need:

  • a chevron friendship bracelet (tutorial found here)
  • 5-6” crystal rhinestone chain
  • 1 yard of embroidery floss
  • an embroidery needle
  • a pair of scissors

Thread the needle with embroidery floss and tie the end into a double knot. Push the needle through the back of bracelet. Lay the rhinestone chain along the middle of the bracelet, using the chevron pattern as a guide. Stitch the floss between the first two rhinestone links, pushing needle out the middle of the bracelet. Bring the needle back through the middle, this time further down between the second and third links. Continue stitching between the rhinestone links. After the very last stitch, tie a double knot on the backside and trim the ends. Your friendship bracelet is sparkling and finished!

To add studs, you’ll need:

  • a chevron friendship bracelet (tutorial found here)
  • 5 3/8” brass cone studs
  • a pair of small, sharp scissors
  • a screwdriver

Use a Sharpie or marker to make 5 evenly spaced marks along the middle of the friendship bracelet. From the backside, push the point of the scissors through the mark to create a hole. Push a screw through the hole. Twist the coned spike onto the screw and use a screwdriver to tighten. Repeat the steps with the rest of the spikes. Voila! Your friendship bracelet has a spiked spine.

To add chain, you’ll need:

  • a friendship bracelet (tutorial found here)
  • 5-6” of brass curb chain
  • 1 yard of embroidery floss
  • an embroidery needle
  • a pair of scissors

Thread the needle with embroidery floss. Untie one end of the friendship bracelet and re-knot it with the tail of the threaded embroidery floss. Push the needle through the outer edge of the backside of the bracelet. Lay the chain flat, against the edge of the bracelet. Thread the needle over and through the first link. Push the needle though the backside about two rows down. Depending on the width of each link, the row count may vary. Keep stitching. Make two stitches around the last link, untie the knot and re-knot with the last of the floss. Trim away any excess. Your chain trimmed friendship bracelet now has an edge – how simple was that? Stack ’em, give ’em away and you’re officially ready for summer.Source

DIY: Hearts from waste material

Hearts from waste material

Good day, dear colleagues.

I would like to bring to your attention two craft classes on making heart from waste material to the holiday Valentine’s Day.

For work, we need:

– A sheet of cardboard;

– PVA glue;

– Brush;

– Pencil shavings;

– Heart pattern.

Progress:

Transfers the image of a heart on cardboard,

Apply glue along the edge of the small area and place the chips from pencils teeth outward, alternating by color. When the first row is laid, we proceed to gluing the second, Then the third.

Each subsequent series of slightly overlaps the previous one. So move until the entire space is filled.

Our heart is ready.

You can cut it, step back a little from the edge. Thank you for attention.

Courtesy: maam.ru