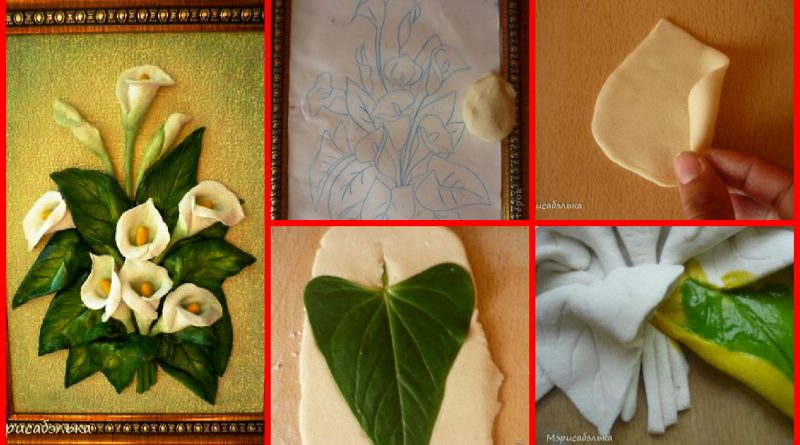
How to make callas of salt dough

Callas of salt dough 1

leaning against a piece of paper to the screen of the monitor simply copied work 21 to 30. As a leaf pattern, I used a sheet of anthurium (I like his veins), but you can just cut the pattern of the desired shape do 10 of these leaves – 6 large and 4 smaller Put the dough on a sheet cake and is rolled with a rolling pin Encircles the stack our list separate the Draws stack streaks Is rolled out of the corner, making them thinner All Templates keep in the package The leaves are smaller tak. list for the test and the stack is cut sheet smaller than the template For colors do the first ball Then this cake roll turn off You can finger we do stalk forming flower We laid on the drawing presses edge, insert into foil thus laid the flowers in the pattern so do bud collect flowers to the cake first leaves
then flowers …. And then, without waiting for drying, green … well wrung wipe lightly brush with green paint semi-dry brush we put green gouache from the edges to the center Flowers painted white gouache, a little toning inside and outside green.Buket without varnish done separately, painted, varnished and then stuck in place Here’s what happened. For background fiberboard covered with wallpaper, painted light yellow gouache, toned light green in the corners and along the edges View of the wall of the flash laterally from above template

How to make small houses with tiled

Small houses with tiled 1

Hello, my dear !!!
blindly here such houses. Height 12 cm and 10 cm. Now wander. The windows. View from above. And on top.
Then I will try to show in detail how I made a house a little more. Little by analogy, only the roof easier.
Also, I’ll show you my experiments with shingles, I hope that will come in handy !!! Required Materials:
– salt dough
– cardboard
-marker (or pen or pencil)
– masking tape
– scissors
– stack
– line
– useless little box (can be made of cardboard)
– cold porcelain
– lace (for little houses)
– eggshell (for a small house)
– paint
– paint
– brush
– PVA glue and resin
– toilet paper.

Let us proceed. I took the box from under the cream. It is necessary to measure the width of the wall of the house, and all the walls should be the same size, that is at the base of the house should be square (it is necessary to make a roof).
You can glue all the boxes instead of cardboard. To cut out the roof 4 of a triangle, as in the photo – the base 8.6 cm (divide it in half), from the middle of conducting a height of 7 cm, and connect the line to the triangle.
8.6 cm – 2.1 cm is greater than the width of our wall (6 , 5), it is necessary that this number is divisible by 2. If you have a different width, take the size of 2-3 cm more for the roof, it all depends on the size of the house. Here are our billets. The base mark the pen, as the parties have turned out almost identical (in millimeters difference mile), you can get confused. Merge all 4 triangles using masking tape. To box glue strips of masking tape to attach the roof. Like this. As the photo shows that those tape glued side of the box that open (top and bottom). Glued roof.

On the roof,

we draw a vertical line at a height of 1.2 cm and mark the middle of the roof.

Cut to the windows on the roof of the triangles, as in the photo. The first triangle 1 piece, the second – 2 pcs. And so for each window. We have them 3. And in the middle of our window glue mark. And so 3 times. On the fourth side of the roof fastened smoker, but you can make the window 4, as anyone would like. That just happened. Harvesting is ready. Getting modeling. We stuck to the walls of the house first test of about 5-7 mm, splash stack of bricks. Then sculpt the doors and windows. I have 2 of the window. One such – for flowers. Go to the roof. Clung to test about 5-7 mm. Then moisten your fingers in water and straighten all the bumps. It was very difficult to stick round smoker (hard to find), so I had peeled off, clung to the test and draw the stack of stones. And then use the test fastened to the roof. It keeps excellent. Like this. Draw lines on the sides of the roof and windows. The photo can be clearly seen. Simulating tiles – below I’ll show you how it’s done. It is a small house. He had almost dried up. The roof is simple, but after drying, I pasted its eggshell. The windows cut out in advance, then opened the box and glued onto the polymer adhesive piece lace – curtain. Such windows 2. More photos. Next painting. Paint houses completely (except windows) black gouache. Doors and smoker I’m a little rubbed with a wet sponge, then turned to the color lighter. I paint the roof of a large house in a large and small blocks in a reddish-brown color. Brown paint doors and smoke.
Then paint the contrary from the roof of a small house, and a large brick in terracotta color. At the end of the window paint. The bottom of the house is not stuck to the test, as long as will be dry with inversion. To strengthen the bottom, I pasted it into 4 layers of toilet paper with PVA glue. Then painted in black.
The houses covered with lacquer in 2-3 layers. He is blind to the little house orange roses from HF and leaves, for a large house with red roses. I stick to the polymer adhesive. Roses on top of a little gold-colored acrylic paint. Houses are ready !!! Now I tell how I chose the tiles.
The left upper and left lower tiles made using the stack, which is sold with children’s plasticine. You can take a nail file.
The top right – with the help of the cap from the handle, bottom right – with a spatula from a manicure set (I do not use it). That last option I used to roof the house. It has 2 options. And this is done with a fork ( the stacks some effect will be on a toothpick).
You can use orange sticks, a knife, etc. Finally houses separately. Thank you all for your attention