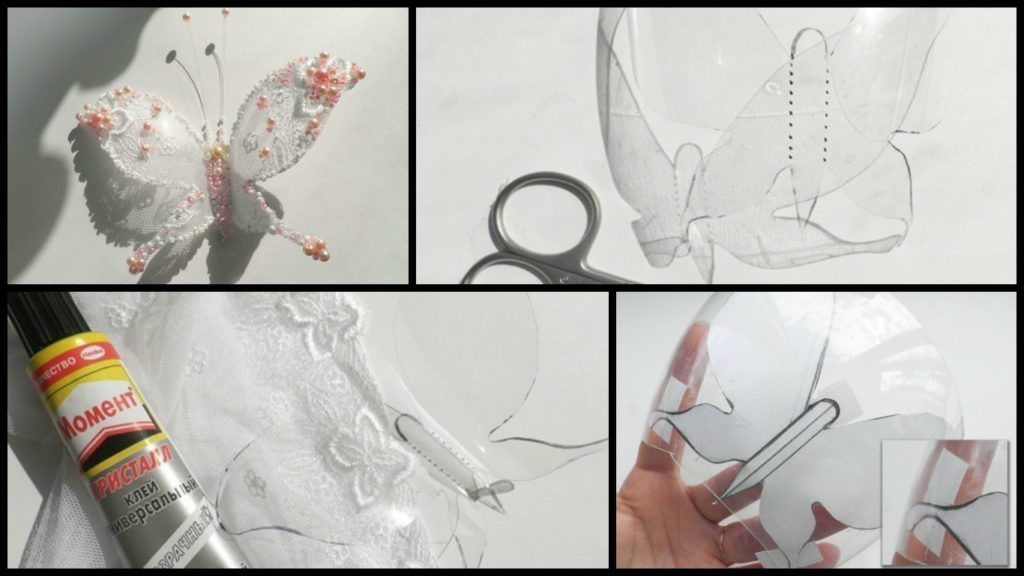
How to make butterfly from a plastic bottle
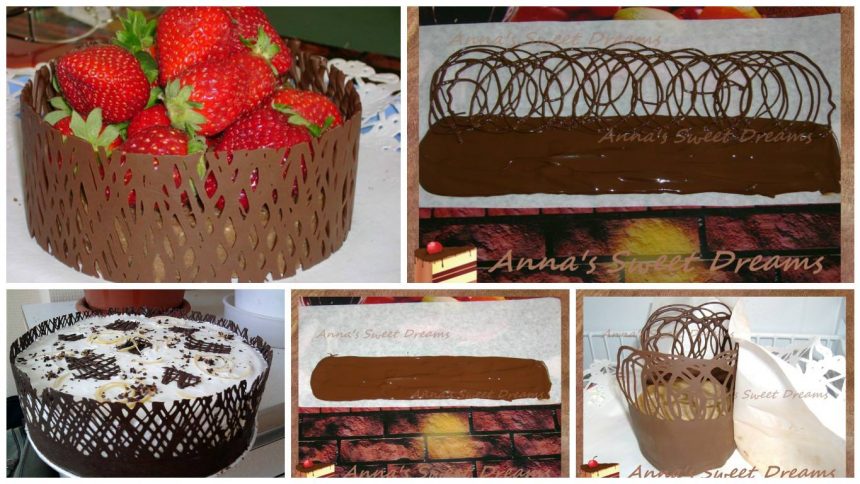
LACE BUTTERFLY FROM A PLASTIC BOTTLE 2

Materials:
• Paper, ruler, pencil, scissors, pen;
• Clear plastic bottle;
• A piece of white lace fabric;
• Beads;
• Water-resistant transparent adhesive

1. Drawing on paper wings. For this purpose, first of all, the middle sheet with a ruler and pen, draw three lines: one – central, two – side, departing from the center line of 3mm.

2. On the left side, touching the sideline, draw a butterfly wing. Use the eraser to redraw until you get a wing that will satisfy you. Well, if you come out the first time.

3. Now lean the line to the center line and fold in half along the line of the paper. Then fold it on the bend in the opposite direction, so that we can draw a second flap on the same side as the first paper leaning against the window.

4. As a result, we get two exactly the same wing.

5. Draw the torso.

6. Now we cut out our paper butterfly.

7. For our next step, we need a clear plastic bottle. Cut a piece of plastic, large enough to accommodate all of our paper butterfly in him when we are leaning against it. The paper needs to be fixed with tape on all sides, to the butterfly is not slipping, as we trace the path on the plastic.

8. Now that we are firmly secured to the plastic paper butterfly, you can trace the outline of the marker

9. Cut our plastic butterfly. I cut small nail scissors, through which you can carefully cut a butterfly in all difficult places.

10. I tagged dots line the wings bend, formerly called the sidelines. Leaning line to the dotted line, carefully so as not cracked plastic, bend the wings. This will be our plastic butterfly volume.

11. Now, on to the fun. Now we need to lace fabric and glue.

12. Apply glue on the wing, leaned against the fabric so that the lace was on the tip of the flap. We wait a few minutes until dry. Then nail scissors cut off the excess fabric of plastic contour of the wing. The same make with the second wing, cloth covering the body of the future butterfly.

13. Well, the time has come when in the course of action you need to let your imagination. Here we need only glue, beads and glass beads. The adhesive can be applied directly to the wing of the broad layers or droplets and immediately pour a palm or forceps to spread beads and beads. A few minutes later the adhesive layer dries, firmly clinging to an all you inflict on him.

14. Try to pick the beads of the same color range, or the same color, but different shades, then your butterfly will look harmonious. Antennae can be cut from the remnants of a plastic bottle in the form of thin strips, stick them on the plastic substrate before applying beads. And on the tips of the antennae secured with glue. so we got a butterfly. Due to the fact that it was created with the help of sufficiently resistant material, it can be used for different purposes: decoration for flower vases, hair clip, magnet on the fridge, and even decoration for sandals.

How to make chocolate lace – Step by sytep

chocolate lace 1

Ingredients:
Chocolate
parchment
Pastry bag
The thin nozzle
How to make chocolate lace

On parchment paper draw a pattern lace future.
Melt the chocolate in a water bath or in a microwave oven.
We fill with chocolate piping bag and draw out all the lines.
Work just jewelry, but the result is worth it.
Carefully wrap the parchment dessert (chocolate figures should touch with dessert).
Put in the fridge.
Once the chocolate hardens completely, carefully remove the parchment.