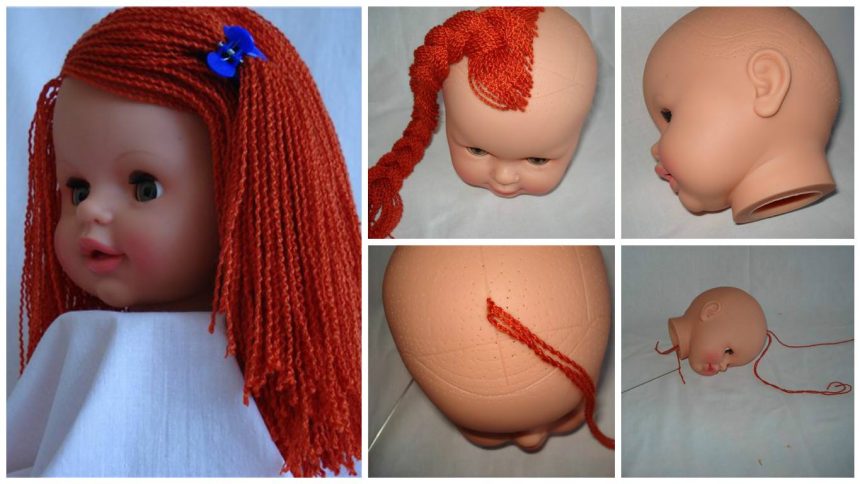
How to make party look hairbands

It turns out that decorate the rim of ribbon and flowers, a very simple and easy. Flowers to decorate the rim, you can buy ready-made or link, such as a hook. The main thing is to have the stem buds, which is fixed on the rim tape.

Also need to decorate the rim itself bezel, thin ribbon, glue and scissors. And, of course, the desire to ochemelymi

Required Material:

  •  narrow plastic headband (smooth and without teeth)
  •  mulberry paper flowers – flowers on wire are easier to use than on thread.  The headband shown used about 55 flowers.
  •  1/16 or 1/8 inch satin ribbon
  • E6000 glue
  • scissors

Put on the headband, measure where you would like the flowers to be.  You won’t want them in the section that tucks behind your ear.  This may also be affected by the way you style your hair.

Cut the ribbon end at a 45 degree angle.

 Glue the ribbon end on the back of the headband, let it set up for at least 15 minutes.  You want it to be in a position to start wrapping around the headband as close to the end as possible.  If you’re using a single sided satin ribbon be sure the pretty side is out.  Start wrapping the ribbon around the headband, overlapping it slightly and gluing it on the back of the headband, until the point you’ve decided to start your flowers.  Again give this some time to set up.  Make sure that every wrap of ribbon is glued in place.  You may be experiencing some web-like glue stands, try to minimize them as much as possible and you can clean off whatever is left when you finish the headband.  Prepare your flowers by bending the wire at a 90 degree angle to the front of the flower.  This is so that the flower will face up when the stem is tucked under ribbon.  Place a flower on top of the ribbon that’s already wrapped with the stem on the unwrapped part of the headband.  You can use a bit of glue to hold it if you need to.  Wrap the ribbon around the stem, and glue it on the back.  If you’re using 1/16” ribbon you’ll need to wrap it one or two more times, if you’re using 1/8” ribbon you probably won’t.  Add another flower, wrap again.  You might need a flower for every wrap, or more flowers/wraps depending on the materials you are working with and how densely packed you want the flowers to be.  Continue placing flowers and wrapping until you get to the point at the other end of the headband where you want the flowers to end.  Wrap the ribbon the rest of the way, continuing to glue it in place on the back of the headband, until you get to the end.  Cut the ribbon and firmly glue the end of the ribbon on the back of the headband. Allow to dry for at least 24 hours before wearing.  E6000 glues ribbon to plastic, it will do an even better job of gluing things to your hair.

Source

How to change the matted hair on the doll’s head to the new – Step By Step

hair on the dolls 1

We need the scissors, about 100 g of yarn (the little head out and even less than 50g). cut into yarn on a yarn length as we need to. Note that at the back should be longer thread than under the back of his head. This is useful if the yarn is small and it is necessary to save her.

Now we still have a long special needle. I bought this for 16 rubles in some ordinary sewing.Ona was so acute that the ability to all the fingers in the blood hair while I was doing. Be careful with it and do only when your children went to bed (for their safety).

Here’s a needle needed.
Now we start to work.
Stick the needle from the top down, as the top is more convenient if the head of a Barbie can be on the top and bottom. In my case, only the top down. On the head-holes were points from the previous hair that’s in there and stick the needle and take it out of the head, so you can thread your hands to grab. By turns (close together) are stuck on queue 3 strands and remove them from the head. Then, exactly 3 strands bind simple single node in a single whole. 3- Why? If 2 unit- long if more than 3 begin to constantly get confused when the top pull-up, tired hook correct.

Now, I’ll show how I fix the thread 3.

Next stage- should carefully pull all these strands 3 upstairs. We carefully pull slowly, alternately pulling the thread of one or the other, and then immediately pull all 3. Look inside, if not all sput Anno STI- well. Begin to make the other 3 threads.

And so on all head, fastening thread 3. Made strands in a braid or remove the anchoring rubber so as not to interfere with our work.

As a result, we get just such a head dolls.

But other dolls, which have undergone a -the hair restoration. Now those restored dolls have a lot. Priznatsya- I am delighted with such hair.

Thank you for your attention!