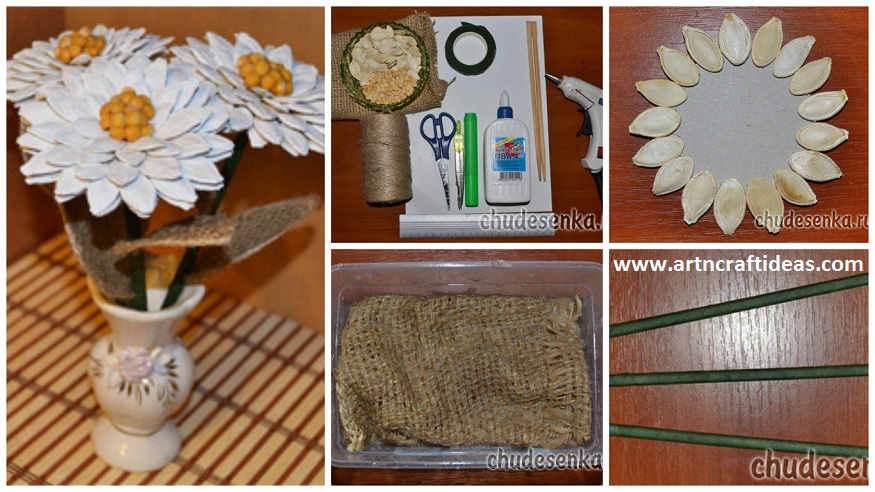
How to Make Pumpkin Seeds Bouquet

Crafts from natural materials are perhaps the most favorite form of creativity in children of all ages. Working with natural materials retains heat and hands of the master and always carries a positive energy. Very beautiful crafts can be made from seashells, acorns, chestnuts, dried leaves, etc. But the most original, and at the same time easy to manufacture work can be obtained from the usual pumpkin seeds.

Pumpkin seeds – this is an easily accessible natural material to work with which it is possible at any time of the year. Pumpkin seeds can produce a wide variety of original crafts, such as floral bouquet. I bring to your attention a master class on making flowers of pumpkin seeds. These flowers turn out very beautiful and original, and most importantly – they are easy to make and do not require great physical and financial costs.

Required Material:

1. Pumpkin seeds;
2. Peas;
3. Silicone adhesive;
4. PVA glue;
5. Floral tape;
6. Hessian;
7. Wooden sticks;
8. cardboard sheet;
9. Jute yarn;
10. The compass;
11. Simple pencil;
12. Scissors;
13. Acrylic paint white;
14. Brush;
15. Ruler.

Before you begin, you must treat the burlap so that it becomes rigid and does not crumble. To this mix of PVA glue and water in a proportion of 50 to 50 and fully put in the sack solution. After that, the fabric should be dried and ironed. While dried burlap, let us direct manufacturer flowers. The basis for the colors to be a circle of cardboard. Using a compass draw a circle on the cardboard with a diameter of 6 cm., And cut it. Now take the pumpkin seeds and using a silicone adhesive or glue “Moment”, pasted them in a circle. Paste the seeds so that their sharp edge was on top. The first row of seeds prepared. Now just glue the seeds of the second row. Sunflower seeds in the second row should be staggered and overlapping with respect to the first row. Also, do the third and fourth rows of seeds.

The middle of the flower reserve not glued.

Now we turn over our flowered on the back side and glue have to this side of a row of seeds.

Since our bouquet will consist of three colors, then make three for flowers. Pumpkin seeds, which we used for the flower petals are not very beautiful yellowish tint, so we using white acrylic paint, paint them white. We leave flowers alone until they are completely dry. Until the paint is dry, we do not lose time in vain and will prepare two cardboard parts: a circle with a diameter of 6 cm, and lepestochek, the height of 7 cm, and width – 4 cm… The carton blanks are put on the pressed and dried burlap and encircle their contours. Circles will need to cut 3 pieces, and petals – 6 pieces.Next a burlap circle glue on the reverse side of a flower preform. And along the contour cut petals from burlap, we stuck jute thread. And now it’s time to prepare for the stems of flowers. To stem can be used straight branches of the tree, we took advantage of chopsticks for sushi. Take floristic tape green and completely wrapped with it every wand. If you do not have floral tape, you can use the corrugated paper. We make three identical stems. Now we collect our flowers. In the middle of the flower Do the workpiece hole and insert the stem into it ready. In the middle of the flower glue yellow peas, which for strength from above abundantly watered with white glue.

Also, instead of peas can be used dried corn kernels, buckwheat or grains of pepper.

And finally left to attach the petals to our flowers. Fasten them using floral tape or corrugated paper.

That’s all – flowers ready! It remains to put our bouquet in a vase. This original bouquet decorates any space, especially natural corner in the school or in kindergarten. Good luck and success!

Source: Chudesenka

Thank you for visiting our website. We seek to always bring the best for you.

Did you like the Tutorial ? Leave your comment.

How to make quilling basket of flowers bouquets

I really like to create thumbnails quilling wee bouquets for my friends. This model is quite easy to do.
The strips in any shade and shape the fold by the following images. Try using thicker paper, ie. Min. 120g / m2. Thanks basket better retain the shape. On a piece of paper, draw two circles (the first is 6.5 cm, the second 2cm in diameter). Put your card on a pad cork and of cover with foil, then it will sklejcie together elements (about 22), the second one in the middle of a larger circle. Wait until the glue dries.

I’ve always enjoyed making Quilled miniatures and flower baskets are my favorites.This model is quite simple and easy to make.

Roll and shape your coils, any color you choose.Try to use thicker paper, at least 120 gr / m2, this way the basket will keep its shape better and will not deform.On a piece of paper draw two circles of 6.5 cm and 2 cm in diameter.Place it on a corckboard, cover it with a plastic sheet and then glue the coils, Approximately 22 pieces, one by one inside the big circle.Let it dry.

Now sklejcie together the ends-receive slightly conical shape. Glue it to tightly twisted disc made from four strips. After drying glue uformujcie basket, generously repress the glue in the middle and in the Paste the basket respectively, cut a piece of Styrofoam.

Now glue the two ends together, you’ll Obtain a conical shape. Glue it on top of a tight coil made from four strips and when the glue dries gently press it to give it an elongated shape. Add a good amount of glue inside the basket and glue a piece of polystyrene.

Cover the Styrofoam piece of paper, add a hand basket – basket is ready. Fill it with any kind of flowers … in my basket was a butterfly.

Cover the polystyrene with a piece of paper, add a handle and the basket is ready.Fill it with any type of flowers you like … it’s mine I also added a small butterfly.

To obtain another invoice you can use the bezel to bars / crimper.

For a different texture you can use a paper crimper tool.

I hope that my course liked you and help you to explore the beautiful art quilling.

I hope you enjoyed my tutorial and That Will help you discover the beautiful art of quilling.