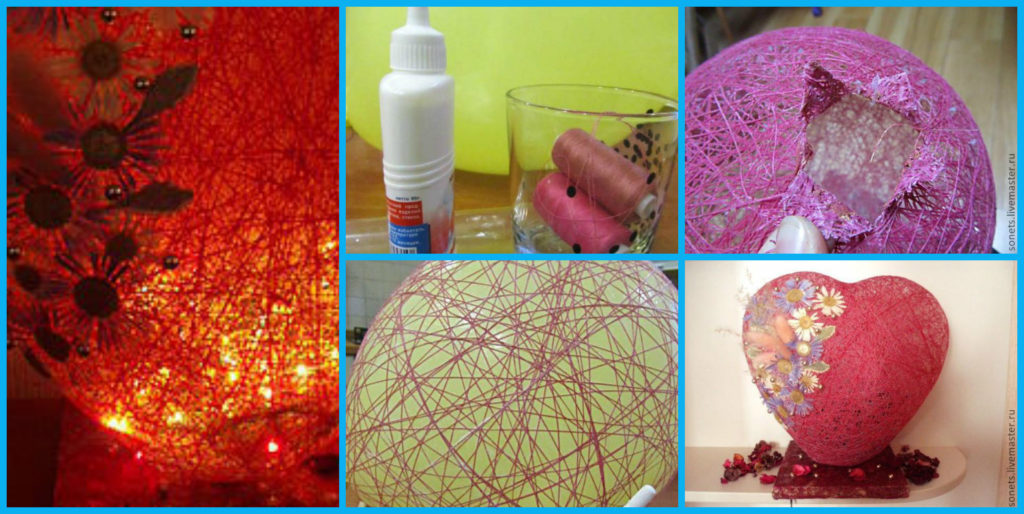
DIY: Beautiful (Night Lamp) Heart ball of thread
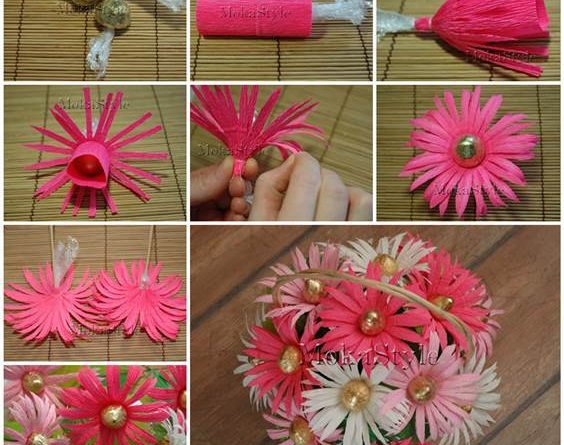
Lamp night lamp Heart ball of thread 1

Lamp-night lamp “Loving Heart” (published in w. Master (Belarus))

In anticipation of the holidays, we overcome suffering – “What to give to your loved ones?” I want something unusual, surprising, no matter what do not like. I would like to express our overwhelming feelings, and the words hard to find? Let’s give your favorite marvelous light “Heart”. With this gift, you will be able to say everything without words.

The night can give mothers on Women’s Day, girlfriend or daughter for a birthday, a favorite on Valentine’s Day heart “beats” from the senses and that’s it. Light a lamp in a romantic evening only strengthen your feelings.

And you can just for yourself, your favorite, to create a miracle. The interior of the bedroom, it certainly attracted attention.

everything you need to prepare in advance.

  • 1 -2 thread spool (pink or other colors), the color of a lamp depends on your decision.
  • 2 PVA glue, not less than 100 ml (not the building!) Adhesive point or hot glue (glue gun)
  • 3 thick needle, long
  • 4 ball in the shape of a heart (you can make a light and around for yourself). For the master class, we took a round ball.
  • 5 square-shaped plate (20 ’20) of a thickness not less than 1.5 cm. You can replace the wooden photo frame with wide planks or solid cardboard box.
  • 6 napkin color (can be replaced with cloth or acrylic paint). The stand can be issued and in its sole discretion)
  • 7 -tailender a roll of toilet paper.
  • 8 dried plants and artificial flowers, beads, feathers, in short, something for decorating our hearts.
  • 9 drill
  • 10 blinking Christmas tree garland.
  • 11 scissors

Getting to the manufacture of

1 First, make shade for our lamp. Inflate balloon heart to medium size. The size of the inflated balloon and will be the size of our lampshade.

2 bottles of glue PVA bottom pierced with a needle with two vdet in her thread.

Figure 1) extends a needle through the bank, took out the other side, take out the needle thread. Pierce the bottom necessarily banks unnecessarily. the thread must always be wetted with glue, and the amount of adhesive in the work decreases. For the convenience of working with a thread spool, and a jar of glue put in jars.

3 end of the thread tying the tail of the ball and start winding a ball
Fig. 2). The thread must always be wetted with adhesive. Initially, it will be inconvenient and thread all the time to slip the ball, but we’re stubborn, hard-working, we will succeed!(Figure 3) tauten thread diagonally lengthwise, crosswise. After 10 min, the winding becomes easier. (Fig. 4)

First, we get the hand and understand the principle, secondly, the thread stops the slide, unnecessarily. It will cling to the wound.

Roundball winding easier than the “heart”. The “heart” do not forget to wrap the “ears”. Look where we are sending to the emptiness and thread. Drum thread pool is not empty. If the glue is ended earlier thread, just  it from other banks. That wound ball (Fig. 5) Leave it to dry. When the thread is almost dry, punctures the ball. Threads will be tough and will keep the shape.

4 Getting manufacturing base. I took a stand for the tablet. Drill a hole in it (you can help one of the men, but not one for which it will be a surprise. Although …. Maybe he was. He did not even guess what it is and why.) The hole should be of a diameter that through it might get through Christmas tree garland. Instead, you can use a thick plank picture frame, replacing the glass with a thick cardboard. Or, in extreme cases, try the box with a thick, dense cardboard, not too thin. (Figure 6)

5 over the aperture ring of glue cardboard, cut from of roll of toilet paper. We attach it with glue well bay. Outside strengthen a strip of paper, grabbing one corner of the ring, the other coming on board. The board. I pasted cloth (PVA) and a bit overshadowed gold acrylic paint. (Figure 7 and Fig. 8 and Fig. 9). On the reverse side, plates make a groove for the wiring from a garland (Fig. 10) 6 Threads almost dried up? Punctures the ball. The ball should unstick itself from the thread. Therefore, it is not necessary to wait until dry. If the ball has dried thoroughly and piercing not unstuck from the thread, will come to his aid. Through the thread is passed a pencil or any wand inside her trying to unstick the ball. If the thread balloon wrinkled, pressed, then we, the same wand inside his straightened, but still try to do everything patiently and carefully. The ball was torn inside the thread. (Fig. 11)

We’ll get it through the skin. It is more convenient to do it with tweezers.

7 At the bottom of the ball (where was the tail), cut out a hole in the form of a lotus. (Fig. 12).

The hole diameter should be with our ring. And it sits on must be tight. (Figure 13). Dress up the ball on the ring, pouring glue. The petals are glued to the outside of the ring. Then you will feel that the ball as if he falls, and “asks” on the stand. Just press it and the place where he sat down on the stand we coat with glue. Just make sure that the lamp was flat, not tilted. (Fig. 14) 8 Zadekoriruem our “Heart” (in our version, to explain the ball.) I used dried flowers. But you can come up with something of their own. Stick to your decor thread, make “heart” of the most beautiful and loving. (Fig. 15) 9 Bottom stand pokes through a hole in the “heart” of Christmas garland. Outside the reserve wire that embarks on the groove and attaches it with glue or adhesive tape.Enjoy your evening

DIY: Chocolate Gerbera Flower Bouquet

Chocolate Gerbera Flower Bouquet 1

Flowers and chocolates are two common choices for gifts. Then why not combine these two awesome things and make something even more awesome? Here is a nice DIY project to make a crepe paper chocolate gerbera flower bouquet. Isn’t that gorgeous? It’s very easy to make and all you need to do is just cutting the petals and wrapping the chocolates. You can make it as a table centerpiece for a wedding, or as a gift for Valentine’s Day, Mothers’ Day, Teacher’s day or any other occasions. It makes nice home decor too!

Here are the supplies you may need:

  • Crepe paper: pink, light pink or your desired colors
  • Chocolates or candies
  • Cellophane
  • Thread
  • Scissors
  • Glue
  • Wooden skewers
  • Tape

Instructions:

1. Place the chocolate on a piece of cellophane.

2. Wrap the chocolates with cellophane. 3. Cut a piece of rectangular crepe paper (size depends on the size of the chocolate). 4. Wrap the chocolate in the crepe paper piece. 5. Tie one end with thread. 6. Cut the outer layer into fringes as the petals. 7. Twist the fringes outward. 8. Cut the inner layer of crepe paper into fringes and twist them out. 9. Press the petals with your fingers to make them curly. 10. Insert the wooden skewers through the middle of the flowers. 11. Make more flowers with different colors of crepe paper. 12. Place the bouquet of flowers in a basket. Enjoy!