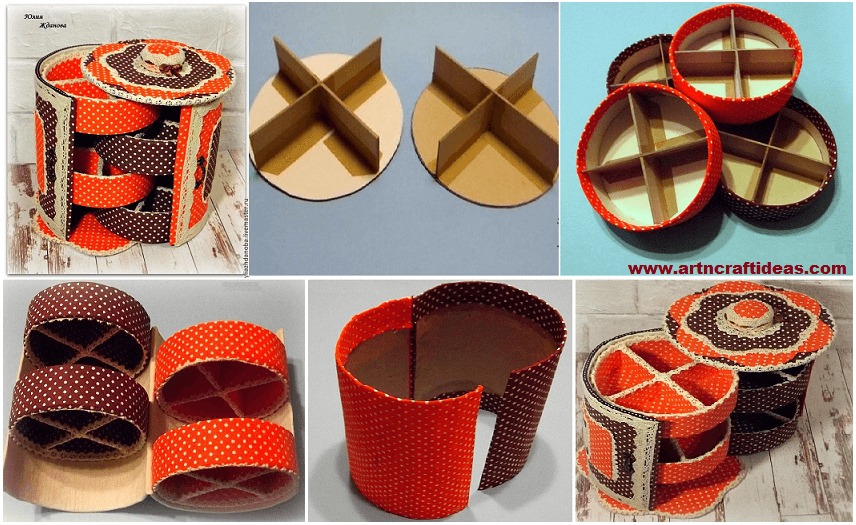
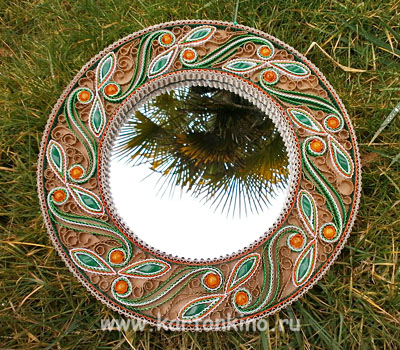
DIY Beautiful Round Box For Small Items

Today I am sharing an idea about round box for small items…
Let’s check how to make round box for small items….

Required Material:
– beer and bookbinding, stationery cardboard;
– kraft paper;
– calico two colors, linen;
– linen lace;
– Clay time carpenter glue Moment Crystal;
– and in a good mood.
So:
To begin, cut out 4 binding cardboard circle with a diameter of 14 cm.
Then the walls – 8 pieces of 14 cm long and 4 cm in height, made exactly in the middle slot – 2 cm.

Kraftoovoy of cut paper strips them and sticking to the walls of the partitions, and then the bottom of the circular compartment boxes.

While I have dried out blank of cardboard cut beer four strips 4.5 cm in height and on one edge, immediately taped a piece of kraft paper.

Clay Moment Crystal greased edge circle and the free edge of the kraft paper, as well as edge strips, and then wait 5 minutes and began to stick to the sidewall of a circle, pressing firmly.

For a reliable fixation of the bottom, further cut a strip of kraft paper.

Pull – stationery cardboard or cardboard can be taken for children’s creativity or cardboard boxes from under cereals, etc., this board is sufficiently dense and holds its shape well, despite the fact that it is thin. Cut first bottom fabric and cardboard, all of pasting glue torque Joiner, evenly distributing the glue on all the surface of the workpiece using a foam roller.

While the bottoms dry, do sidewalls, as you can see in the photo, only sizing the bottom sidewall, top left free.

Combine pasted bottom sidewalls with the edge of the bottom and also pasting, the free edge of the fabric, are folded inwardly and incised, pressed tightly and land.

Made of thin cardboard, cut into triangles and paste them with a cloth edge is left free, they will bend to the side walls side.

Coat with glue and insert the bottom of a down, watch for so that the edge of the fabric smoothly bent on the side cover.

Then cut from paperboard blanks angle when corners are taped, executes a circular sidewall.

The upper edges – decorate linen lace.

Now came the turn of the box base. In order to bend the flat surface, taken as a basis for a 5-liter bottle from under the water, her twisted and bonded masking tape – cardboard. Then take a beer carton, it is soft enough to be folded, cut two pieces of 20 cm, width 48 cm, are coated with glue, glue them to each other and cardboard becomes very soft until it is dry – wrapped around the bottle, then we must make sure that it does not twisted, I fix the cut masking tape and land hairdryer.

When the base is dried, cut it into two equal parts and their light flux paste inside, leaving 0.5 cm on the extension and immediately all land hairdryer, preventing disintegration cardboard.

Once the base is dry, mark, as I stand round branch boxes between them, should be a gap in the 0.5-0.7 mm from the edge – top and bottom have to retreat to 0.2 mm.

I do another perform – is the front, it will be wider than the inner 2 cm, to pane came to each other. Tissue base I consist of two parts, I joined them on the sewing machine.

Round shelves are glued to the bottom – on the glue Moment Crystal.

When the foundation is well dries, cut two pieces for the bottom and the lid, they have me consists of halves, pasted them on the glue Moment Crystal. I fasten the handle to make it convenient to push the box.

It remained for the small – decoration and cover the bottom of the box. I fix them as the glue Moment Crystal.

And casket stands ready, at the very domes sitting small needle bed, with a coquettish bow of satin ribbon.

Casket opened and closed

I wish you creative inspiration 🙂
courtesy: livemaster

Round frame mirror made of cardboard

round frame 13

Greetings, friends! I present to your attention another master-class on the creation of decorative frames made of cardboard, prepared by a great expert in this matter.This time Marina tell you how to make a round frame for a mirror . The new workshop will undoubtedly enrich your perception of cardboard and corrugated board within the possibilities of a whole. And following the laid down in it hints and tips, you will be able to do with their hands delicious interior decoration – for the joy yourself and loved ones.

Materials and tools:

– Three-layer corrugated board thickness of 0.4-0.6 cm
– soft corrugated board (dual-layer)
– color double layer micro corrugated: white, green, orange, brown
– a sheet of paper or thin cardboard (for the template)
– the color of the markers of micro, to paint sections (if necessary)
– the orange and green beads
– a pencil
– a compass
– stationery knife
– scissors –
dressmaker pins
– tweezers (for the convenience of placing strips and decorative elements)
– glue for cardboard (important the adhesive was of good quality and when dry – transparent)
– double sided tape
– a hook for the frame
– a round mirror (or photo)


1. Preparation of the frame .

I had two small mirrors, so for them, I decided to make beautiful frames. The size of the frame is determined based on the size of the mirrors or pictures (but note that the photo of the scope of this design then does not remove).

The diameter of my mirror – 20 cm Optimum width of field frames -. 6-7 cm , but you can do more. Thus, we need a circle of cardboard with a diameter of 20 + 7 + 7 = 34 cm .

We draw on the cardboard circle compass required diameter or, if there is no compass, draw out some round object of appropriate size. I found a lid on the pot diameter 35 cm.

We draw another concentric circle whose diameter is the diameter of the mirror.

From cardboard cut out a circle of 2-3, one (bottom) – a rear wall of the frame, one or two others made a circle with a truncated central part – the window for a mirror or picture.

On the back wall of the right anchoring hook (if it is inserted through the hole in the wall).

Check if our mirror included in the carved window to correct, if necessary. A number of cardboard circles with windows depend on the thickness of the mirror and cardboard thickness – mirror should be slightly pritopleno (pictured below mirror turned up the rear surface).

Merge layers of cardboard.

We make the outer edges of the frame. The process I have described in detail in previous workshops (for example here ), so I do not allow myself to repeat.

In short, this frame I pasted two glued strips of soft (two-layer) corrugated board. The width of the outer strip of the sum of the widths of all the layers of cardboard 0.6 cm (height and width of the inner rim strips). The lengths of the bars are equal to a circumference of the frame with a small allowance.

Then glue the mirror. One can choose different ways. I taped it to the double-sided tape, but you can use glue. If the frame is not to be used for the mirror, and for a photo or image, it is better, of course, is to use an adhesive tape. Once the mirror is glued, paste over the inside edges of the frame, as well as external – layer cardboard strips.

Already at this stage, you can start to decorate the frame of a different color, for example, paste a strip of double-layer micro color between the two strips of brown corrugated cardboard. I did not do it in this box but then plastered bordyurchiki and external, and the internal circles of orange and green strips of corrugated cardboard (below it will be seen).

I remind you that all the internal strips for edging and decoration should be the width of 0.6 cm .

2. Decorating frame .

This preparatory work is completed. Getting started decorating the inside of the frame. It is a creative process, and you can do it to your liking. I think that those who are engaged in a classic Quilling could well draw a frame in this technique because the paper is thinner and plastic and has greater opportunities for decoration.

Well, we, corrugated lovers will not be deflected to the side and remain loyal to our favorite material – corrugated cardboard. ?

The entire surface of the circle, I divided into 8 parts. This is easily done if you cut around template out of paper and put it on the layout. The same range of paper is useful for sketching.

Design, as a rule, undergoes changes in the course of 2-3 – this is normal.

For long curls, I snapped  (green, white, Kraft), length 22 cm , but you can make them a little less. If you have a different diameter of the box, specify the size of the elements on their own, according to the situation.

Adding 3 strips together, spin, first one way, then the other end turned in another direction. it is not necessary to glue together the strips as they are moved relative to each other, so they should be free when tightening. They just need to give the desired shape to make it easier to glue on the surface of the frame. Even better glue them individually, but I realized only then when all done.

Glue the curls at the scheduled place, causing a small amount of glue on the lower sections of cardboard strips. We make sure that the colors are arranged equally.

If you are going to use beads, immediately make curls on their size.

Here in the photo still curls in the original version, I later made changes and added more slips.

Making the petals. The order of colors from the center to the edge and their length: White – 7-7.5 cm , green – 8.5 cm , orange – 9.5 cm , white – 10.5 cm in the center, I taped green oblong beads.

If you do not have beads or you do not want to use them, you can leave the middle of a blank tab. Or you can make the roll, lightly dismiss it and flatten the edges so that it fills the space inside the petals.

Next, I filled all the remaining space in small curls of different shapes of gofropolosochek natural (brown) color, but when I looked a general view, I realized that something was missing. For a long time looking for the option you want, and finally realized that the main curls at me too tight. So I  even one green strip on both sides of each curl. Curls are wider and better look.

The remaining space on a frame, I filled the curls of any form of natural corrugated cardboard. And so I turned to the mirror frame.Good luck and inspiration!