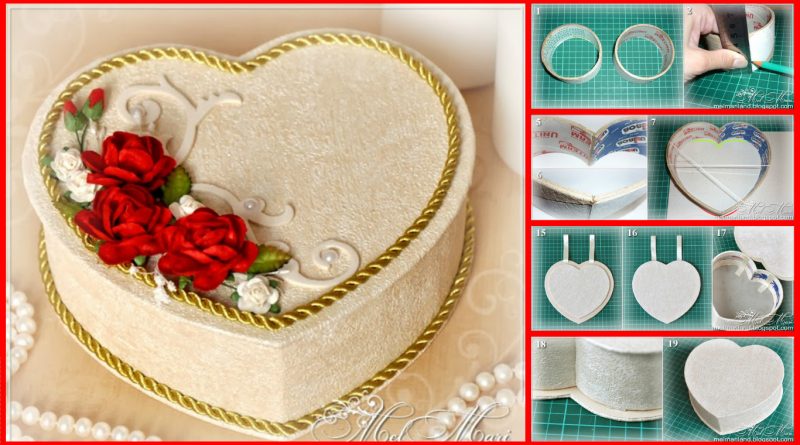
Jewelry Box in Heart shape (Reels of Adhesive Tape)
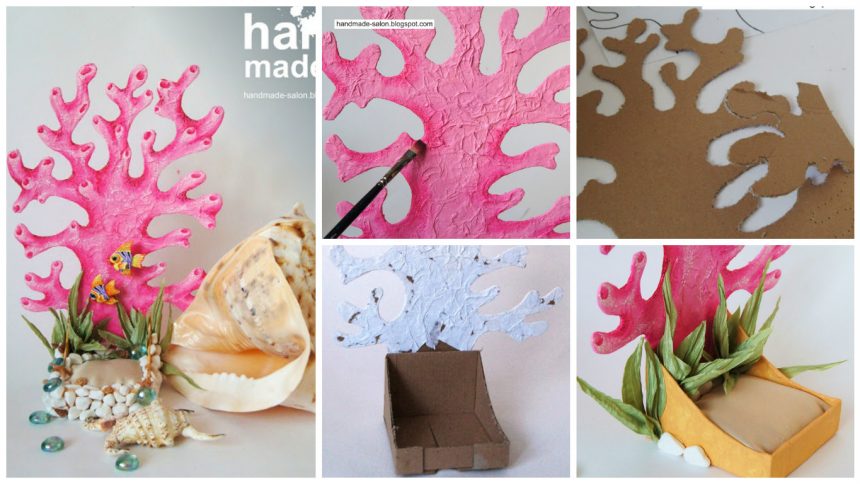
Casket in a heart 1

For this we need:

– 2 reels of wide tape,
– The size of a sheet of chipboard 30h30sm. and 2 mm thick. (You can of beer cardboard and other.)
– Glue (I Moment Crystal)
– Design paper (or cloth) for finishing the outer and inner surface of the box,
– Tape for attaching the cover,
– A twisted cord, flowers, cutting out chipboard, for decoration.

Let’s get started.
Take a ruler and strictly at right angles to outline the cutting line on the reels. This is important for a smooth connection 2-parts of our boxes.

After the cut, the two spools, accurately straighten each one hand. To halves of the heart were symmetric, we put detail on each other and correct. Now glue the seams. If the heart has turned out not quite symmetrical, you can drag it or rubber thread (photo 7), to give the desired shape, sprinkle with water and leave for several hours to dry.
Meanwhile, prepare the bottom of the box and the lid.
Take a sheet of chipboard and draw out our hearts on the outside. Then, retreating 2-3 mm., Outline the contour of another (the red line in the image 7). Should get 2 loops (as in the photo 8). Will be cut by the outer contour. Such details do 2 pcs. (for the bottom and lid).
To casket lid was fixed and not shifted, do one more detail, but in a smaller size. Those. perimeter wall boxes on the inside, draw a parallel circuit of 2-3 mm. less (green line on the photo 7) and cut by the inner loop. Paste paper design (or a tight-fitting cloth) all the details. Glue the bottom and proceed to the assembly of the cover. To make it look neat, cut out another heart made of cardboard a suitable color, that will cover all the bumps on the inside of the lid (photo 11). Make the cut at fixing and threaded them tape (for strength folded in half). The ends of the strips are glued to the underside of the board, turn it upside down and glue to the inside of the lid. Top glue third smaller part (picture 15 – the inner side of the cover, pictured 16 – external). The free ends of strips glued to the walls of the casket. The photo box 18 upside down and seen how it should look like the mount on the outside.
That’s it! Bag ready. Now we have to decorate it to your taste. I used a twisted cord, cutting out chipboard, different flowers, stamens, leaves, and. Inside the velvet pasted paper.

How to make organizer for jewelry in the form of coral – Step By Step

organizer for jewelry in the form of coral 1

Take a piece of cardboard A4, attach a picture of the future of coral-organizer …

image rendered specifically for printing, so feel free to download and print this pattern … or draw a …

all drawing on a path through a needle … to figure turned with 2 sides … the more often put the holes, the more accurate the drawing will …

Speaking of thin corrugated cardboard take the inside, I took the doll from the packaging …

a cardboard base the future of coral, it is desirable to enclose another piece of the same board, because we will pierce through and through, that needle is easily entered, it is better to enclose something ..

So get ready

further connect the holes … ie on the planned cuts through the loop …

on the reverse side and draw out …

and gently remove unwanted parts …

what happened …

Further take the box, cut it …

try on a coral …

crop, glue …

edge coral paste mint

middle and paste … draping a little paper …

texture of ready undertake the box …

paste, and it is also …

paint pink (or any other) acrylic coral … a box under the rings in the color of the seabed … ie ocher …

toning curves coral darker color from the main … to volume effects …

We draw the work piece surface coral … holes, spots …
white acrylic draws the porosity …

maroon paint pores in the pits …

operate with the bottom cut out a piece of cardboard … 2-3 mm less than the base of each. hand …

We do … puts a pillow under the cardboard padding polyester, tight cloth “on the sand” …

glue in a box …

decorate the bottom … of ruffled green fabric cut out foliage and form bushes ..

side boxes paste stones ….

stones can be laid around the perimeter …

and add Marbles …

from Fimo or any other plastic lepim shells and sea stars … if there is a natural sea shells, you can use them

place seashells and stars on the seabed …

volume loop draw a grain of sand on the fabric … for more decorative …

like that….

add animals to our coral reef …
fish ….
I take the glass eyes of two colors, white acrylic base color the brightness …

of gypsum mass sculpt

heir bright paints …

each fish glued on the stem of a twisted paper …
and placed them on the reef …

left enrich reef decorations …. ie to use it for its intended purpose …

rings on a pillow …

Thank you for your attention and wish you success and creative ideas