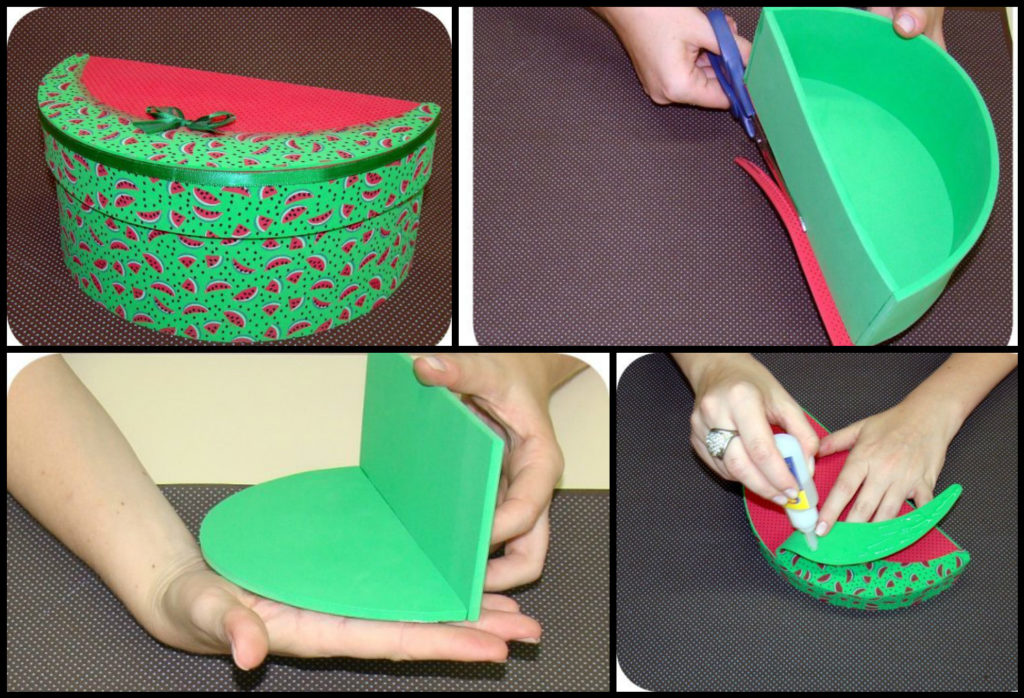
DIY: Beautiful Watermelon Box

Watermelon box 2

You can make a beautiful watermelon box to give a loved one and make the greatest success.

Tips to Make Cash Watermelon

To do this piece you will need:

1.Green satin ribbon;
2.EVAs with colors: red with black polka dots, green, EVA stamped with watermelons;
3.universal glue, glue for EVA glue all or hot glue gun, glue depending on their preference to work with EVA;
4.Stick BBQ;
5.Scissors;
6.Molde (image below).

Start by transferring the mold parts to the respective colors of EVAs, with the help of stick BBQ. Then, with the mold parts already cut, join portions of the bottom side of the EVA and the case back using the glue you prefer to work with EVA. Then apply glue around the edges, uniting the parts already assembled, forming the structure of the box. Soon after, paste the structure of the box on the EVA with the balls, but with an upward pattern and cut out the excess. Now start gluing the side finishes in watermelon EVA from the center side of the background. Cole involving the entire side of the structure, and if there are leftovers, cut, making the finish. Glue the cover piece on the poá, leaving the dots to face down and cut out the excess. Then paste watermelon strip around the lid, as you did in earlier body structure. Press the strip in the corners, so it does not drop. Soon after, paste the watermelon detail on the cover Now, to finish your piece, decorate the cover with a tie and finish around the cover seam with green satin ribbon. And you are done!

Handmade Simply box

Simply box 1

 Opt fragment pattern and translate it on a sheet of paper.  Fun watching this sheet stapled to the box and translate drawing using carbon paper.  fun begins … I spread the tissue pattern threads. This fragment took 6 strands 20 cm long and 2 cm wide. The size of this pattern of 10×10. (Box of chocolates Raffaello) Work laborious, this fragment is laid out for an hour. And on the box exactly four such fragments. Here is a hand made!  Pattern pasted around.  Dyed black acrylic top and pochpokala sponge with gold. And here is the result!  And the last stage-lacquered of balonchika.  Well, just once more in the finished form. Cover does not become. Since it is not necessary school.

DIY Miniature casket made ​​of plastic canvas

Miniature casket made ​​of plastic canvas 1

A miniature casket made ​​of plastic canvas. Plastic canvas – a fantastic material for many kinds of handwork. It is dense, come in different colours, white, cream, Gray, black and clear. The advantage of this canvas is that she is not afraid of water, has a beautiful smooth edges that do , not wrinkled, suitable for 3D embroidery. Plastic canvas for sale size A 4 and has a different number of holes per inch: 5, 7, 10, 14. Canvas 14 holes per inch has small holes and embroidery looks at this canvas is much more elegant. Therefore, take this box of embroidery canvas. More will need: a needle, thread type floss, scissors, pencil, paper, glue, staples.

Embroidery consists of simple squares of embroidered stitches. Based on this scheme can determine the size of the box. Choose the length and width of the finished boxes, using the template as a guide. The bottom cover makes a little more bottom boxes to cover can be put on the box.

You can embroider on the whole sheet and then cut side, during embroidering knit knots, and tighten the tail for embroidery.

Example embroidered caps and side boxes.

So it seems the bottom and sides of the box.

On the front side of the box double thread sew the seam was tight.

Sheathe edge boxes and covers.

Inside the box lid and paste paper or cloth. This box can be used to store small items of jewelry.

DIY Autumn rainbow box

Autumn rainbow” box 1

For autumn theme came to me this box. A little unexpected and uncharacteristic for my work.

Perform such work does not require special skills of drawing, it is the strength and beginners.

Home, fantasy and orderly execution.

Acrylic paints : white, black, red-orange-yellow-green-blue-violet

Here is my source code: box, waited in the wings at least a year. Harvesting of elm wood, tinted stain (think walnut).

Pre-made sketches on paper by distributing the leaves on the cover of the box, and some plan how they will be placed at the bottom. Then sketched already at the box pencil, lines and filled with white. White to the subsequent application of the paint layer was really colourful

Here are the highlights of this stage:

Note the ends caskets I sometimes follow a pattern tree and outlines wavy lines straight “on the trail” (photo – bottom row right).

Parallel to begin to fill the leaves colour, reprises the rest white. All in a typical autumnal tone. It is now … 🙂

Next appear iridescent colours! When conceived work, be honest about them and I did not think. Prismatic burst suddenly and unceremoniously. There were doubts, but stay I could not 

After completing all the colours start to work with the contours, rather, it is a contour paste. The lines are thin paste does not spread, it is very convenient to work! I have here are:

I have three colours in the process: gold, bronze, copper. Here, the main thing is not to hurry up and change the areas of work in order to avoid smearing un dried moments.

Decided to decorate the edge of the cover crumb Pot al (bronze, copper, gold).

How I do it: for glue , I did not have on hand, took advantage of acrylic lacquer. Nanoshu thin layer of varnish, just give it to dry and begin to apply potal slices, pressing down slightly flat brush. That’s the “doubleness” obtained by:

Giving it to dry for about an hour, I start to take off the excess sweat, too flat brush.

Likewise execute and hem on the bottom.

Now photos of finished work from different angles. On rowan berries and put blichki draw “tails” in black.

View caskets from all sides:

All of them! Box covers Yachting glossy varnish, usually three layers. On the photo is a single layer.