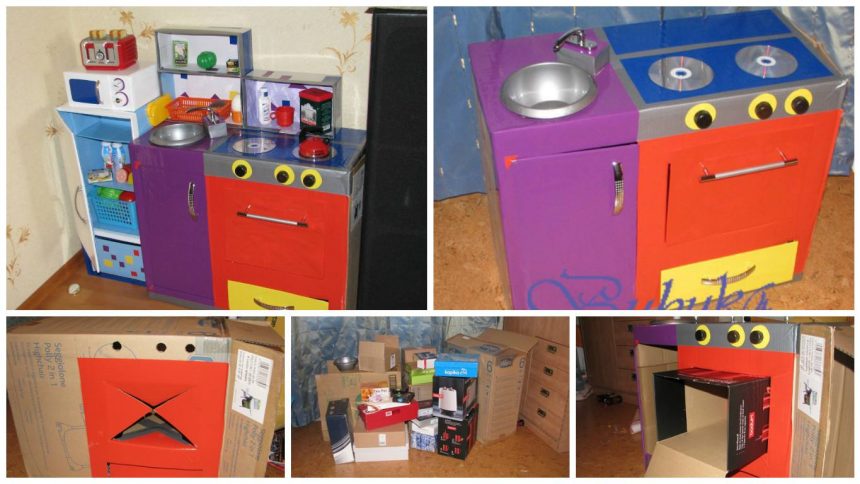
How to make children’s kitchen set – Step By Step
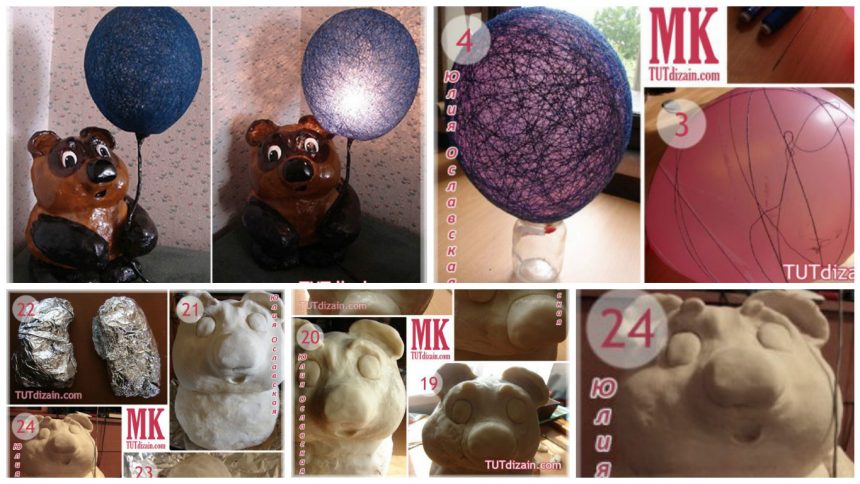
childrens kitchen set 1

The base plate big box of children’s highchair.
Mark up the pencil, a stationery knife was cutting, self-adhesive paste from wallpaper store. It is also used adhesive tape shopping (gray Scotch type, but few stretches), glue point – liquid nails,
beginning

like this in the oven for a device. At the bottom 2 layers of thick glossy magazines for the severity and stability of furniture. All plastered with tape

As an ordinary plastic bowl sink

In the role of handles plates, cork from bottles with cut off neck

so look inside the handle

as well as outside

on oven

so the inside

it is from the inside with the lower compartment

taped to the front socket on the liquid nails thick cardboard pasted film, self-adhesive

for burners her husband CDs

crane used for the handle on the balcony door bolted to pack cartons (in the form of a cube)

All these pens from the store (p 30-40)

well, buy more products and a grandmother, she was so inspired by the idea that bought Dimona and the dishes and products.

Here the comparative size, Dimon fits under the sink:

Well, in general, and all!

Ask clarifying questions. I will answer with pleasure!

How to make nightlight for children’s room – Step By Step

nightlight for childrens room 1

We offer you a nice idea of ​​manufacturing a nightlight for a child’s room in a Winnie the Pooh with balloons. Mishka offer blind from salt dough, and the ball is made of thread and glue (previously we have not once described the process of making such balloons)
To produce a nightlight for the nursery, you will need:
FOR THE BALL:
– Balloon;
– 3 spools of thread + PVA glue;
– A large needle;
– Wire, black electrical tape;
– Lighting small + cartridge under it, plug wire.
FOR Winnie the Pooh:
– salty dough;
– Paper, foil;
– Toothpicks,
– Gouache paint and varnish.
Nightlight for the nursery step by step:
Pierce tube with glue and insert the thread ( picture  2). Then wrap the bead thread (photo 3). As a result, you get the appearance of a “cocoon”, leave for a few days to dry (photo 4).

Pierce the ball and remove the residues (photo 5).

Make two balls of newspaper (for the torso and head) (photo 6). Wrap them with foil (photo 7). Now spread the dough, and for the best bonding between the balls you can use a toothpick or a piece of wire (photo 8).
Just shape of the orbit (eye deepening) (Photo 9). Make a muzzle (photo 10). Mouth with nose and ears (photos 11-13).

Secure yourself the edge (photo 18). Next, create the slides, flatten, try, remove the excess. This will be the most interesting point in the work, because the bear appears the mood and character (photos 19-21).

Make paws on the principle of body manufacturing. Newspaper wrap foil (Photo 22). Clung to test and insert toothpicks (Photo 23). The paw to slide wire, which is attached to the lamp cartridge (photo 24).

Secure the wire holder (wrap the wire around – chuck will be as if inserted into a ring of wire), cut into a “cocoon-bowl” hole required to accommodate the bulb with holder and sew the thread to the frame wire. Next, connect the wire and the wire together by wrapping them with electrical tape (photo 25). The wire remains inside the legs, holds the empty top (photo 26).

The ball can turn unstable, so the circle at the bottom need to add stiffening using toothpicks. You can also consider a successful design of the ball.

Nightlight for “Winnie the Pooh” children’s room is ready!