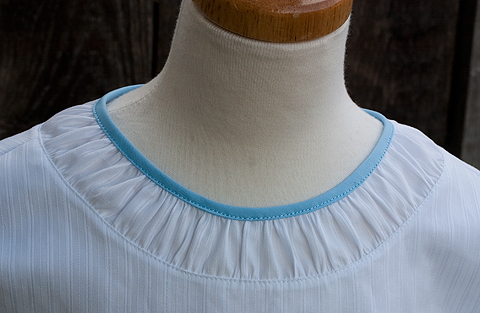
Different types of kurtis neck designs

Kurti is an Indian traditional dress worn by girls and women. It has been used as a casual wear since ages. Nowadays, it is also being worn by women. In India, there are different types of kurtis available. They are mostly made from cotton or silk fabric. There are many types of kurtis designs available in the market. You can choose one according to your taste.

Kurti has become the women and girls most favourite style statement to look stylish with the charming traditional look. These classy yet trendy kurtas are so comfortable that you can wear them round the clock. The best part is that you can easily modify and customise Kurtis for different looks. Available in different styles and patterns, kurta is first to picked of college going girls, working women, social women as well as of housewives for any occasion. Fashion designers are trying to keep pace with the growing popularity of kurtas and find endless options to design kurtas according to the latest trends. As a result, wearer gets ample choices, from ethnic to indo-western style with different patterns, cuts, and designs. Some popular types of Kurtis are mentioned here; just have a look and you will get smart ways to look best in all avatars

Selective Types of kurtis neck designs

Emboridery neck border design for Kurtis

Yellow Kurti design with green border

Kurtis are traditional Indian garments which are usually made out of cotton. They are very comfortable and easy to wear. They come in various lengths and colours. Women love wearing kurtis because they look good on every body type.

Cute Kurti neck design – suitable for girls

Chudi neck design

The kurta is a traditional Indian garment which is usually made out of cotton. It is a loose fitting shirt with long sleeves and a round collar. The kurta is usually worn over pants or trousers. The neckline of the kurta is usually straight or slightly curved.

Trending Neck Design for Kurti, Salwar-Kameez

Stylish Kurti neck design

Suit Neck Design

Kurtis are traditional Indian garments that are made up of two pieces – a shirt and a pair of pants. They are usually worn over long shirts and trousers. The kurti is a loose fitting garment which covers the torso and upper body. It is often used as casual wear.

Kurtis with V-shaped necks

Cotton Kurti Neck Design

U neck design for kurtis

New kurti neck design for girls

A line kurti neck Design

Simple Door Shape Neck design with dori

Simple neck design for Kurti

Unique Kurti design for female

Modern Kurti neck design

Loving kurti neck design for weddings

Latest Neck designs for Kurti

Sexy kurti neck design

Some more different types of kurtis neck designs

* A-line kurtis with Mandarin collars

A-line kurtis with Mandarin collars are a stylish and elegant choice for any occasion. They are perfect for both formal and casual events, and can be dressed up or down to suit your needs. The A-line silhouette is flattering on all body types, and the Mandarin collar adds a touch of sophistication. Whether you choose a solid color or a printed kurti, you are sure to make a fashion statement.

* Kurtis with V-shaped necks

Kurtis with V-shaped necks are a type of clothing that is popular among women in India. They are typically made of cotton or silk and are worn over a blouse or shirt. They are often brightly colored and can be embellished with embroidery or other decorations. Kurtis with V-shaped necks are considered to be both stylish and comfortable, and they are a popular choice for Indian women of all ages.

* Kurtis with boat necks

A Kurti is a traditional Indian garment that is often worn by women. Kurtis with boat necks are a type of Kurti that feature a boat-shaped neckline. This type of Kurti is typically made from a light and airy fabric, making it ideal for warm weather. Kurtis with boat necks are often decorated with intricate patterns and embroidery, and are often worn with a lehenga or saree.

* Kurtis with round necks

Kurtis are a type of shirt that have a round neck. They are usually made of a cotton or linen material, and can be either long or short sleeved. Kurtis are worn by both men and women in many different cultures, and are often seen as a more traditional type of clothing.

* Kurtis with square necks

Kurtis with square necks are a type of clothing that is typically worn by women in India. They are usually made of a cotton or silk fabric and can be either long or short. Kurtis with square necks often have intricate designs and patterns on them, which makes them very popular among Indian women.

* Kurtis with halter necks

Kurtis with halter necks are a great choice for a summertime look. They are comfortable and stylish, and can be dressed up or down depending on the occasion. Pair them with shorts or a skirt for a casual look, or dress them up with pants or a dress for a more formal occasion.

Sew a ruched neckline step by step

Now, if you recall, when we designed the patterns for our bodices, we left it at the point where the underdress ruched neckline was higher than the overdress neckline so that the underdress neckline would show. But what we want to show is a strip of puffing that we’re (ostensibly) going to insert into the underdress neckline. So we need to address that situation right now before it goes a step further.
Pattern
I think an inch and a half is gracious plenty for a puffing strip. So we’re just going to lower the underdress neckline by 1 1/2″.

The puffing strip is going to be a straight strip of fabric, so we won’t really need a pattern piece for it. So we’ll go ahead and add the seam allowance back on to the neckline before we cut it out.
We’ll consider here for a second what the puffing strip dimensions need to be. As for length, since we don’t want it to be frilly-puffy, just moderately puffy, I think we’ll measure the neckline and cut the puffing strip 1 1/2x the length. We could measure the pattern pieces at this point, or we could measure them when we’ve sewn the shoulder seams and the whole neckline is waiting for us to stick the puffing in. I think that’ll be easier.
The width of the puffing strip is like this: We want the final strip to be 1 1/2″ wide. It needs a seam allowance on the bottom, where it adjoins the bodice neckline, but it does not need a seam allowance on top since we’re going to bind it.
Now we need to sew up the bodice. We’re going to line this bodice completely. First, we’ll start by cutting 2 backs and 2 fronts on the fold:

Shoulder seams
Now we’re going to sew the shoulder seams together. Each front shoulder seam goes to the shoulder seam of a different back piece, and then the remaining back shoulder seams go to the remaining front piece again. So that the whole thing makes one big happy circle:

What we’re going for here is a lined bodice without a center back seam, which make more sense if I fold the lining underneath, like this:

Inserting Puffing
Get it now? Good, because here comes the puffing strip:

The puffing strip is a straight strip cut lengthwise, with both ends finished and gathering threads run down the long ends. A fairly innocuous puffing strip, all in all.
Now we’ll find the precise place where our back pieces are supposed to fold over (which is not the center back, which would have made it easier to say), and put a pin there.

Now we’re going to open the neckline up and place the finished ends of the puffing strip right there, cozied up to the pins, and the center of the puffing strip at the center front. The puffing strip and the bodice are right sides together.

Then we’ll pull up the puffing bobbin threads so that the puffing strip fits the neckline:

adjusting the gathers so they look nicely distributed, and pinning many, many times. Now we’ll just sew that down, along with the inner gathering thread.
Once that’s sewn down, pressed gently, and good to go, we’ll place the lining on top of the puffing, making a sandwich, and sew that down:

See the puffing in between the layers? Now we’ll press the seam, trim it, and turn it right side out:

A row of edge stitching at the base of the puffing, through all layers, makes this look very crisp. Do notice, if you would, that if we’d taken big clips out of the seam allowance they would be very obvious at this point.
Now we’ll just pull up these little gathering threads that we put at the top of the gathering strip:

Binding
Now we’ll bind that top edge, okay?
First, we need a binding strip. This time we are going to use a French binding. The width of the binding needs to be 6x the finished width of the binding, plus 1/4-3/8″ to allow for folding. The length needs to be the length of the gathered puffing edge, plus a couple of inches. This measurement doesn’t need to be very precise, as we’re just going to trim the ends when we get to that point, but we certainly don’t want the binding strip too short. This strip, since it’s going around a curve, needs to be cut on the bias.
The strip is folded, wrong sides together, and pressed.

Now we’ll pin the long raw edges to the raw edge of the puffing strip, with the binding on the wrong side of the puffing and sew that carefully down.

Here I’ve sewn again 1/8″ from the first stitching and trimmed the seam allowance close to the second stitching.
Now we’ll fold that binding around to the front and pin it so that the fold covers the stitching on the front:

The ends need to be folded in like this:

Now, slowly, because we’re going around a curve and this is a focal point in our dress here, we’ll edgestitch close to that fold to sew the binding down.

Side Seams
Before we can put this on the dress form to look at it, we’ll need to sew up those four little side seams. Bodice to bodice, lining to lining.

Pressing those and putting them in place lets us look at the bodice:

We did not baste the armhole and its lining together because we’re going to need it loose when we attach the bodice to the skirt.
Here’s a closer look at the finished neckline:

And here we are so far:

Now all that’s left is to create the blue bodice and sew it all together. Whew! Which we’ll do next time.

Source