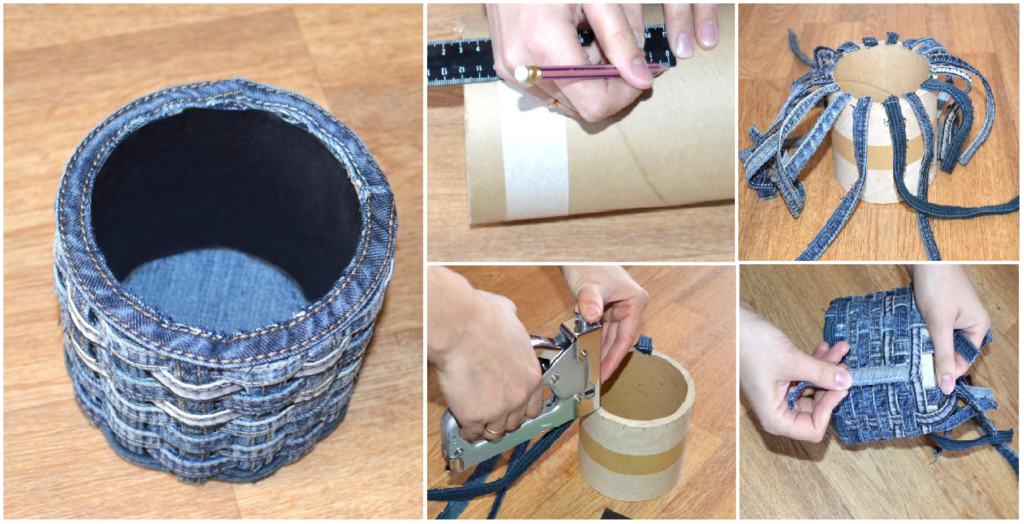
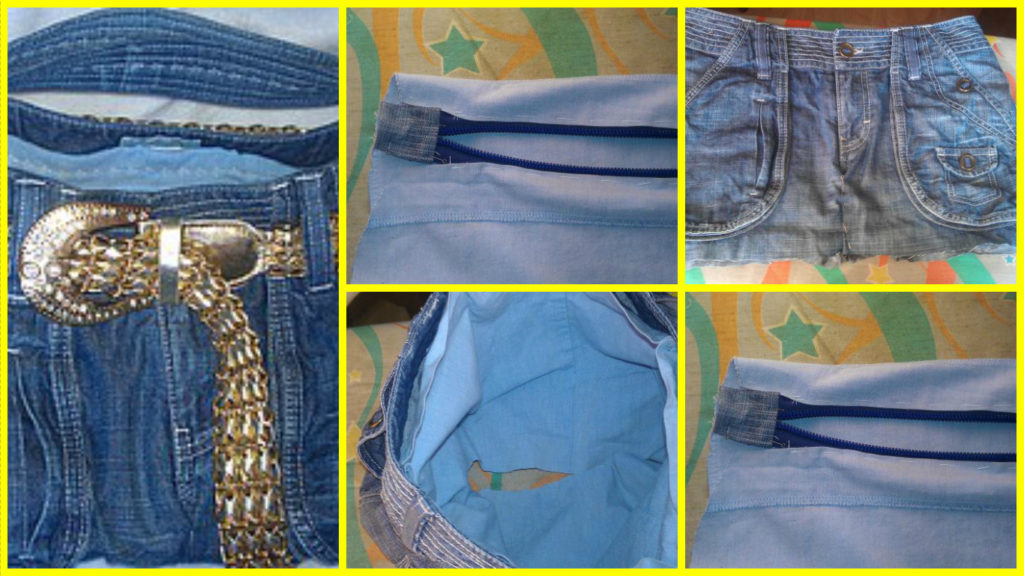
How to Mend Jeans Holes in Cutest Way

Mending or a hole in your pants doesn’t have to be ugly! There are so many fun ideas out there to patch a hole. Here are some properly mended pants as well as some super silly mending. From patches to pom poms, you can sew just about anything in, over or behind a tear to make it look fun and playful.

Use this as a way to incorporate your child’s personality into their clothes. Ask them what they might like, and do the job together. Not only is this a way to recycle clothes, but it is a way to spend time together instead of being at a shopping mall.

Hope you like these cute ideas of mend jeans holes.

We would love to hear your thoughts in the comment section below. And be sure to like us Facebook for more ideas!

Thank you for visiting our website. Keep Creating with Art & Craft!

DIY Handmade brutal cup of denim

I want to tell you how to make brutal cup of denim scraps.

This is no big deal. Along with shooting on everything about everything took a couple of hours.

To produce it do not even need a needle and thread, you only need to stock some of the materials that you would otherwise be thrown away. So, we need:

1) thick cardboard tube, which is wound around the linoleum. It is clear that every day is such a thing at home and can not attend, but now you know that you can ask friends or family who started a repair. 🙂 We have a once thrown out (were stupid), and that I begged my brother when he was doing repairs. Even I had to saw it into pieces, as the three-meter in the car does not fit;

2) a bunch of old jeans seams. I used to rework ripped jeans, but, firstly, it is terribly long, and secondly, a lot of debris in this thread fray. So I began to simply cut off. That’s handy! Cut off the need to stitch the seams with beautiful (mostly domestic) close to the seam. Very well, if they are different in color – so even more interesting;

3) hacksaw to cut off a piece of pipe;

4) Furniture stapler;

5) thick cardboard to the bottom;

6) colored cardboard for inner walls of the cup;

7) the glue that you like and it seems quite reliable. I Moment-crystal.

8) a couple of pieces of denim to bottom.

I have a rough edge of the pipe, it had to be cut. I pasted masking tape so that the ends exactly united. He measured out by 10 cm – is the depth of our cup. Taking advantage of a hacksaw (and male force) to cut off a piece of markup. Scotch tape is not necessarily clean.

Now we sort the seams along the length: short (13-15 cm) to vertical (I have 16 pieces), long – for contours (about 43-45 centimeters). One seam of the trouser leg is enough for 2 lanes contours. Now furniture stapler short stretches to one end of the pipe at a distance of approximately 1 cm from each other

Then we begin to spin out long stretches of the side of the cup, hiding under the ends of the vertical stripes. Horizontal stripes when weaving Stretch, so the cup will be smoother. Excess cut the butt and prishpilivayut stapler, it is better not to press strongly to the bracket did not come out from the inside. If you still come out or from the outside to be fit is not tight, it is possible to adjust the hammer.

The photo shows the place stapling. They will not be seen, closed vertical stripes.

The vertical stripes in the weaving and Stretch.

When the spin finish (I got 9 rows) are bent by sticking the ends of the vertical bars and prishpilivayut the ends of the pipe, at the very beginning.

I cut off the excess, but it is more convenient to do it, get neater. That’s the sort of thing we have got:

Making the bed plate. Cut the cardboard circle 2: large – on the outer radius jars, lower – Inland. We cut out of the denim patches on them slices, leaving the hem allowance. Glue the cardboard circle to the jeans (I glued), an incision around the edge and fold back the allowances, also gluing them.

Now connect via Crystal large circle with one end of the resulting cup and little glue inside.

The upper section of closing another strip, sticking it with adhesive.

Cut out of colored cardboard (I took this time black embossed) rectangle, a width of 10 cm, length – equal to the inner circumference of the pipe and glue on the inner walls of the cup.

Now we put the entire structure under the press to the bottom and top rim firmly and evenly stuck. Voila! The cup is ready! You can give your loved or brother, but you can keep the favorite of the hook, pencils or cosmetic brushes in the end.

How to make fashionable bag from old jeans

bag made of old jeans 1

Take the old jeans, which for some reason do not have to … nalazit beauty. Or just do not like already.

And a flick of the wrist, turn them into elegant shorts.

Then make a skirt of denim shorts. Beauty!!! The cool thing out. The only doubt that her mother would wear. Sighs and then continue. My bag out of old jeans will zauzhatsya down. Therefore sacrificed bottom folds.

Theoretically, they can be just scribbling. But I was not sure of the number and width. Because left is pinned.

Then I took a piece of my father’s overcoat (or, in the beautiful – greatcoat cloth), folded in half. Affixed to my denim skirt. Vd line first, and then the bag “spread her” and outlined a sort of a strange oval-rectangle (my mother – a teacher of mathematics from such a term she would definitely eye twitched!).

Pinned to her purse, she pulled down – admired. Attached to the bottom of the denim and looked around. She left a margin. Well, nothing! There was no need to leave anything.

Set aside. Basically, if you have patience ended, can be jotted wrinkles on the bag, stitched the bottom, sew the handle – and hello! Bag of old jeans ready! But! Mom wanted the bag into two compartments. With pocket!

I had to sacrifice a bathrobe. Old, but decent.

Fold it in half. I put in such a way that the top of the bag coincides with the hem. (Really too lazy to bend even the hem) .Prilozhim bag and leaving the stock, circle.

Cut out two pieces of the lining and how they. Insert in the bag. Admire! However, I have to admire the first time did not work – I pinned the lining across the bag and then all tried to understand that the train is not here ?! Cut out the jumper and denim from the robe. Sostrochim krasivenko More will need to mine for the lining. We cut him out of his robe. Skolem together.

And here it is the nightmare and began !!! LIGHTNING!! What I revised master-classes as descriptions revered! Those guys do not understand! It has made its own way. Wrong, perhaps, but just!

She took a split (which until the end unbuttoned) zipper, disunite and sew the two halves of my backing.

First time sewed to the front side. It turned out beautifully, but it turned out that the pad then it is necessary to sew inside out. Otporola and sewed the zipper as it should be – from the inside. Then he buttoned it and ends, and not to the slider jumps, small klaptikami jeans closed. Stitched (for me, as it turned out, even the foot is in the special machine to sew the zipper).

Encouraged by the success, I even made a near lightning decorative stitch!

The main thing – denim klaptiki scribbling on the zipper tightly! Otherwise, the slider will go into them. We’ll have to get it and spoil the manicure (we need this ?!).

But the zipper seemed to me a little! My eyes fell on her dressing gown pocket.

I otporola him and moved to the lining of the bag. I almost shed a few tears – what sort needlewoman !!

Next – just all posostrachivala, posobirali:

Sostrochila lining.

Sostrochila greatcoat bottom and denim. Scribbling folds that initially pinned on the bag. Stitched to the bottom of the bag. Sew lining. Do not think that just because the village and sew! No! The happiest moment pridelyvaniya lining up my understanding that the bag has a thing for a BELT !!! What underneath stitch machine ?! Maybe someone and there is a special foot, I was not there. Because I had to take a needle in the foot and part of the lining to sew by hand.

But – assembled bag! The case for small – pens!

Cut two long ribbons. To make amends for the edge (it to ostro chit does not turn out).

Inside invested little syntepon. Handbag sewed to mother – a teacher and she is wont to be laid in a handbag pile of notebooks, a couple of kilos of potatoes, a loaf, and so on. And I thought, just the harness, with no filler, it will put pressure on the shoulder. I stitched. Many times. Stitched into a ring. And sew it to her purse like this: So I turned and short handle and long. And so!!!! A solemn moment – Bags of old jeans READY !!!! The result was a spacious, light enough. Remarkably washed in the machine. And pockets – the dam!

Maman this bag is now out of the hands is not released. The pieces for the belt (!!!), then insert the belt, the handkerchief vent – every day is different and beautiful!

Sew! This I told for so long, and sew the bag of jeans – simple!