Have you got loads of newspaper lying around? Are you feeling crafty? Well, you have come to the right place.
In this tutorial, I will be telling how you can turn your old newspapers into something good-looking and useful. So follow along.
- Loads of newspaper (obviously)
- Flour (to make glue)
- Water (to make glue and paper mache clay)
- A bottle or anything similar (you will see why, later.)
- A bowl
- PVA Glue
- Paints and brushes
- Paper shredder (optional)
- Hand blender (optional)
And that’s it.
Let’s get making.
Step 2: Shredding Newspaper to Make the Container
Start by shredding the newspaper in 1 inch wide strips. You don’t need a lot, these stripes of newspaper will only be used to make the container of our pencil holder, which will not be very thick.
But you can shred a lot because we will be needing them in later steps anyway.
Step 3: Making Paper Mache Glue
Traditionally the glue used to make paper mache crafts is made by mixing flour and water. and we will be using the same in this project. But you can always use regular glue if you want to.
The glue made out of flour tends to be messy, but it adds to the fun.
To make paper mache glue, take a cup of flour in a mixing bowl and gradually start adding water in it while constantly stirring it. Keep doing it until the mixture turns into a smooth paste. The paste should be neither too runny nor too thick. Click here to watch the video. (Don’t worry, the link will open in new tab.)
TIP 1: Don’t make a lot of paper mache glue at once, because after a day or two, the glue will not be as sticky. So only make as much as you will be able to use in one day.
TIP 2: Use something strong to stir the mixture. I learnt this the hard way, after breaking one spatula.
Step 4: Making the Container
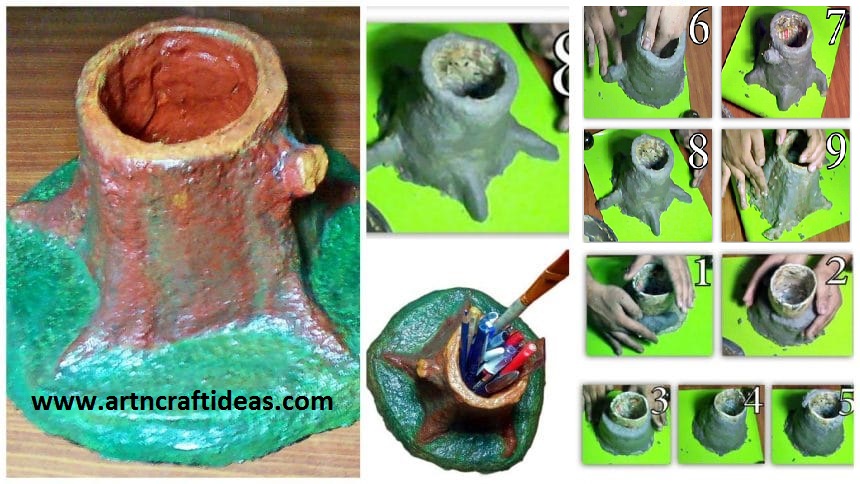
To make the container, dip the strips of newspaper in the paper mache glue, once the whole strip is covered in the glue, remove the excess and start laying it on a bottle or any other such thing as shown in the picture above (numbered as 1, 2, 3, 4 and 5). Lay the strips perpendicular to one another in order to give the container more strength. (Click here to watch the video.) Keep doing this till your container is two layers thick (see the picture numbered as 6). Then leave it for drying overnight. On the next day, carefully remove your container from the bottle. You may have to use some force, but be gentle, you don’t want to break it. If necessary, use some prying tool to get it out. Don’t panic if it breaks slightly, It will be fixed in a moment, but try not to break it in two or three pieces. At this stage, your container should look somewhat like the one shown in picture above, numbered as 7 and 8.
After removing the container from the bottle, start covering it with newspaper stripes once again. This time, you have to make it thick enough so it is no more fragile.
One important note: let your container dry after every layer, otherwise molds could ruin your pencil holder. I dried mine in the sun, but if the sun is not in your favour, use your oven. Keep it in a warm oven and leave the door slightly open so water vapour could easily escape.
By now you may be wondering that the container looks so ugly. Yes you are right, it is. But it will no longer be, get prepared to make it look beautiful.
Start shredding more newspapers, but this time shred in smaller pieces. If you have a paper shredder, go ahead and use it, it will make your work a lot easier because you need a lot of shredded newspaper. Keep the shredded paper in a large bowl.
After shredding, add water to fill the bowl and let the paper soak in water for around 12 hours, it will make the process of making paper mache clay much easier.
Now that the paper has become soggy, start destroying it. (Take a look at the picture above or watch the video linked above.). Take your time and turn the paper into smooth pulp. Make sure there are no lumps in the pulp, because they will trouble you afterwards.
When you have turned the whole thing into pulp (like in picture numbered as 6 above), remove the excess water by straining and squeeze the pulp. You just need the pulp to be moist, there should be no water dripping from it.
Once you have got your pulp out of the water, add some paper mache glue to it and mix well. I added the pulp and paper mache glue in about 3:1 ratio. you don’t have to be precise.
If done correctly, you should now have your paper mache clay ready for next step. Your paper mache clay should look somewhat like bread dough.
Step 6: Time to Get Crafty
Now that you have made paper mache clay, use it to sculpt around the container using your imagination. Use plenty of paper mache glue to make your sculpture smooth. I made my pencil holder look like a tree trunk (take a look at the images above), but you can get creative and make something else.
After you have done sculpting, dry it in the sun for at least 7 to 10 days before proceeding further. It has to dry completely not only from outside but also from inside otherwise molds will find their way to your pencil holder, and I don’t think you want that. So make sure it dries completely.
When I was making my pencil holder, the sun was not in my favour, so I had to use my oven to dry it.
You can do it too, Keep your pencil holder in warm oven and leave the door slightly open so the water vapour can escape.
TIP: Make sure there are no cracks tn your sculpture as they will reduce its strength. Fill any cracks with paper mache clay and plenty or paper mache glue.
Now that you have completed sculpting your pencil holder, let’s paint it to make it look even better.
But before painting it, cover it in a layer of PVA glue. Any PVA glue will work. Mix one part of PVA glue in one part water, and apply it on your pencil holder. It will make your pencil holder stronger.
Once the glue has dried, go ahead and paint your pencil holder according to your imagination using acrylic paint. Acrylic paint, apart from looking good, will seal your pencil holder so no moisture can enter and ruin it.
You can use any other paint if you want to but, you will have to seal your pencil holder with some sort of acrylic sealant to make your sculpture weather sealed.
Now go and make your own, and if you have any questions, feel free to ask me. Best Of Luck.

