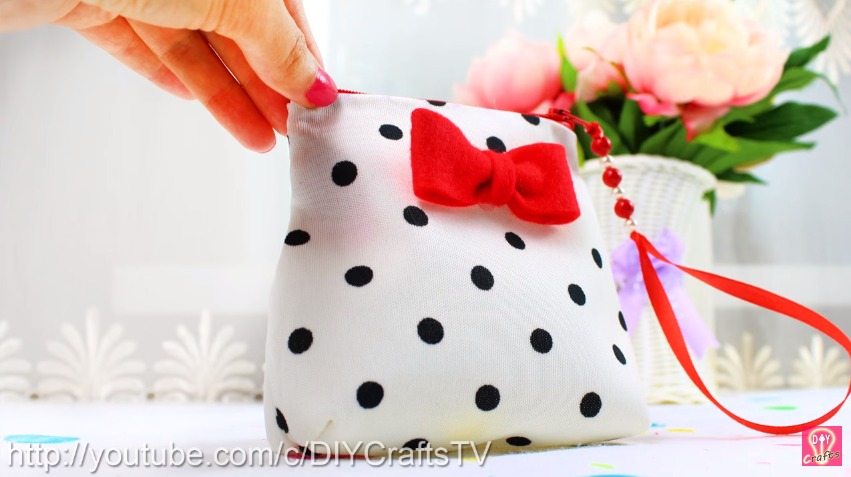
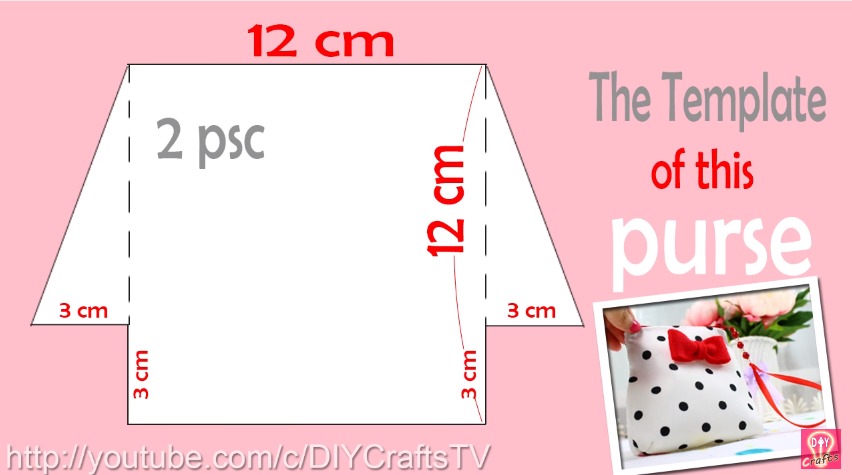
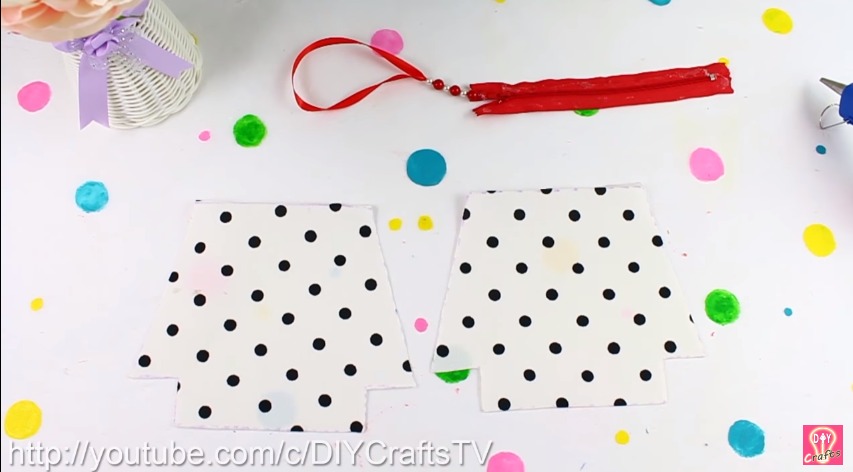
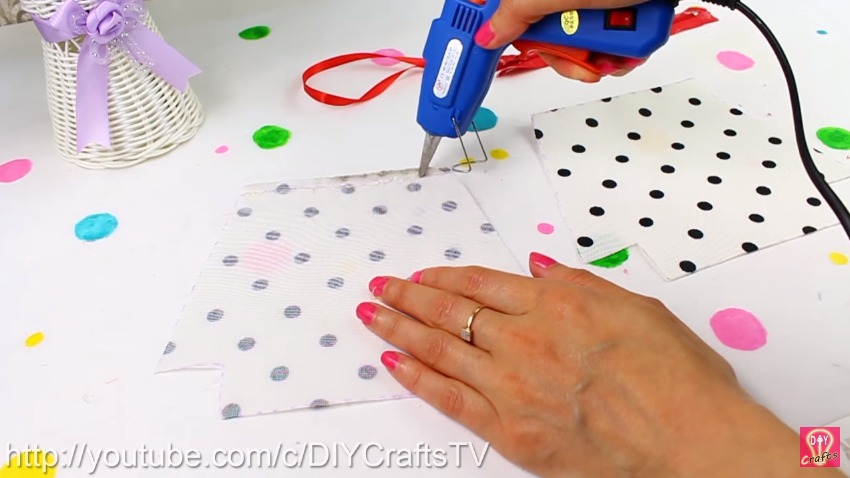
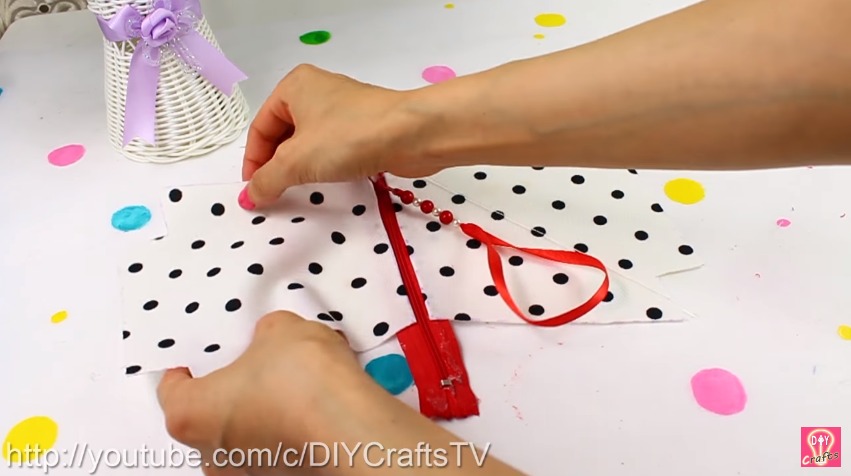
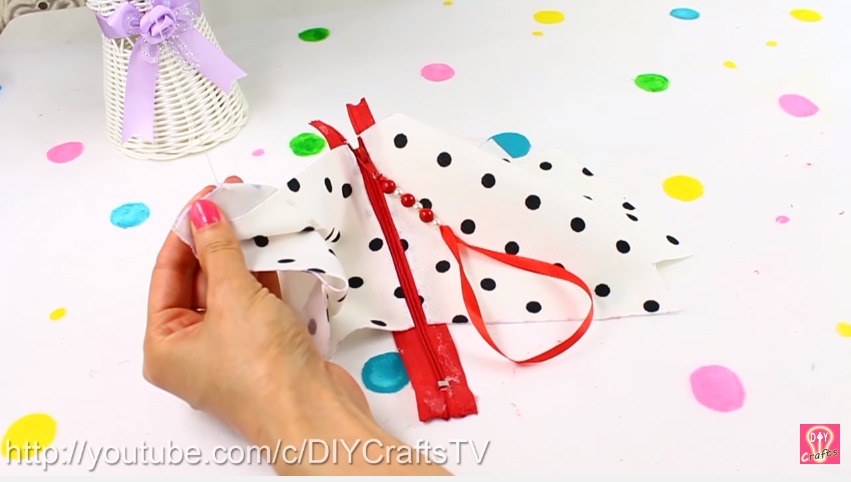
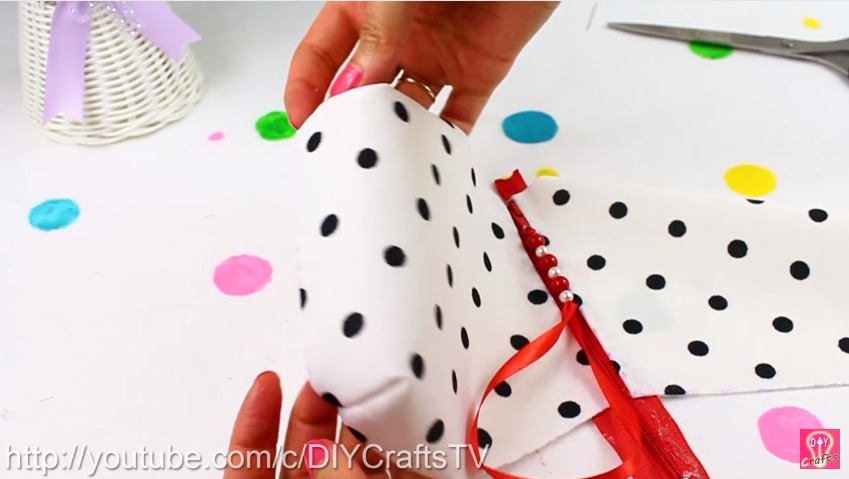
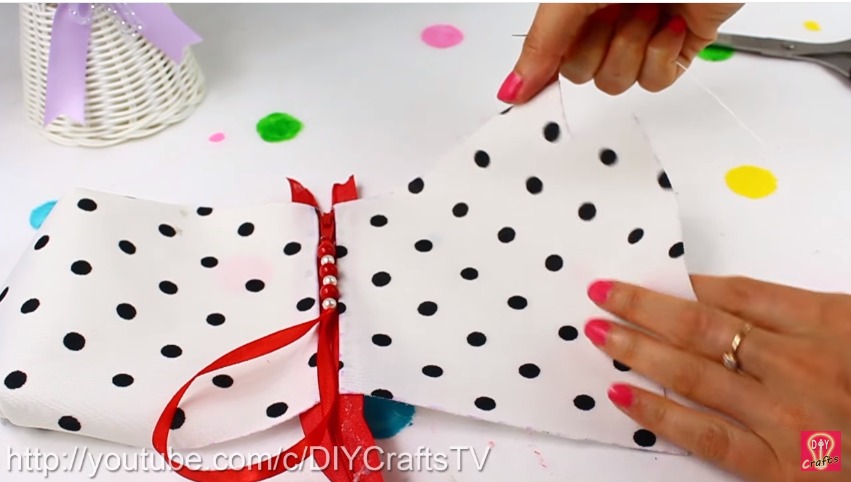
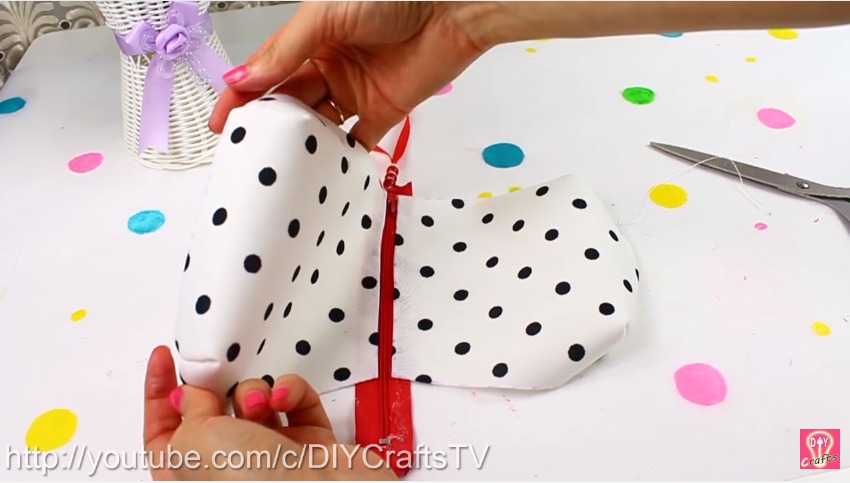
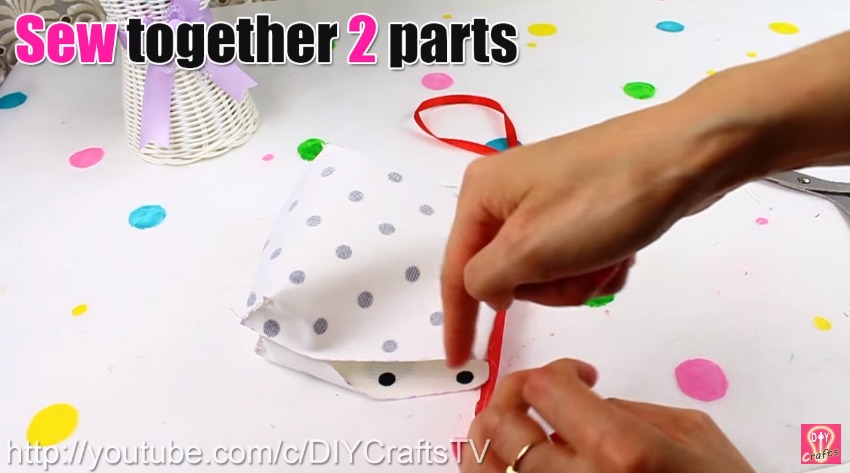
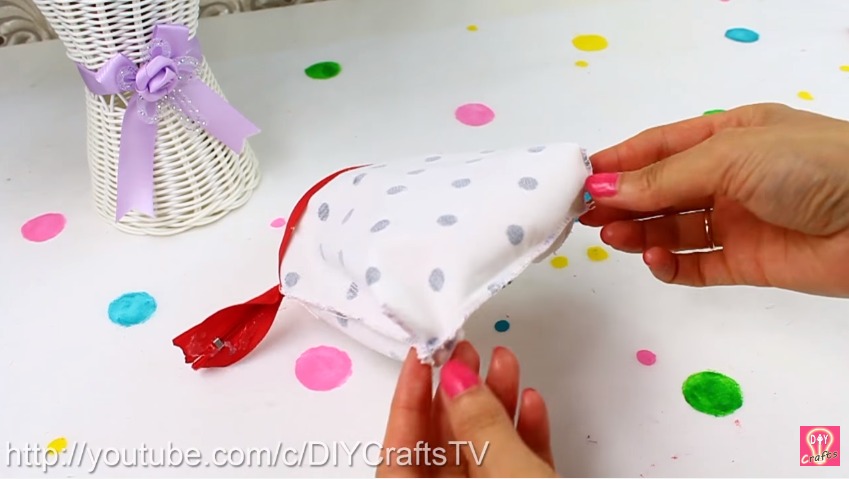
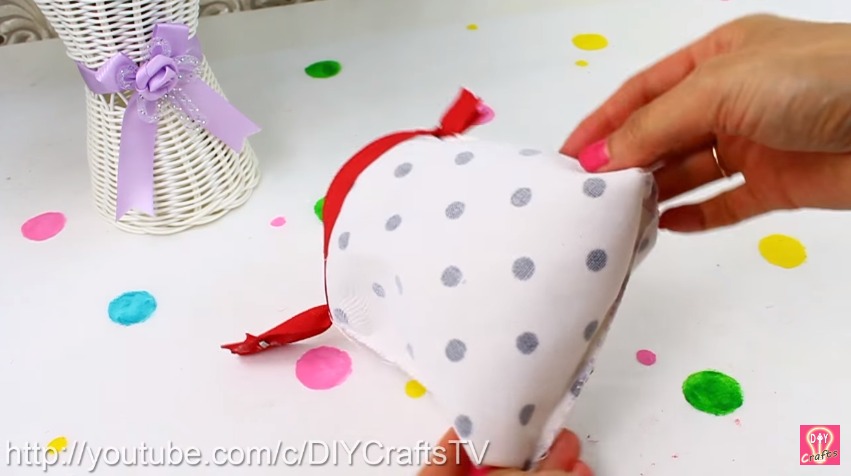
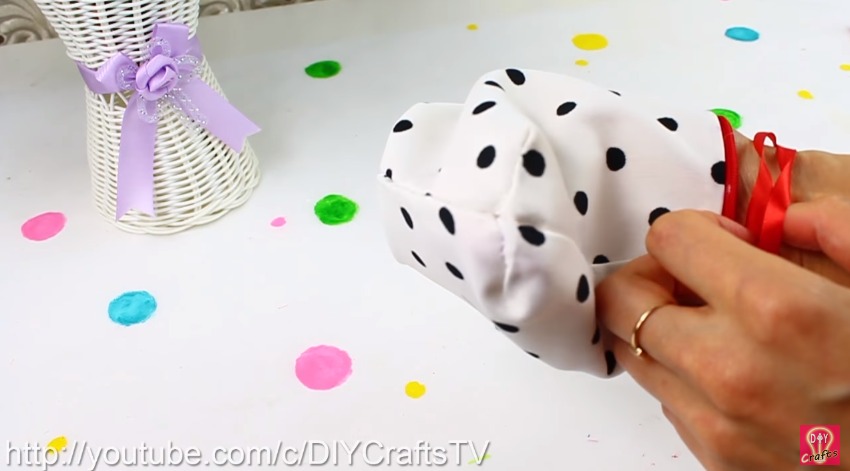
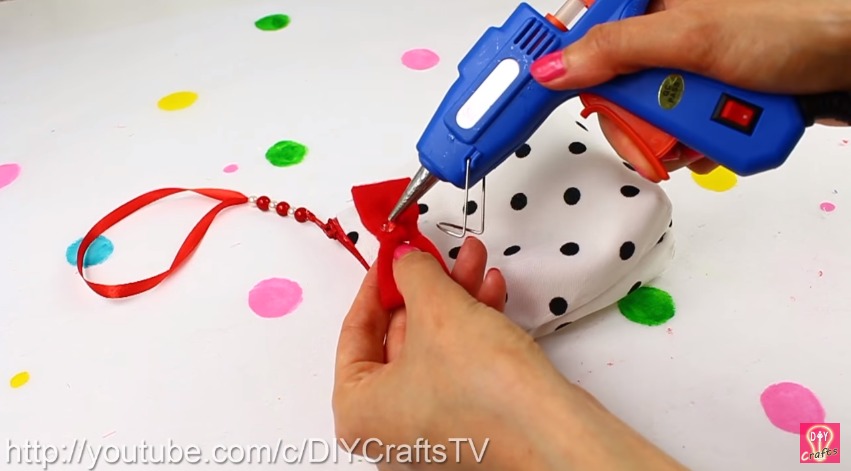
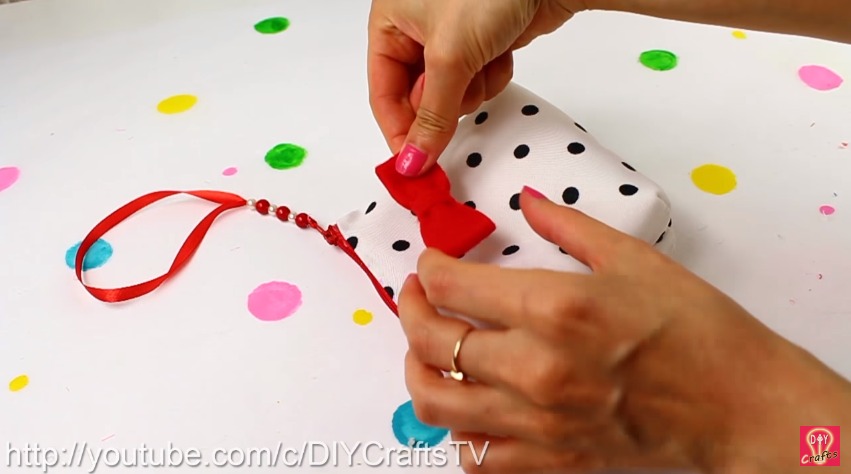
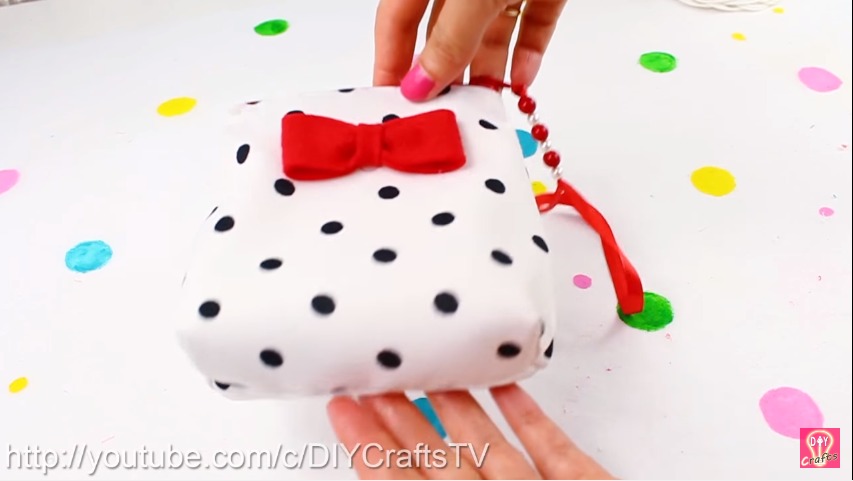
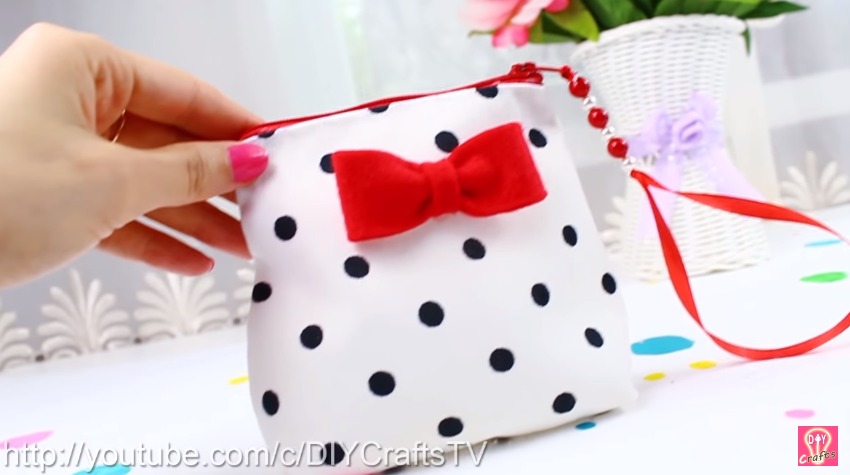
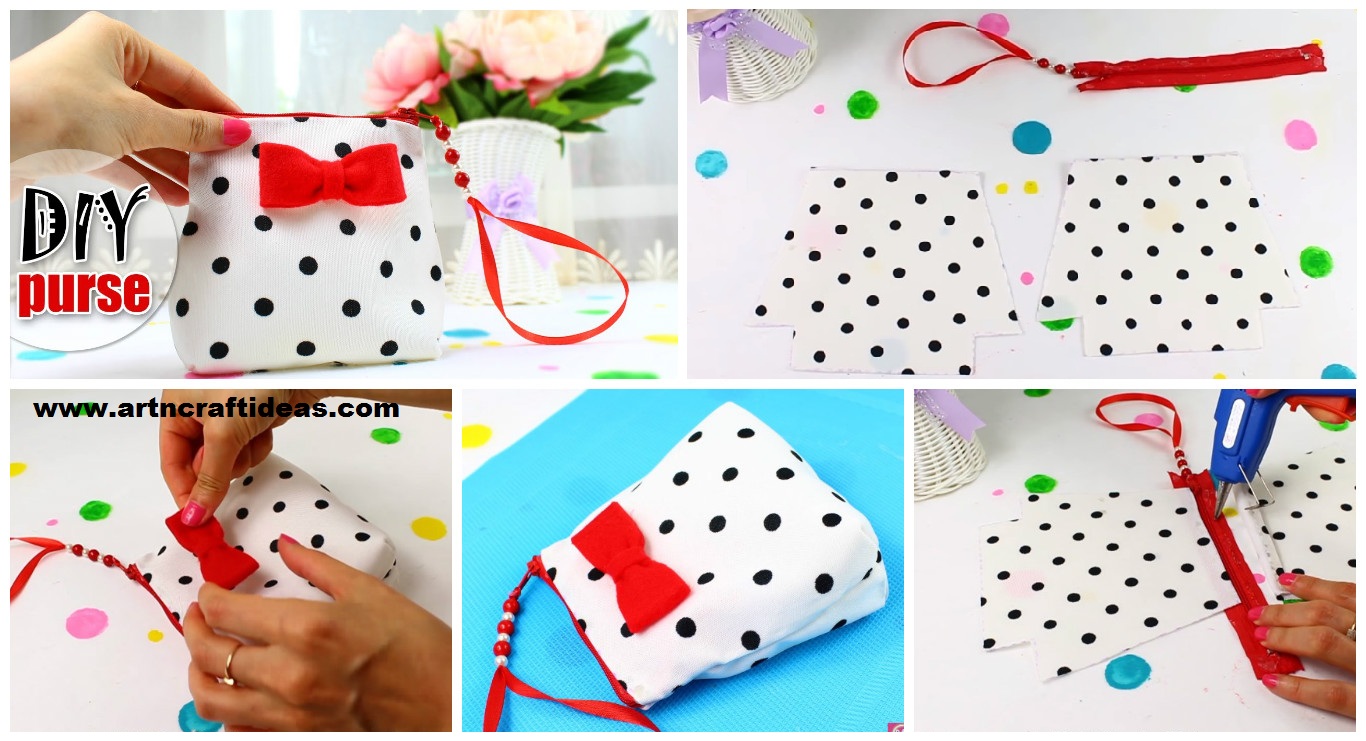
Easy DIY purse bag sweet zipper bag tutorial for those who really love to make purse by own hands. Just easy and so cute purse.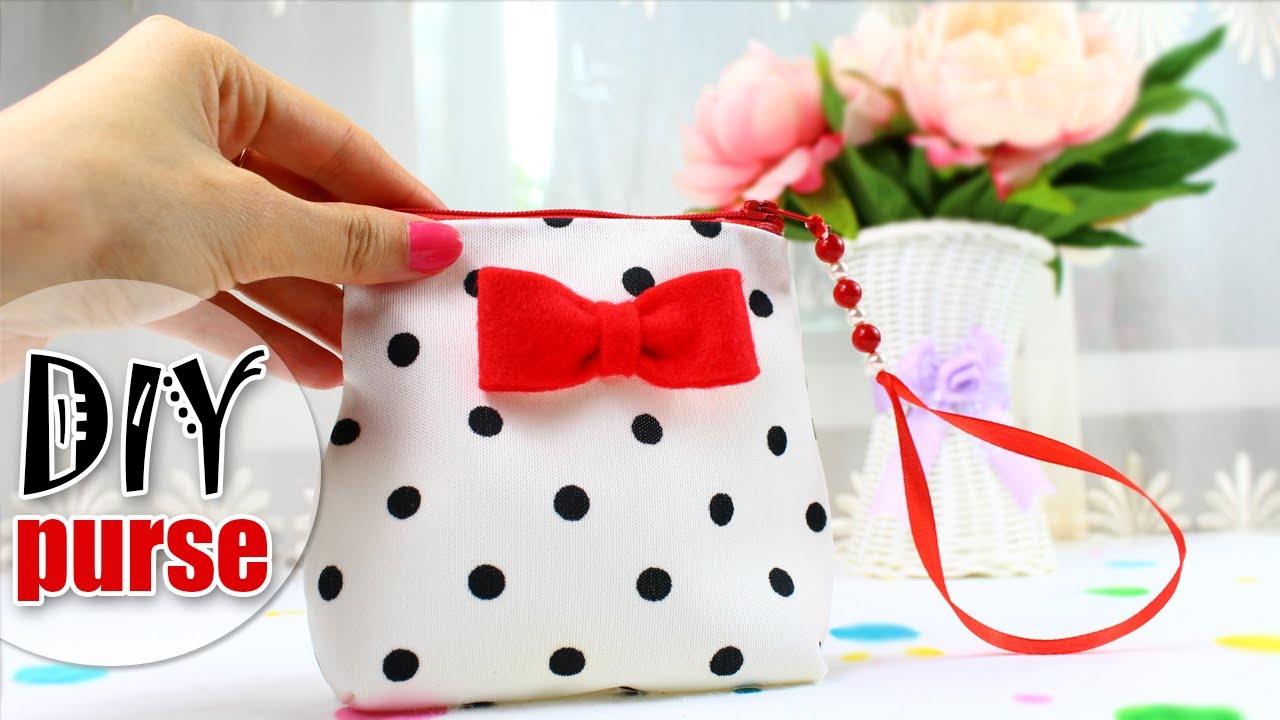
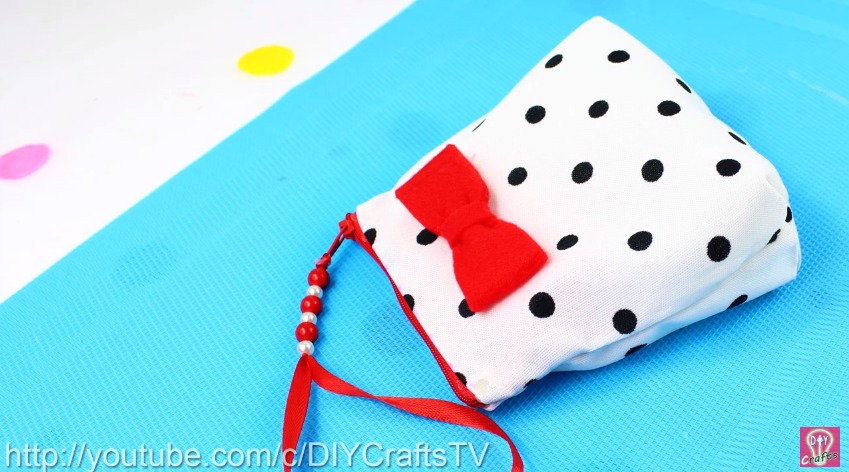
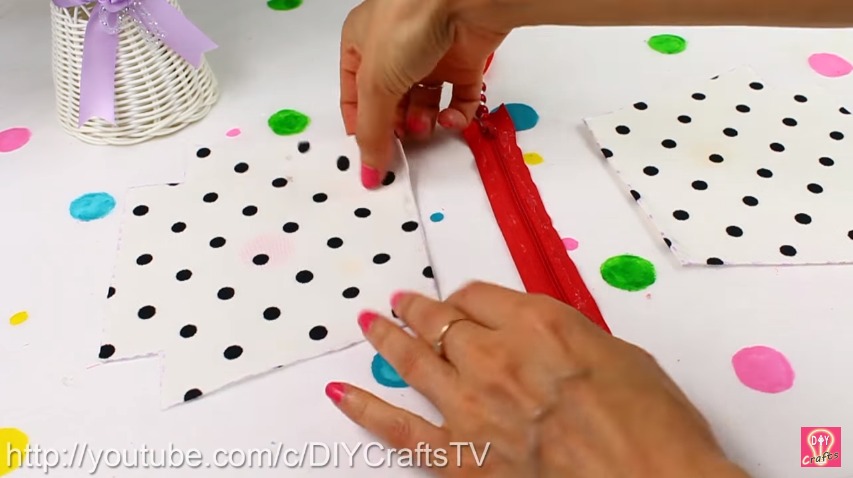
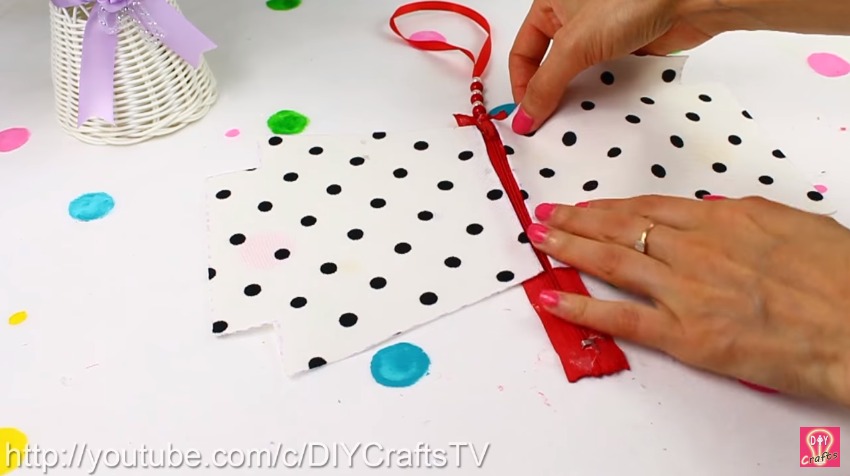
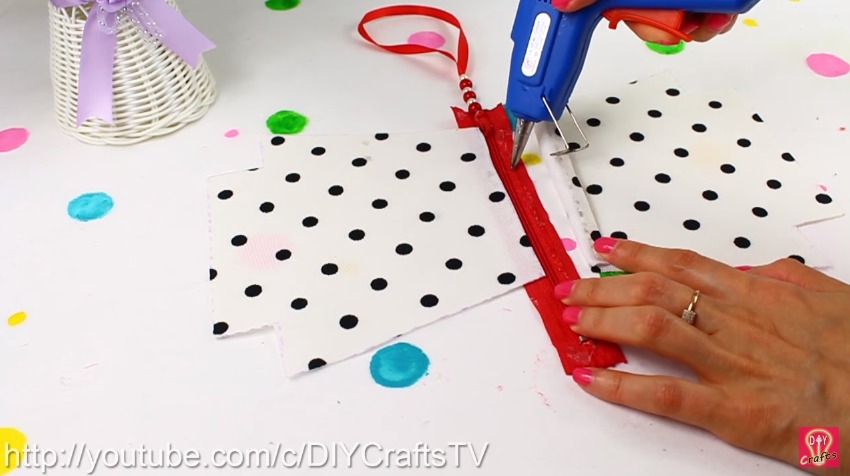
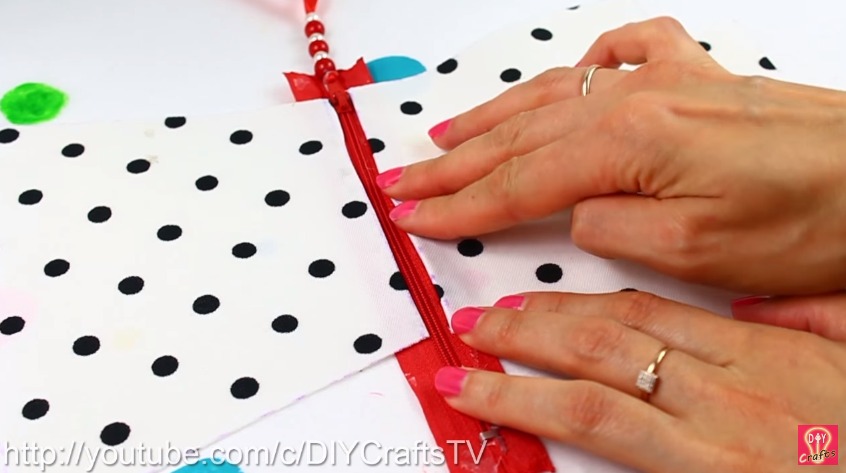
DIY Sweet Zipper Purse Tutorial
Get Daily Art and Crafts Ideas & Tutorials…
Easy DIY purse bag sweet zipper bag tutorial for those who really love to make purse by own hands. Just easy and so cute purse.
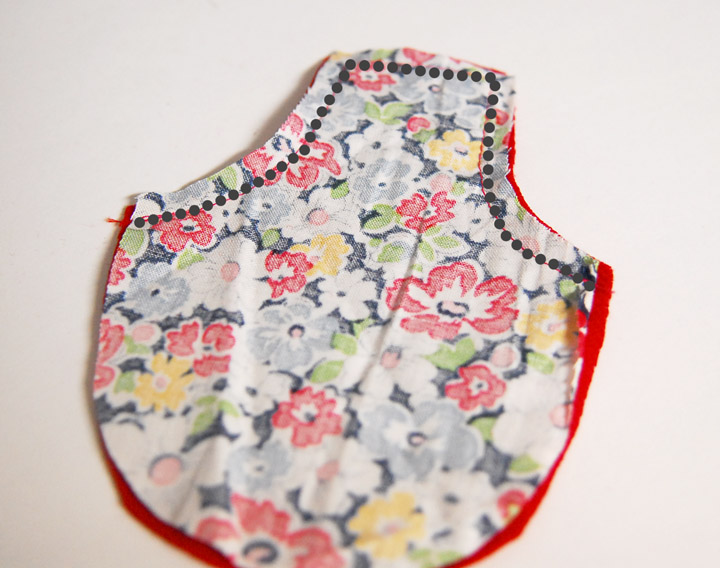
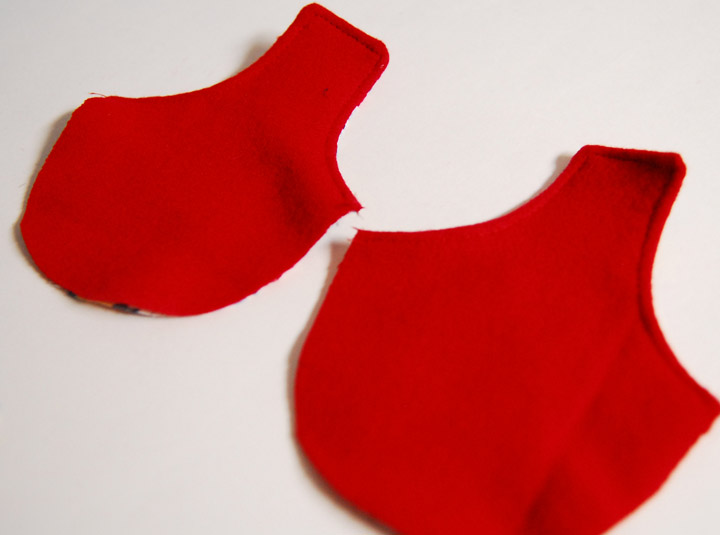
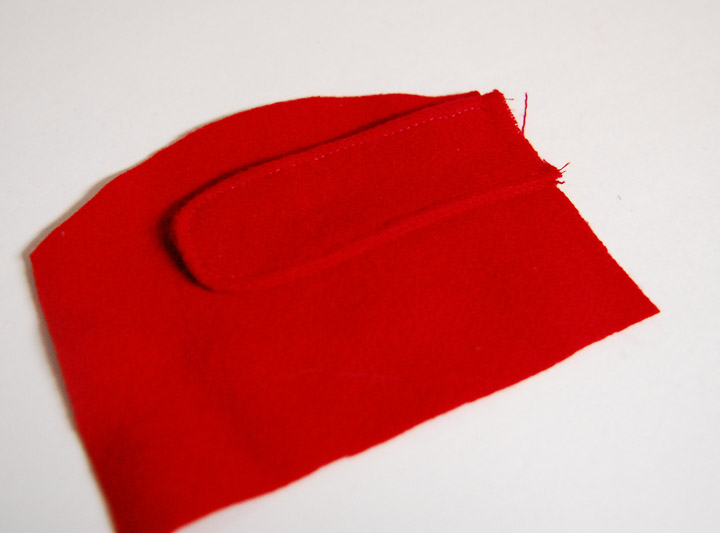
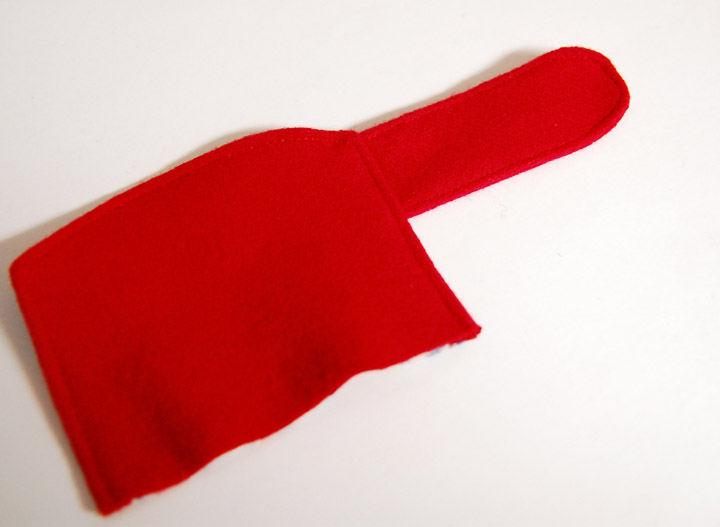
 What you’ll need : :
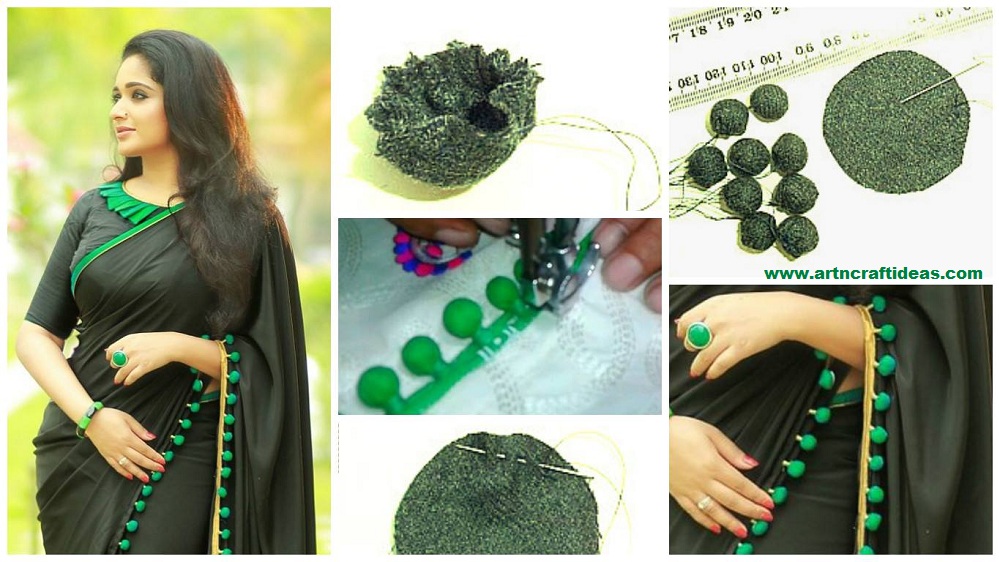
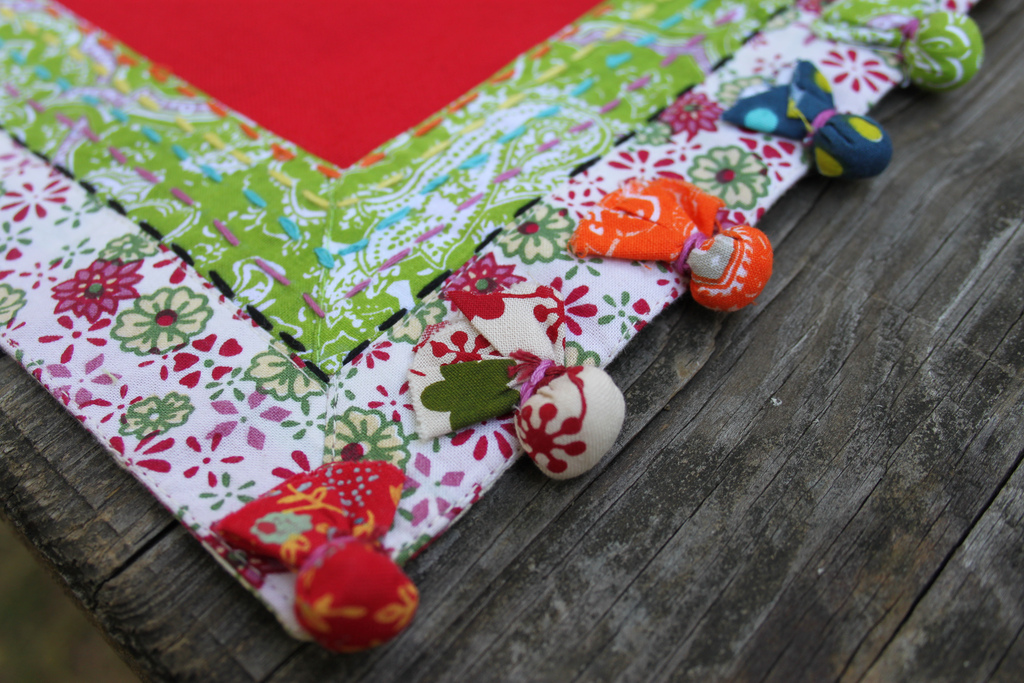
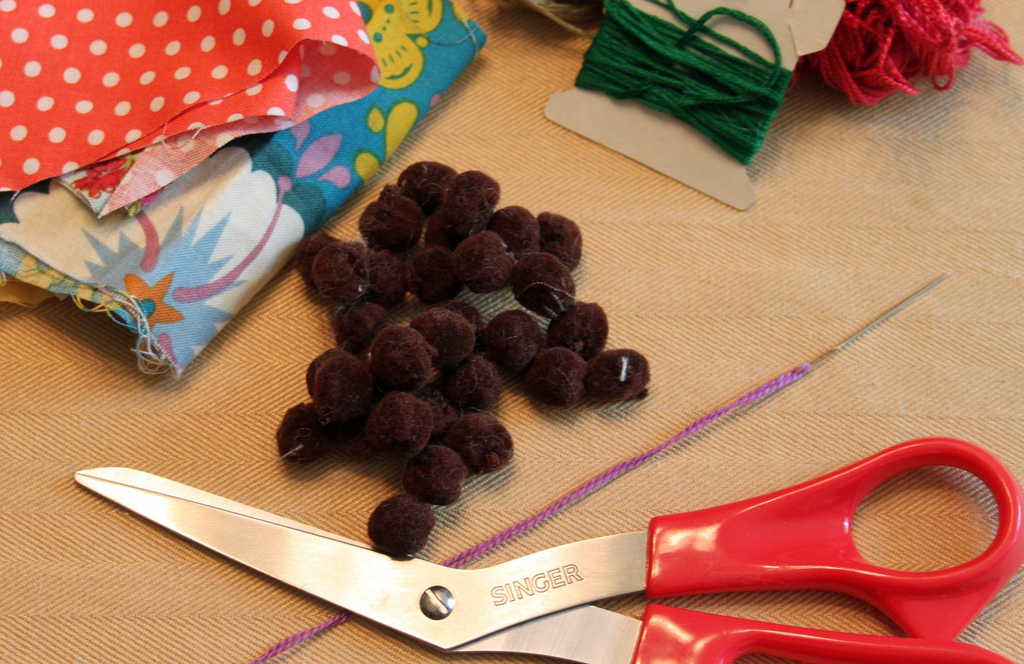 Making the Fabric Pompoms : :
1. Place the pompom in the center of the fabric scrap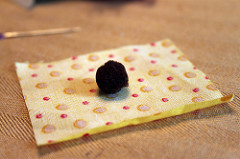 2. Fold the edges of the fabric up around the pompom
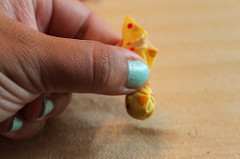 3. Wrap the floss around the fabric right above the pompom
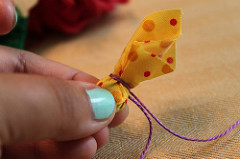 4. Knot thread ends together well, trim, and trim the fabric ends even
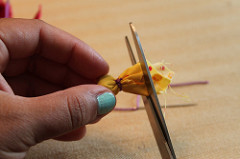 Continue making your Fabric Pompoms until you have the amount you need.
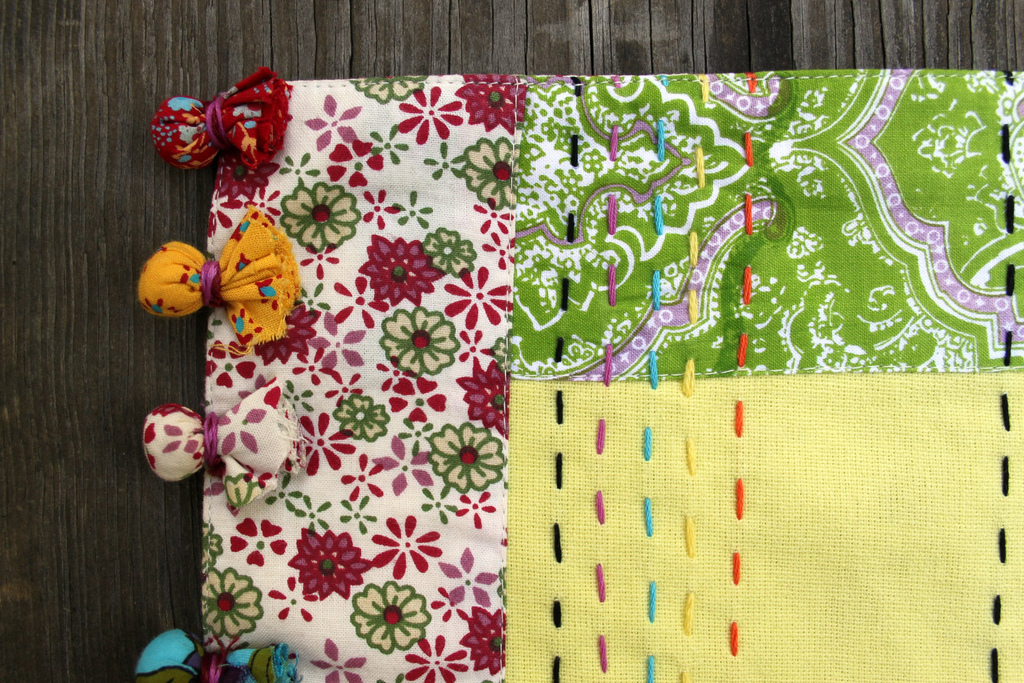
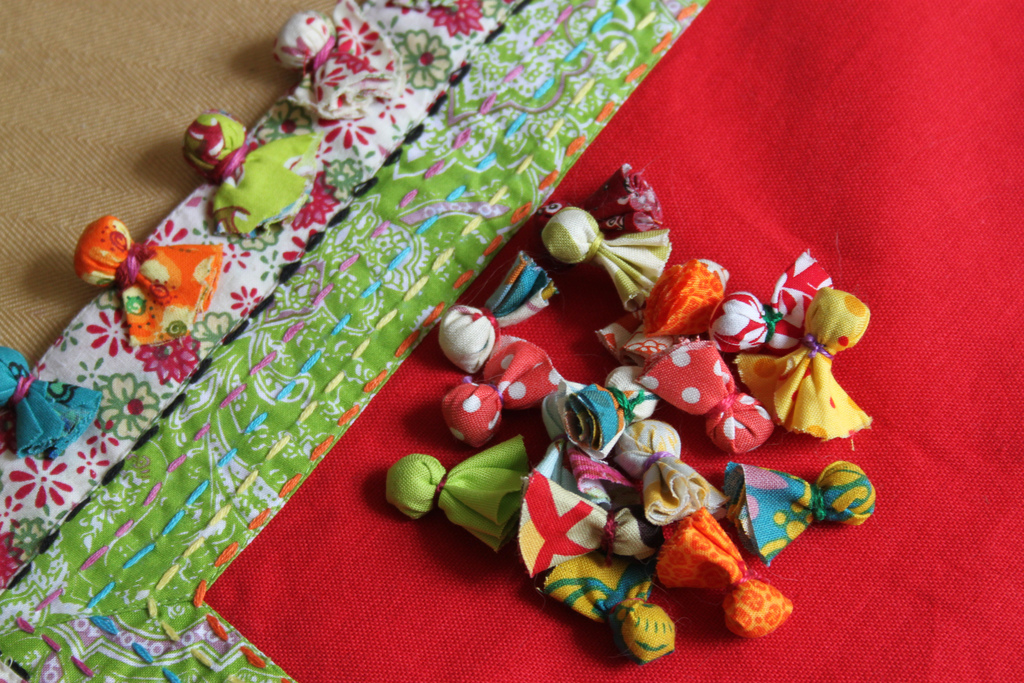 Fabric Pompoms Details : :
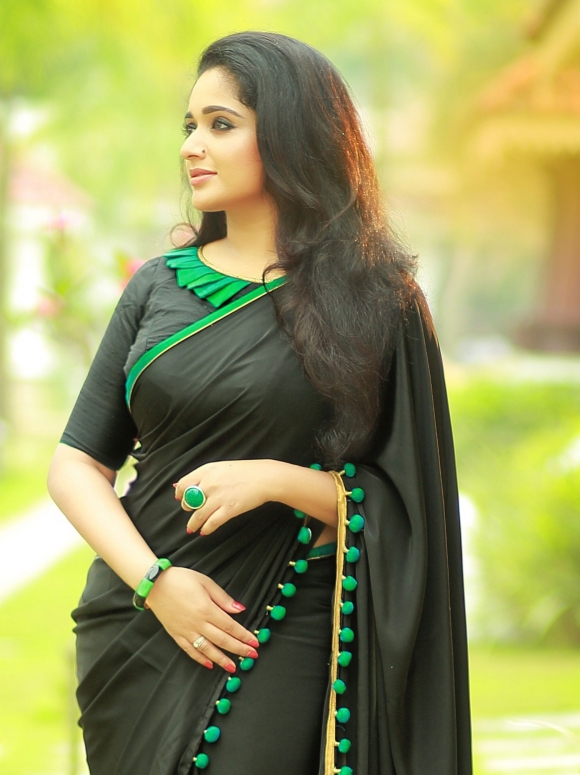
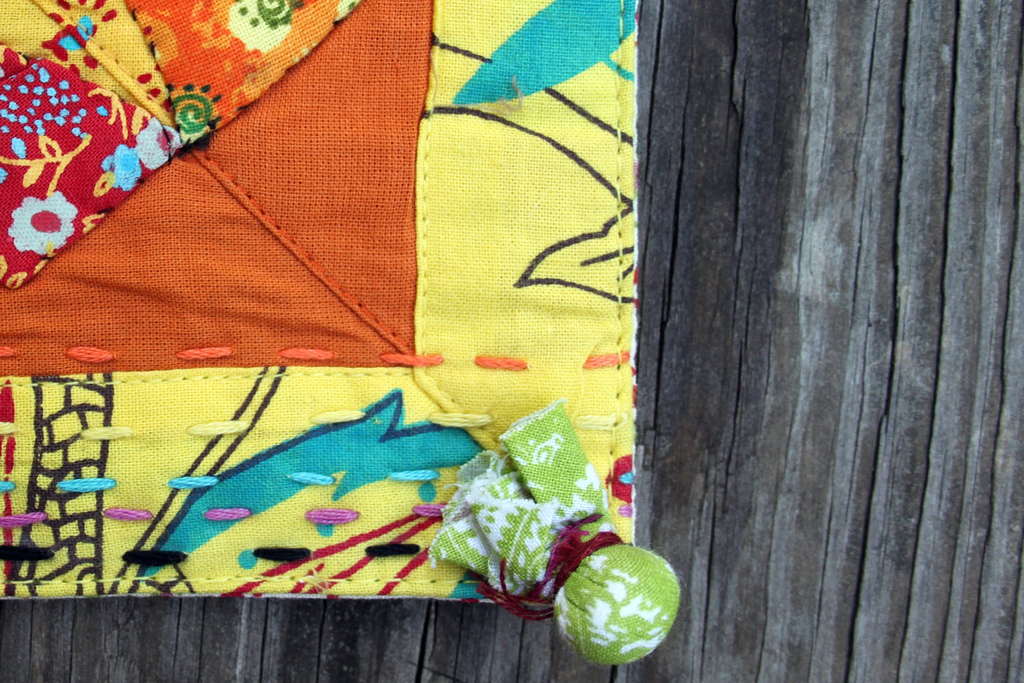
I’m adding mine to my Fabric Lover’s Apron, any item will use these same instructions.
1. Layout your design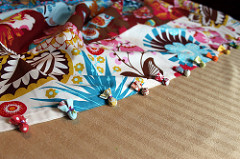 2. Place the Fabric Pompom onto the item
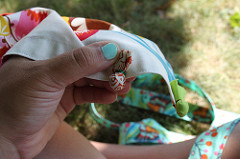 3. Using a needle threaded with floss and knotted at one end, insert the needle at one side of the pompom pulling up through the back of the fabric item
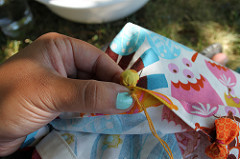 4. Pull thread all the way through until it catches the knot
 5. Insert the needle on the other side of the pompom, pulling back though the fabric so the floss is holding the pompom tightly in place
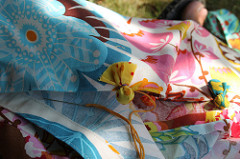 6. Knot well, close to the fabric, and trim away excess floss
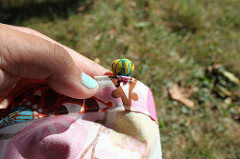 Continue until all of your Fabric Pompoms are attached.
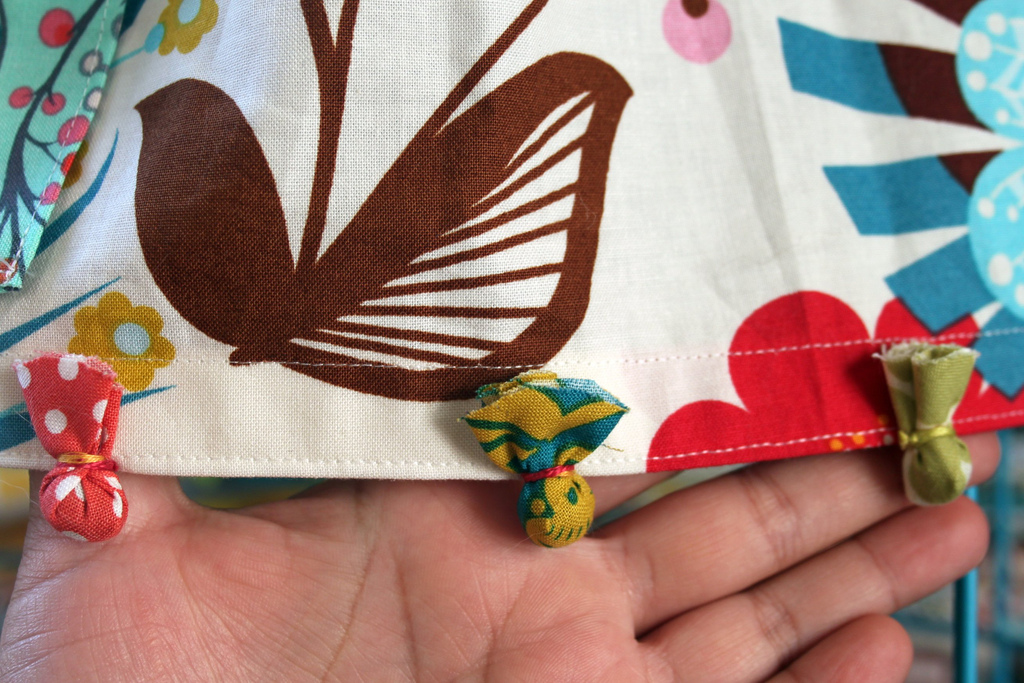 Voila! You’re finished!
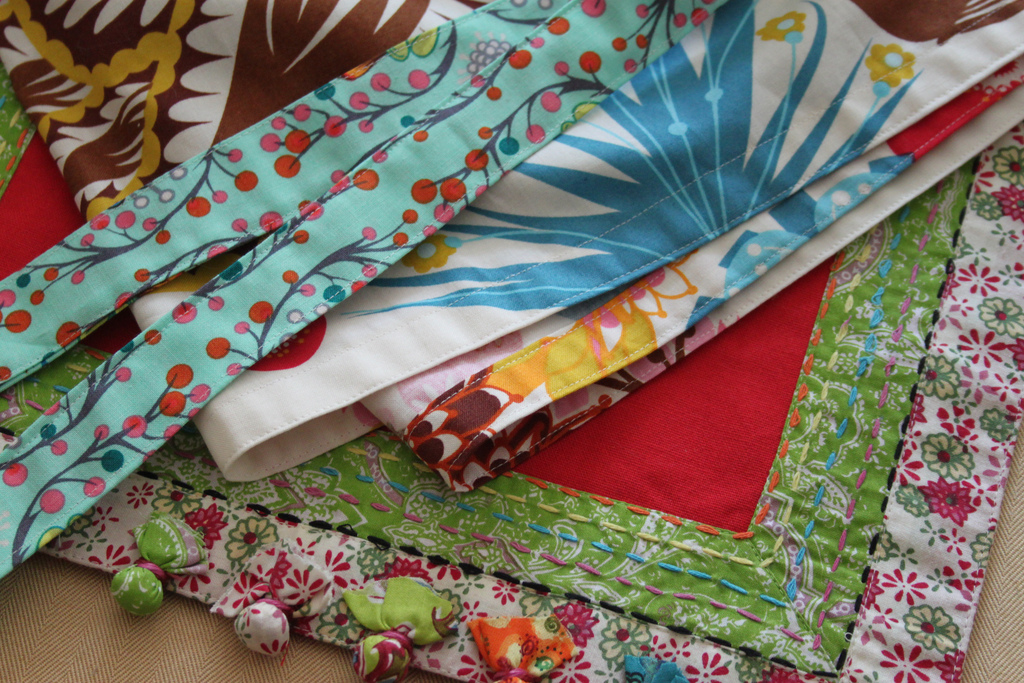
 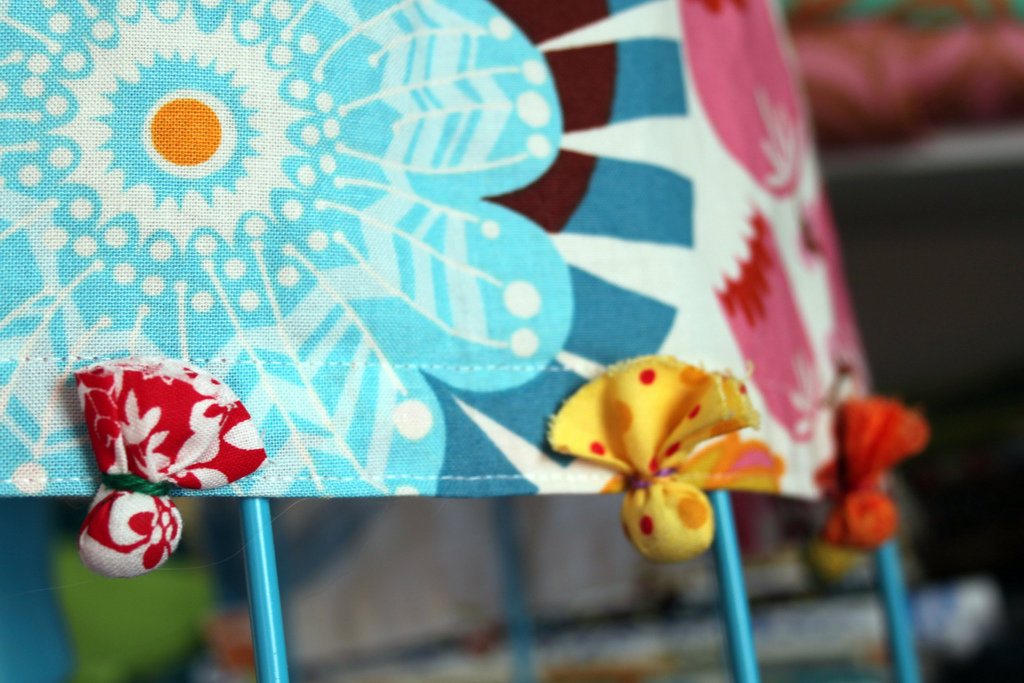 Variation ideas : : You can reverse how you attach them so only the Fabric Pompom ball is showing for a less funky look. You can add them to a pillow this way or attach these just as you would purchased pompom fringe. Here is an example of that on a pillow of mine from Pier1.
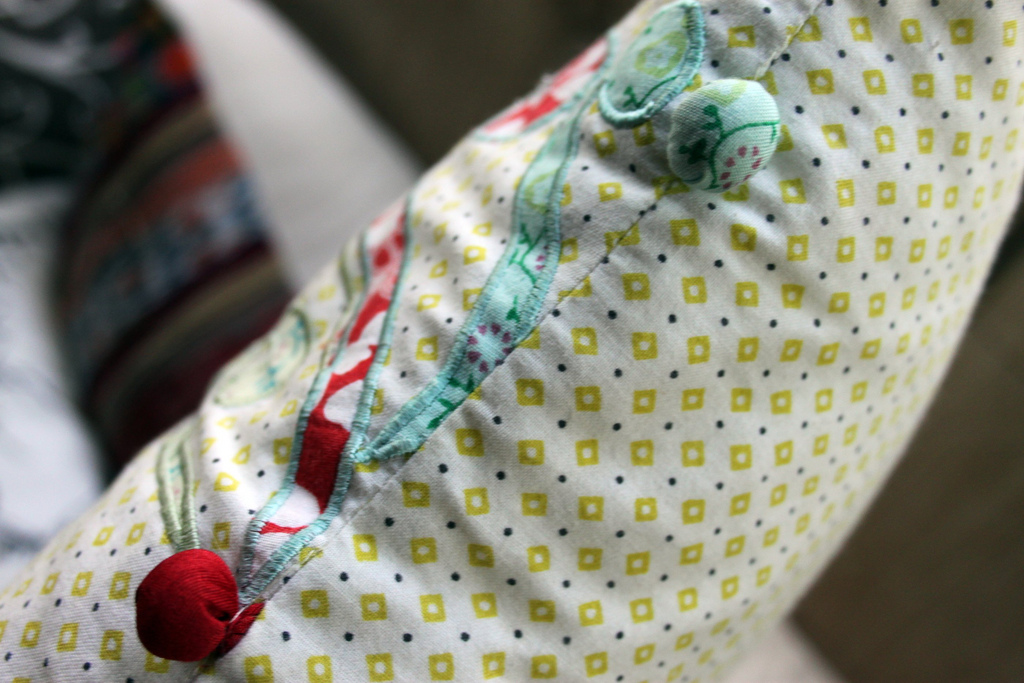
 I hope you enjoy this tutorial!!! This Fabric Pompom detail is something I’ll certainly be adding to the edges of many of my own handmades!
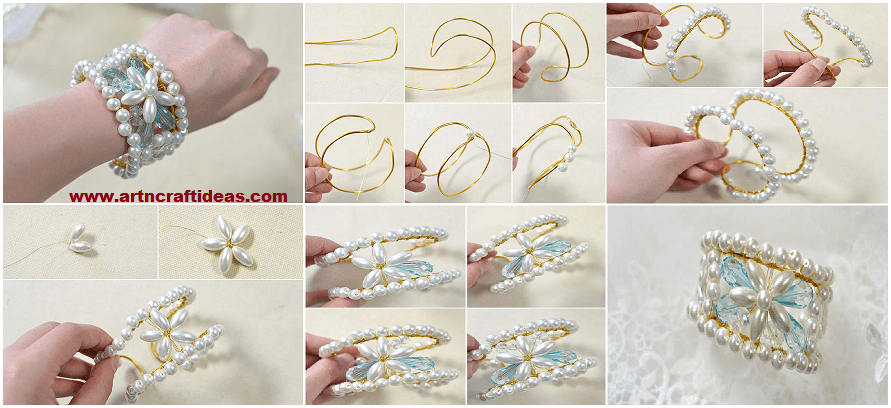
Do you like wide bangle bracelet? Here, I’ll show you a tutorial on how to make a wide pearl bead bangle bracelet at home.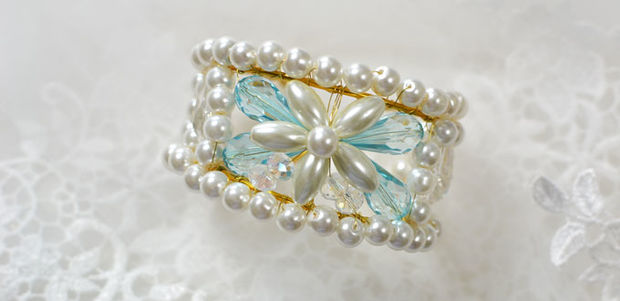
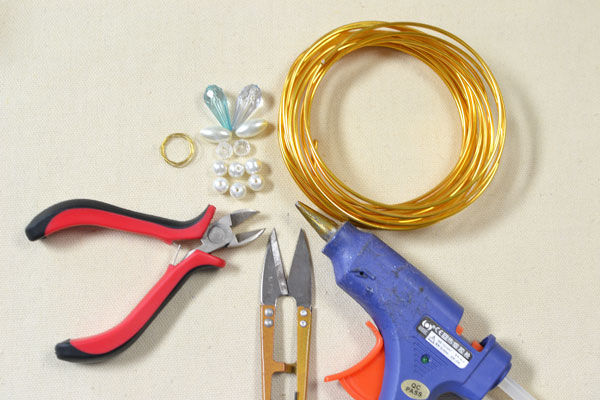
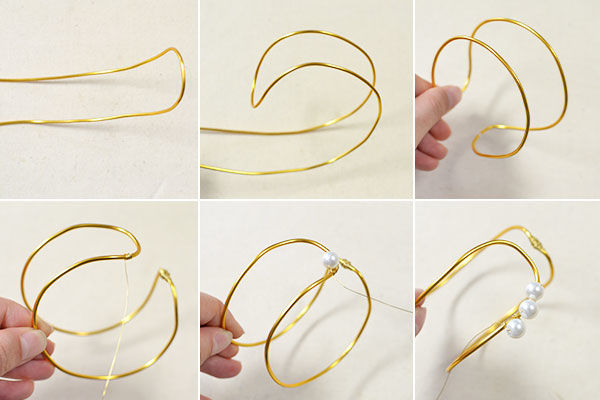
1st, cut a piece of 2mm gold aluminum wire with a length about 55cm. Then, fold the gold aluminum wire into a rectangle and wrap the two open ends with 0.3mm gold copper wire. Twist the rectangle into a ring (as shown in the picture);
2nd, cut a piece of 0.3mm gold copper wire and wrap it on to one side of the circular gold aluminum wire(as shown in the picture). Then, thread a 8mm white round pearl bead and fix it onto the gold aluminum wire by wrapping the gold copper wire onto the gold aluminum wire. Repeat this step to add more 8mm white round pearl beads onto the gold aluminum wire (as shown in the picture);
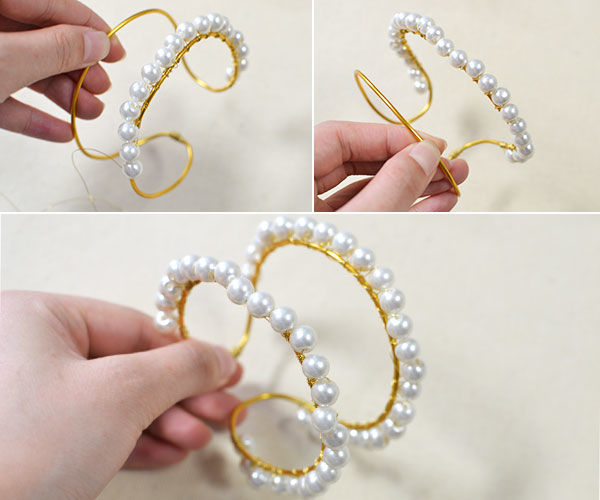
3rd, repeat the above step to add enough 8mm white round pearl beads onto the gold aluminum wire on the other side;
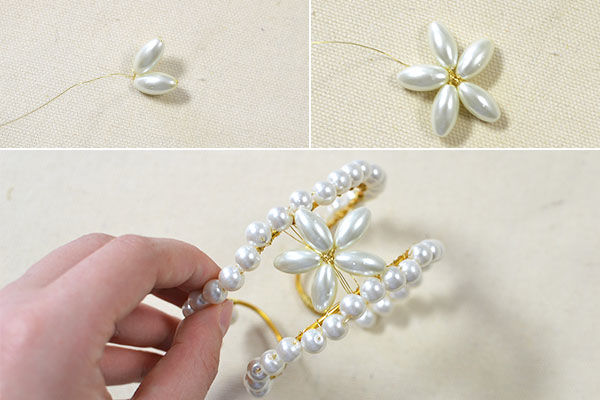
1st, cut a piece of 0.3mm gold copper wire and combine 5 16x8mm white glass pearl beads into a flower (as shown in the picture);
2nd, add the pearl bead flower into the middle of the bangle bracelet with 0.3mm gold copper wire;

1st, cut a piece of 0.3mm gold copper wire and add a blue drop bead into the bottom right space between the two 16x8mm white glass pearl beads by wrapping one end of the copper wire onto the nether side of the bangle bracelet and the other end onto the middle copper wire that combines the pearl flower with the bangle bracelet (as shown in the picture);
2nd, repeat the above step to add another blue drop bead into the left corresponding place;
3rd, cut a piece of 0.3mm gold copper wire and add two 8mm transparent acrylic beads into the top right space between the two 16x8mm white glass pearl beads by wrapping one end of the copper wire onto the upper side of the bangle bracelet and the other end onto the middle copper wire (as shown in the picture);
4th, repeat the above step to add two another 8mm transparent acrylic beads into the left corresponding place;
5th, repeat the first step to add a blue drop bead into the top right space between the two 16x8mm white glass pearl beads and another blue drop bead into the top left space between the two 16x8mm white glass pearl beads.
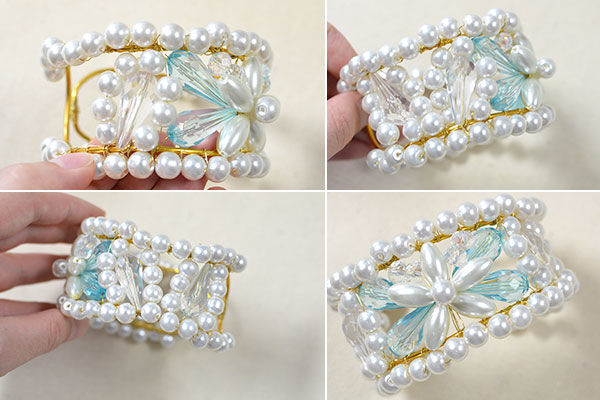
1st, cut a piece of 0.3mm gold copper wire. Then, wrap one end of the copper wire onto the nether side of the bangle bracelet and string 4 8mm white round pearl beads;
2nd, thread another 8mm white round pearl bead and wrap the copper wire onto the upper side of the bangle bracelet. Then, continue to thread 3 more 8mm white round pearl beads and wrap the copper wire onto the nether side of the bangle bracelet. In this way, a white pearl bead loop comes into being;
3rd, repeat the above step to add another white pearl bead loop beside the white pearl loop made just now;
4th, repeat the above steps to add two white pearl bead loops into the right corresponding place of the bangle bracelet.
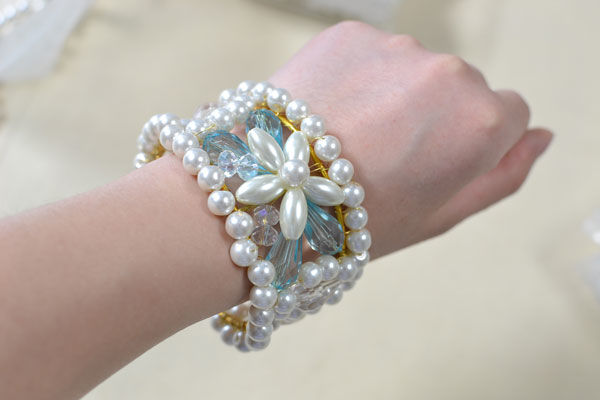
Wearing this wide bangle bracelet, you’ll surely stand out from the crowd. Store-bought bangle bracelets can be costly, but you can create your own stylish bangle bracelet at home for a fraction of the price. Come on and have a try!
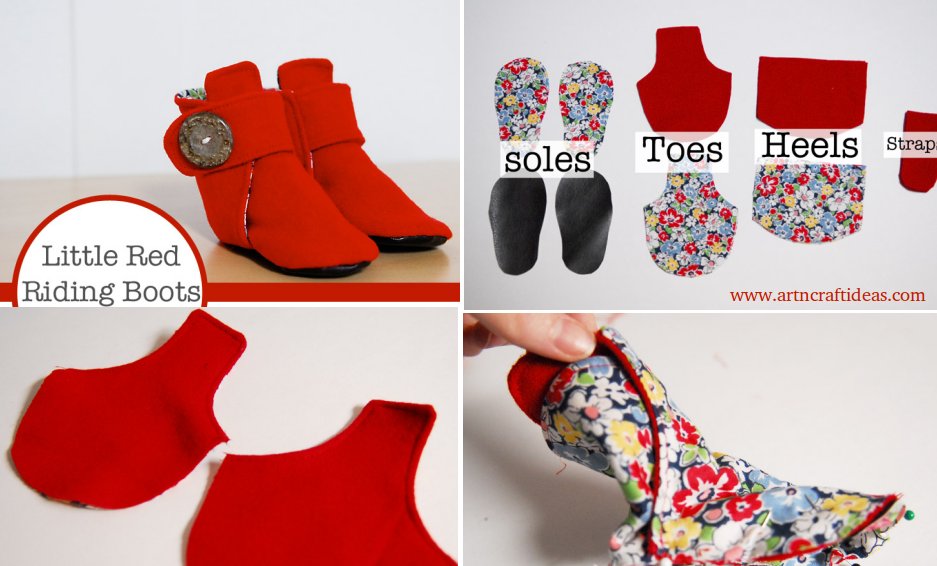
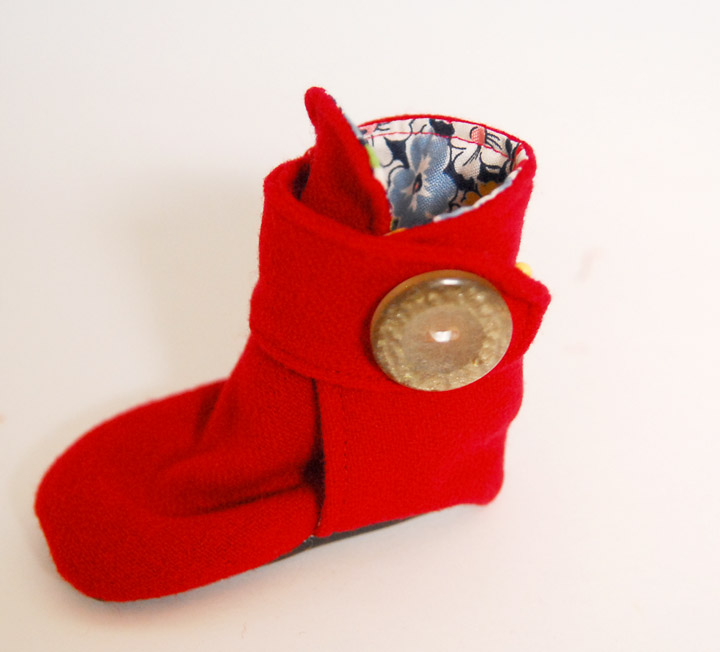
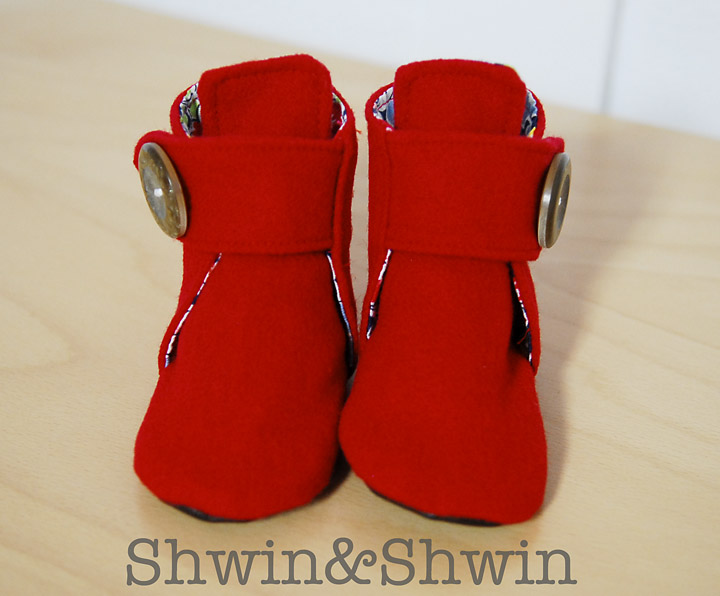
The free pattern today is a sweet little pair of boots. Because every baby needs some boots. This style is simple and clean and could easily work for a baby boy or girl.I just love boots on babies especially young babies because they stay on better when there is something wrapped around the ankle.
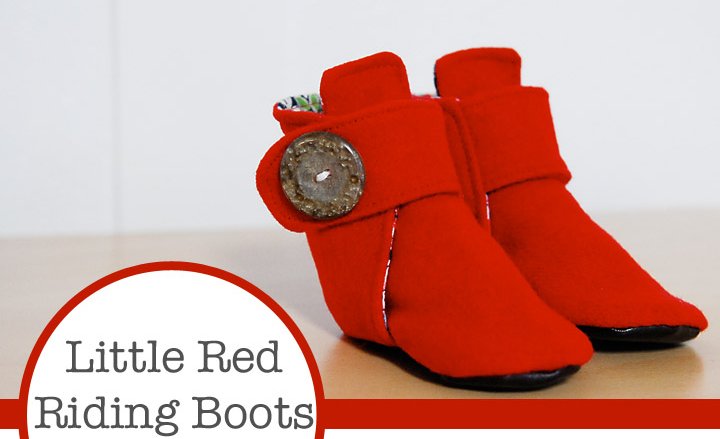

They are soft and comfy with a strap and snap closure.
The button is just for looks but you know I love a button 🙂
It includes 0-3m 3-6m and 6-12m
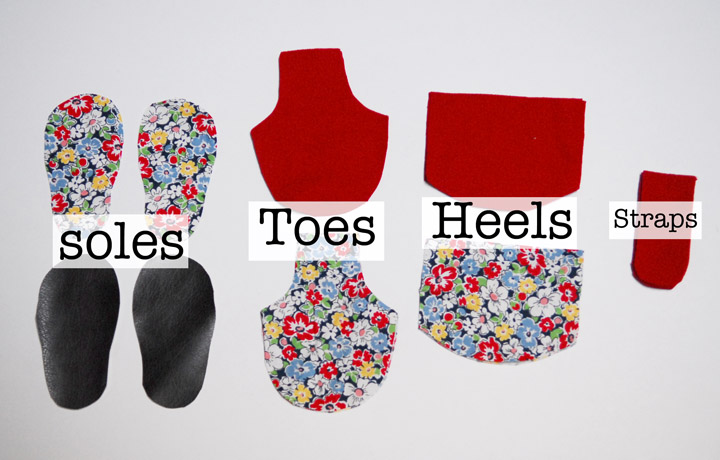
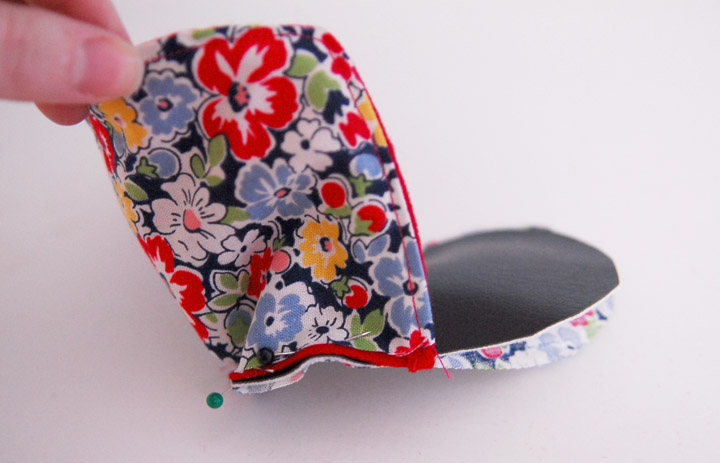
Cut out your pieces. You will need 4 soles (2 reversed so you have a right and left foot) I used pleather for the outside sole since I think it holds up a little better. Then 4 toe pieces two outer and two lining, 4 Heel pieces two outer two lining, and 4 straps 2 for each shoe.
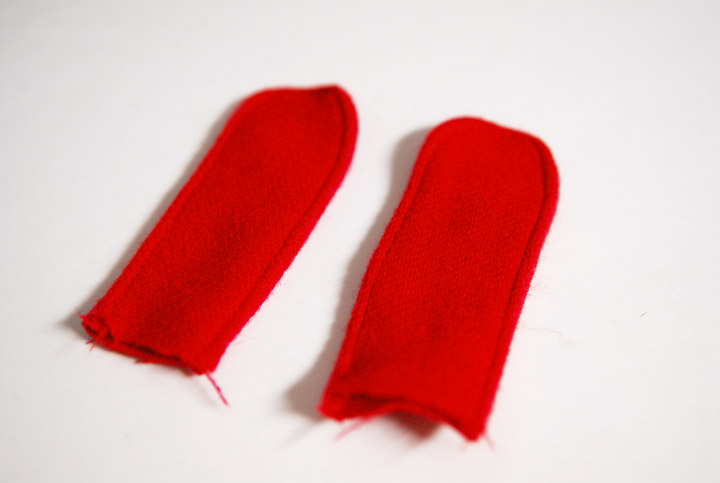
Start with the straps. Sew two right side together along the sides and curve. Then turn right side out and top stitch. Repeat with both straps.
Next for the toe pieces. Sew one lining and one outer piece right sides together along the grey dotted line. Clip the corners and the curve.
Turn it right side out and top stitch. Repeat with both toe pieces so you have two.
Next for the heels place the strap down near the top of the curved edge and have the raw sides together. Then place the lining right sides together, sew along the sides and top.
Clip the corners and curve then turn the heel right side out. You want two heel pieces like this but you want them to be reversed so the straps are opposite each other.
Then pin the heel in place to the soles (which should be wrong sides together) Sew the heel in place.
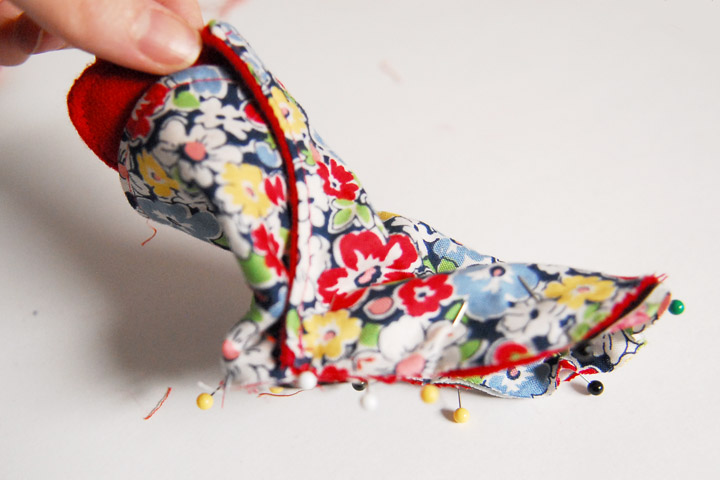
Then add the toe piece to the front. Sew in place. Clip all the curves on the sole.
Then turn the boot right side out and add a snap to the strap and side of the boot. Sew on a button for decoration and you are good to go.
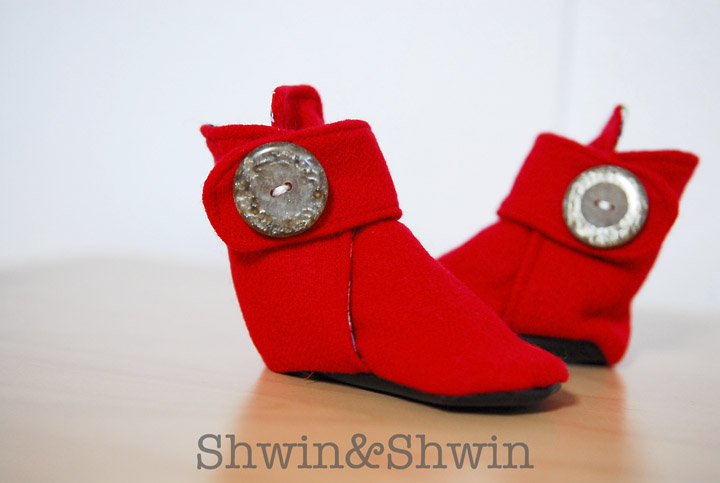
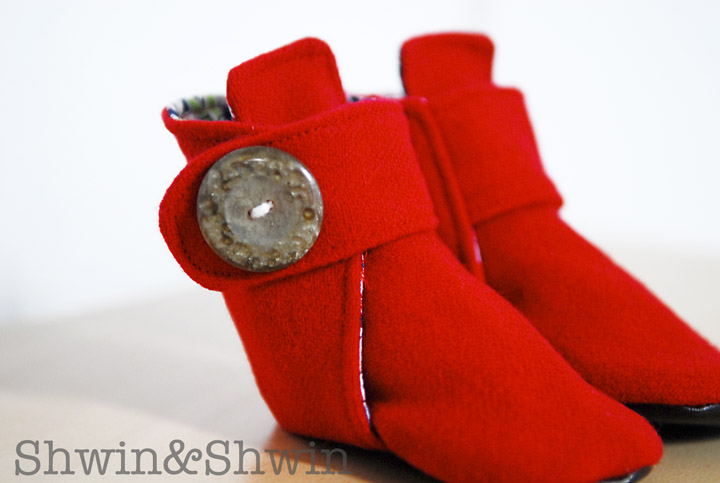
Now you have some adorable little boots to keep those little toes warm.
Hope you like this tutorial.
Source: shwinandshwin

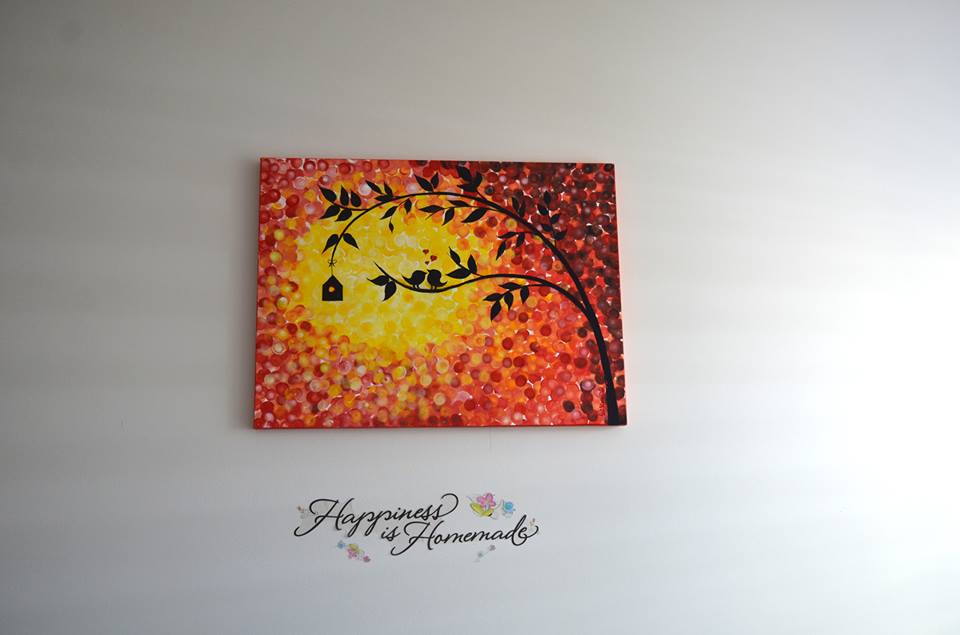
Love birds – Acrylics Painting on Canvas: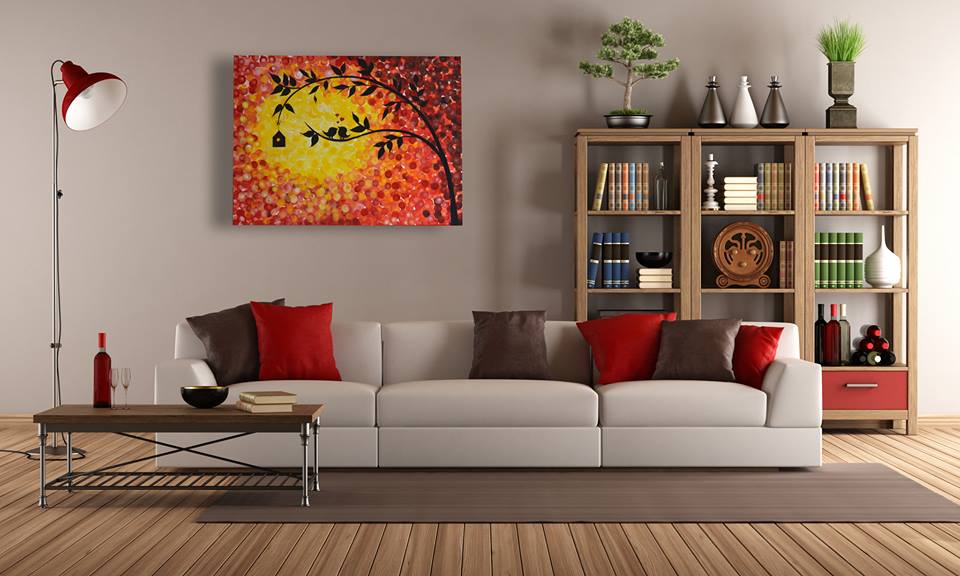
Required Materials :
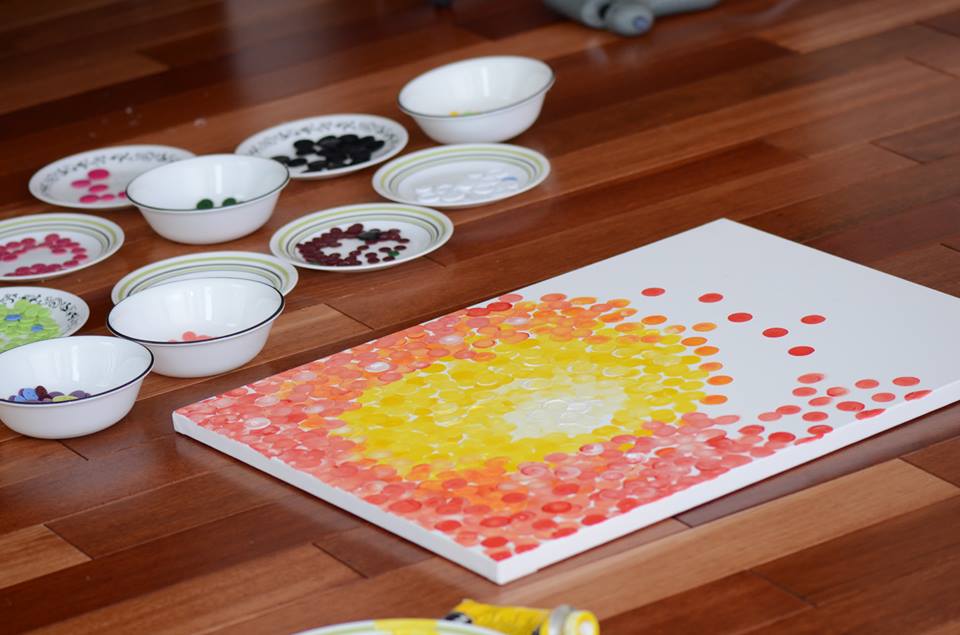 I used round flat tip sponge brushes(pouncers) for the background.. I was after bokeh affect of a sunset scene..
Start with white in the center of the sun and add yellow, and then eventually red.. try to blend the colors so that they wont appear like patches..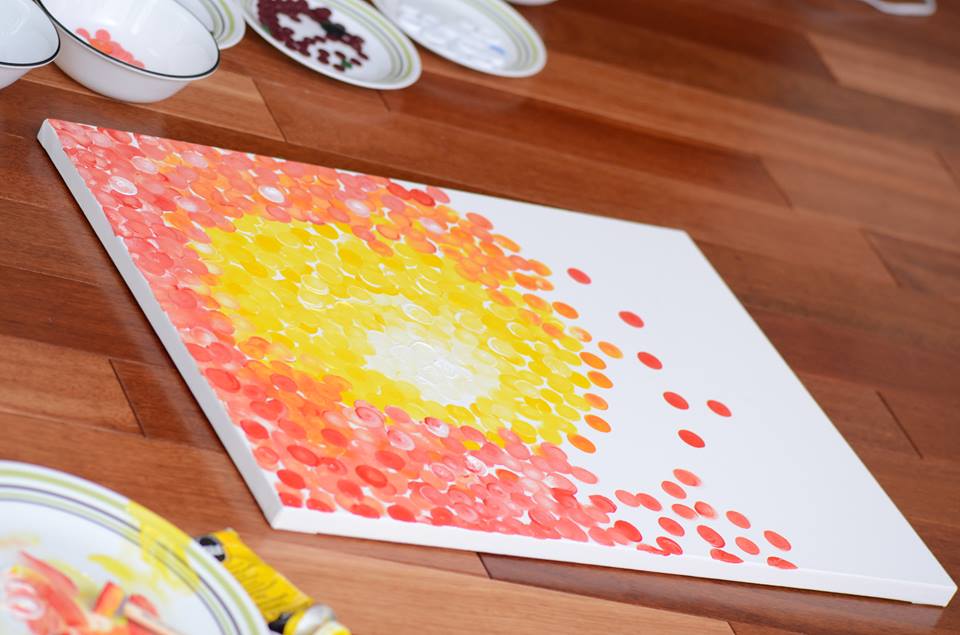
You can see the pouncer brush beside the painting, used different size brushes randomly..
The main colors used in this are yellow,red, white, and black.. Basically add black and white to your colors to make it dark and lighter..
For the stroke, you just dab the pouncer in the paint(Acrylics) and put it on the canvas, and rotate it so that you get a perfect round.. Keep repeating until you get the desired background…
…plan was to use the buttons you see in the bowl, on the painting. but changed at the end and settled with just a silhouette of a tree and birds..
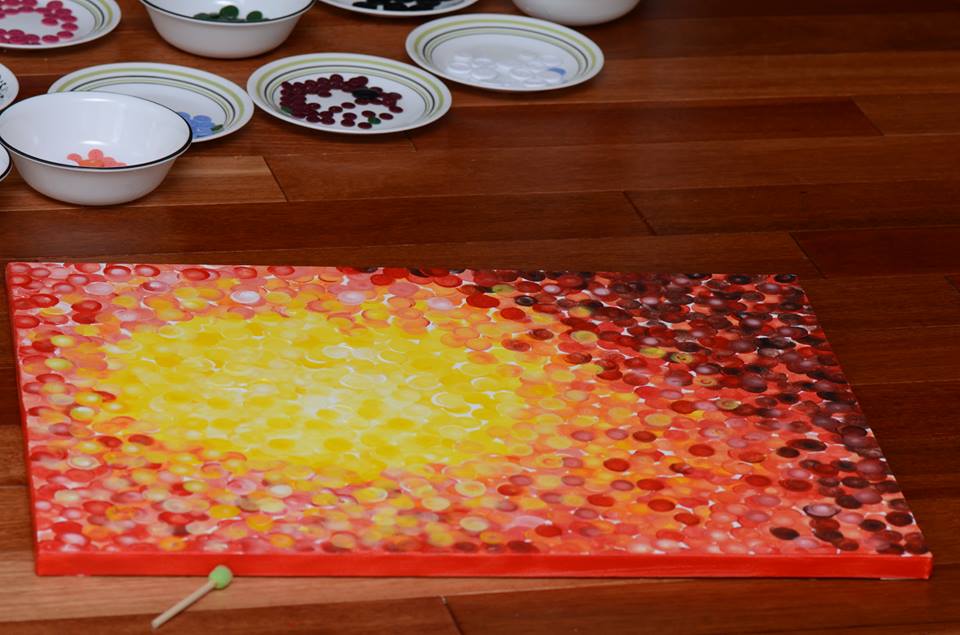
This is how the background looked before adding the silhouette…
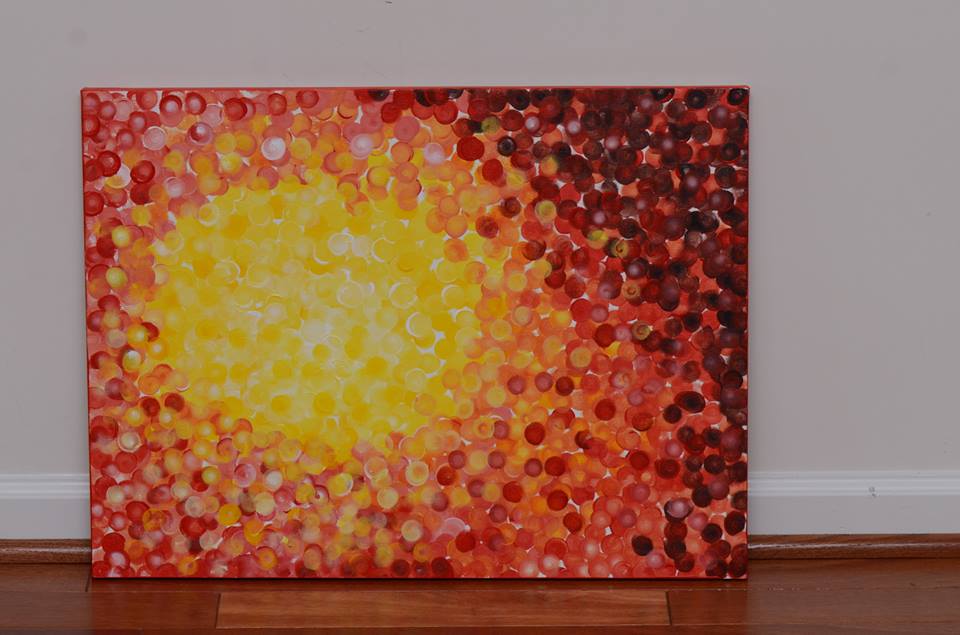 Finished version – After adding a simple silhouette of a tree with love birds.. it gave a real dimension to the background..
  Just an illustration done in adobe to see how would the painting look on a wall…
Courtesy: Sriks Creative Corner
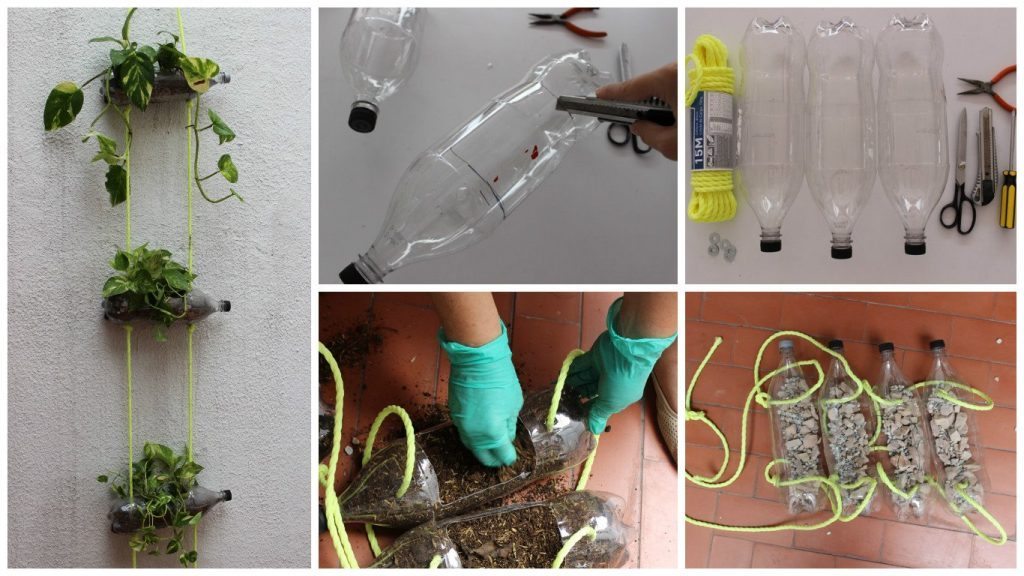
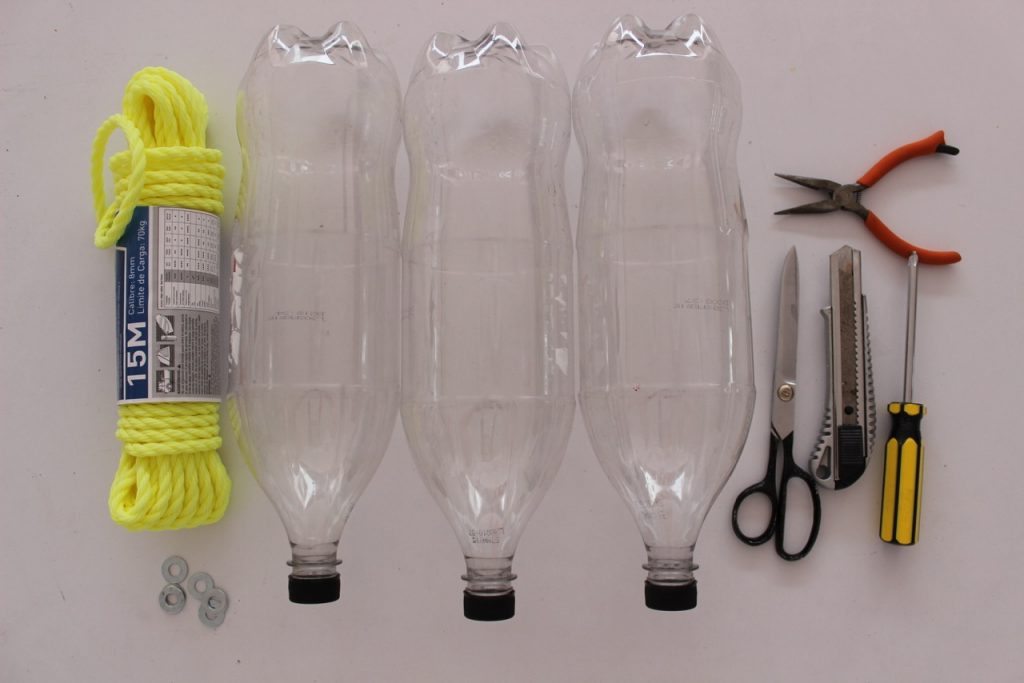
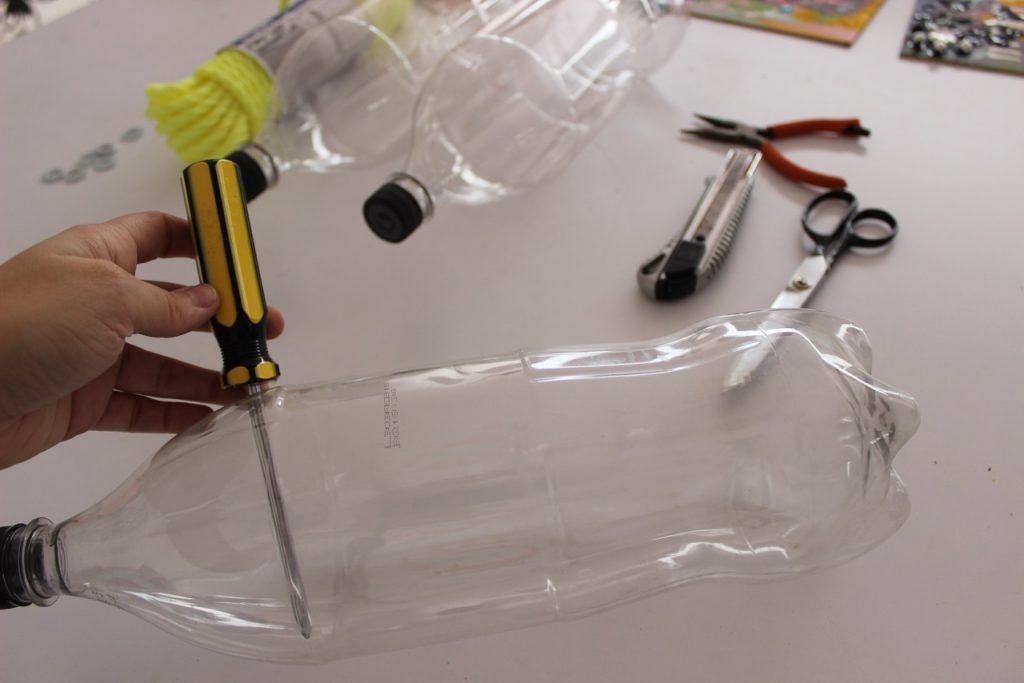
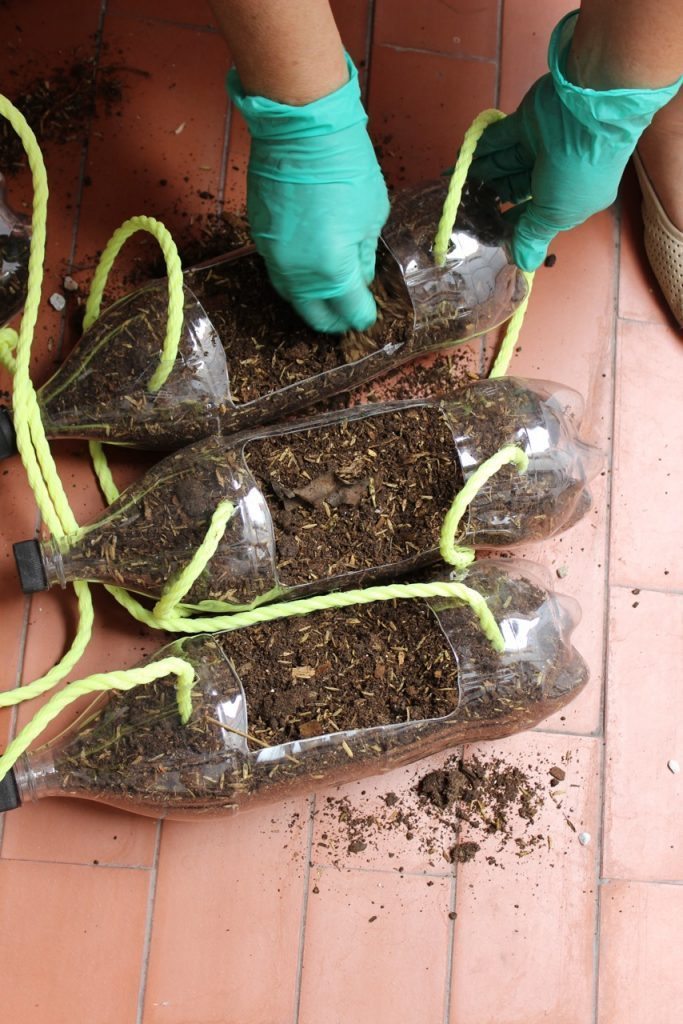
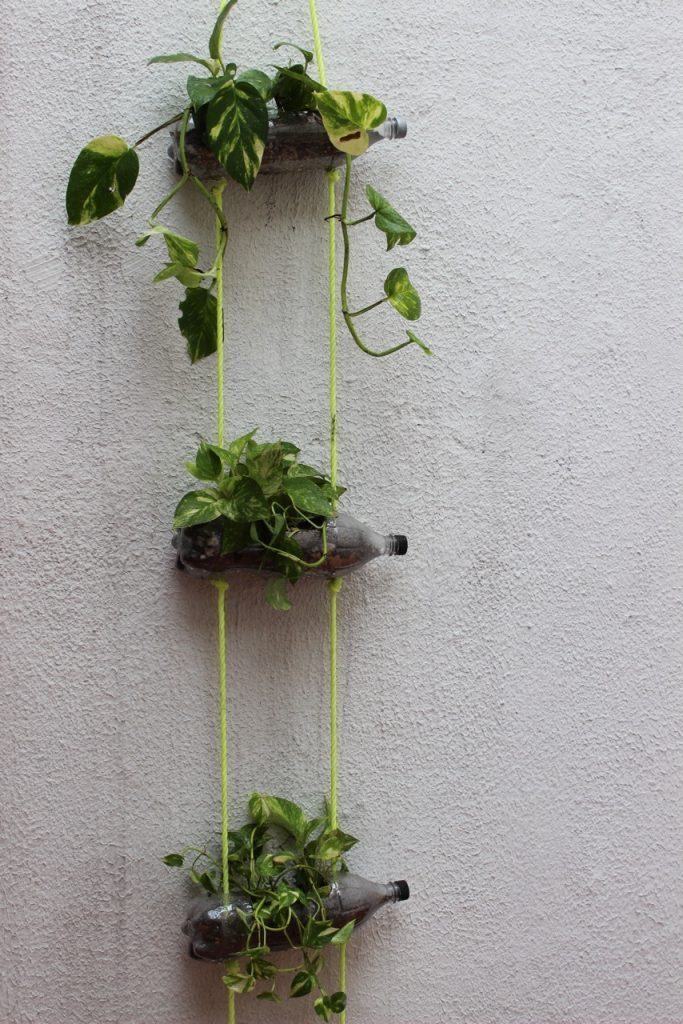
The materials are very basic, it’s a matter of making the list and going to a hardware store or a warehouse where tools and construction materials are obtained. The most important thing is to have on hand:
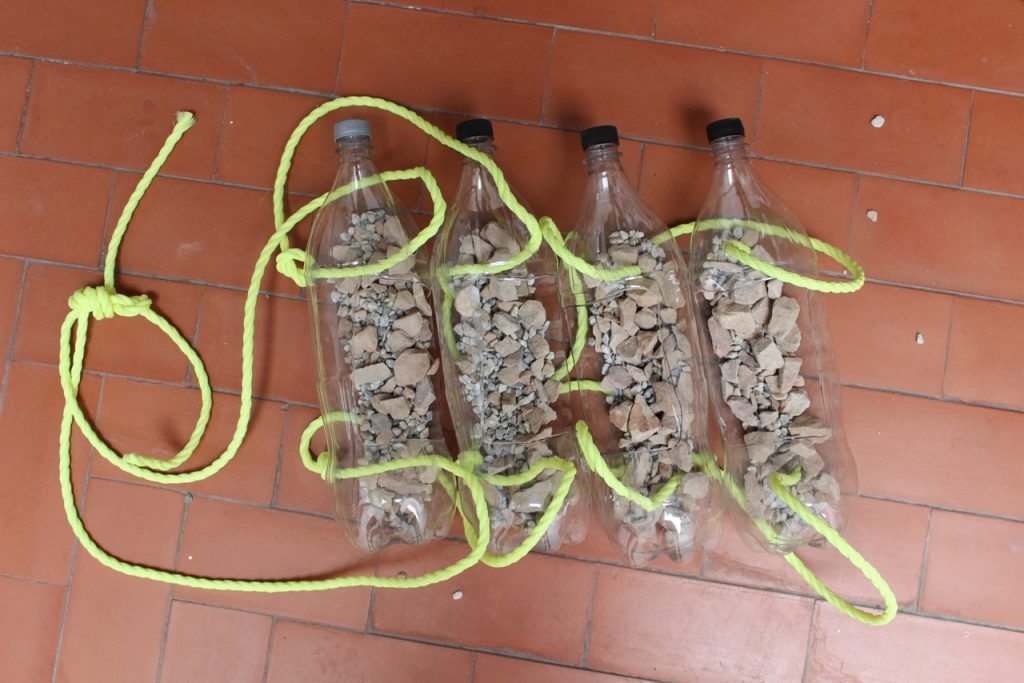
A couple of plastic bottles, all the same size. I thought the 2-liter ones were perfect.
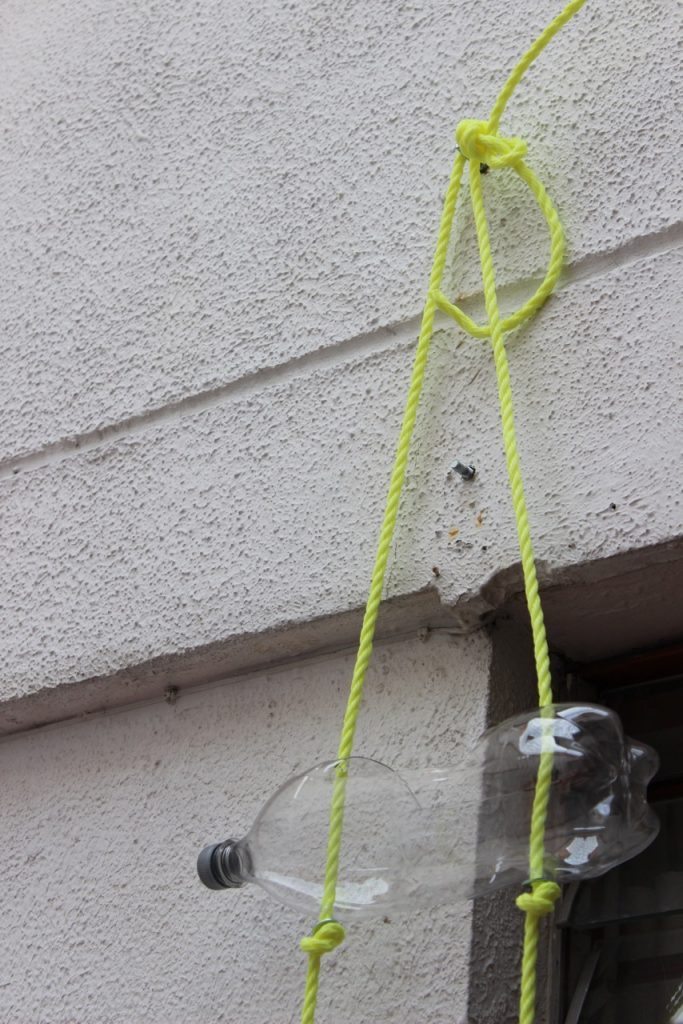
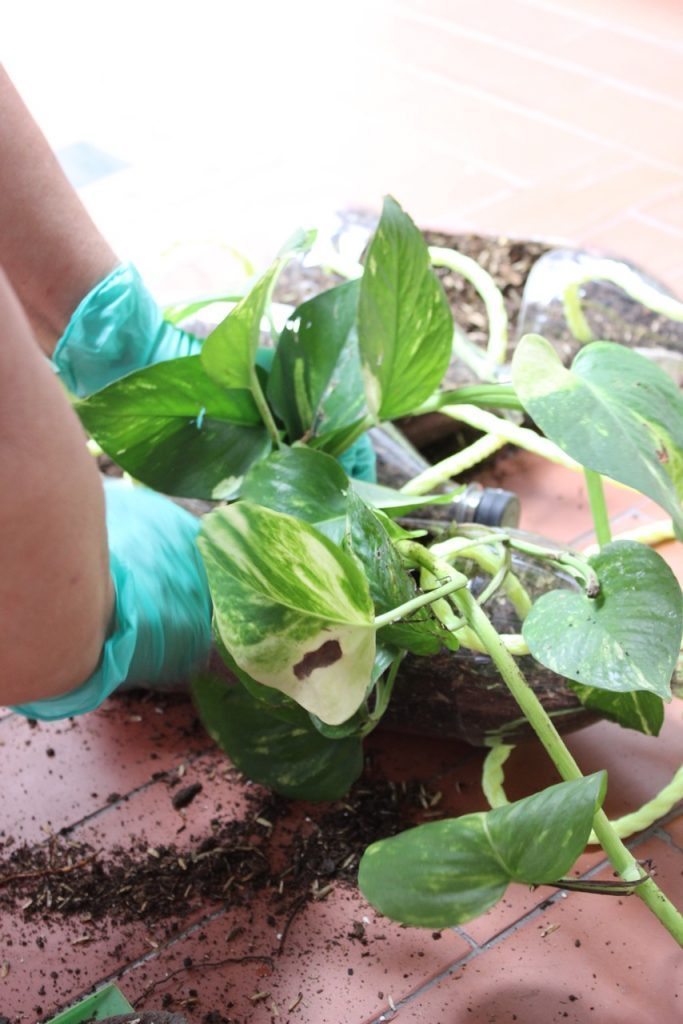
This is for me the first of 4 “green stairs” I want to make to put on a whole wall of my patio. I love how it looks, and I feel very proud because I thought I needed an expert to achieve it, and I love the touch of the recovered bottles. How do you think it was?
I worked in my yard, so after sweeping the soil off the ground, we mopped up with a bit of Fabulous Fruit Passion to freshen up, even more the atmosphere.
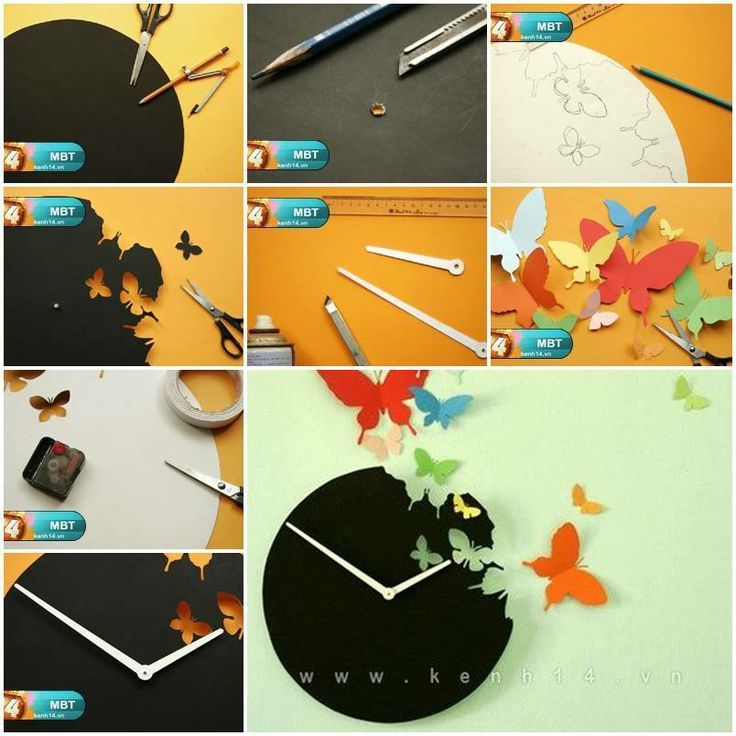
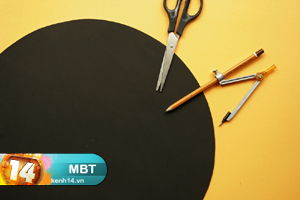
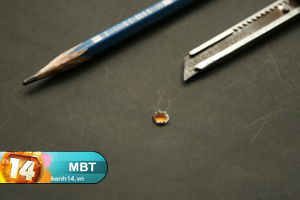
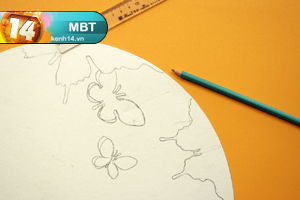
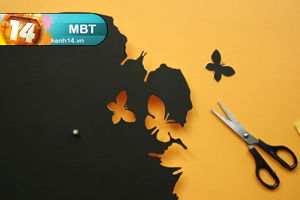
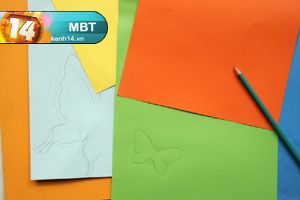
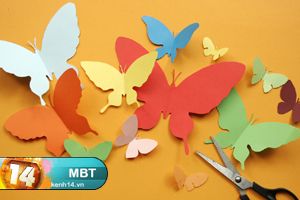
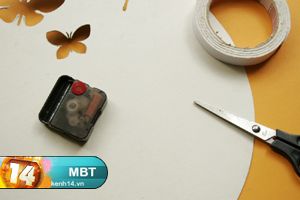
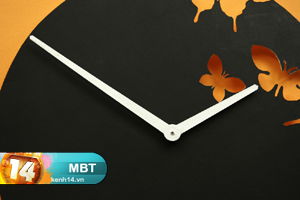
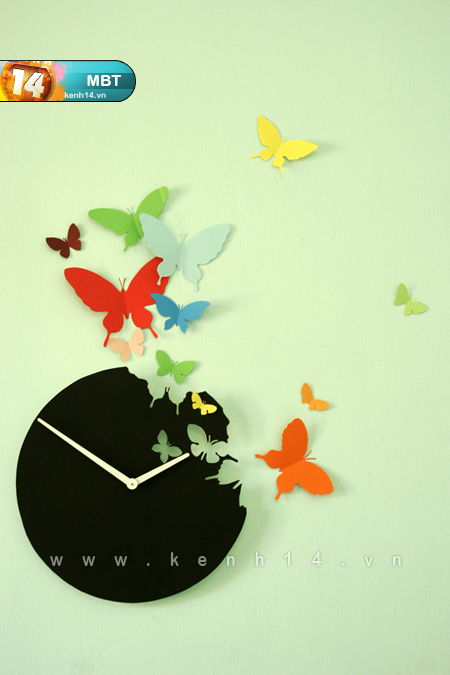
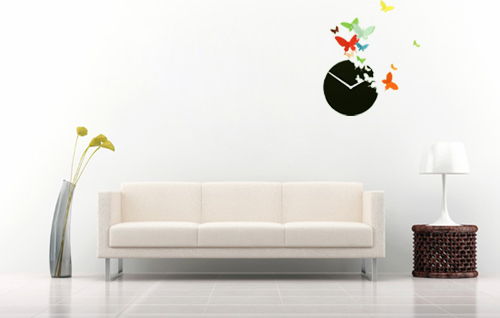
This crafts project shows how to make a butterfly clock wall art. Creative DIY idea to make unique piece of home decor with your own hands! It will look fantastic on your home wall. You can make colorful butterflies to decorate kids’s room. Let’s try it.
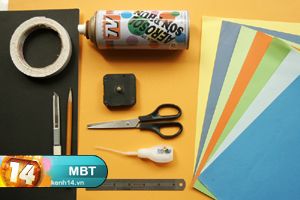
Required Material:

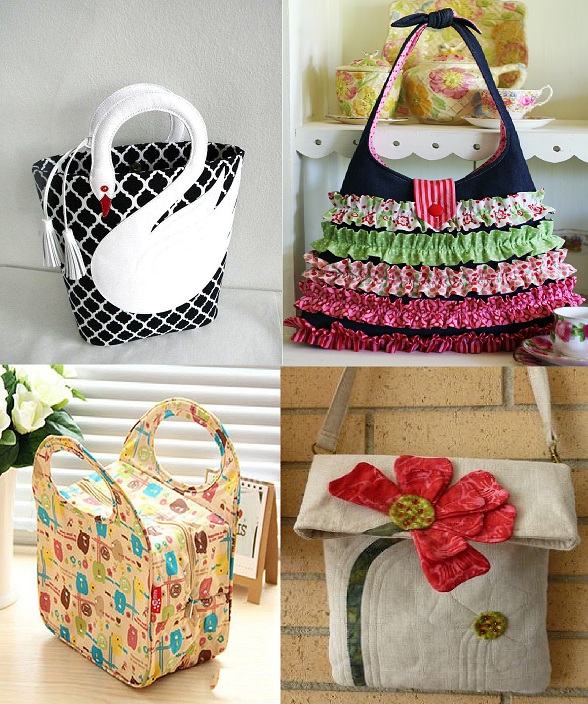
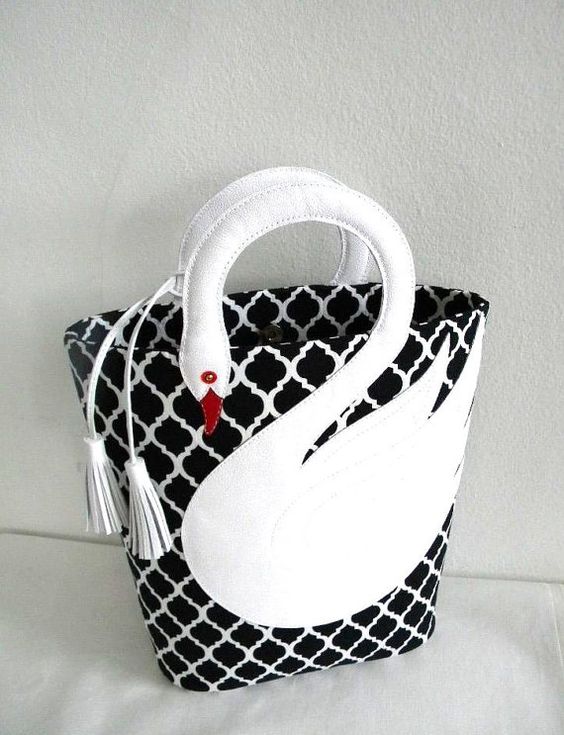
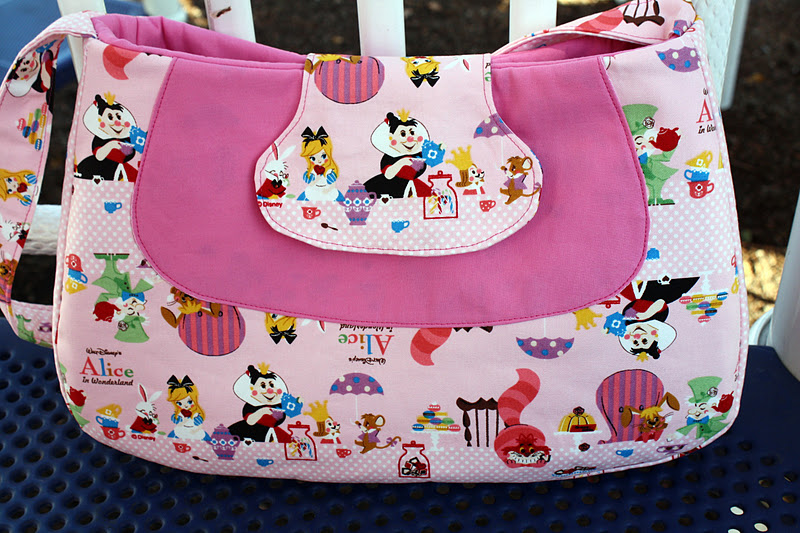
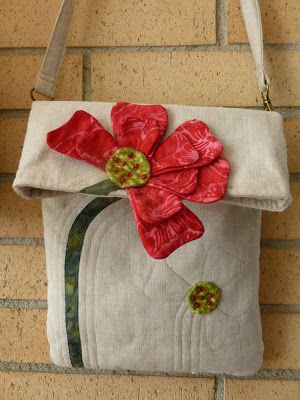
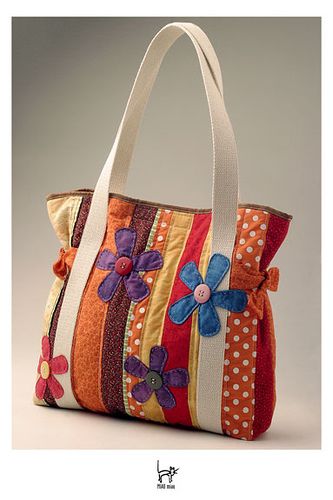
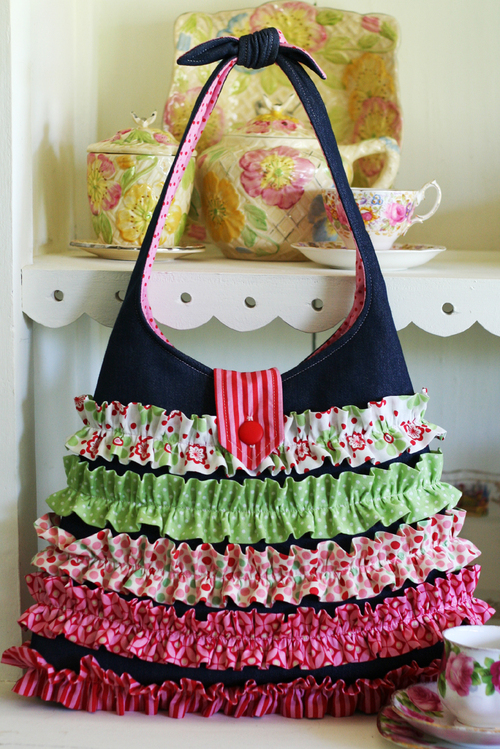
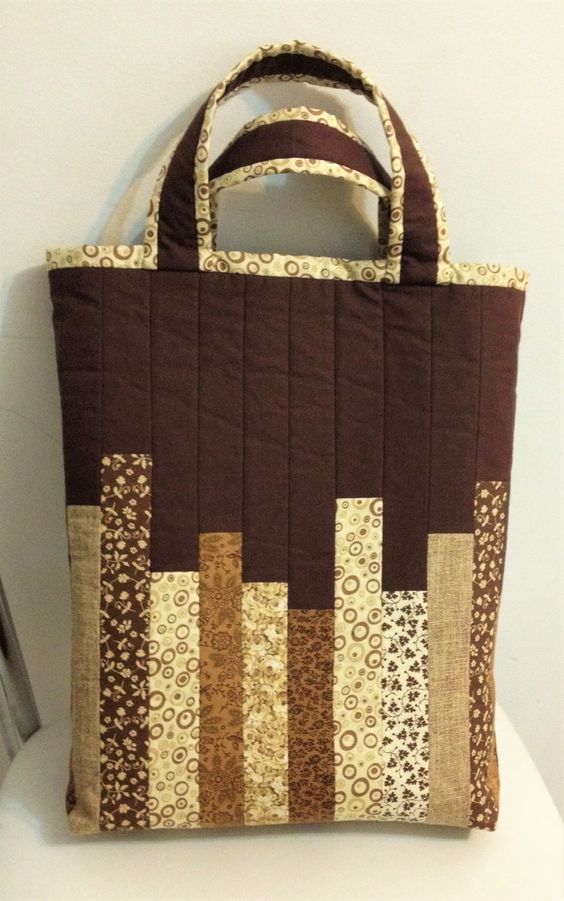
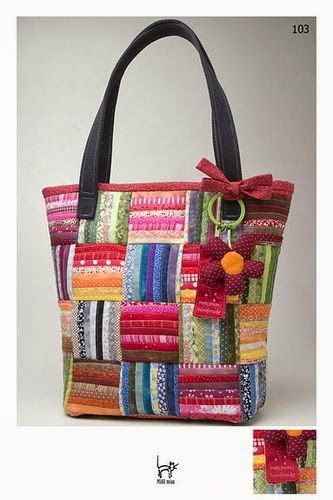
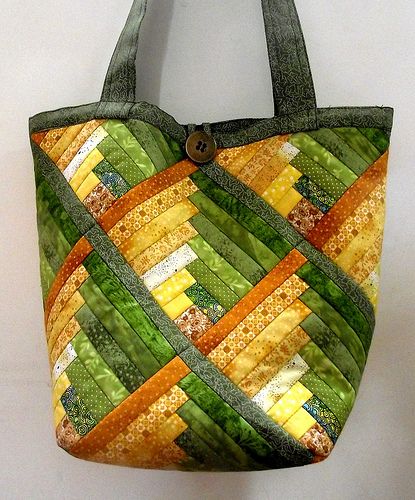
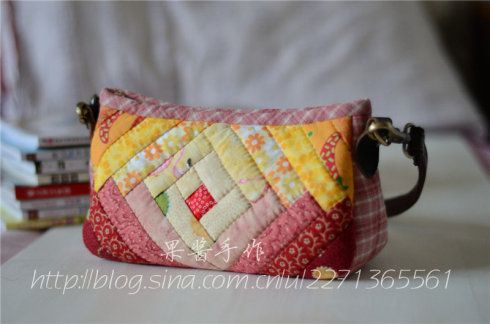
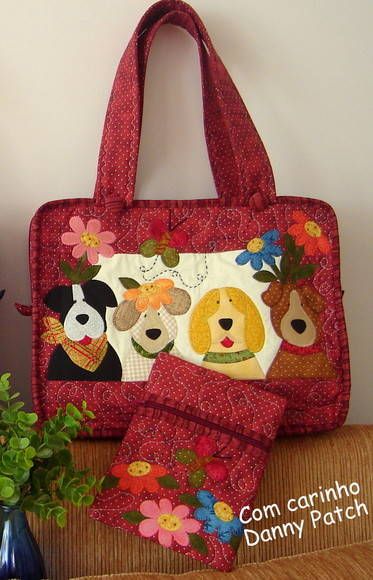
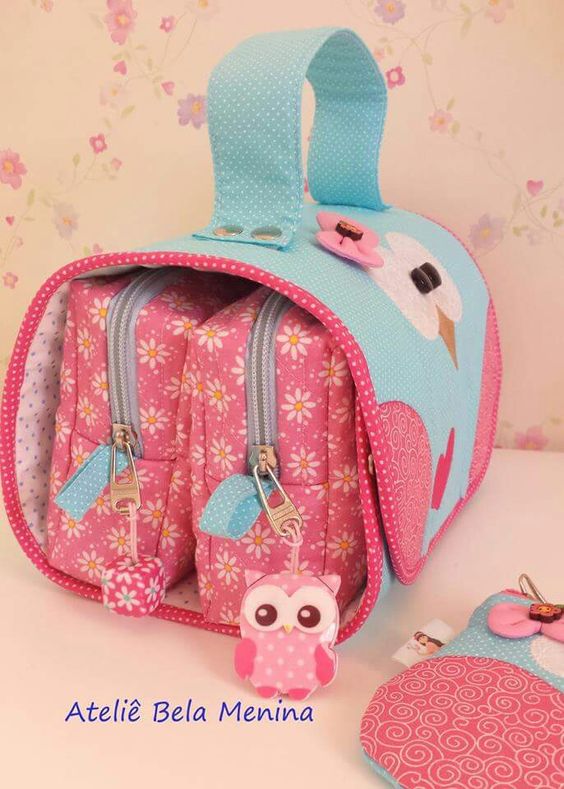
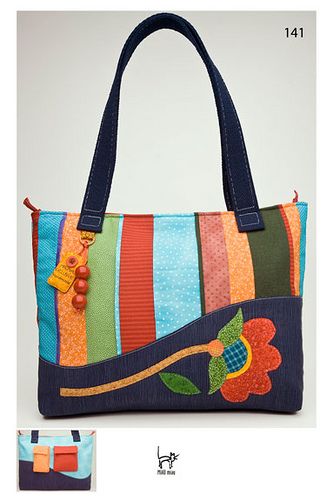
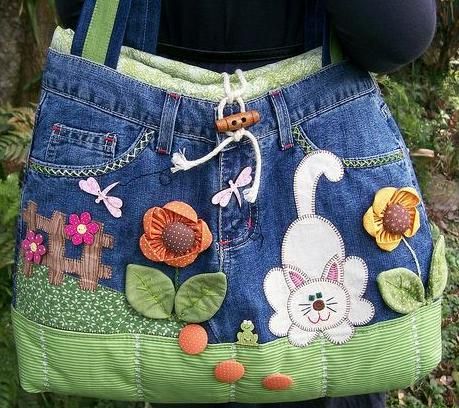
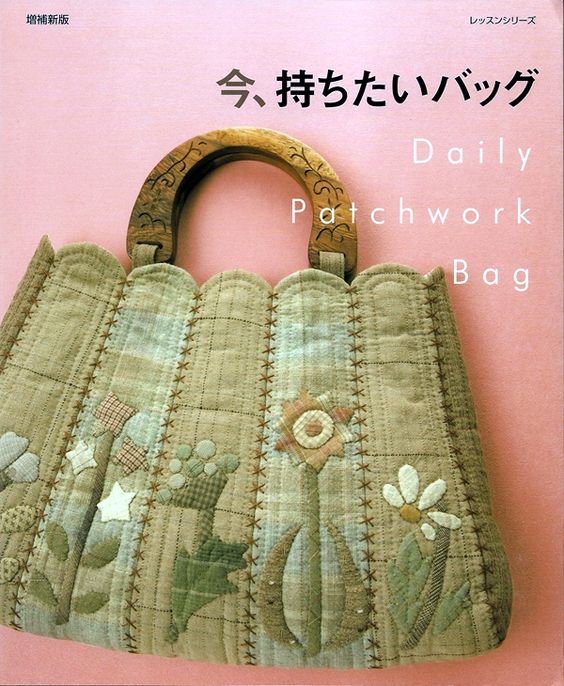
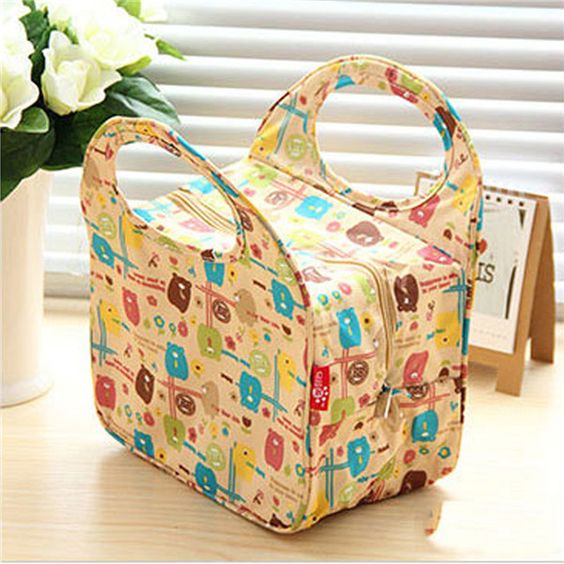
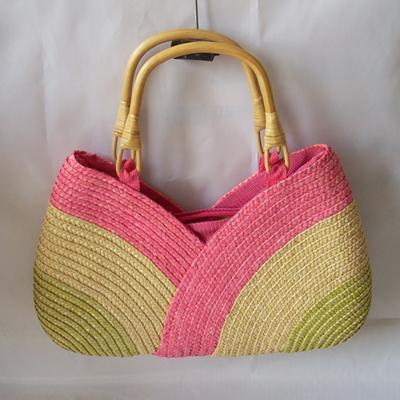
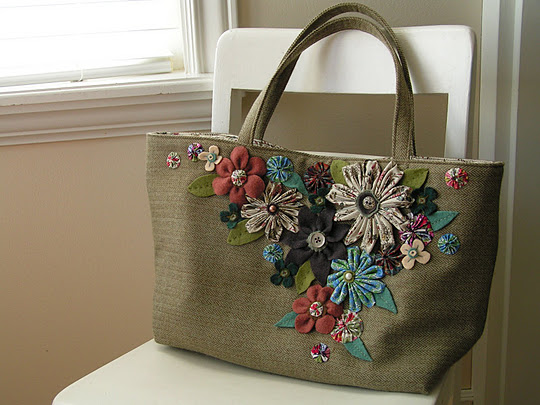
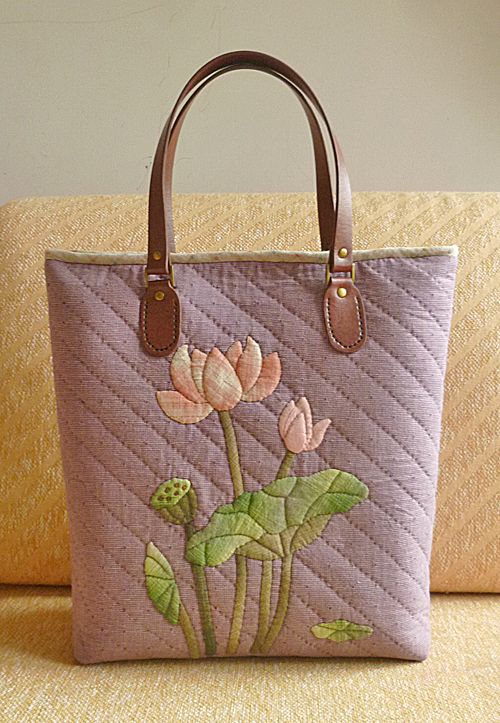
Different type of cloth bag patterns!
We offer a wide variety of handbag, purse, tote bag and travel bag patterns to suit your every need.
Create a bag that you can carry for any occasion or during any season. This free purse pattern is absolutely perfect in every way and is great for moms and grandmas on the go.
There are many different ways to make a cloth bag, but using a pattern is often the easiest way to get started. There are a variety of different patterns available for handmade cloth bags, so you can choose the one that best suits your needs. Whether you want a simple tote bag or something more elaborate, you can find a pattern to suit your taste.
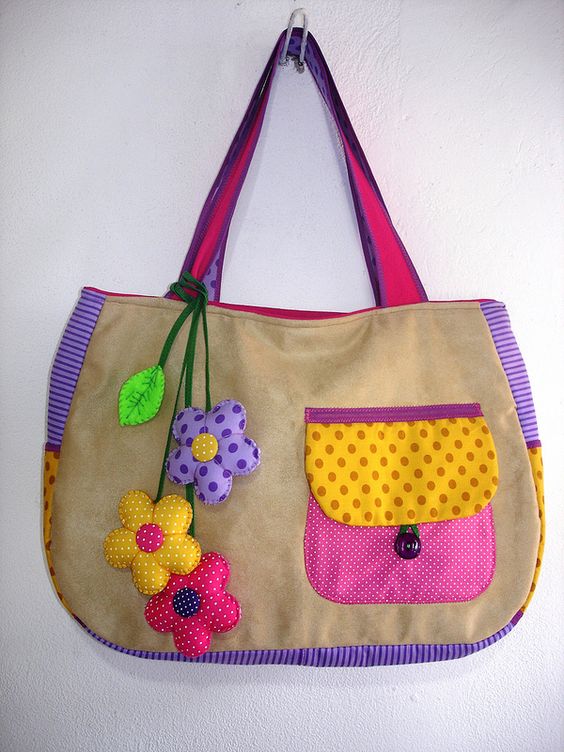
Cloth bags are great for storing small items, especially if they have a drawstring closure. You can make them out of any fabric you want, but I recommend using cotton or linen fabrics. If you use a heavier fabric, you may need to add some weight to the bottom of the bag to keep it from flopping over.
2. Drawstring Bags
Drawstring bags are similar to regular cloth bags except that they have a drawstring at the top instead of a zipper. These types of bags are great for storing smaller items, like keys, coins, and jewelry.
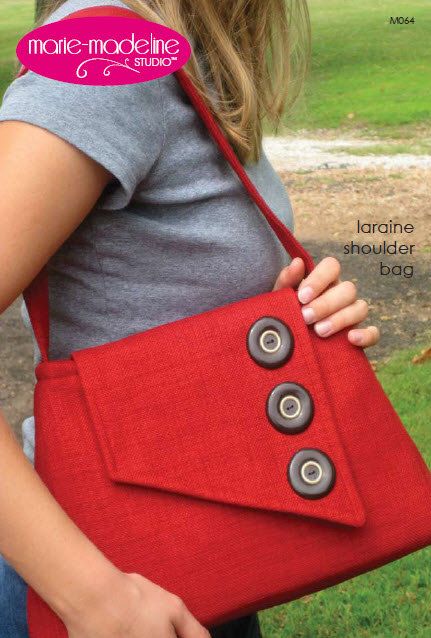
This pattern is perfect for making a handbag! You can use any type of fabric you want, but my favorite is canvas. You can find free printable patterns online, or you can buy a pattern book.
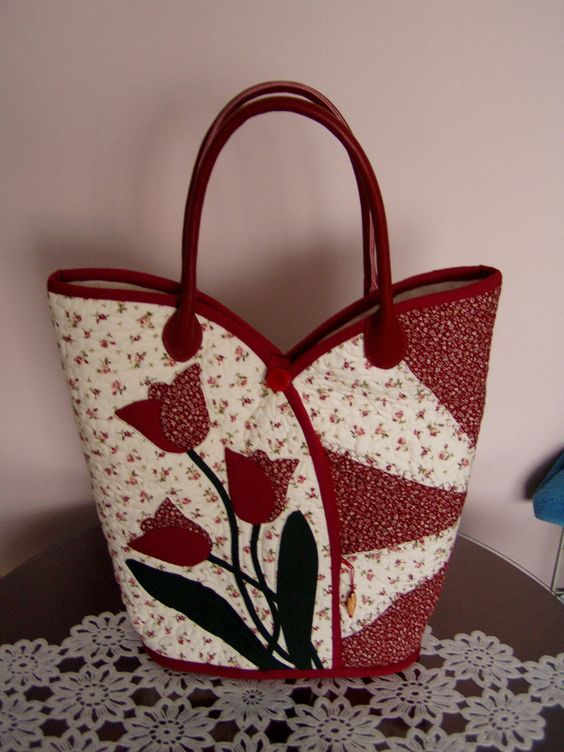
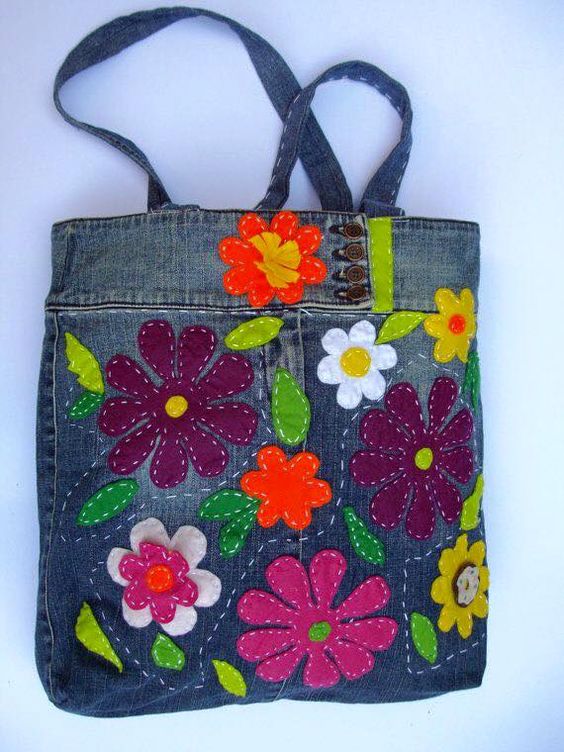
Totes are great for carrying groceries, school supplies, and other things around the house. You can make these bags out of any type of fabric you choose, but I recommend using canvas or denim.
Zipper bags are great for storing larger items, like books, magazines, and clothes. You can make these out of any type of material you want, but I prefer using nylon or polyester.
Flower bags are great for holding flowers. You can make these from any type of fabric you like, but I recommend using a lightweight fabric.
These flower pots are great for growing herbs indoors. You can make these pots out of any type of plastic or ceramic material you want, but my favorites are terracotta and clay.
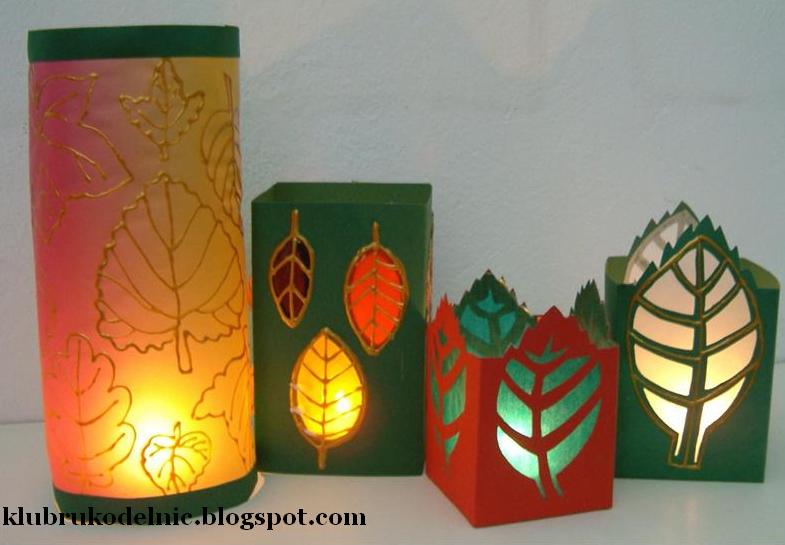
Lanterns with autumn leaves create a magic atmosphere not only in the evening. Call your children or grandchildren to get along with them made you. Made lanterns with your own hands you will later recall the time spent together whenever light a candle.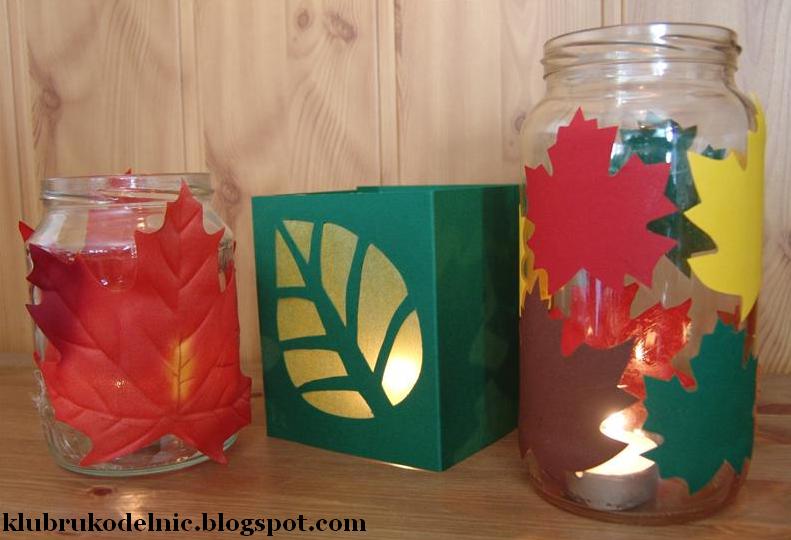
– Color paper
– Green cardboard
– Transparent yellow paper
– pencil
– scissors
– glue
– Jars
– Leaves of different trees, which will meet for a walk
1. For the manufacture of simple ordinary flashlights need glass jars of different shapes and sizes, which should be well washed and dried. On coloured paper pattern or with the help of this tree leaf draw sheet form in two sizes.
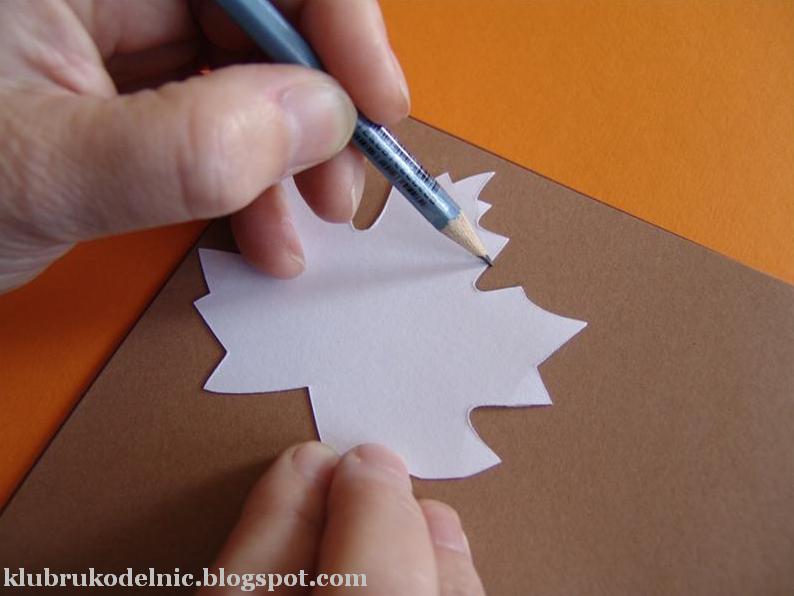 Cut out them.
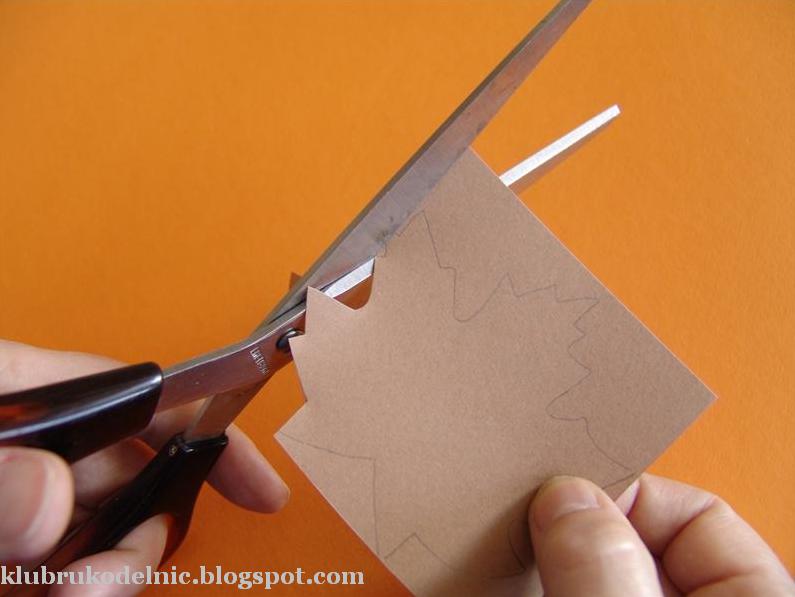 Cut the leaves pasted on the bank.
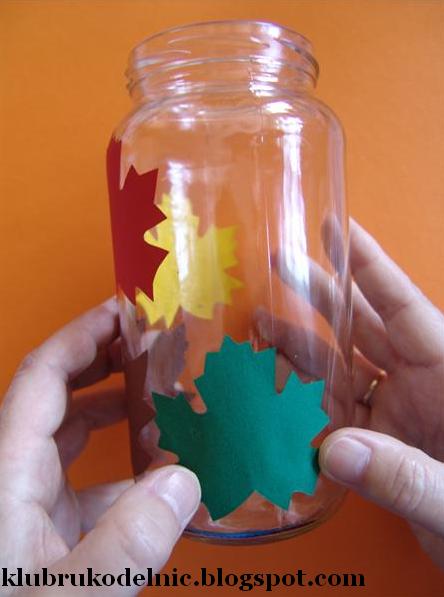 Another flashlight is made from a sheet of solid cardboard the size of 12h41 cm. Pencil-lane divided into four rectangles the size of 12×10 cm, one will see at the end of a seam for bonding the candlestick. On one rectangle draw sheet (sheet a pattern of living). We cut it so as you can see in the photo – a sheet skeleton consisting of veins.
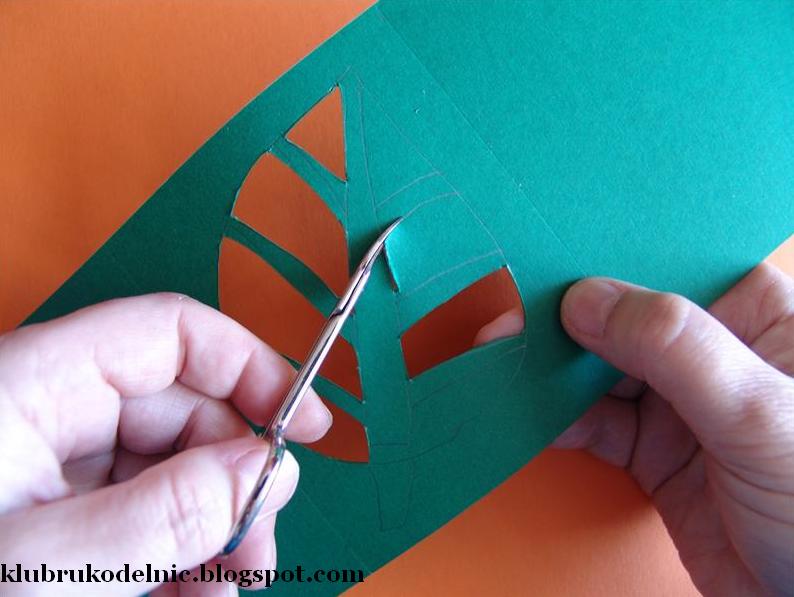 When the sheet is cut, smear “skeleton” of glue …
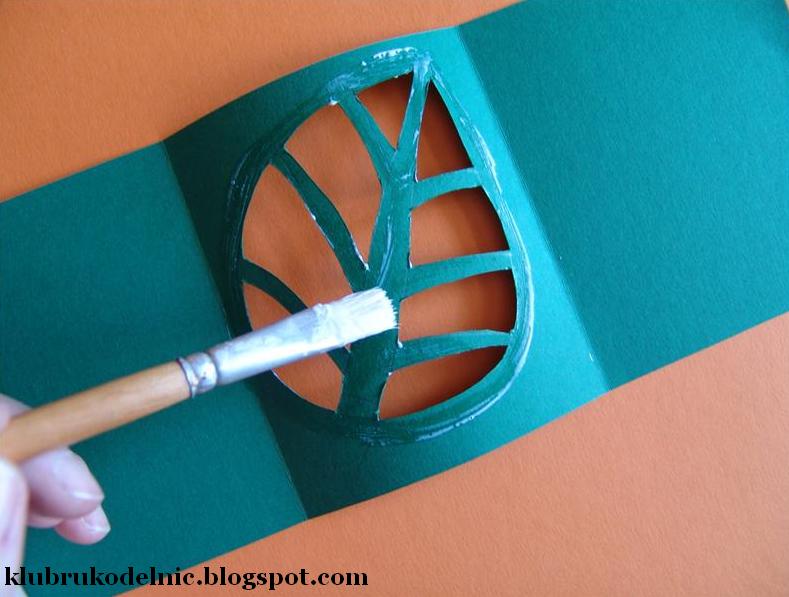 and seal the entire rectangle yellow transparent paper on the inside.
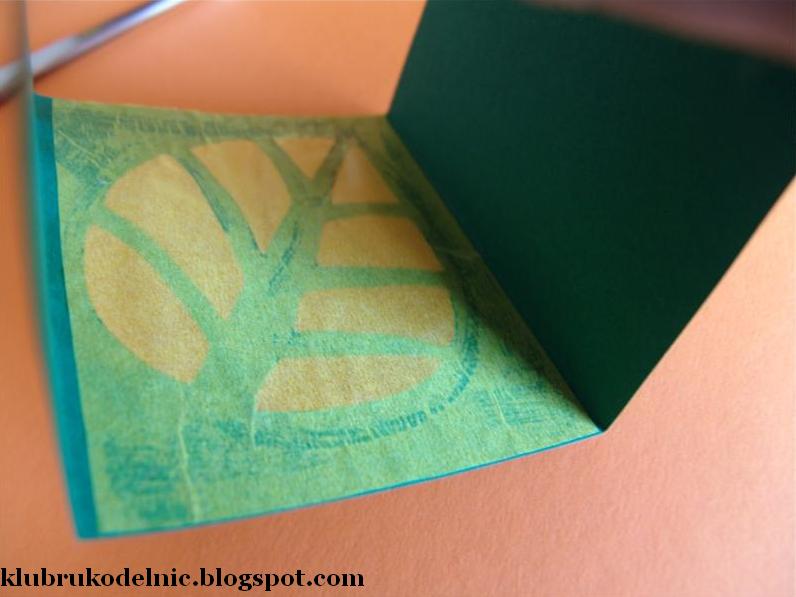 On the sheet of paper, draw coloured transparent outlines various contact collected leaves and draw them gold or silver paint. On the upper and lower edge of the solid stick the strips of coloured cardboard. When the paint is dry, glue the sheet into a cylinder. It will turn the flashlight, which can be inserted with a candle jar. Very nice these lanterns look at the window from the street, set between the panes.Source

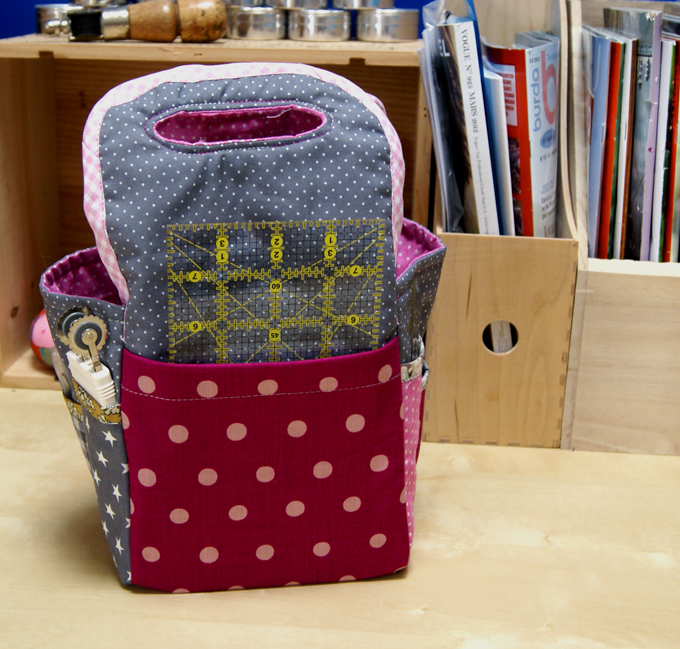
Today a boss and a little tutorial to make a cute little stitching bag, inspired by the scrap booking tote bags, which you will be able to see page 78 of my last book, Workshops, and sewing corners.
To make it, you need:
– of matching cotton,
– of interlining to stiffen and reinforce the small pockets
– of Vlieseline X50 or H630 (a little fleece and Thermo coll ante on one side) to give a holding to the basket.
– the bias (or bias) associated with the selected tissues.
Here are the templates of the different parts: pdf file to print the sewing margins are not included Parts A and A “bis”: long side of the basket where the handle is (to be cut 4 times in the fabric, interlining Colleton e) Parts B and B “bis”: small side of the basket (cut 4 times in the fabric, 2 times in the interlining ….é ). Exhibit C: backplane (2 times cut in the fabric, interlining 1 time in …..é ). And the sizes of the small pockets (sewing margins are not included)
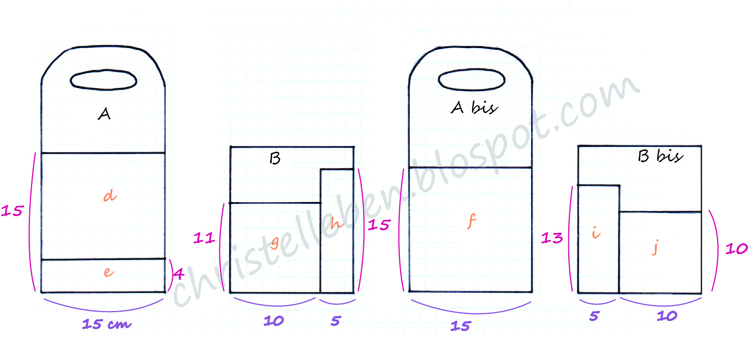
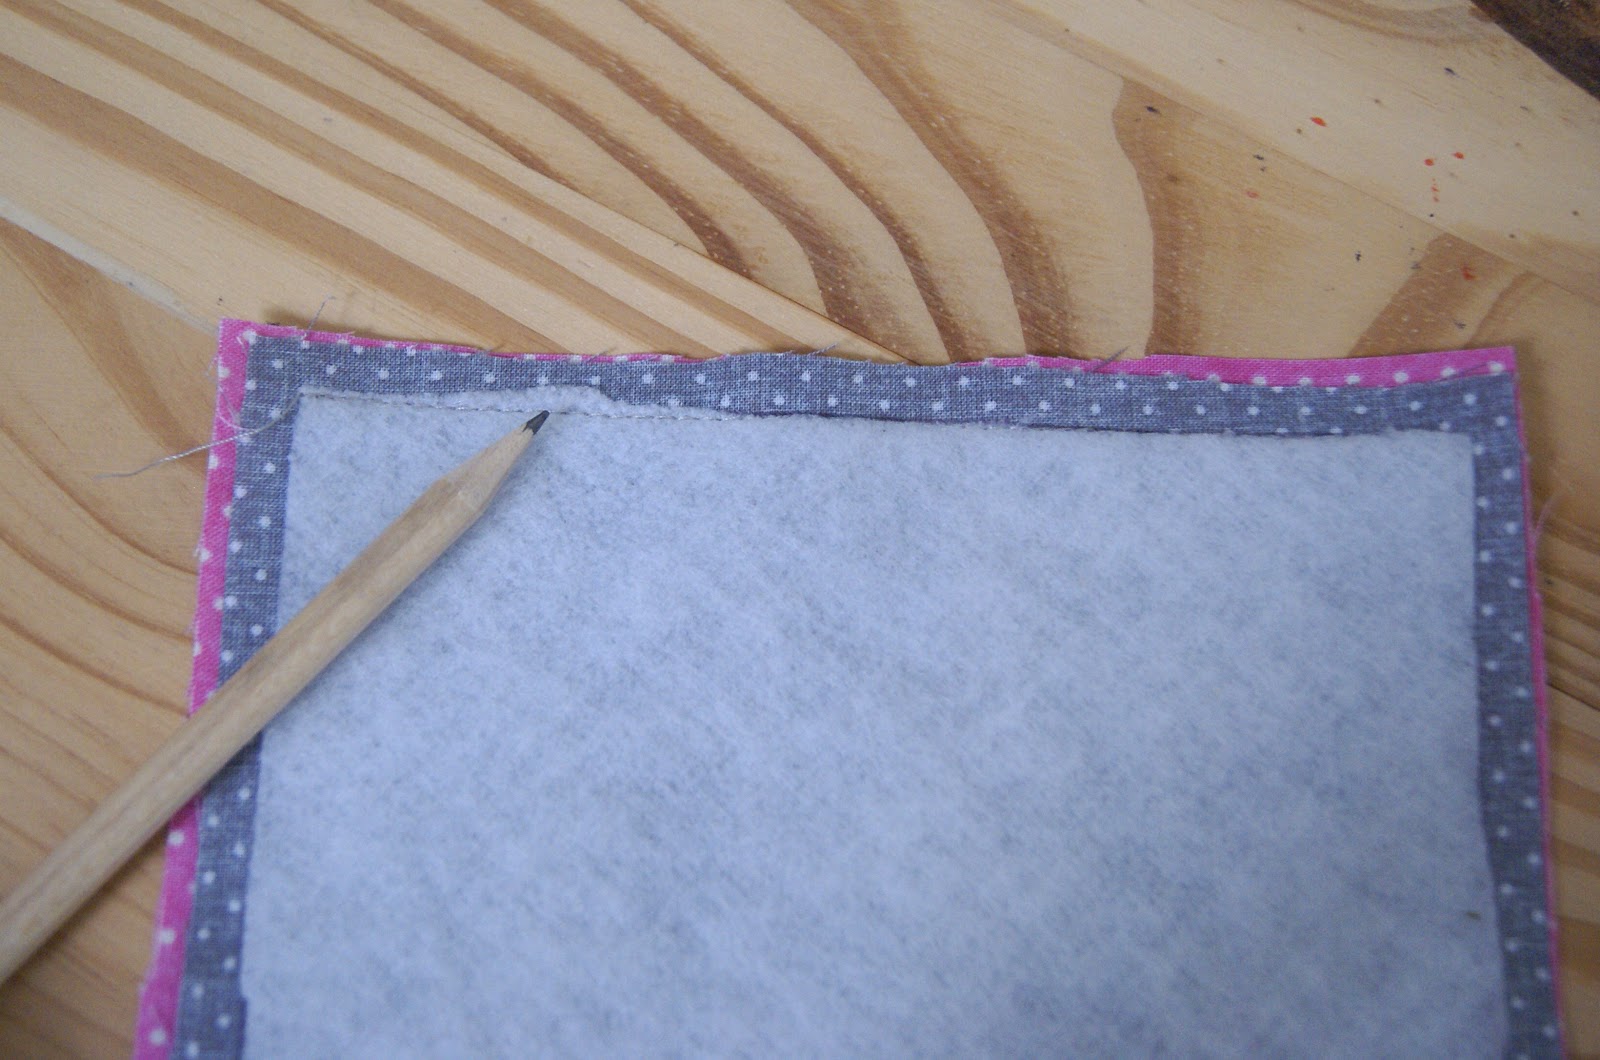
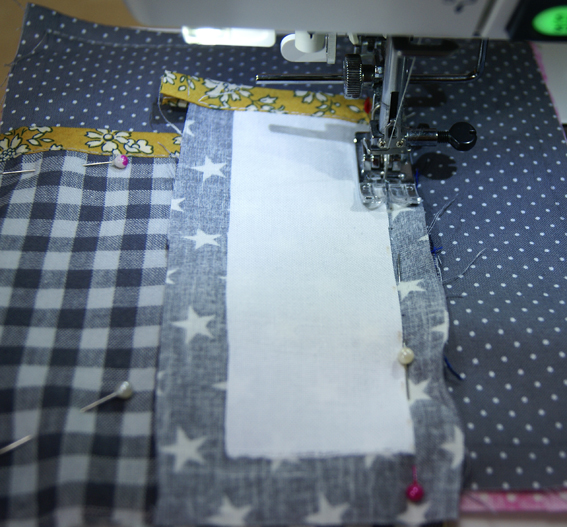
Pocket d: large pocket of part A (to be cut once in the fabric and once in the interlining) Pocket e: small pocket of part A (to be cut once in the fabric and once in the interlining) Pocket f: medium pocket of the piece Abis (to be cut once in the fabric and once in the interlining) Pocket g: left pocket of B (to be cut once in the fabric and once in the interlining) Pocket H: Right B pocket (to be cut 1 time in the fabric and 1 time in the interlining) Pocket i: left pocket (to be cut once in the fabric and once in the interlining) Pocket j: pocket (To be cut 1 time in the fabric and 1 time in the interlining) Step 1: Prepare the 4 sides of the baskets and the bottom of the basket ■ Draw and cut each piece in the outer fabric and inside the fabric by adding The margins of seams.
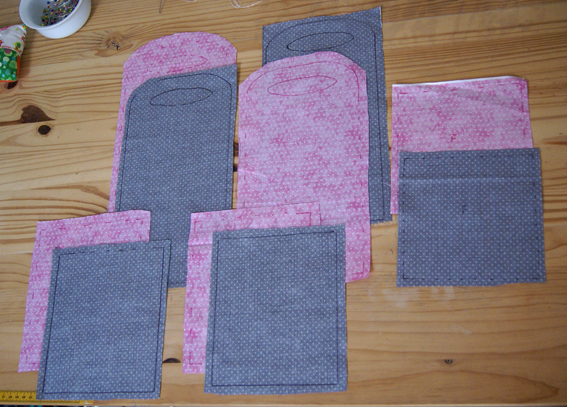
■ Cut parts A, B and C in the fleece fabric without seam allowance and attach each piece of fleece to the corresponding piece of the outer fabric. Wait about ten minutes before handling them again.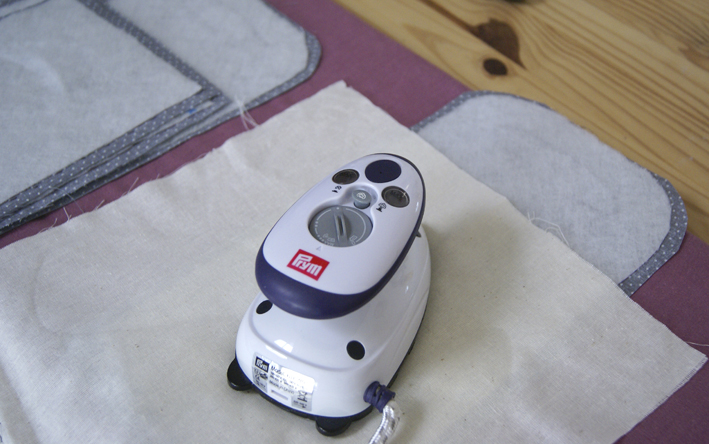
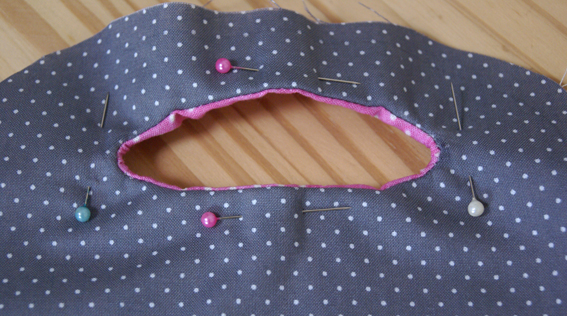
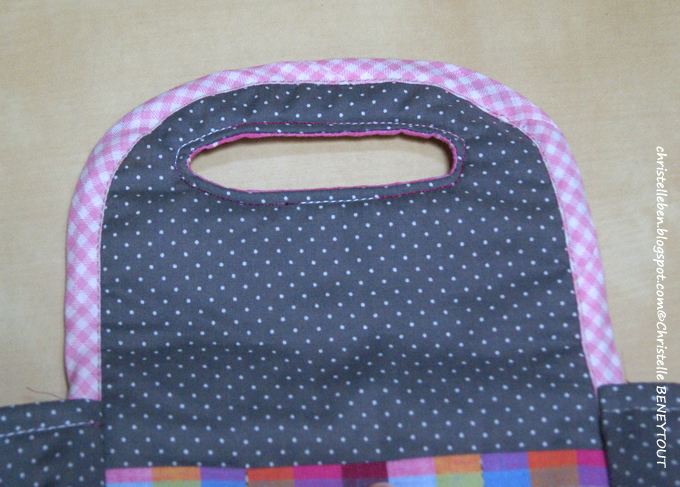
■ Sewing the handles of the parts A: Place the outer part An on the inner part A, right side up and sew the opening on the right stitch (place the fleece over you, redraw the hole on the fleece).
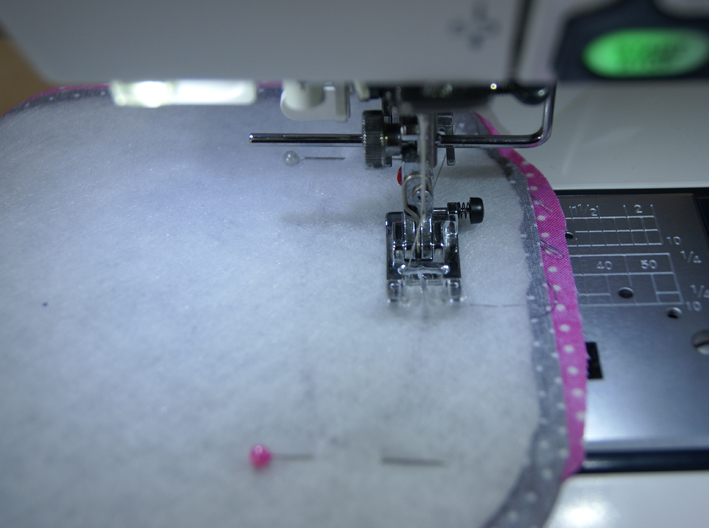
Using a chisel or wire cutter, slit the inside of the opening and crunch the ends.
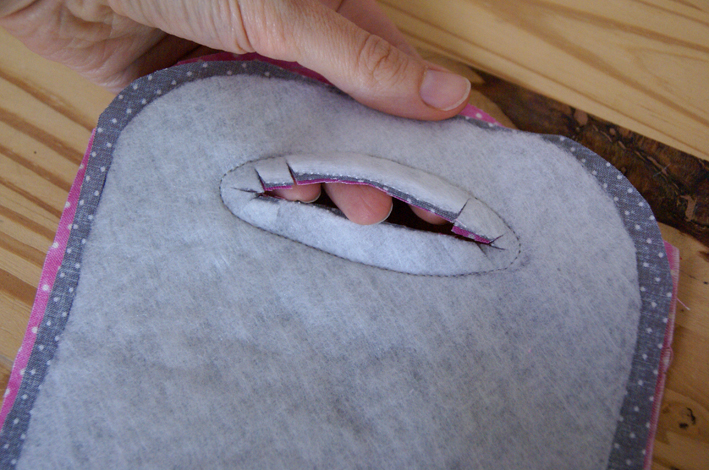
Pass the outer fabric through the hole in the opening, position the pieces face-to-face and stitch the round of the opening.
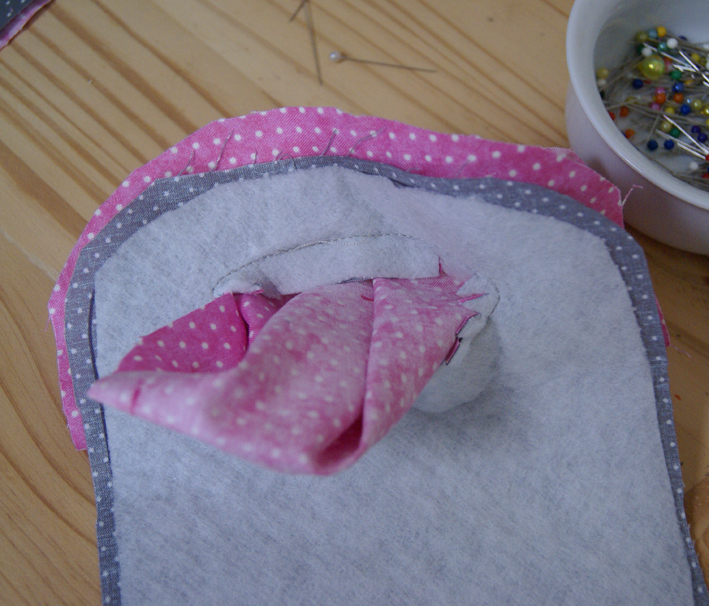
Finally, bend the handle between the 2 markers. You get this:
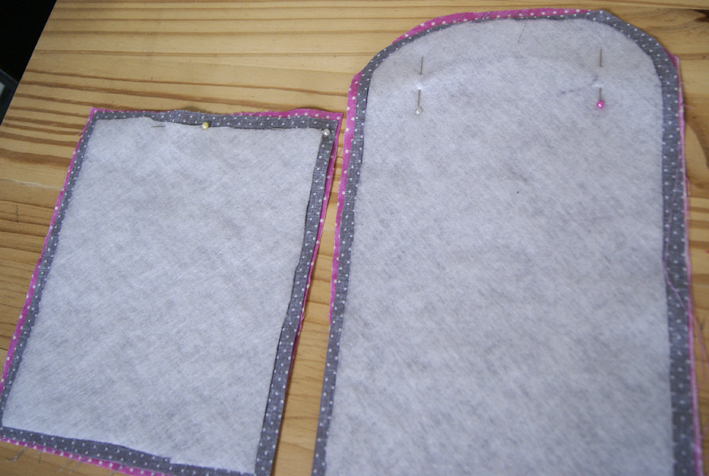
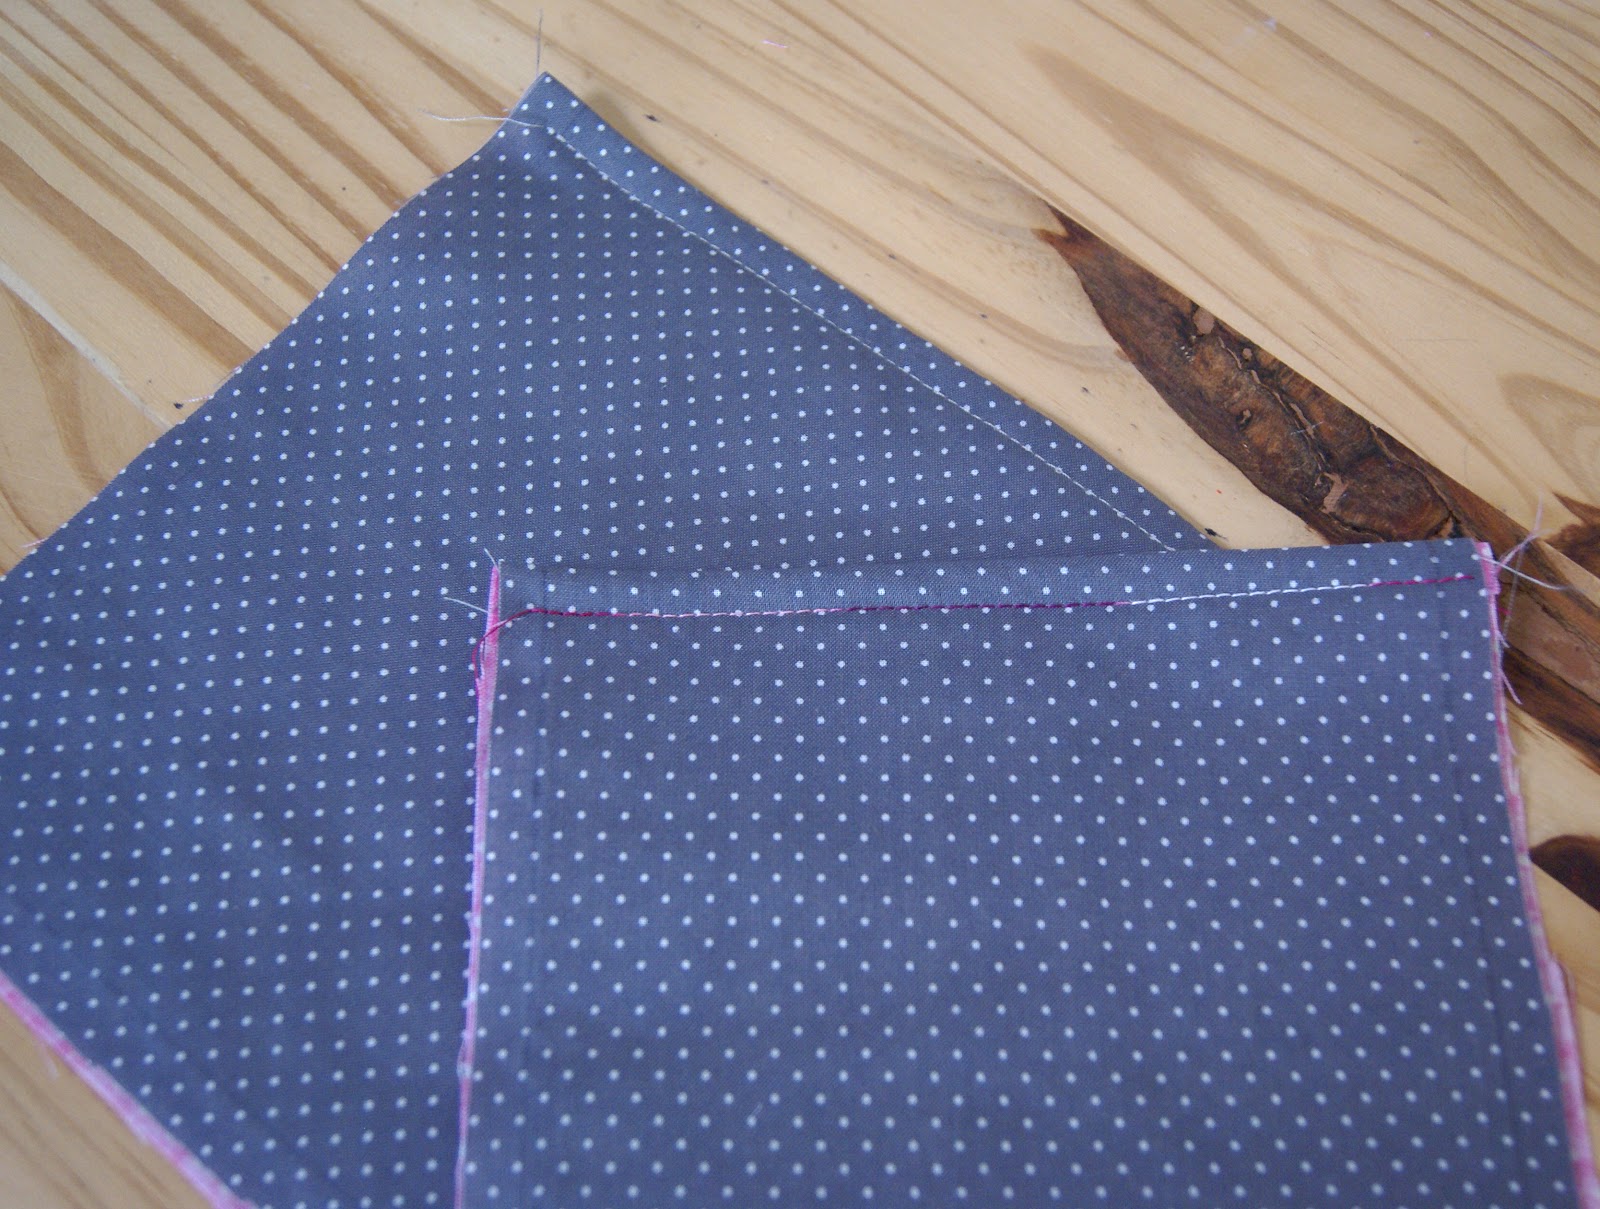
■ Prepare sides B : place each inner piece on each outer piece, place against the place and assemble the top edge.
Turn over, place iron and stitch on place 0.5cm from an edge.
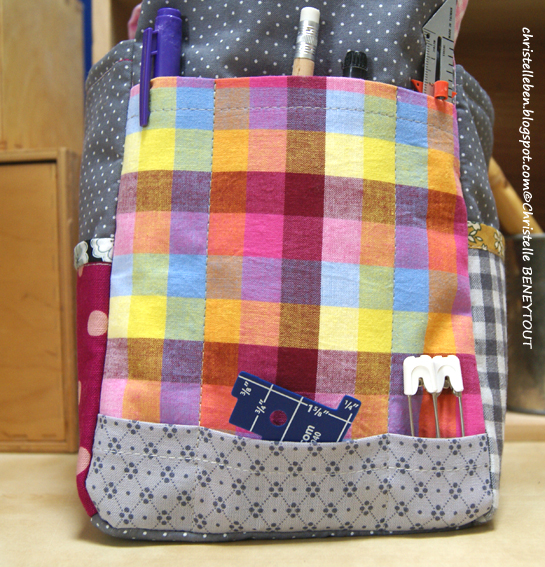
Step 2: Prepare the pockets.
■ For pockets, choose to border the edge that remains open, or make a simple hem if the fabric is thick enough, or double with another fabric.
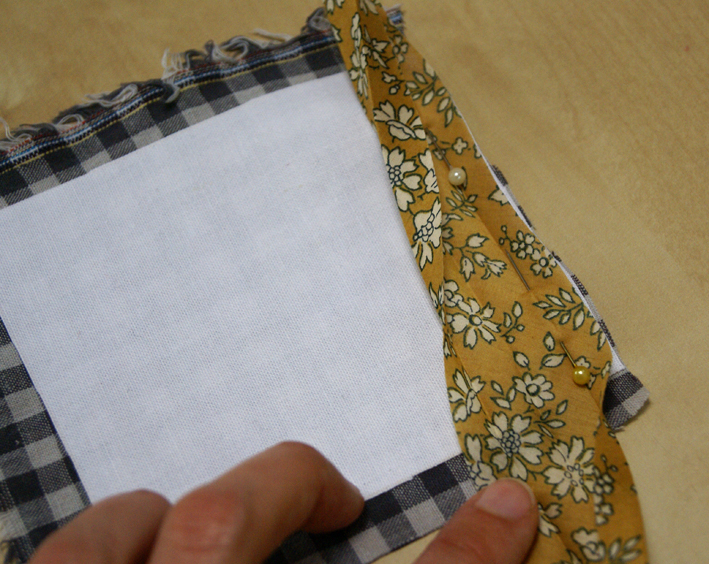
Think about covering the fine fabrics so that the pockets have the hold and can contain the material that you will put in it.
■ Attach the pockets to the sides of the basket.
You can divide one of the large pockets of the sides An or Abis, by sewing straight lines that will make separations for your pencils, rulers etc.
We obtain the 4 sides thus, and the bottom: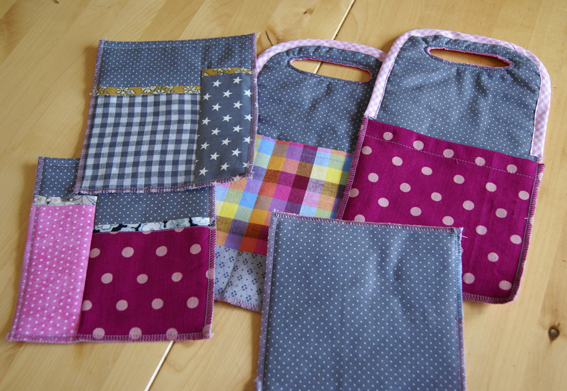
■ Mounting the basket:
Scuff the sides and bottom. Assemble the sides together, then sew the bottom of the basket.
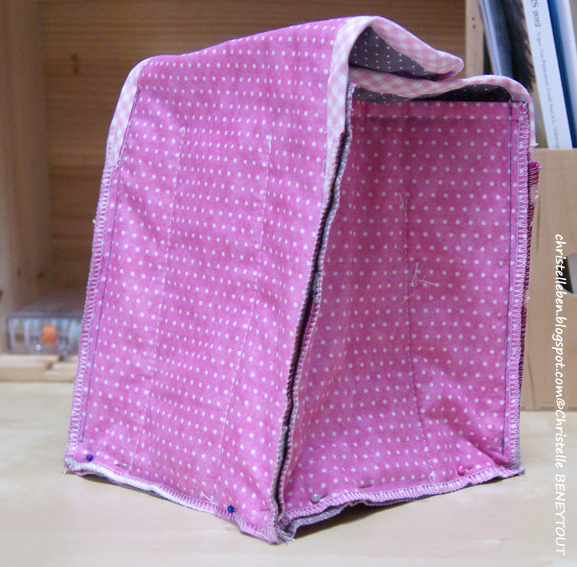
And return to the place: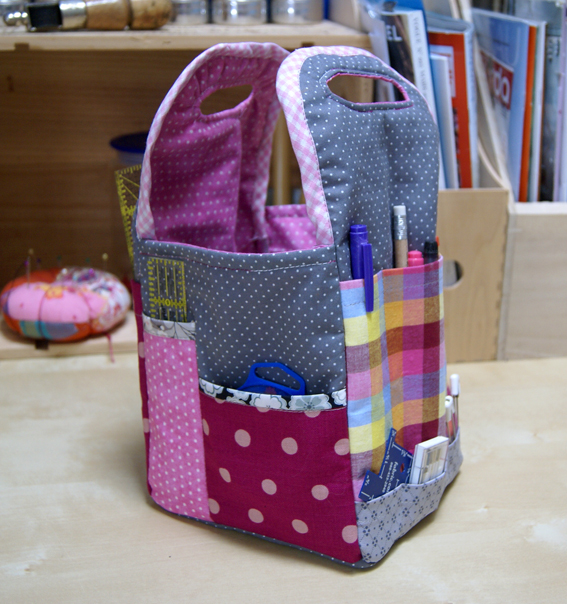
So here is a small storage basket, to divert according to your desires (for children’s felts and pencils, makeup products in the bathroom etc), a gift idea more for Christmas approaching;)