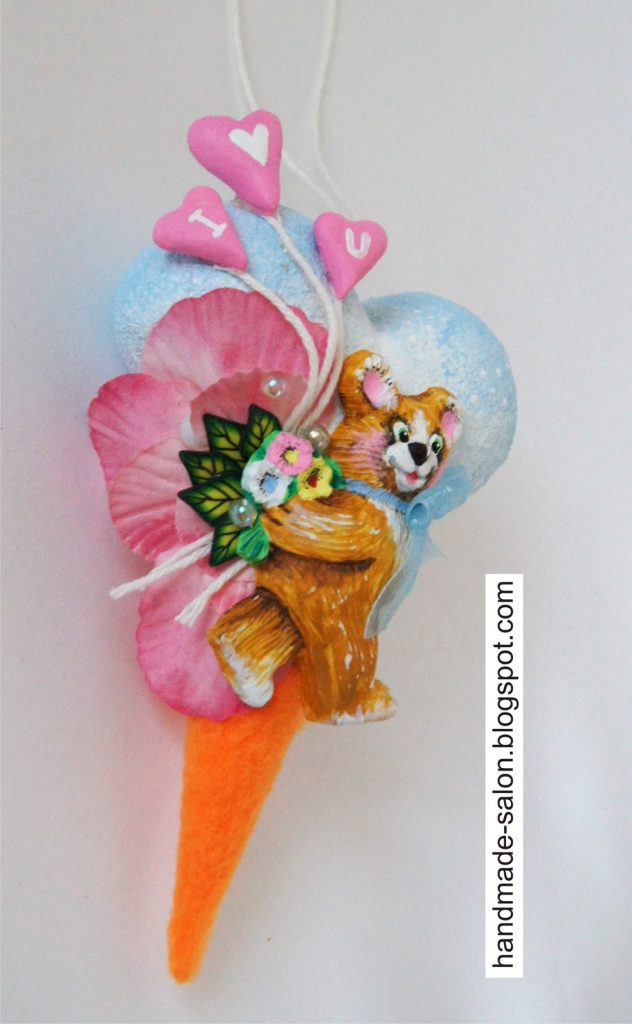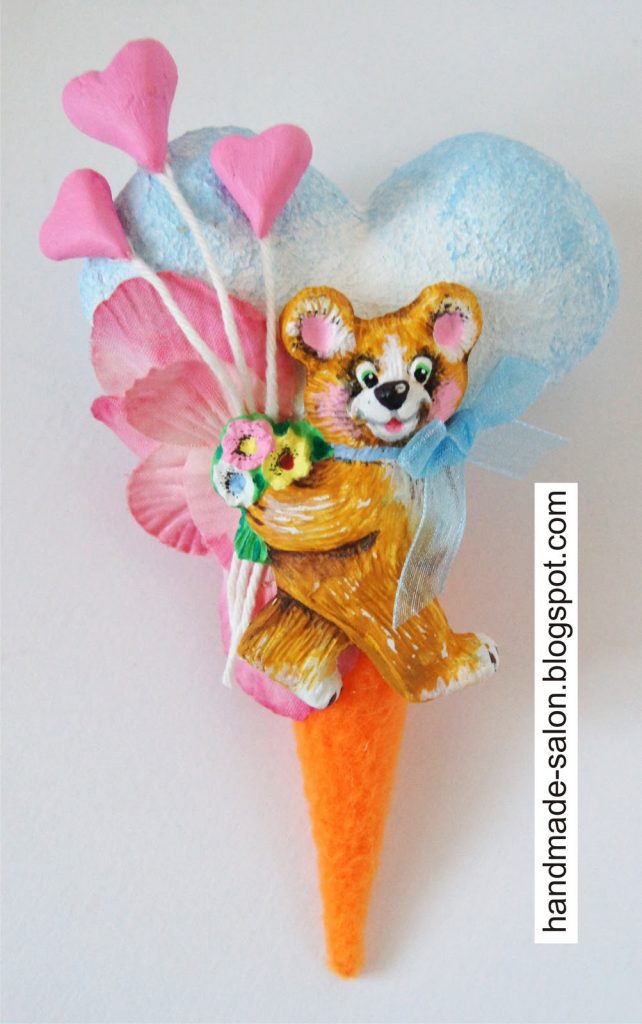
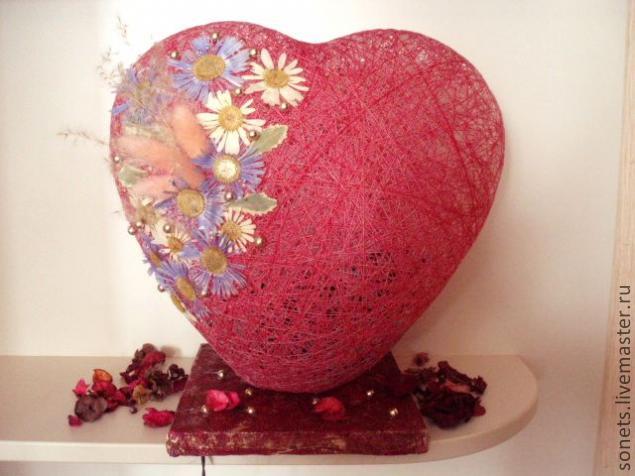
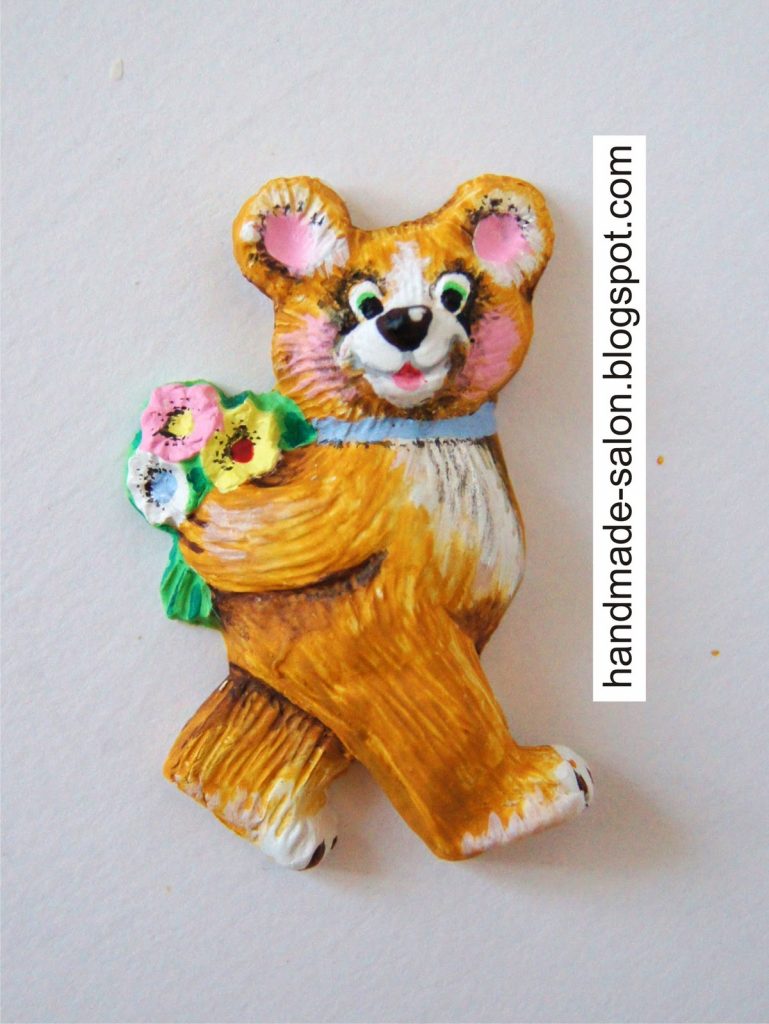
Lamp-night lamp “Loving Heart” (published in w. Master (Belarus))
In anticipation of the holidays, we overcome suffering – “What to give to your loved ones?” I want something unusual, surprising, no matter what do not like. I would like to express our overwhelming feelings, and the words hard to find? Let’s give your favorite marvelous light “Heart”. With this gift, you will be able to say everything without words.
The night can give mothers on Women’s Day, girlfriend or daughter for a birthday, a favorite on Valentine’s Day heart “beats” from the senses and that’s it. Light a lamp in a romantic evening only strengthen your feelings.
And you can just for yourself, your favorite, to create a miracle. The interior of the bedroom, it certainly attracted attention.
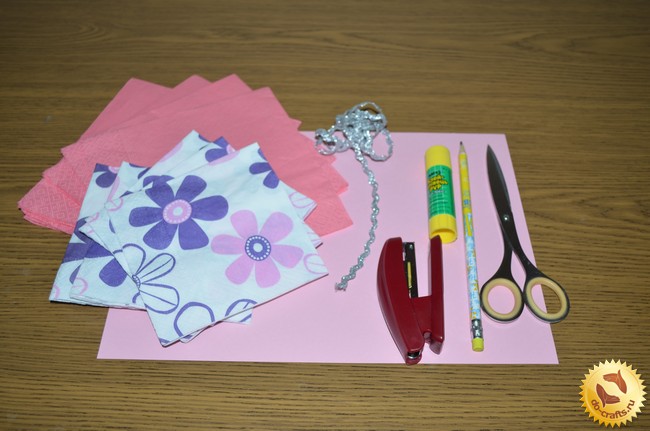
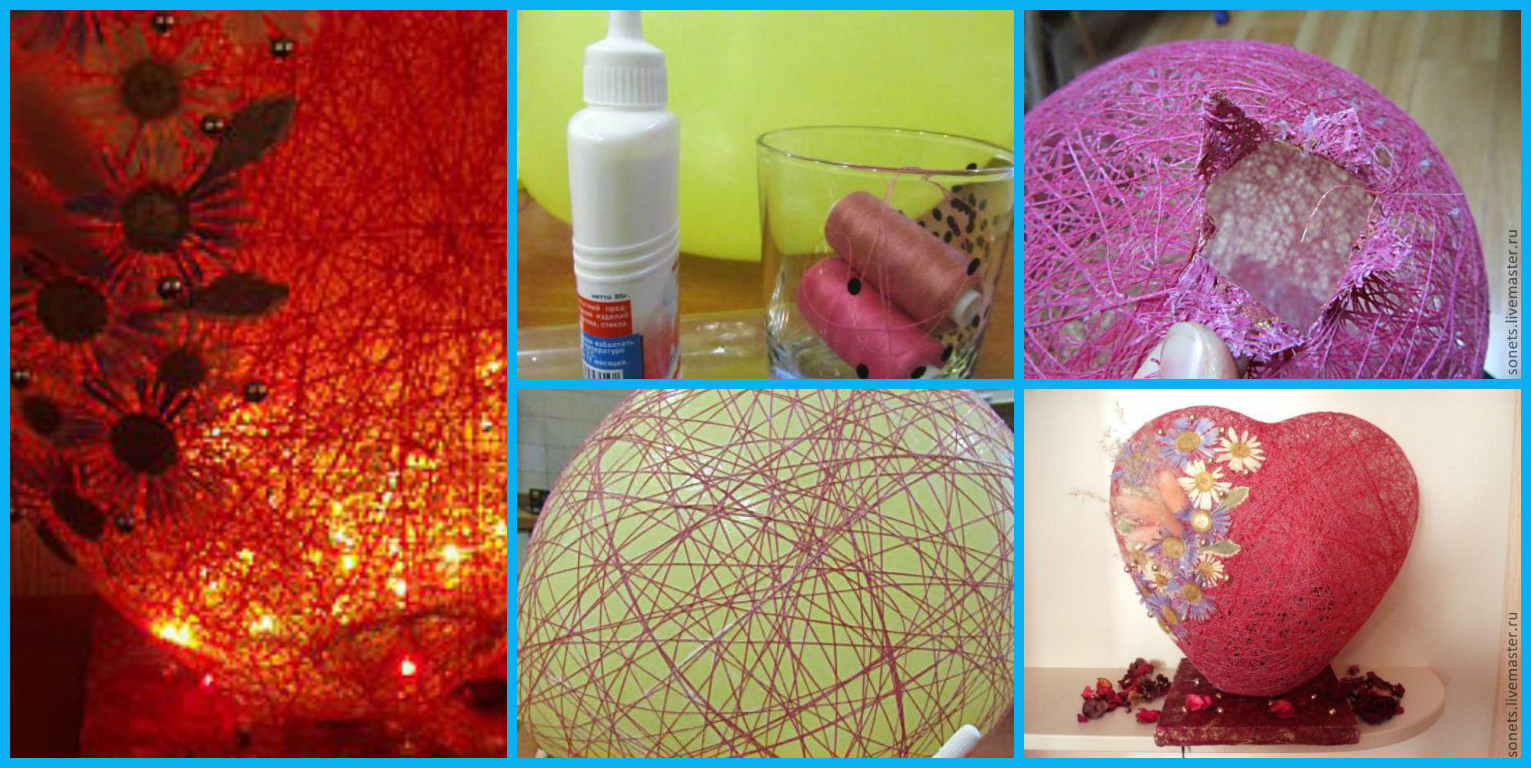
everything you need to prepare in advance.
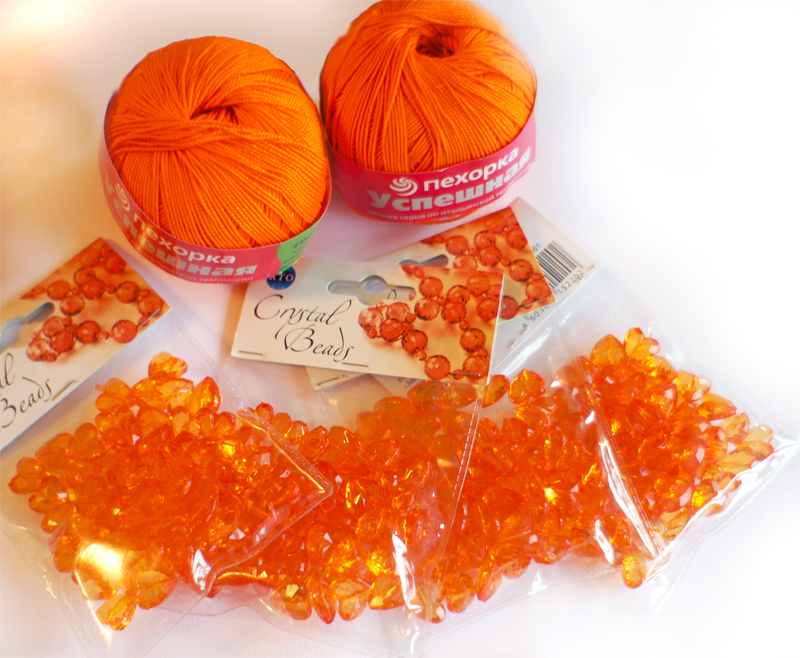
- 1 -2 thread spool (pink or other colors), the color of a lamp depends on your decision.
- 2 PVA glue, not less than 100 ml (not the building!) Adhesive point or hot glue (glue gun)
- 3 thick needle, long
- 4 ball in the shape of a heart (you can make a light and around for yourself). For the master class, we took a round ball.
- 5 square-shaped plate (20 ’20) of a thickness not less than 1.5 cm. You can replace the wooden photo frame with wide planks or solid cardboard box.
- 6 napkin color (can be replaced with cloth or acrylic paint). The stand can be issued and in its sole discretion)
- 7 -tailender a roll of toilet paper.
- 8 dried plants and artificial flowers, beads, feathers, in short, something for decorating our hearts.
- 9 drill
- 10 blinking Christmas tree garland.
- 11 scissors
Getting to the manufacture of
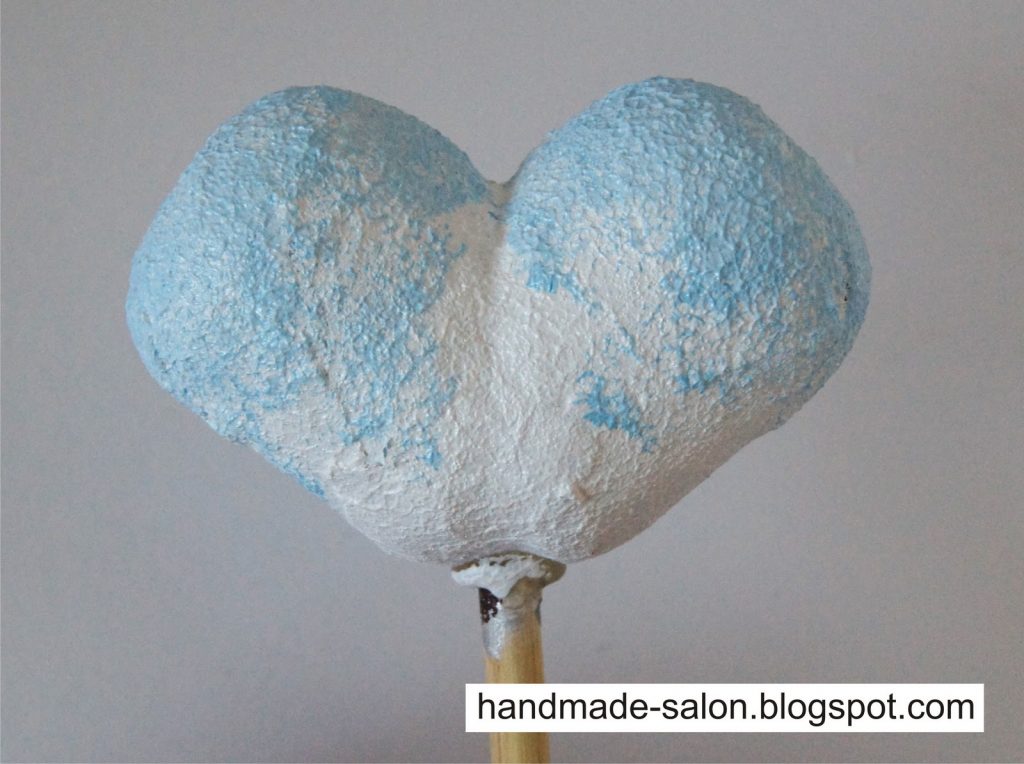
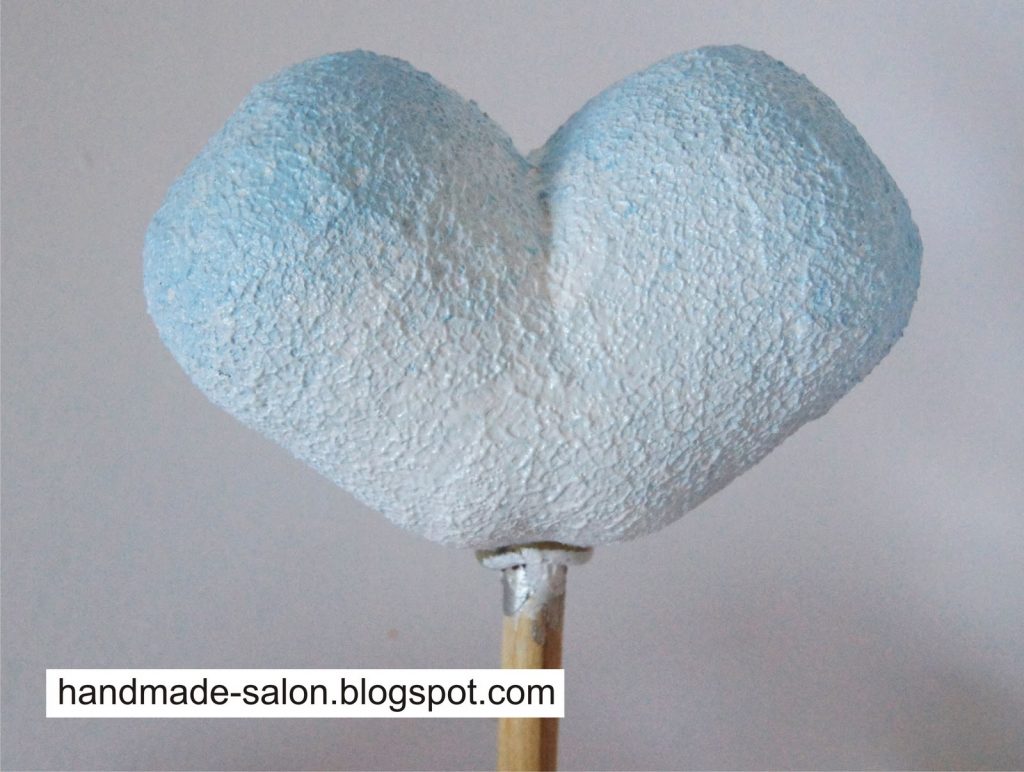
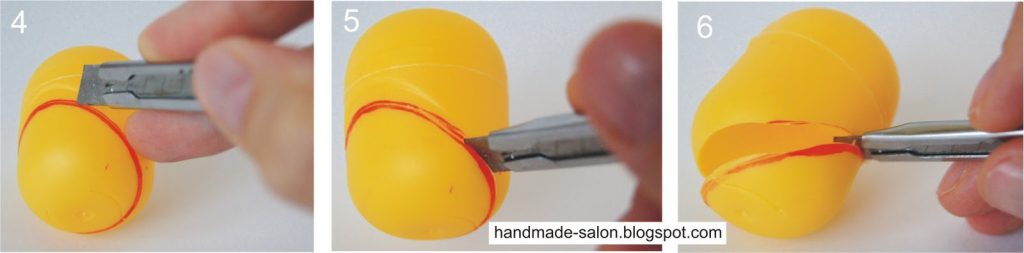
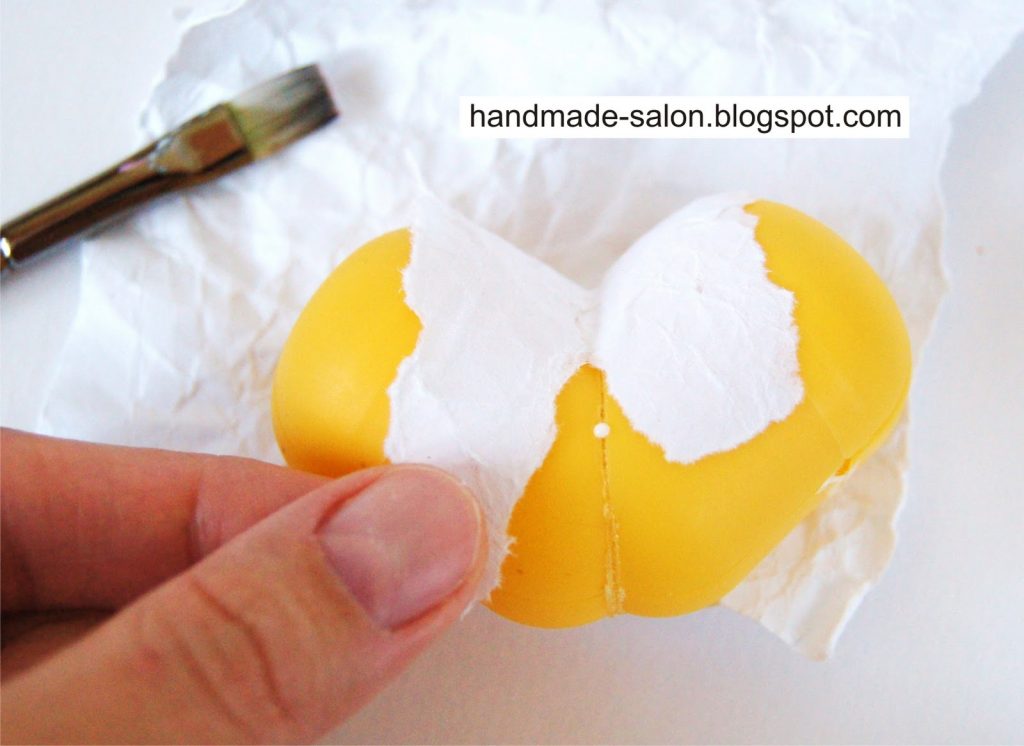
1 First, make shade for our lamp. Inflate balloon heart to medium size. The size of the inflated balloon and will be the size of our lampshade.
2 bottles of glue PVA bottom pierced with a needle with two vdet in her thread.
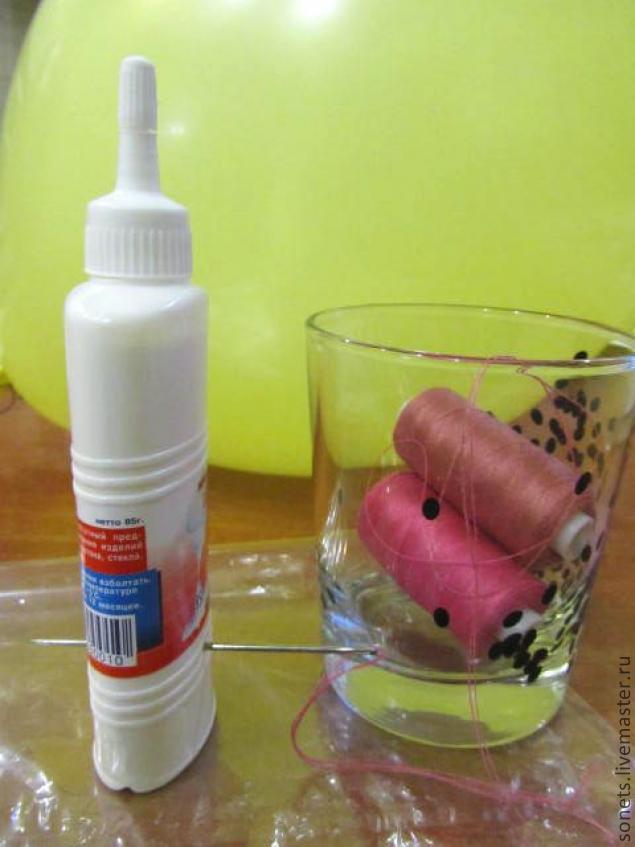
Figure 1) extends a needle through the bank, took out the other side, take out the needle thread. Pierce the bottom necessarily banks unnecessarily. the thread must always be wetted with glue, and the amount of adhesive in the work decreases. For the convenience of working with a thread spool, and a jar of glue put in jars.
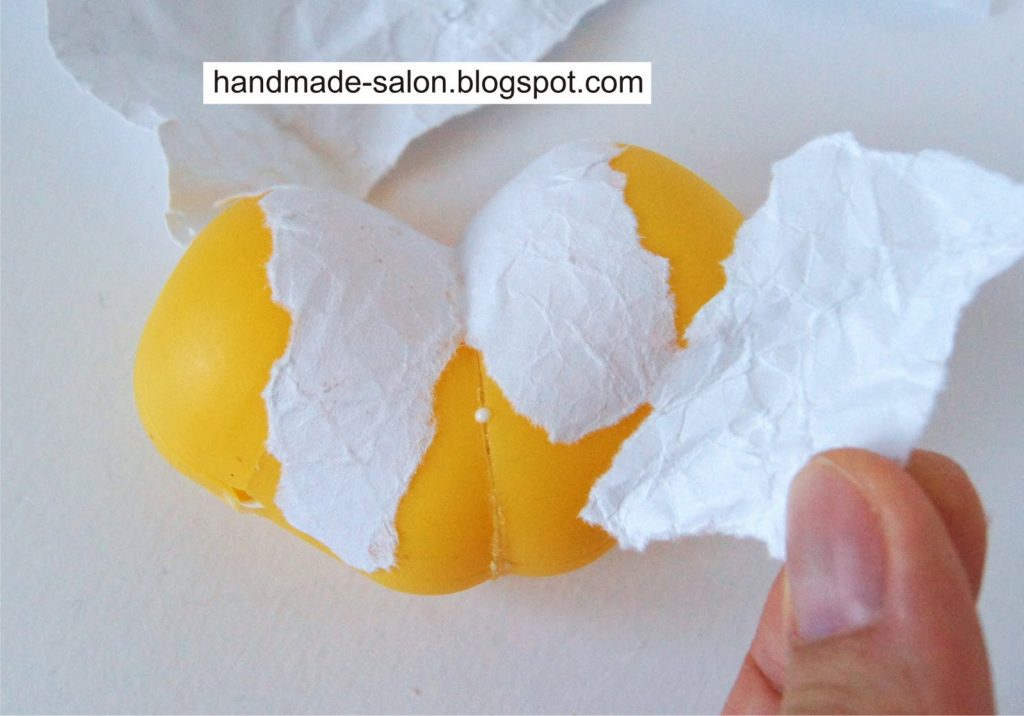
3 end of the thread tying the tail of the ball and start winding a ball
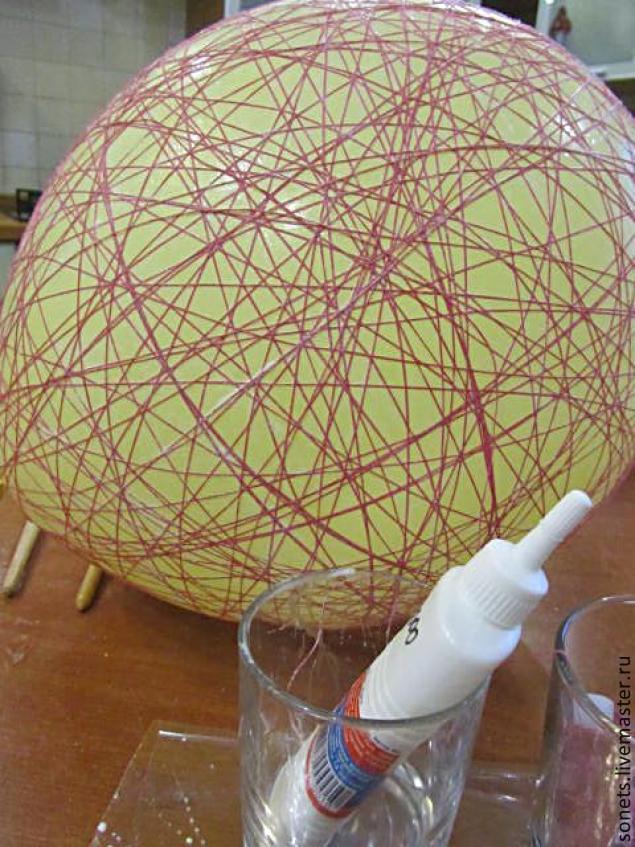 Fig. 2). The thread must always be wetted with adhesive. Initially, it will be inconvenient and thread all the time to slip the ball, but we’re stubborn, hard-working, we will succeed!(Figure 3) tauten thread diagonally lengthwise, crosswise. After 10 min, the winding becomes easier. (Fig. 4)
First, we get the hand and understand the principle, secondly, the thread stops the slide, unnecessarily. It will cling to the wound.
Roundball winding easier than the “heart”. The “heart” do not forget to wrap the “ears”. Look where we are sending to the emptiness and thread. Drum thread pool is not empty. If the glue is ended earlier thread, just it from other banks. That wound ball (Fig. 5) Leave it to dry. When the thread is almost dry, punctures the ball. Threads will be tough and will keep the shape.
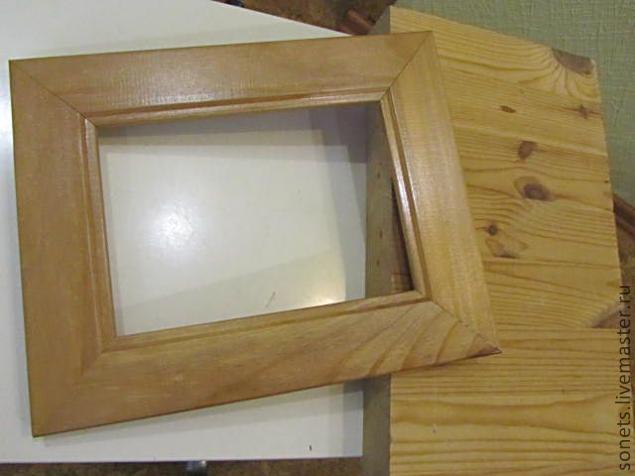
4 Getting manufacturing base. I took a stand for the tablet. Drill a hole in it (you can help one of the men, but not one for which it will be a surprise. Although …. Maybe he was. He did not even guess what it is and why.) The hole should be of a diameter that through it might get through Christmas tree garland. Instead, you can use a thick plank picture frame, replacing the glass with a thick cardboard. Or, in extreme cases, try the box with a thick, dense cardboard, not too thin. (Figure 6)
 5 over the aperture ring of glue cardboard, cut from of roll of toilet paper. We attach it with glue well bay. Outside strengthen a strip of paper, grabbing one corner of the ring, the other coming on board. The board. I pasted cloth (PVA) and a bit overshadowed gold acrylic paint. (Figure 7 and Fig. 8 and Fig. 9).
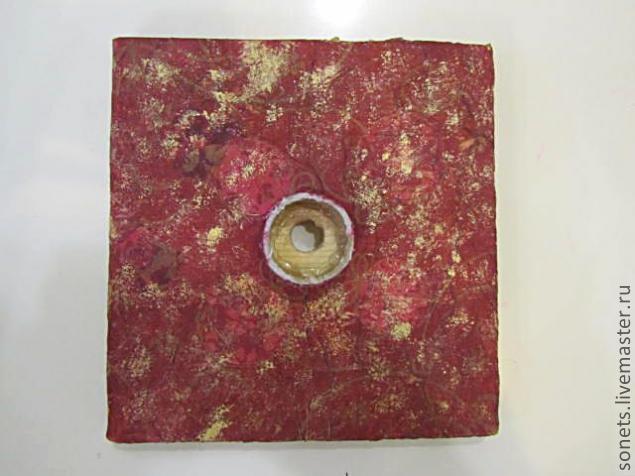 On the reverse side, plates make a groove for the wiring from a garland (Fig. 10)
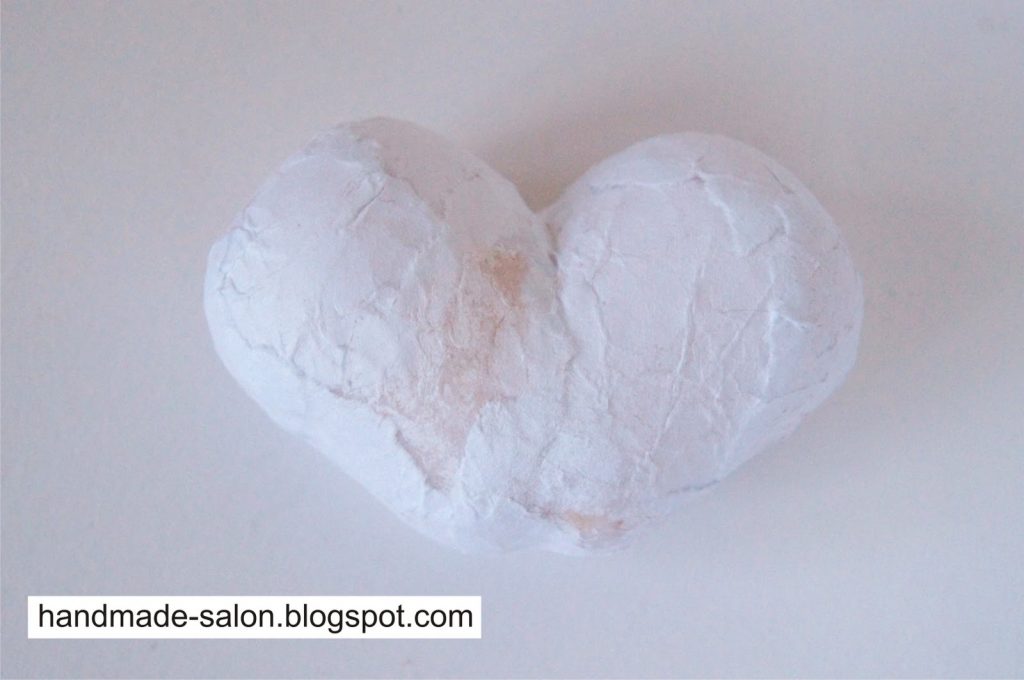
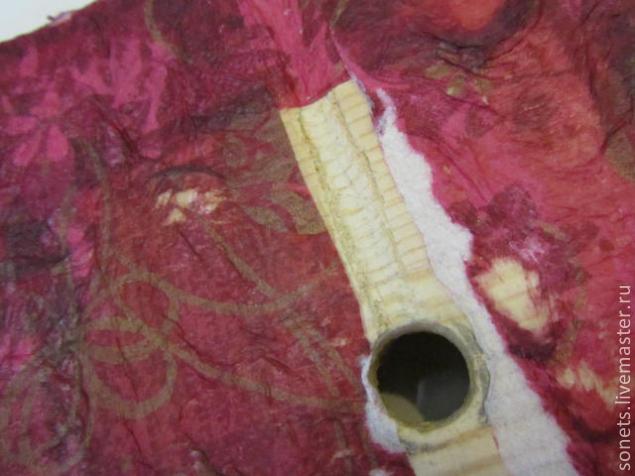 6 Threads almost dried up? Punctures the ball. The ball should unstick itself from the thread. Therefore, it is not necessary to wait until dry. If the ball has dried thoroughly and piercing not unstuck from the thread, will come to his aid. Through the thread is passed a pencil or any wand inside her trying to unstick the ball. If the thread balloon wrinkled, pressed, then we, the same wand inside his straightened, but still try to do everything patiently and carefully. The ball was torn inside the thread. (Fig. 11)
We’ll get it through the skin. It is more convenient to do it with tweezers.
7 At the bottom of the ball (where was the tail), cut out a hole in the form of a lotus. (Fig. 12).
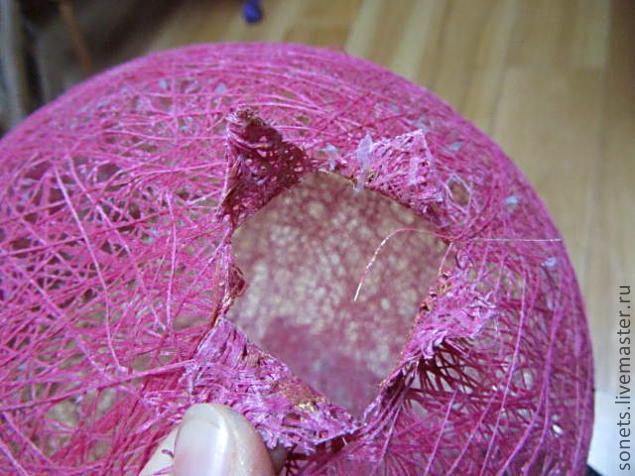 The hole diameter should be with our ring. And it sits on must be tight. (Figure 13).
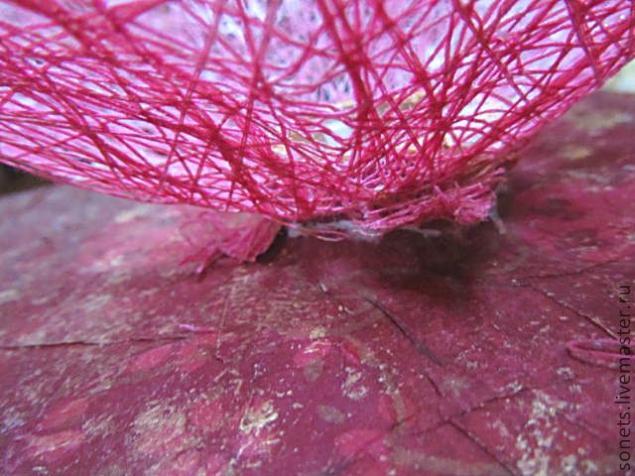 Dress up the ball on the ring, pouring glue. The petals are glued to the outside of the ring. Then you will feel that the ball as if he falls, and “asks” on the stand. Just press it and the place where he sat down on the stand we coat with glue. Just make sure that the lamp was flat, not tilted. (Fig. 14)
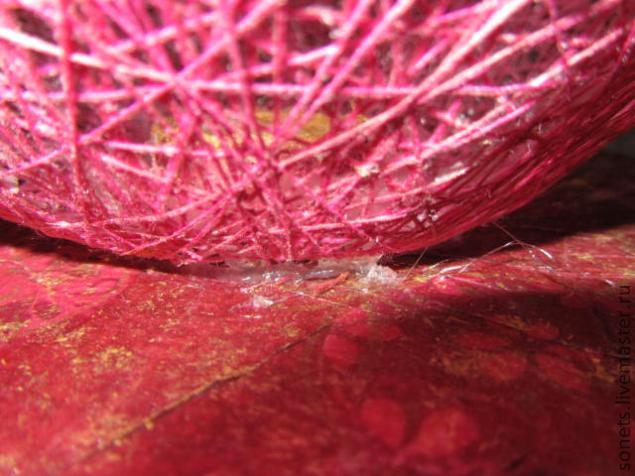 8 Zadekoriruem our “Heart” (in our version, to explain the ball.) I used dried flowers. But you can come up with something of their own. Stick to your decor thread, make “heart” of the most beautiful and loving. (Fig. 15)
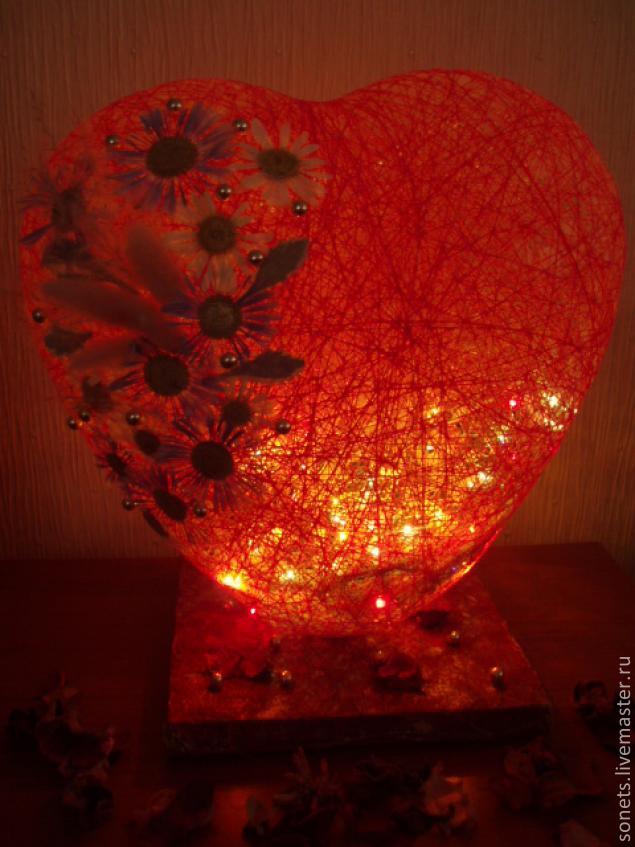
 9 Bottom stand pokes through a hole in the “heart” of Christmas garland. Outside the reserve wire that embarks on the groove and attaches it with glue or adhesive tape.
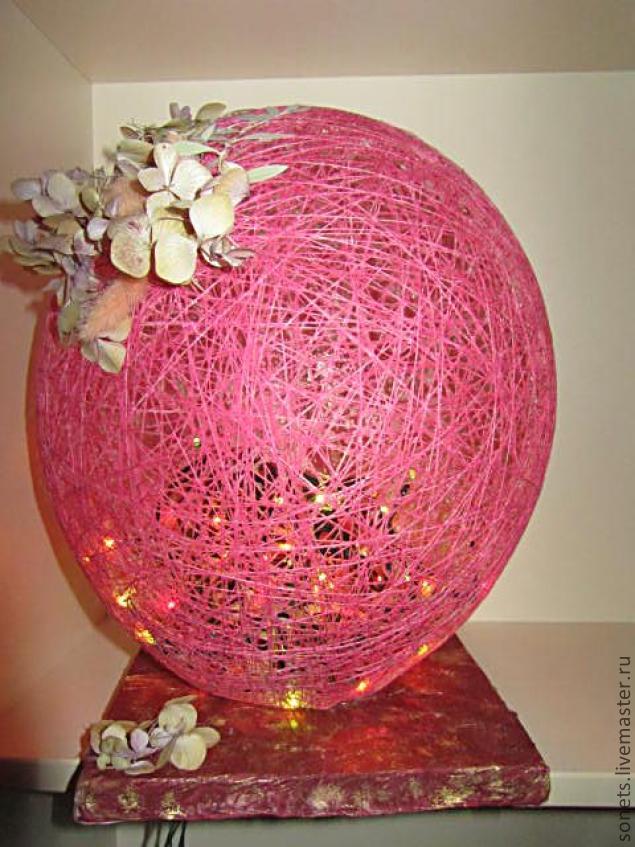 Enjoy your evening
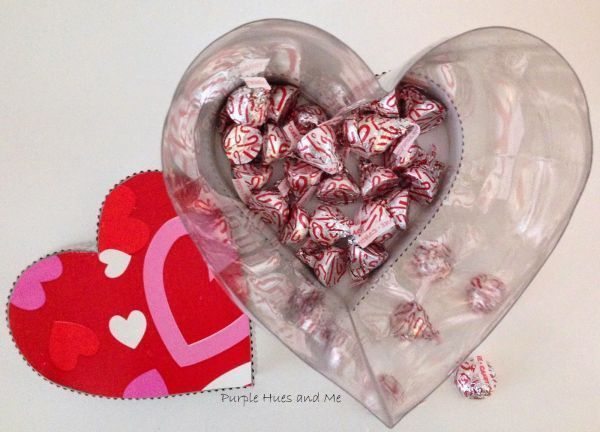
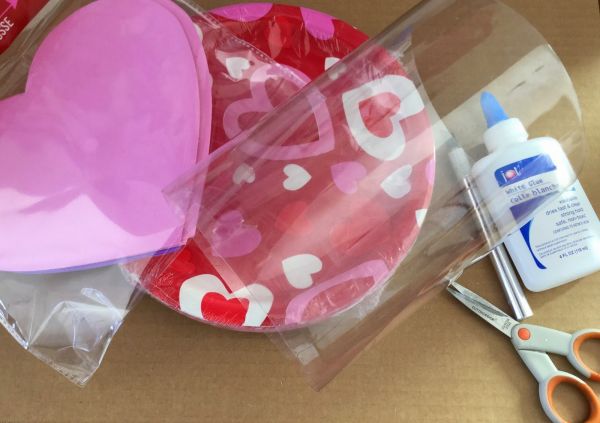
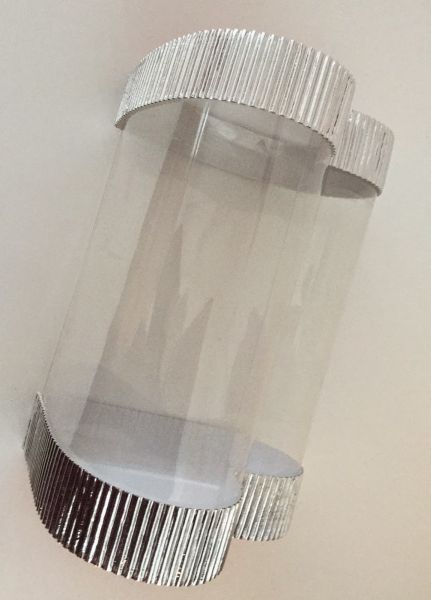
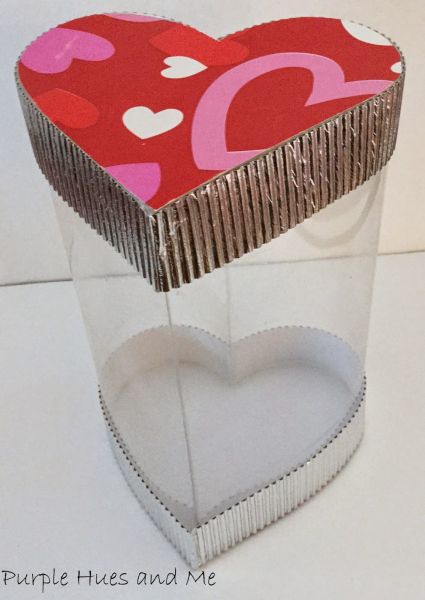
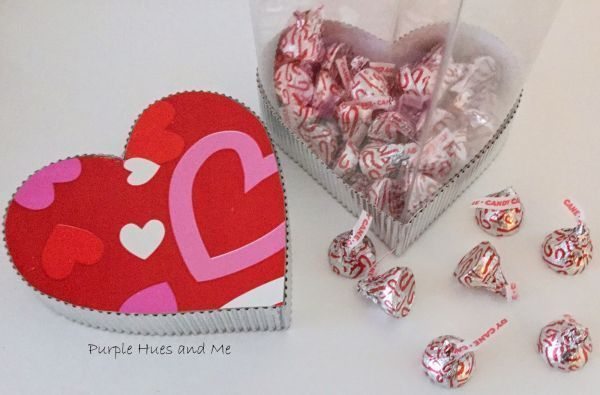
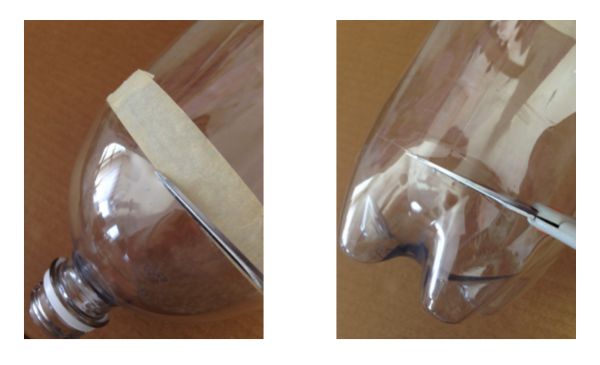 Then wring a piece of the pet bottle. Use a spatula, if you want, to make the job easier.
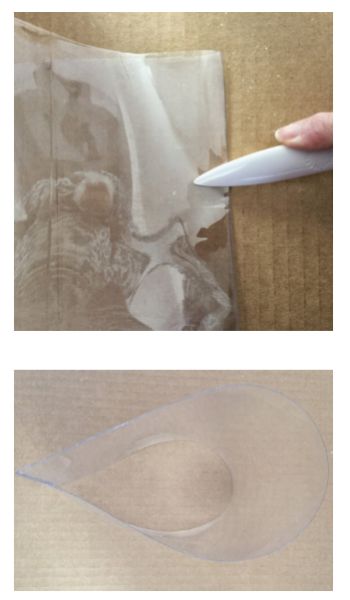 Soon after, fold in the curved part, making a second crease.
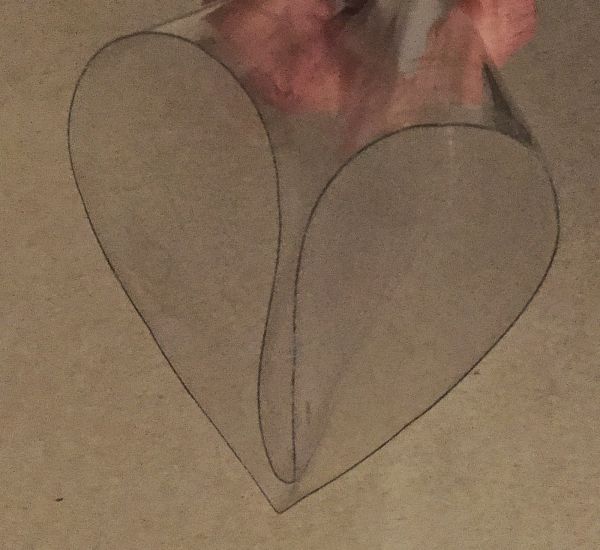 Now, release the bottle so that it opens naturally and is in the correct position.
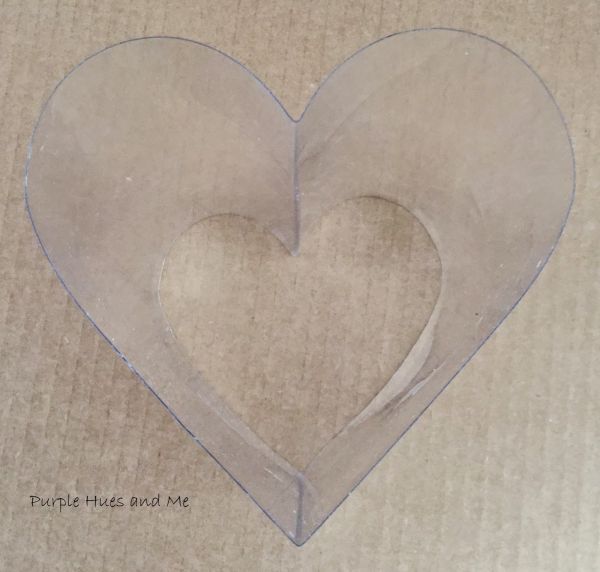 Then, take the heart made of pet bottle and scratch in the chosen paper. Cut two hearts, to make it firmer, but leave a small leftover around the whole heart, so that the piece made with the pet bottle fits inside the heart at the end.
 Soon after, stick one paper heart to the other.
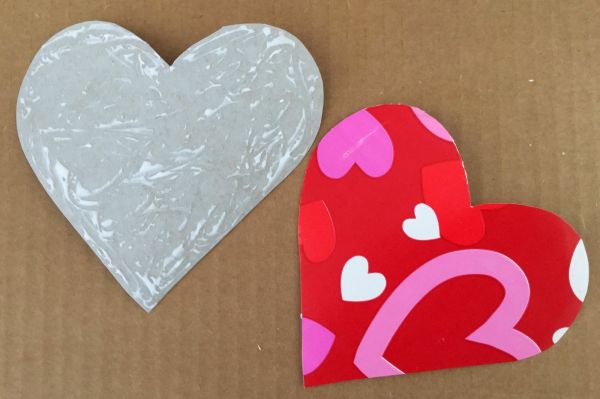 Now, cut a strip as wide as you like on the chosen micro-corrugated paper and place it around the paper hearts.
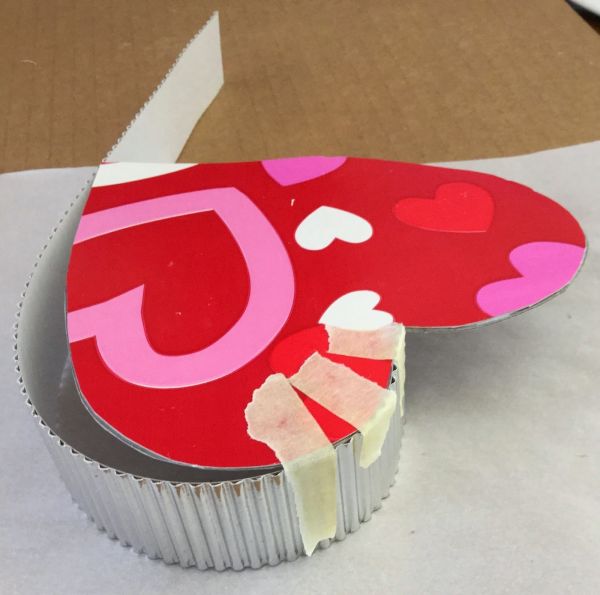 Then apply all glue or hot glue to the heart splicing. Let it dry. Stick the heart made of pet bottle. Let it dry.
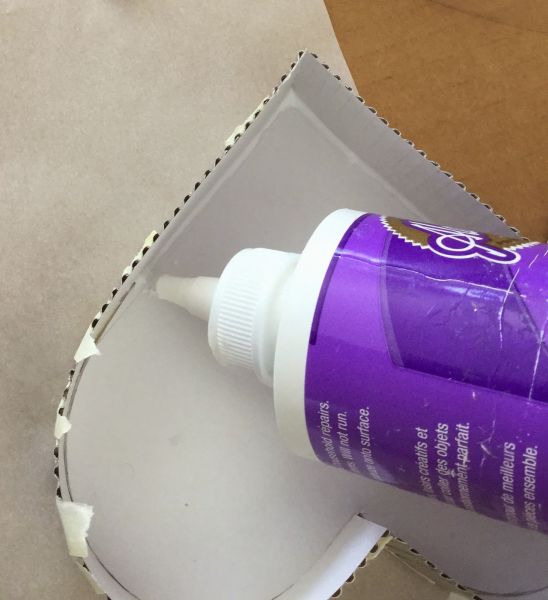 Then, to finish your piece, make another piece of paper, to be the cover of your carrier. If you like, stick a flower or other ornament on the lid. And it’s ready!
 (images by plumperfectandme)
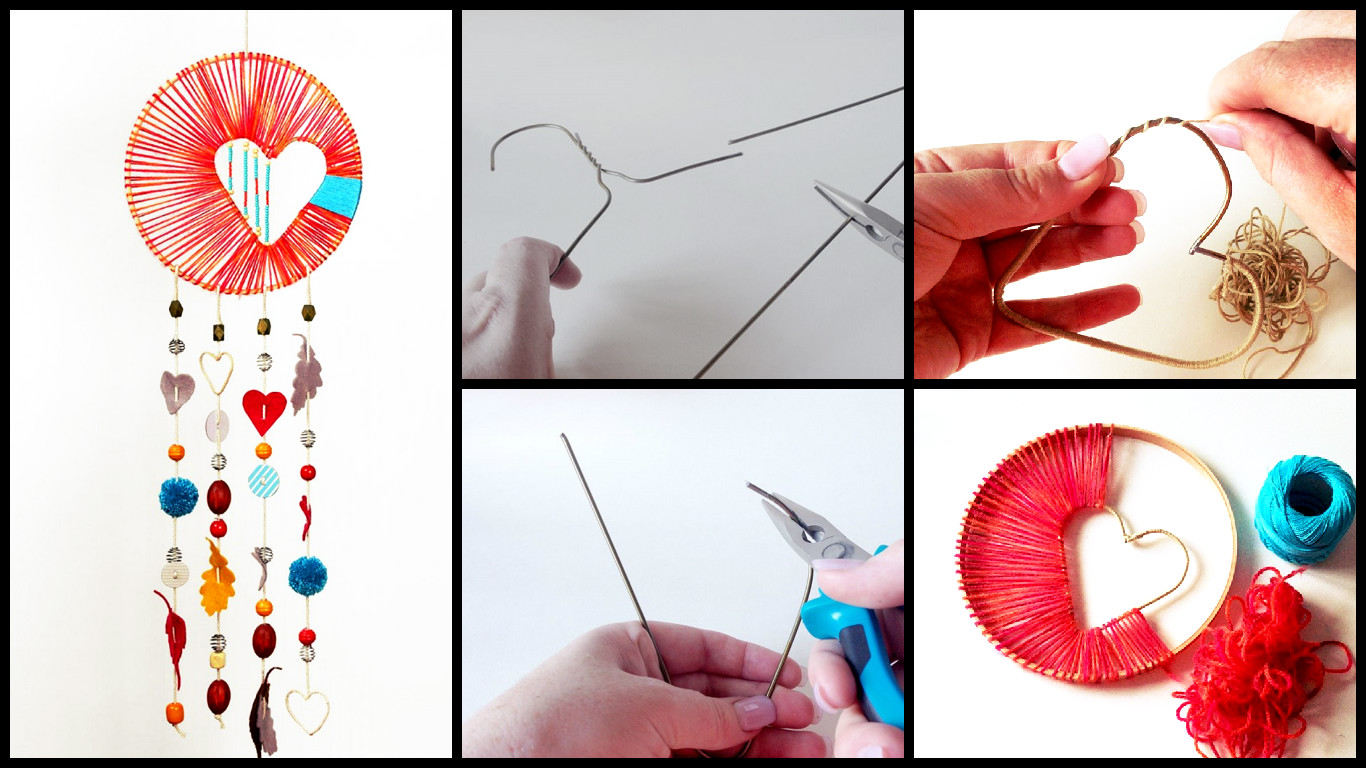
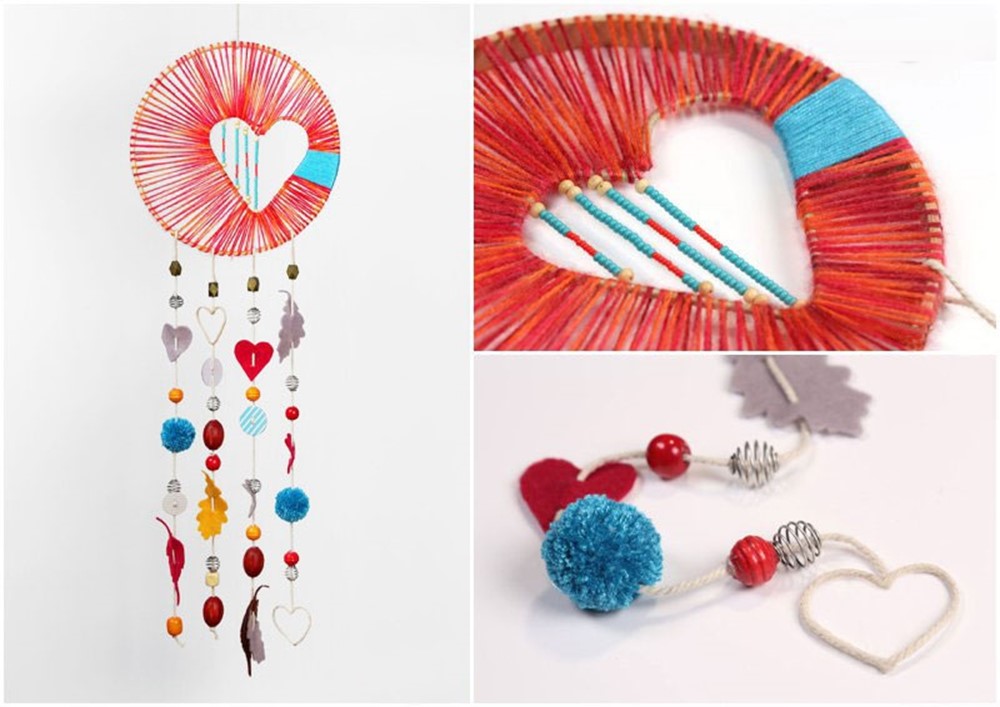
 The Wind the thread (so as not to slide the next layer):
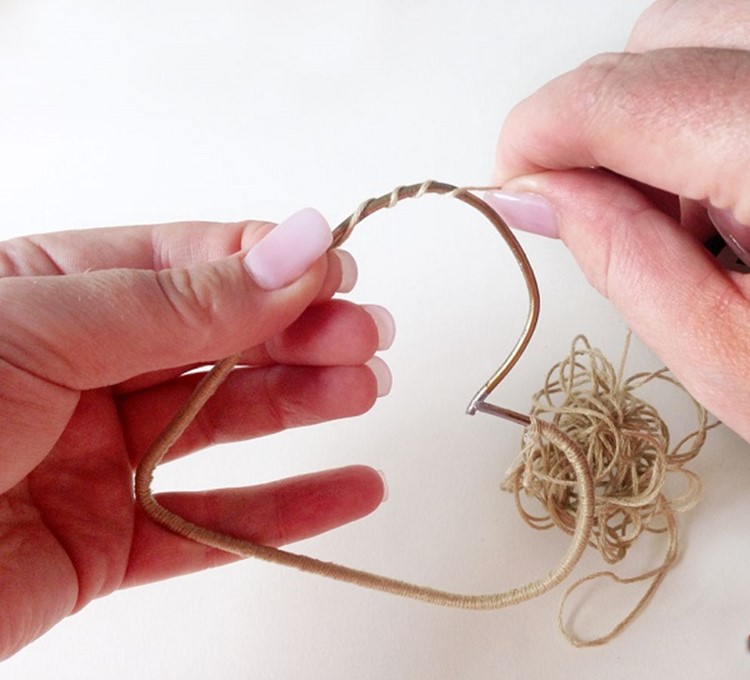
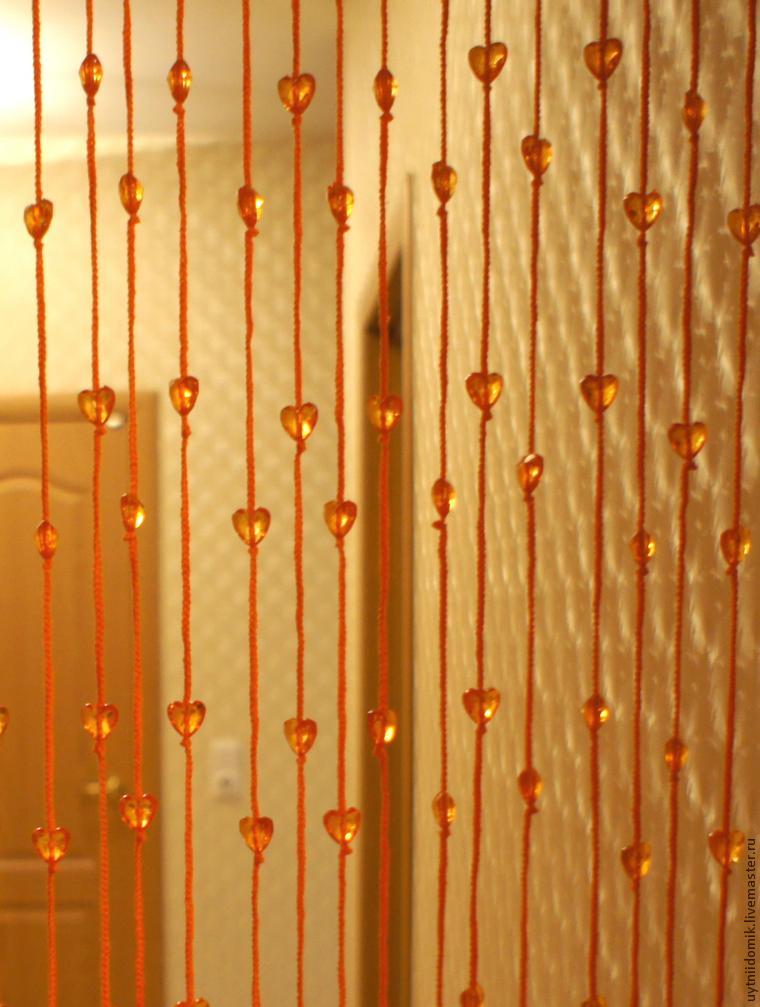
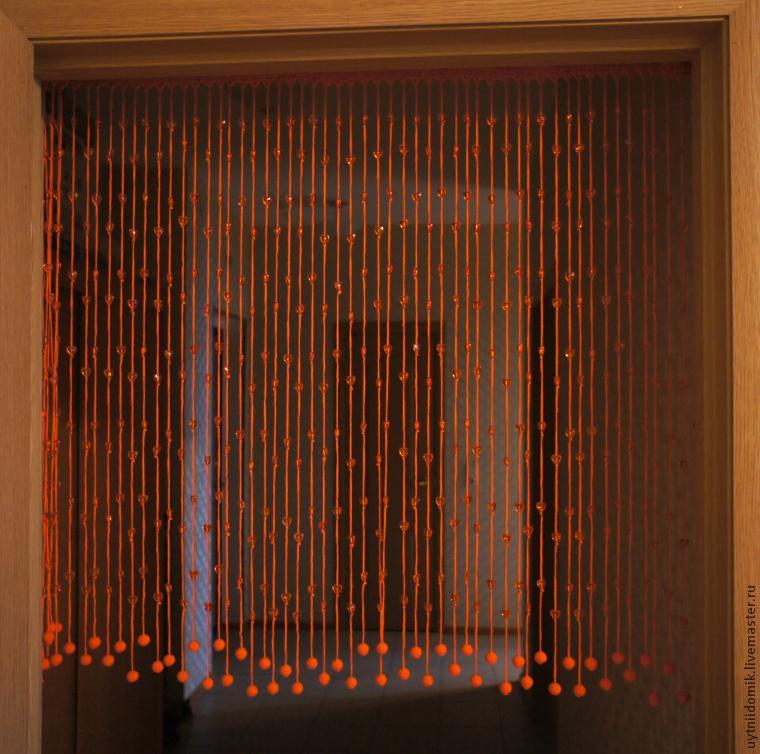
 Then connect the tambours and our heart as follows:
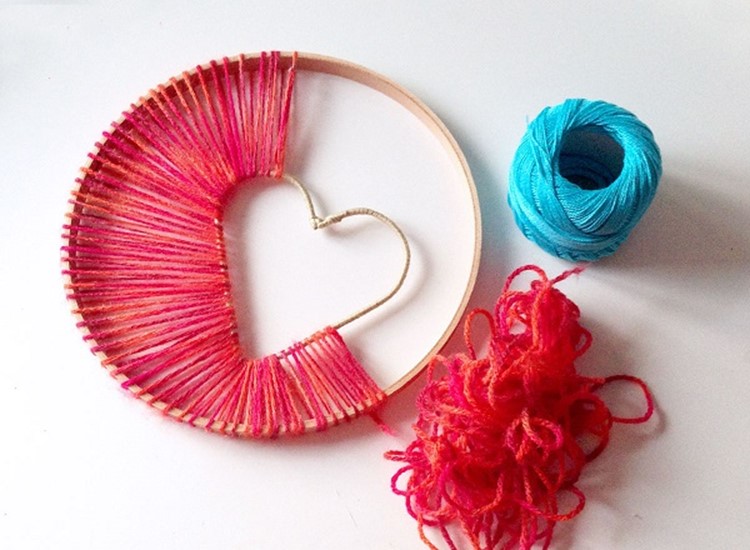 You can decorate the middle of beads, beading.
 Tail section can be made of any materials at hand, but don’t forget about hearts
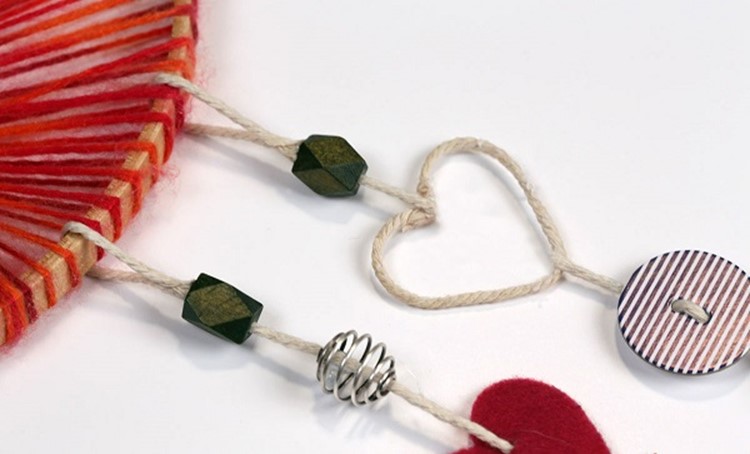
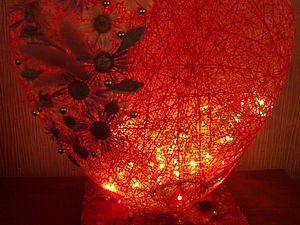
 To make a heart from the rope, take the mold, wrap it with a rope and fill with adhesive. When the glue dries, the heart becomes hard.
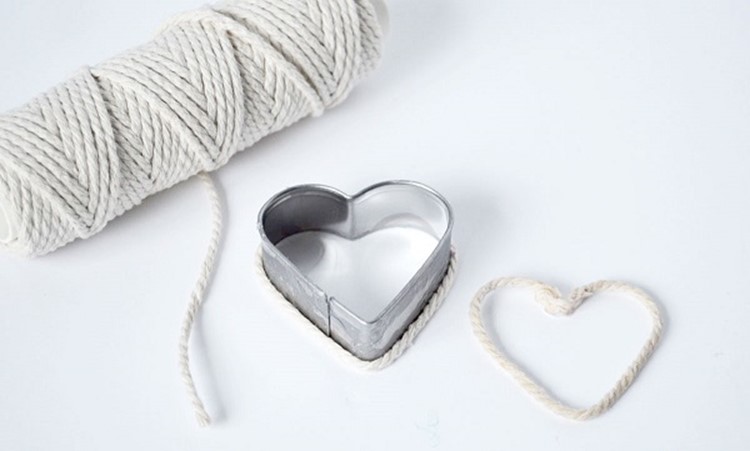 That’s such a beauty you can hang a chandelier, and a romantic mood will be provided.
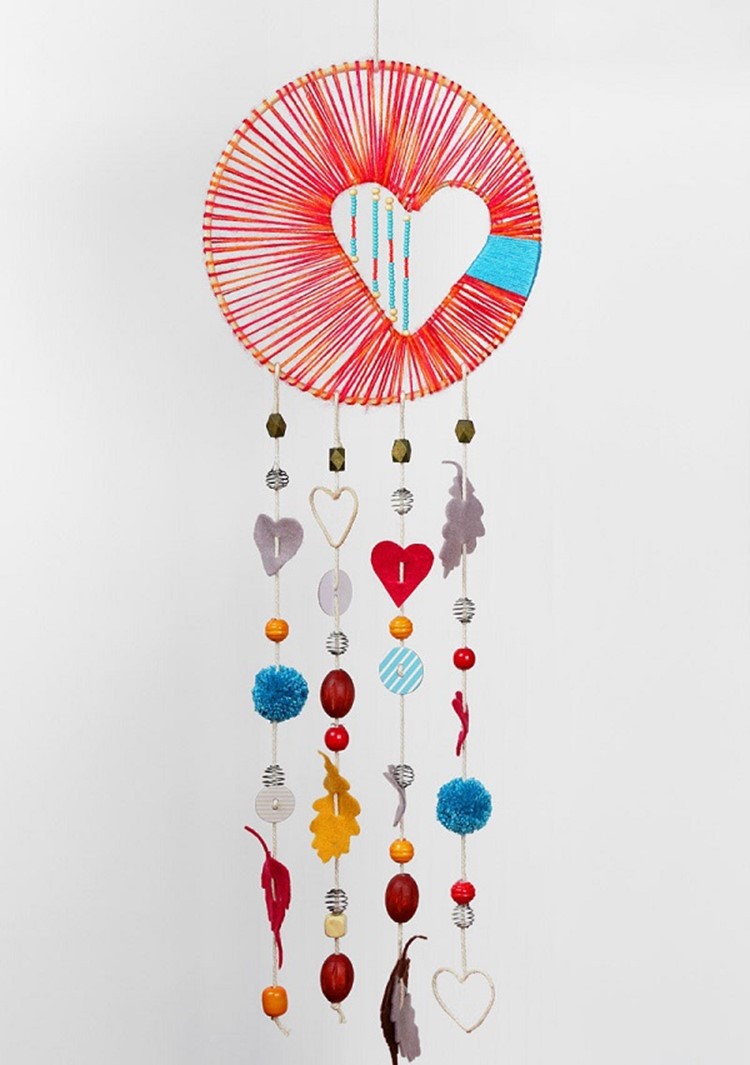
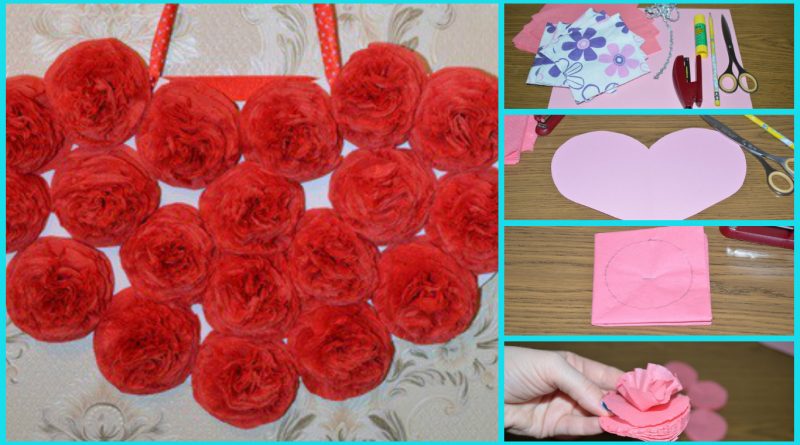
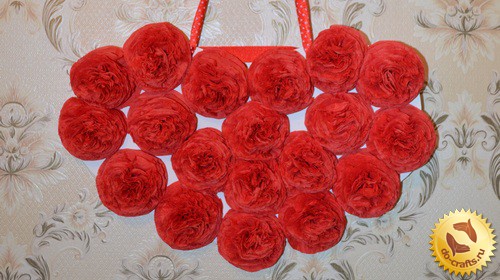
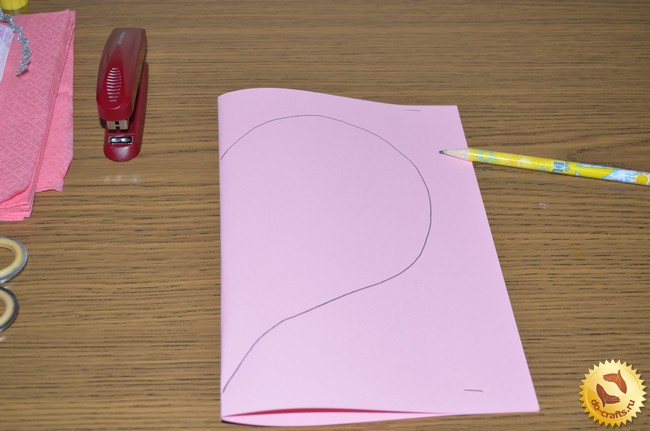
 Step 2. Making flowers from napkins. Take a paper towel and fold it four times to get one box.
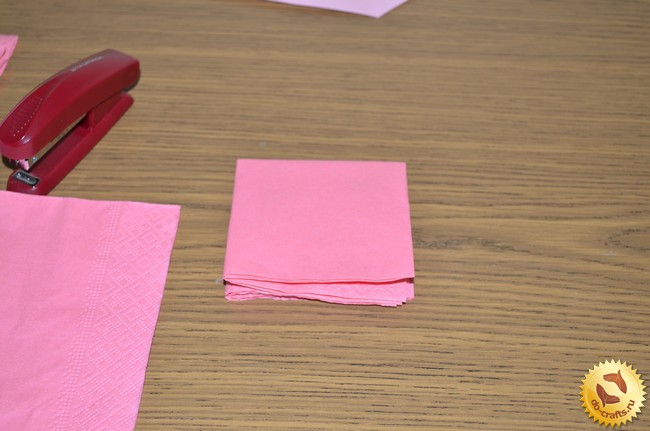 In this box draw a circle, a circle can be described any suitable size.
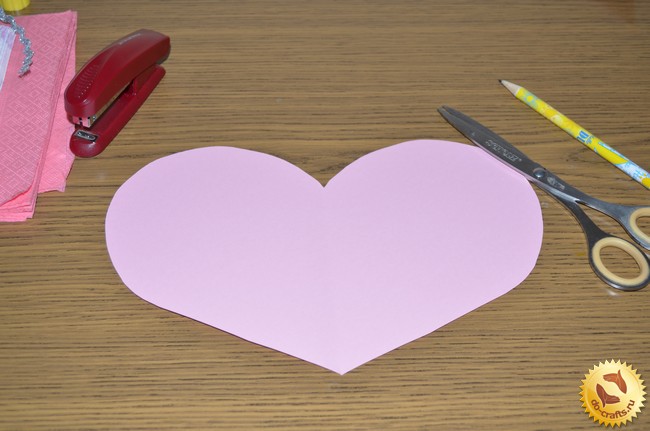
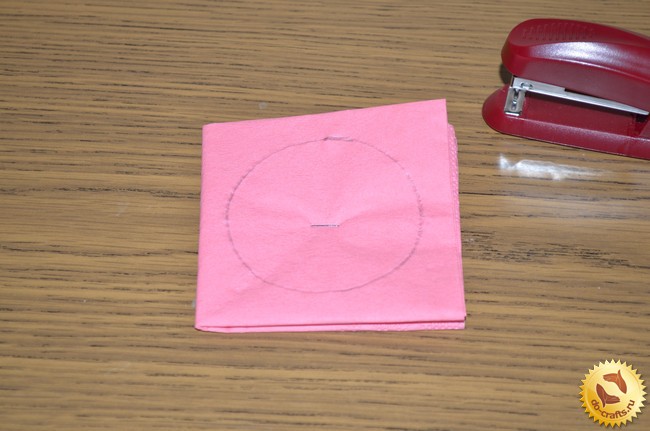 Staples for fastening the middle, napkin, and then cut along the contour of the circle. Such preforms flowers can be done by 10 – 20 units, in accordance with the size of the heart base.
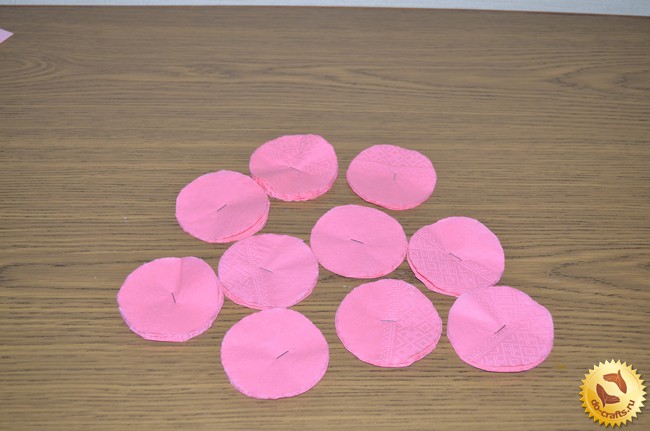 Step 3: For the manufacture of the flower, it is necessary to take a ready-made circle of bonded wipes and gently remove each layer of tissue in the center. The more layers of cloth have, the more luxuriant will flower.
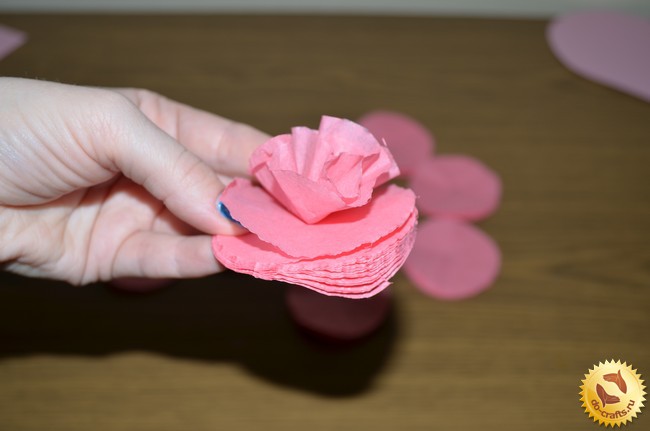 Step 4. The next step is to mount the paper on the basis of color. It is necessary to take a glue stick and spend some time on the back of the flower and glue it to the heart.
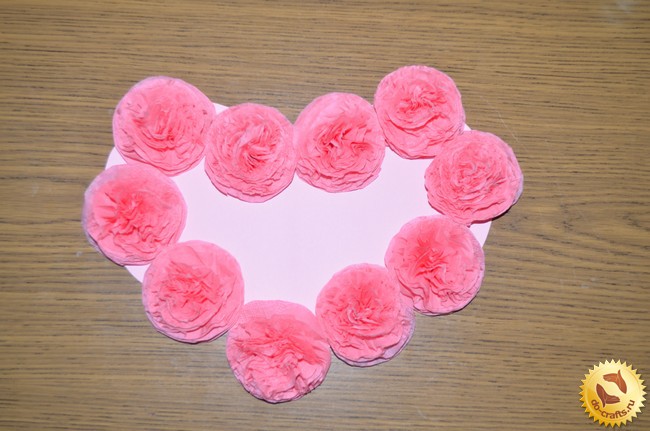 For a better and rational distribution based on space, fill in the first edge of the heart, and then the very middle.
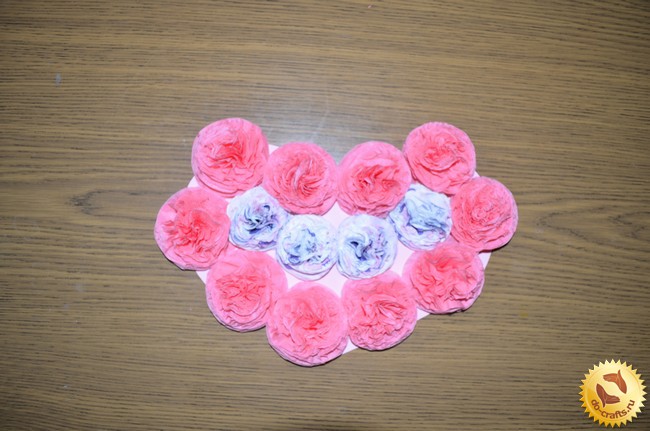 Step 5. Once all the flowers pasted on the base of the heart attach stapler ribbon for hanging on the highest part of the back of the heart.
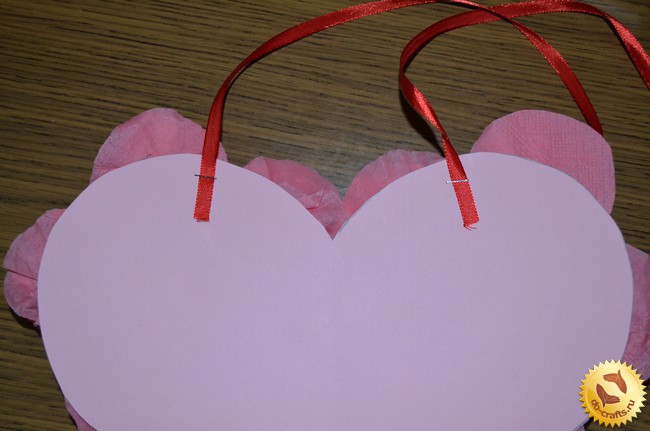 After that, cut the ribbon and tie in the middle of a beautiful bow.
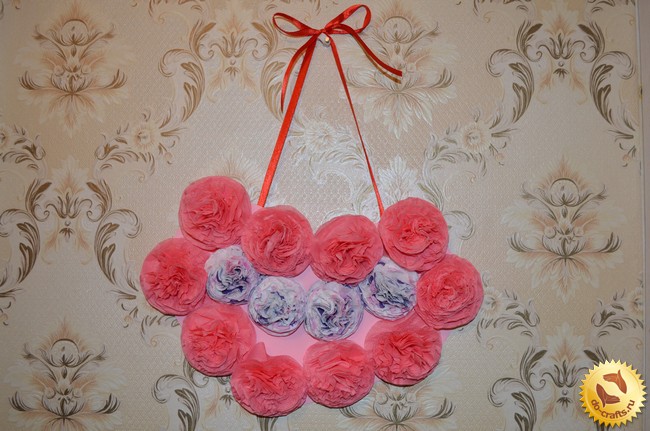
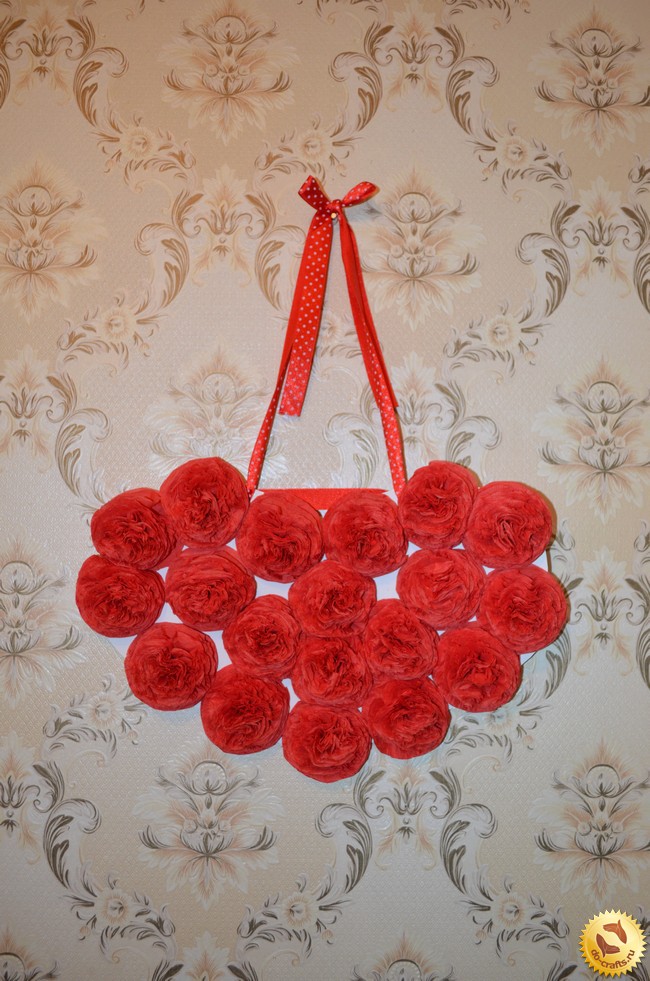 The suspension can not only hang in his apartment but also give a loved one. This decoration will always be a symbol of your love and care. This decor will not require large financial costs and can be done in several different ways for any holiday.
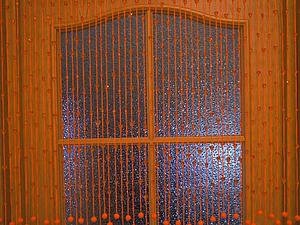
 2 row: knit 6 CP – “Ears”, for which we tie the thread – and v s / n in the 7th ce
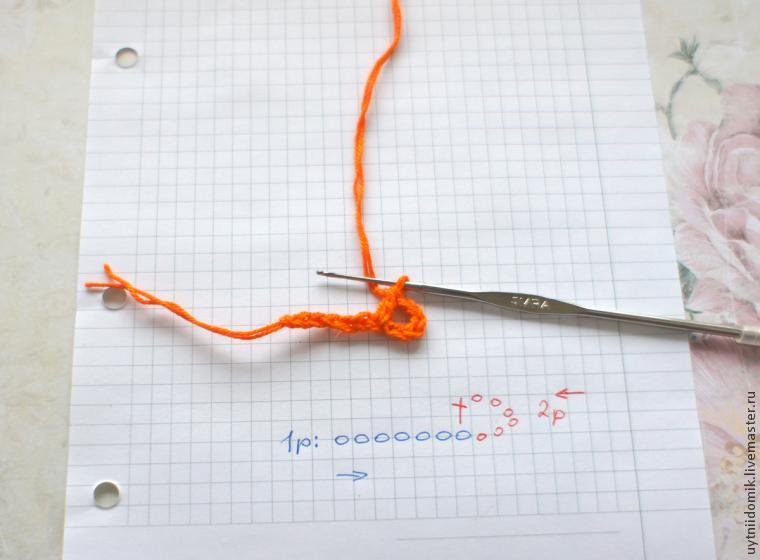 Thence and 5 v s / n.
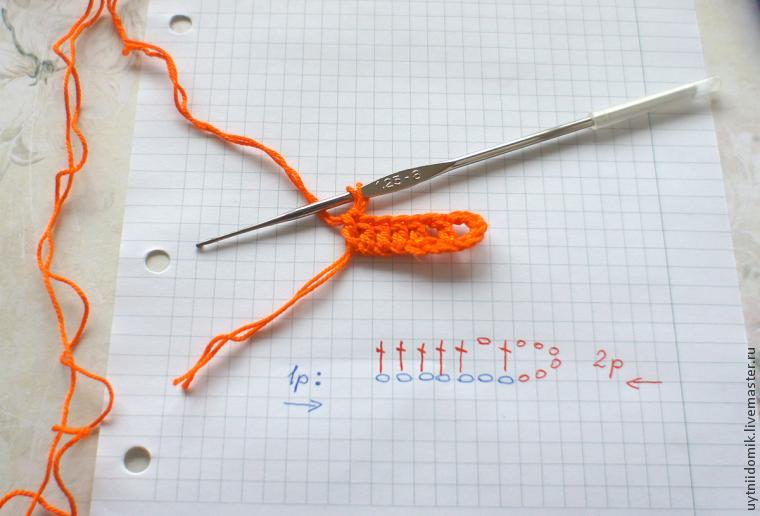 3 series of 12 ce ( “ear” for which the curtain will be hung on the door), turn over knitting, Article 5 s / n, CP, arts / n.
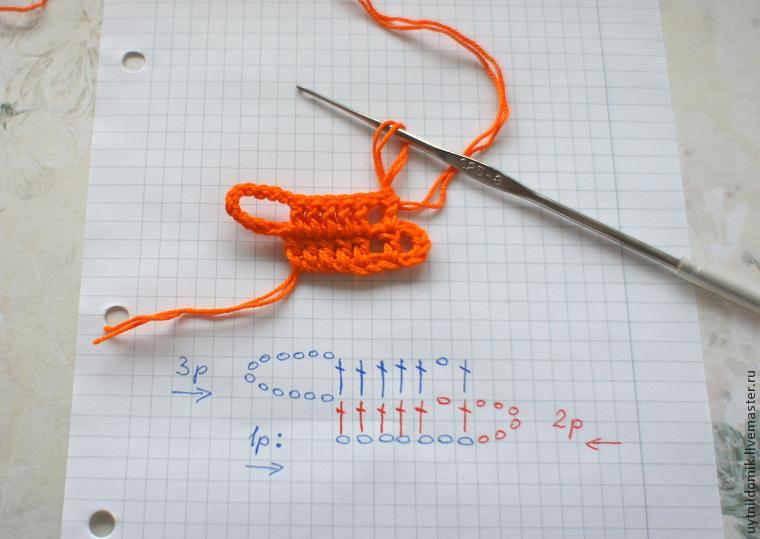
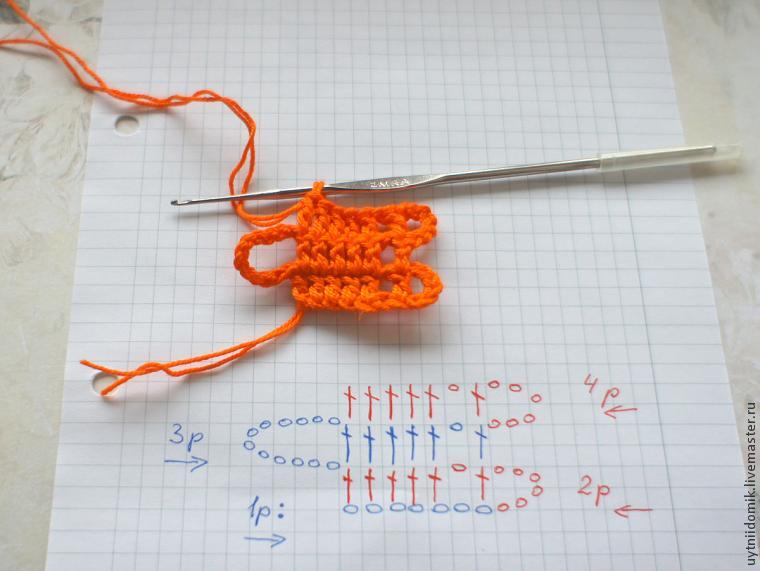 Row 5: knit, as the third.
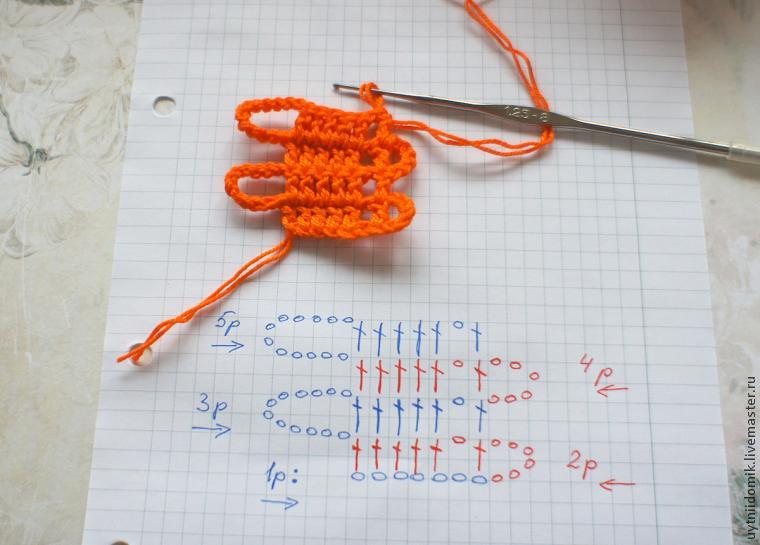
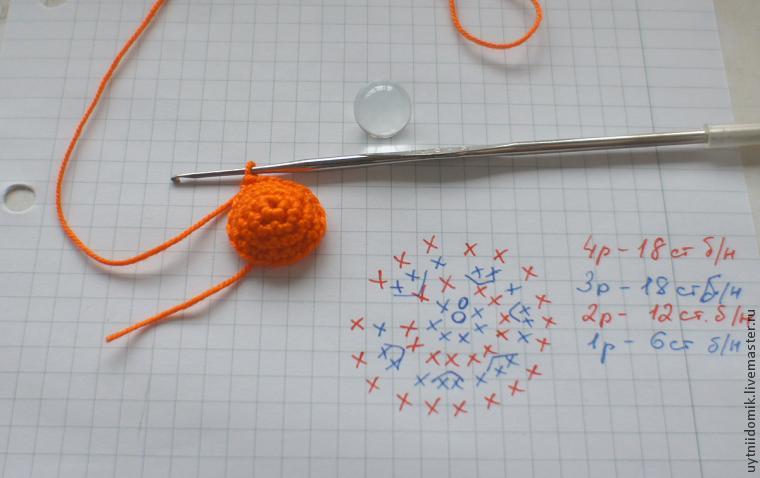
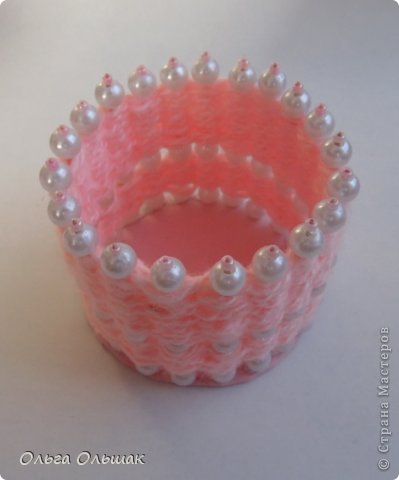
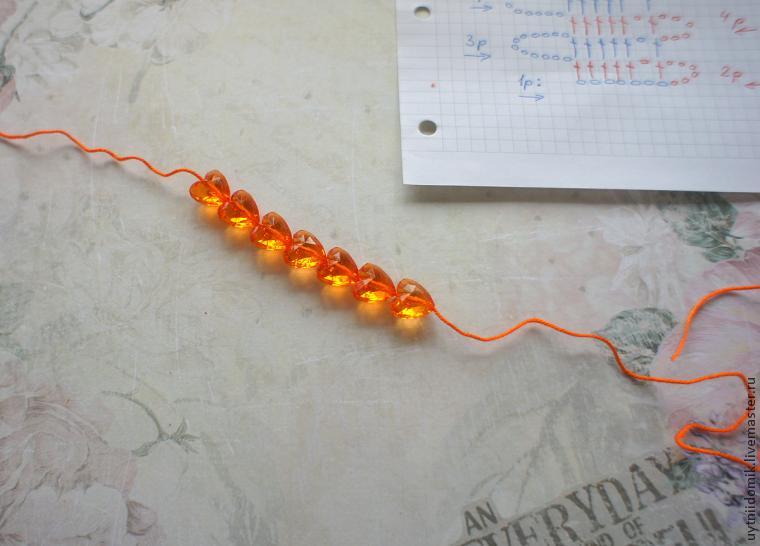 Move aside the beads away, so they do not interfere with undergirding the ball and start to trim. We type 2 CE and the second loop on the hook 6 item b / n – 1 number.
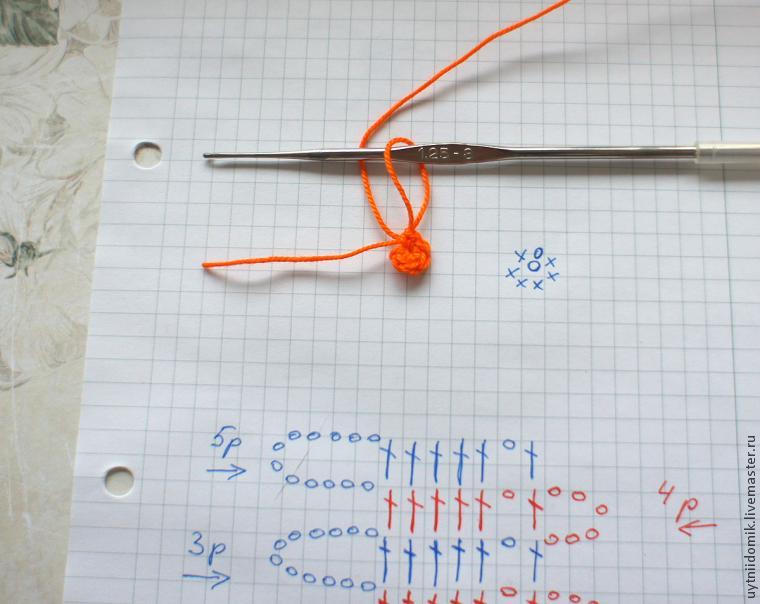 2 number: 2 item b / n in each column – get 12 st b / n.
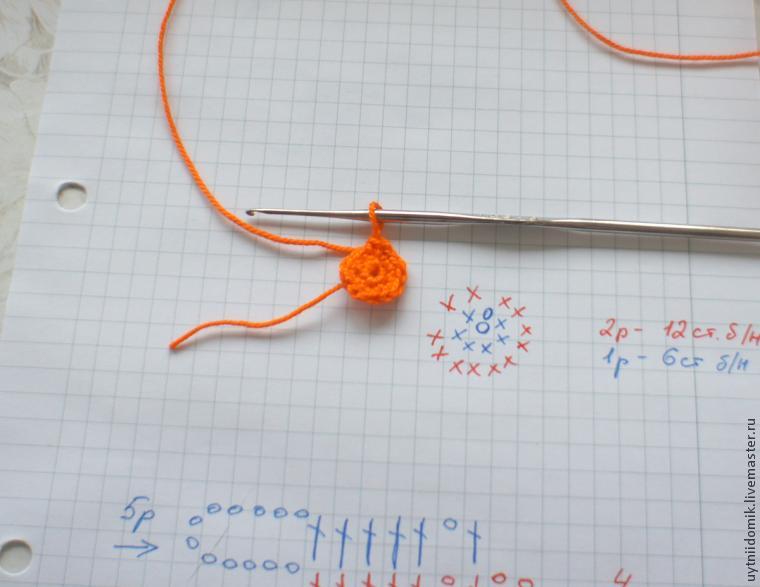 3rd row: Art w / o, 2 tbsp w / n in a column – so continue until the end of the series and get a 18 st b / n.
 It’s time to try on the ball 🙂
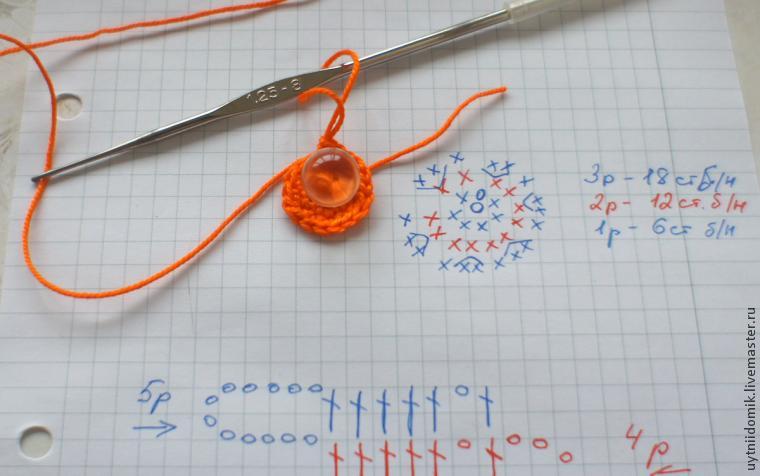
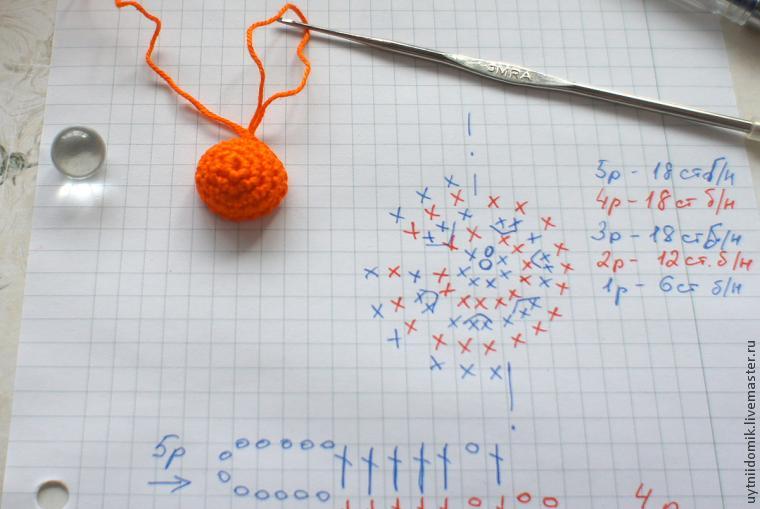
 We put into our “cap” the tail that sticks out from the beginning of knitting and the ball – he enters with difficulty, but still gives in, but will not fall out when knitting the next row.
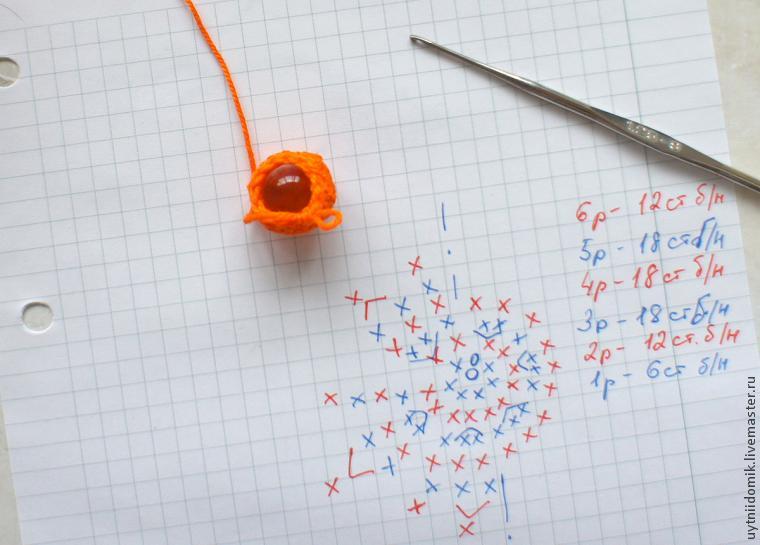 7 number: Article w / n in every two columns (Ibaka) – continue until the end of the series and get 6 tablespoons w / n.
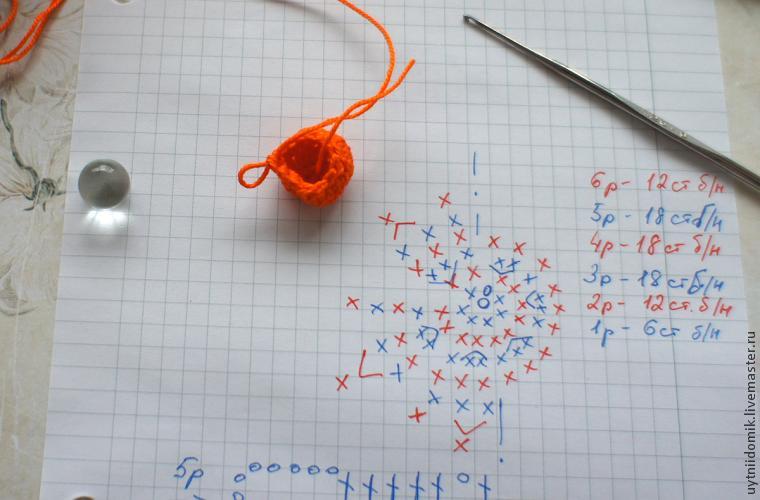
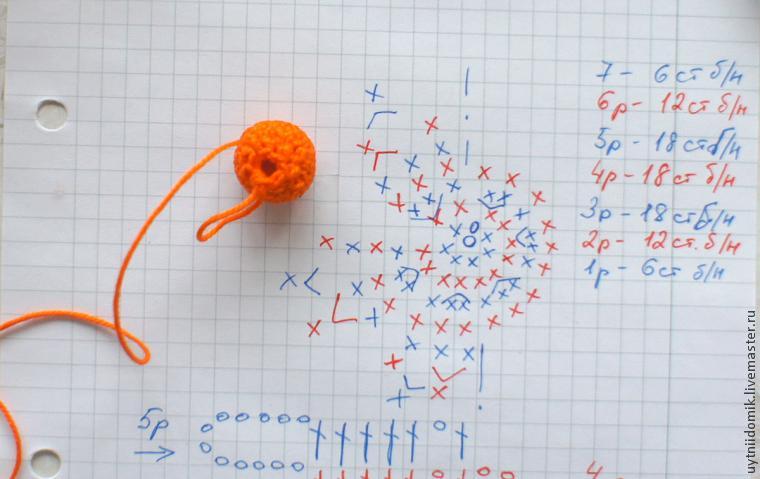 At this point, I usually end up tying the ball. Through Art w / I pull for eyelet – turns 3 loops on the hook – and them together, thereby connecting the edges.
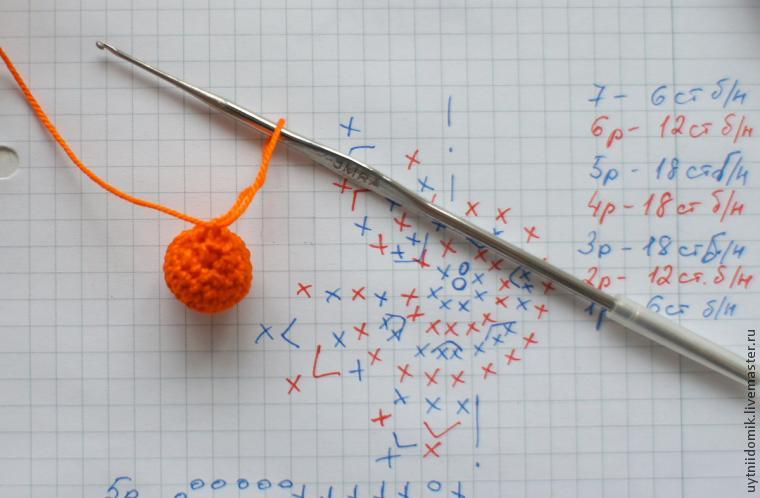 Now the thread itself. Try knitting ce tightly and uniformly to the thread of the same length were obtained. Provyazyvaem 40 CE
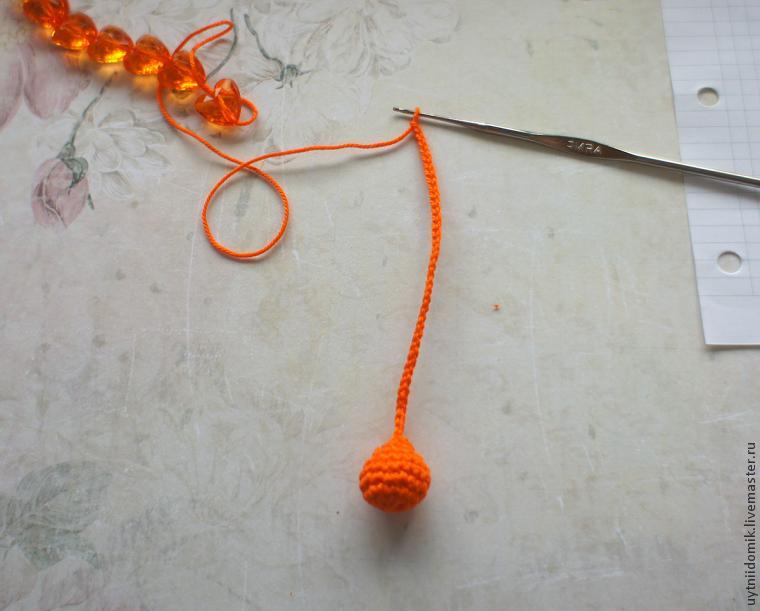 Provyazyvaem another 2 CP and item b / n the 2nd ce off the hook – get neat “knot”, which will hold the bead.
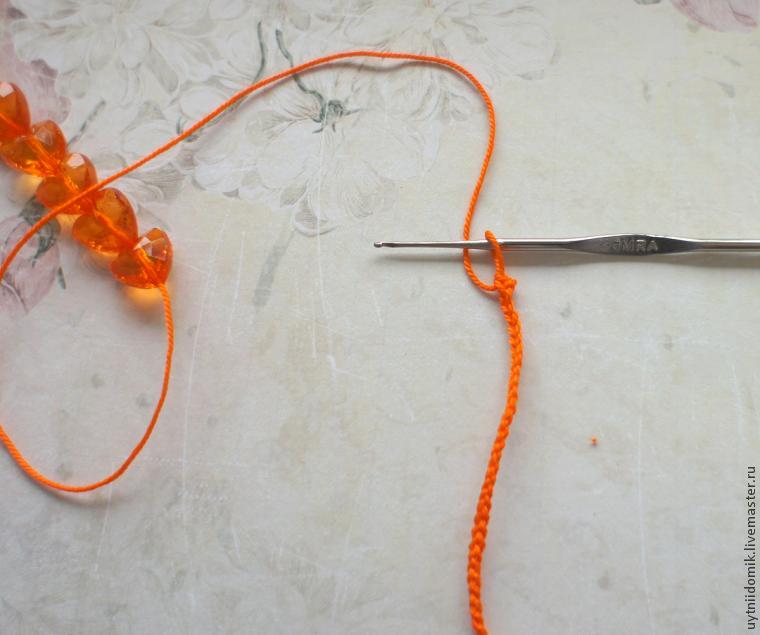 The height of the beads is equal to 5 V. – Provyazyvaem 5 CP
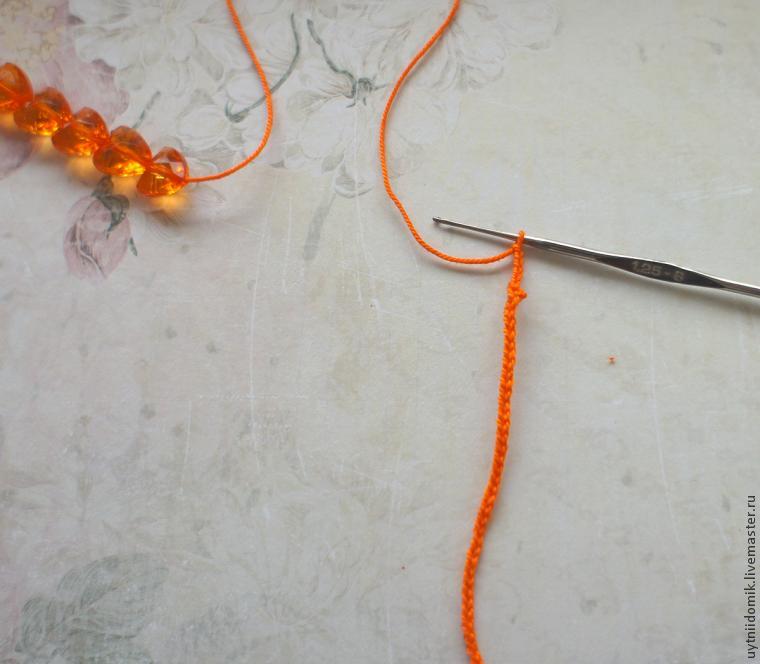 Slightly pull the loop and with the help of the hook through the hole stretch her beads.
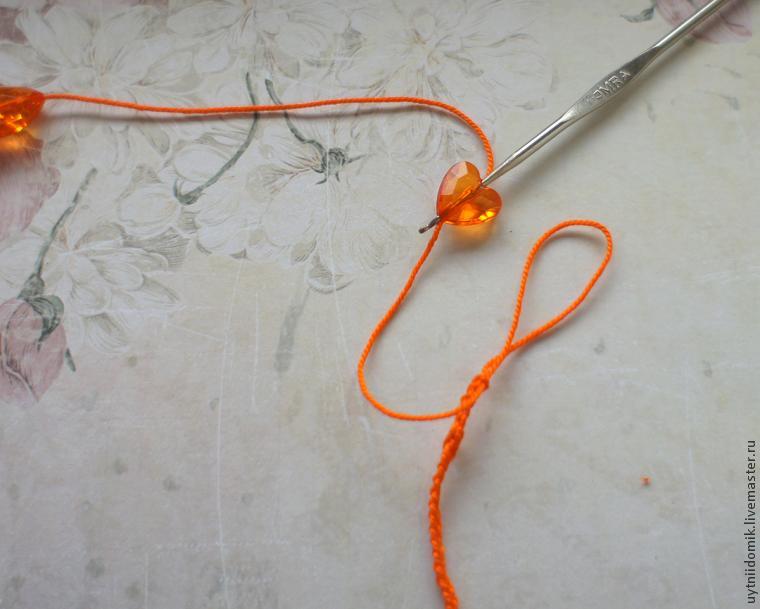
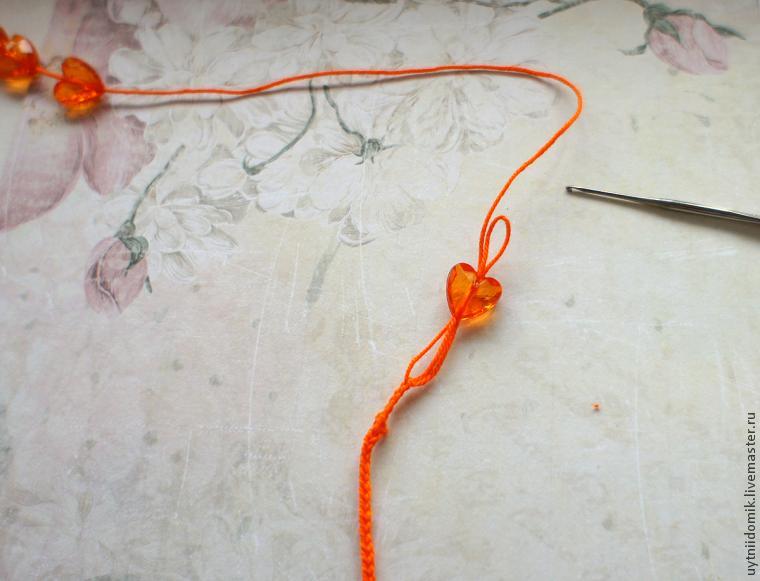 From beads sticking only half ce Waist loop to normal size, and continue knitting.
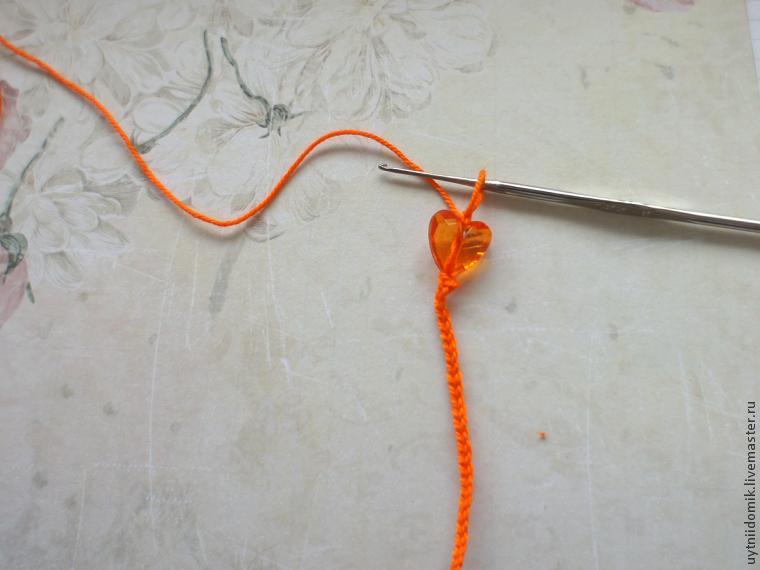 Again 40 ce, 2 ce with Article w / n, 5 CP, and bead.
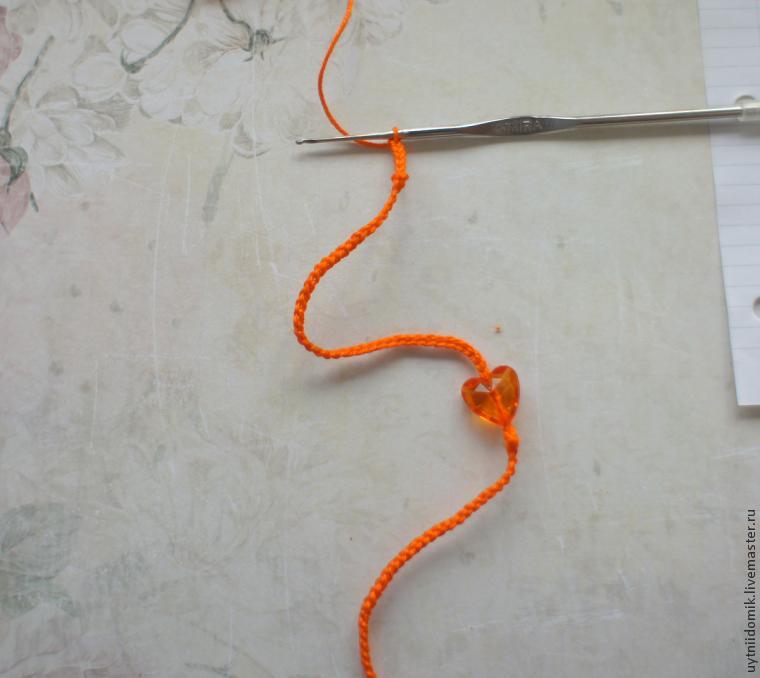
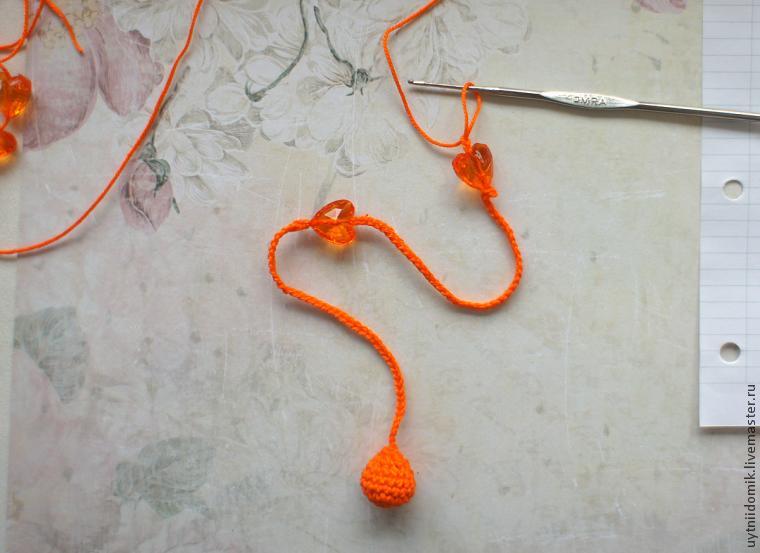
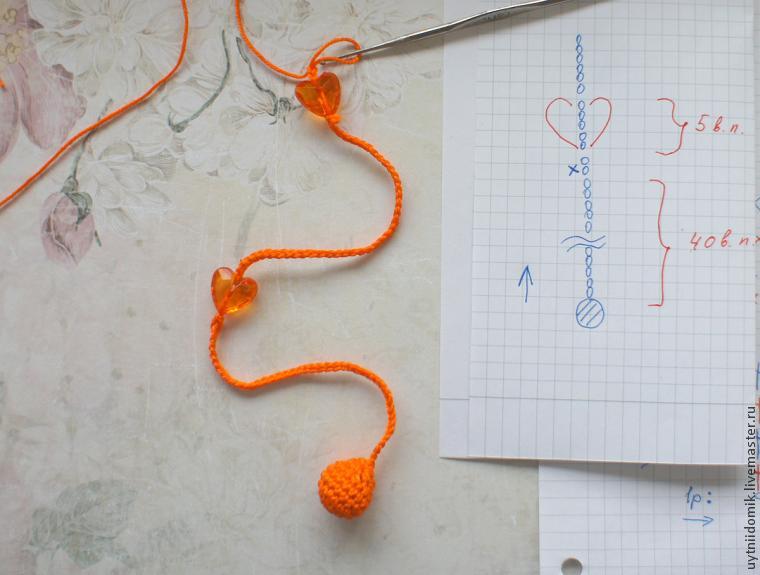
 Measured basis, divide the desired distance between the stanchions. If you can not without a trace, corrects the distance. I got 1,8sm. Normally, less is better.
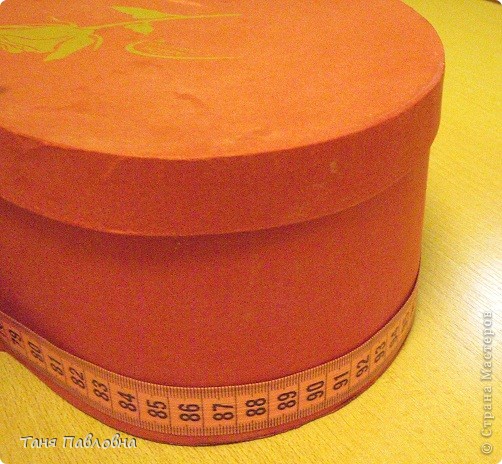 Postpones 1.8, starting from the center of the “heart”
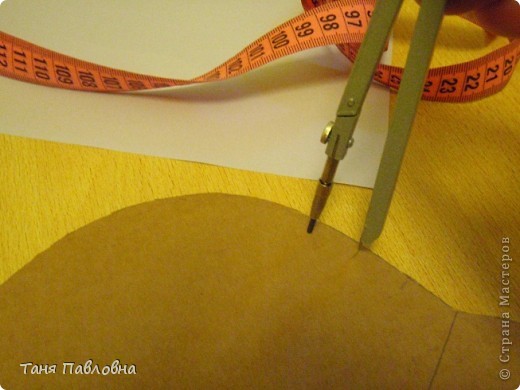 It turned out this way …
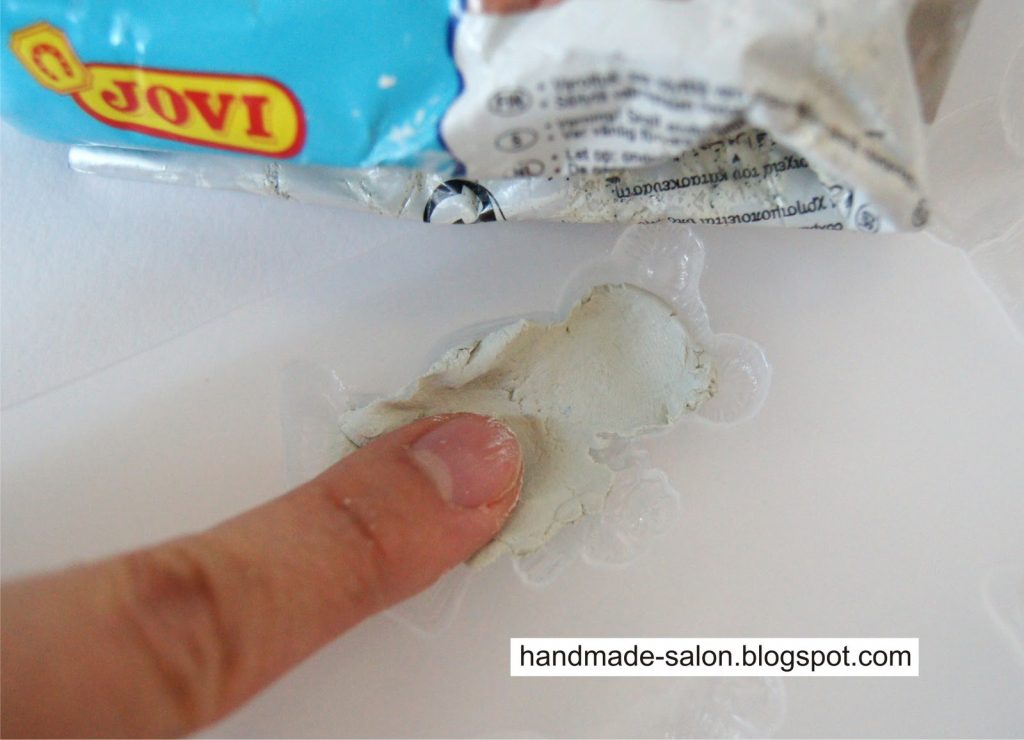
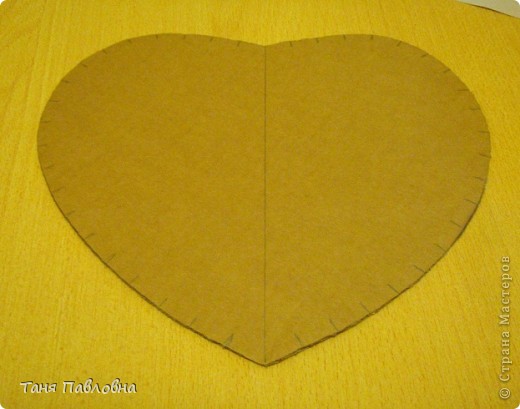 I prepare the paper
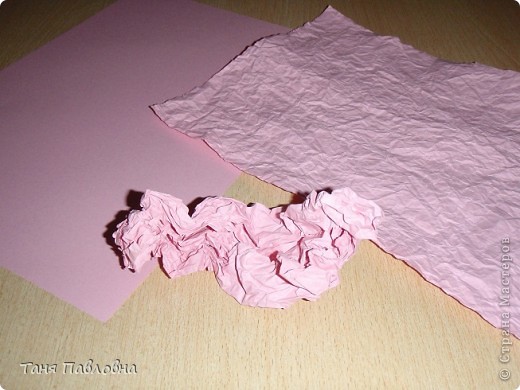 and more … The paper pasted on cardboard with white glue and left to dry. A bit dry and put under load, so as not curled hours on 12. The process of bonding is not removed, fascinated.
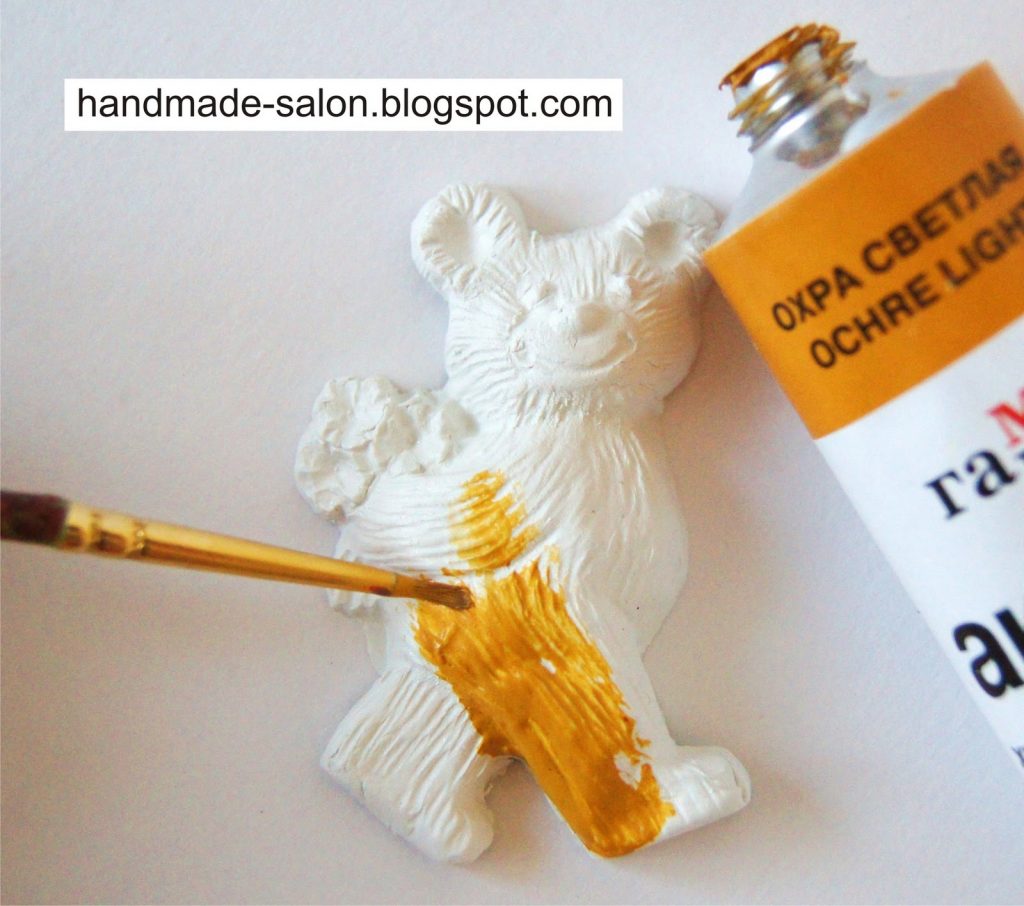
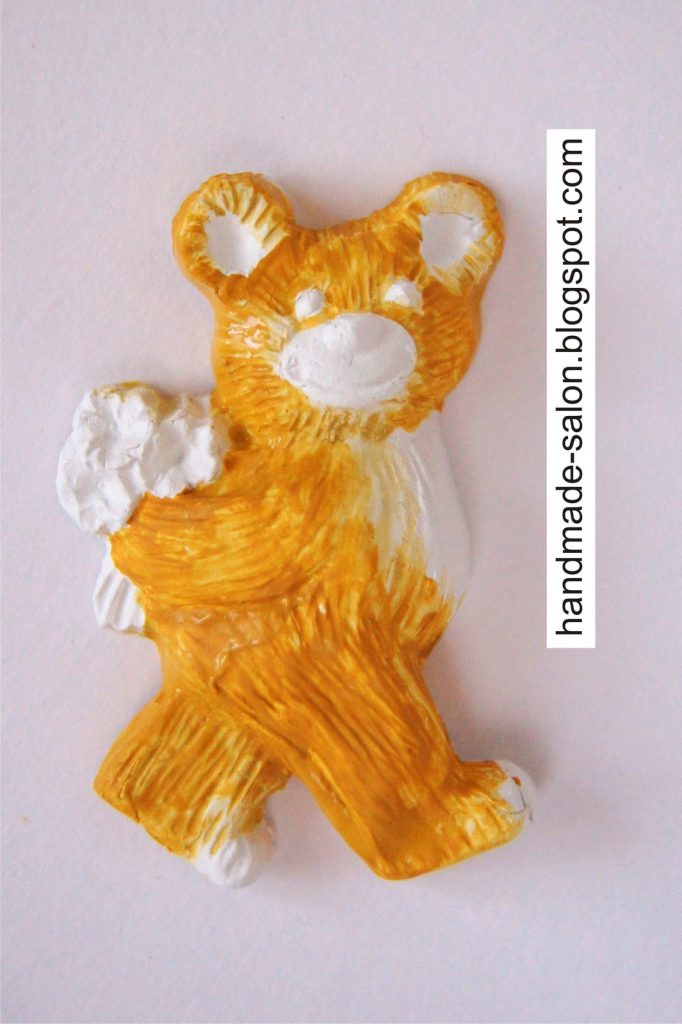
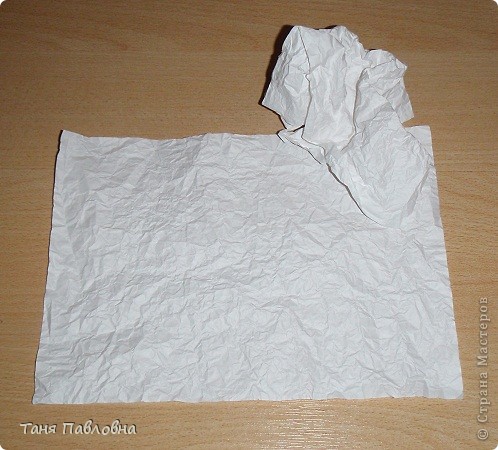 While the bottom of a dry, paint tubes.
 Expanding to dry and leave everything until the morning.
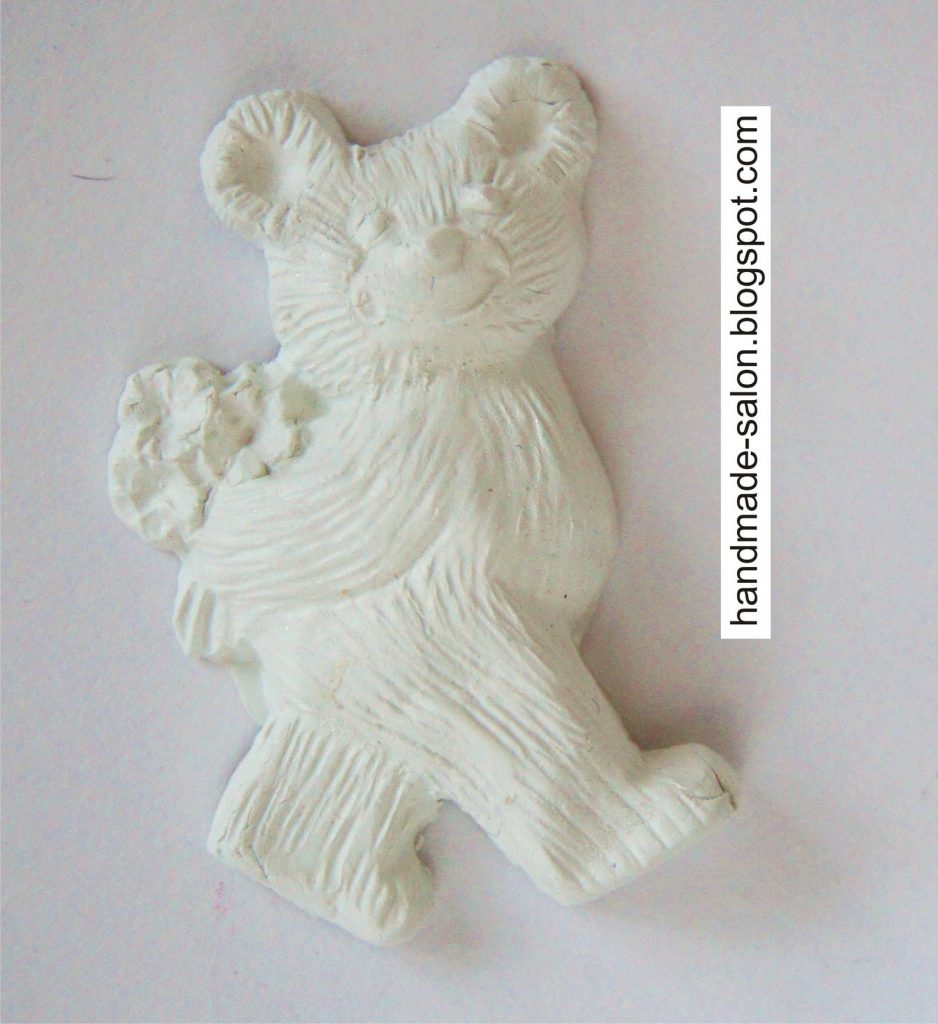
 And in the morning for a surprise. That such a result is obtained. Apparently, the tubes were caught from different parties. I hope that will be enough of a color.
 Clay “Titan” pasting tube
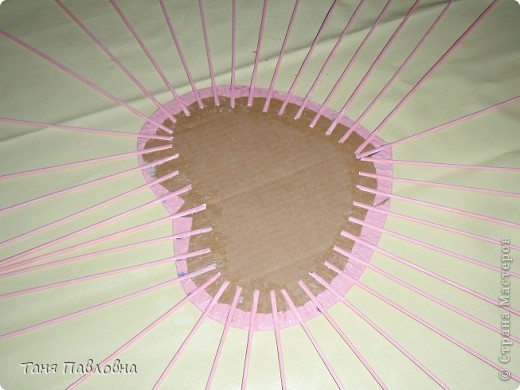 Top pasting the front of the bottoms. The process of gluing napkins too missed. Well, not all at once. Decoupage do with the file. I put the napkin “face” down at the file, pour some water into the center of a little and start to lift the edges to Vodicka gradually distributed on a napkin and no wrinkles. I add a little brush continue to keep raise for all parties. Try to keep the water before the time has not got to the edge (tear). When there is only the edge unglued, helping brush. When the napkin is flat, without wrinkles on the file, carefully poured the water and turn on the bedplate, smoothes. I remove the file from top to drip screed and PVA brush. Land.
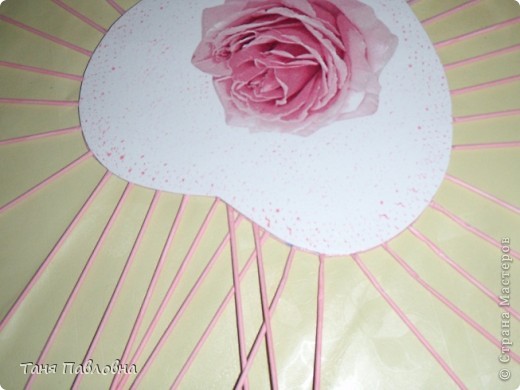 Yes! Two hearts are glued together, too, putting under pressure until it sets. It is better to wait a little longer. Clay grabbed. I begin to braid rope bottom of a single row.
 I lift the rack and begin to weave a rope in the two tubes.
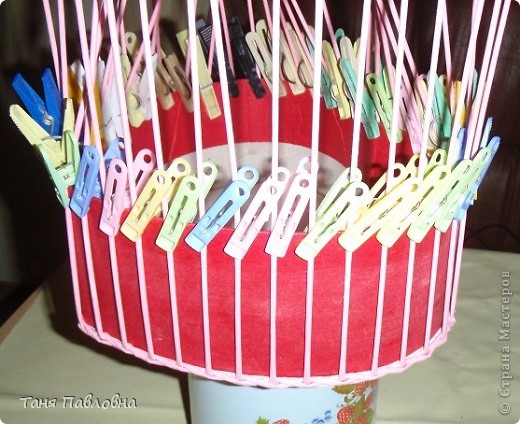 Get out of shape, that’s what happened. The result is not pleased with what’s nose turned out. It was necessary to equate the braid after varnishing.
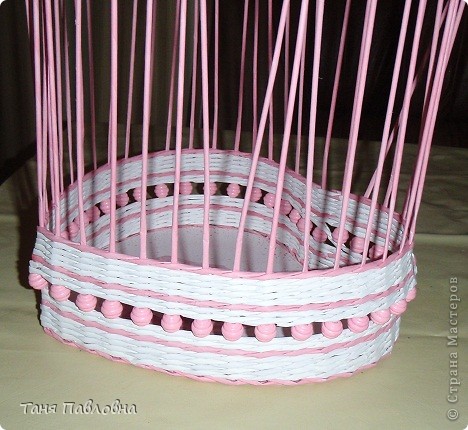 close: in front of the two, in the third
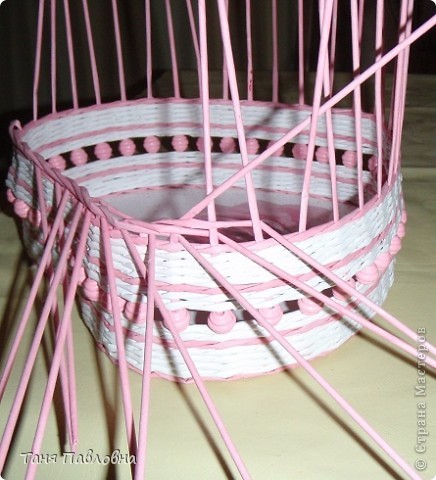 It remains the last three tubes. The first of them is bent before the two and slips under the first rack start crisscrossing.
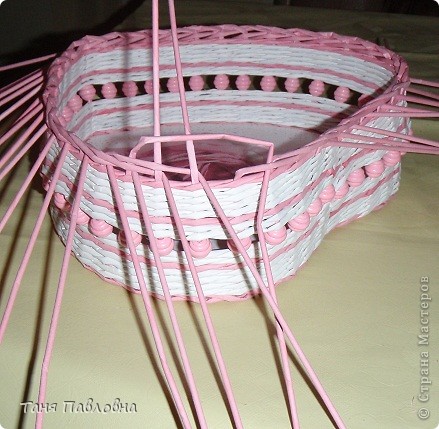 Second-on rising: before the third and the inside of the first braided basket
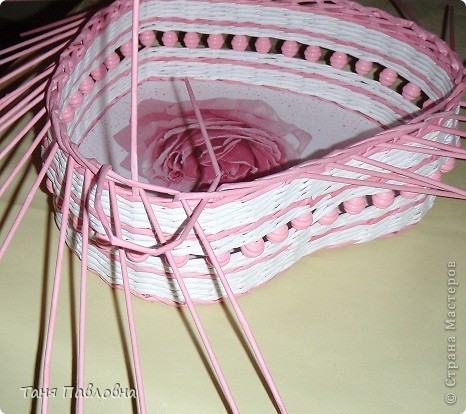 for the second braided out
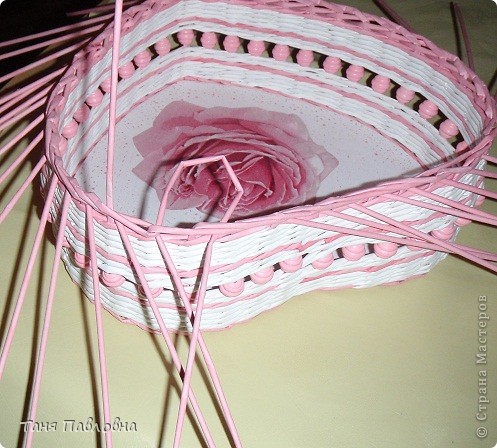 by drawing
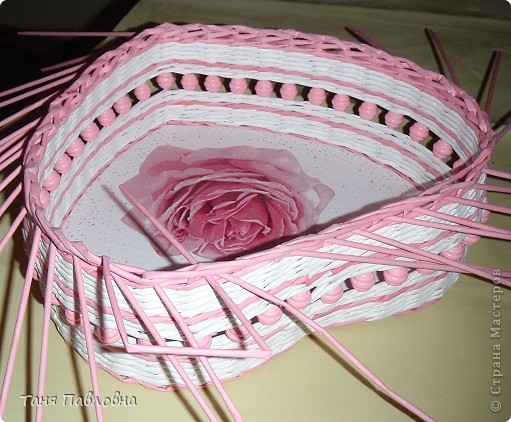 Fotik agreed to work only to that frame. I had to finish without him.
 And it is you! This beauty blossomed in my yard, and I am very pleased.
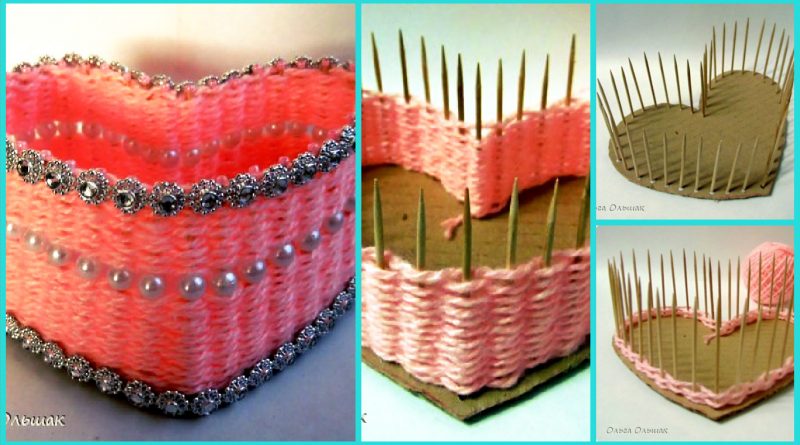
 I will describe the process of making mistakes that I made to you, if you want to do, they are not repeated. To the bottom it is necessary to take a thick cardboard, cut two identical blanks, I have a heart and glue them together. Then I immediately began to stick a toothpick, this is the first mistake that had to correct later. When glued workpiece 2 further need to paste over the bottom of the colored paper or make a decoupage napkin generally elevate the bottom of the ONCE, until a toothpick stick!
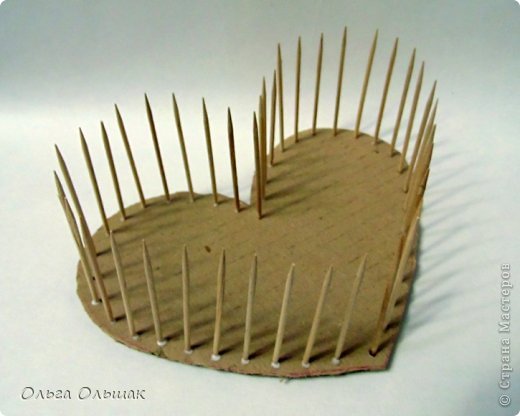 Winding yarn
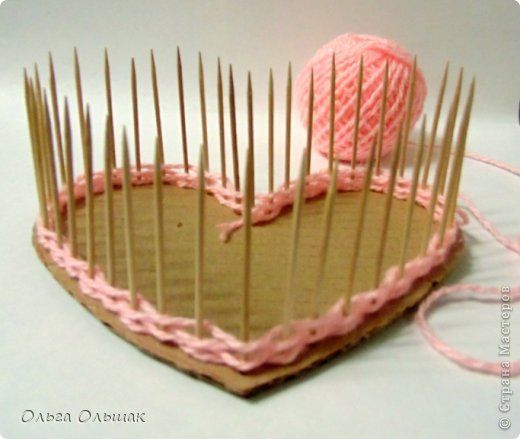 Well, that’s got to the middle! Then I strung beads and braid further continued.
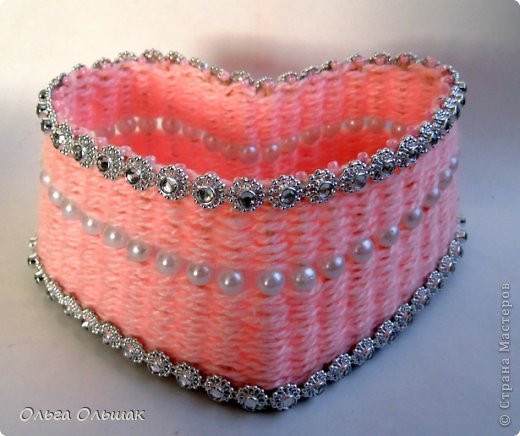
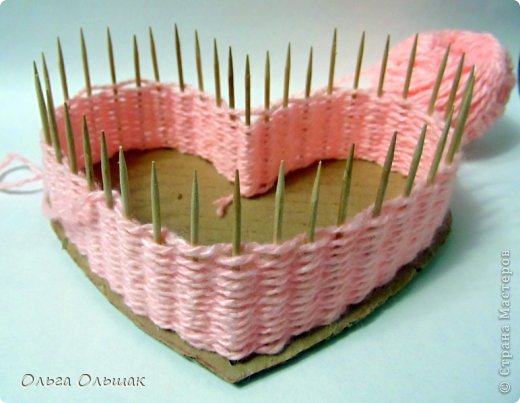 When to the top, then on each toothpick glued beads. Ennoble the bottom and top. The result is pleasant to me, do not you?
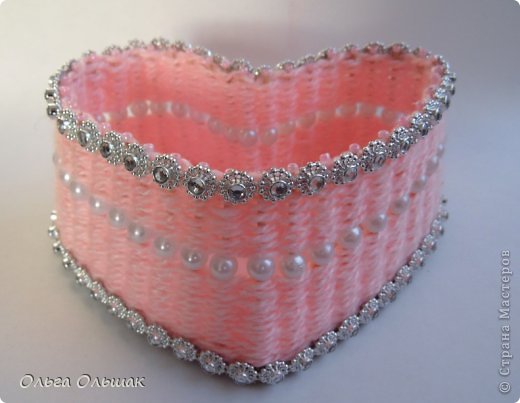 We had to split hairs with the inside of a vase-taped pink paper and pigtail yarn hid an ugly seam.
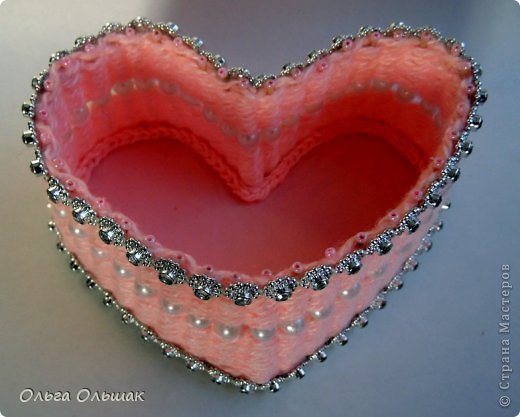 Here the colors are in fact-vase was very gentle.
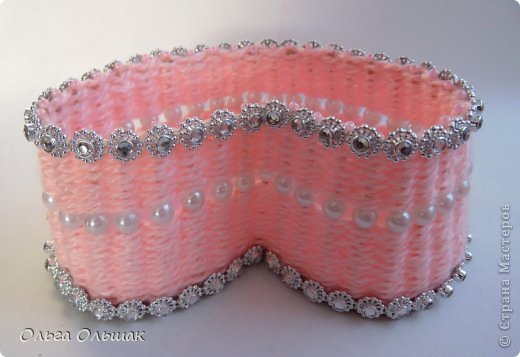 He made one more round shape – bottom. Mistakes are the same – DO NOT!
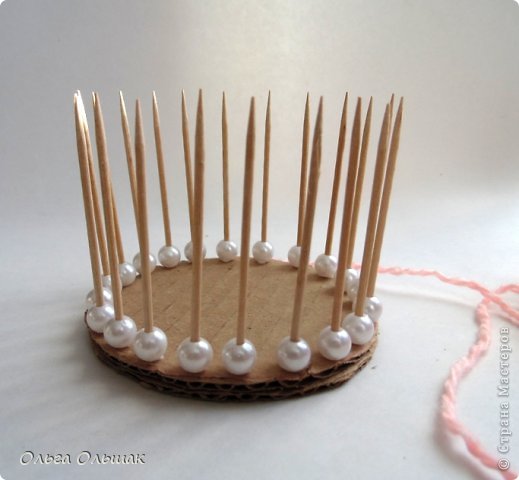 Result. Bottom corrected!
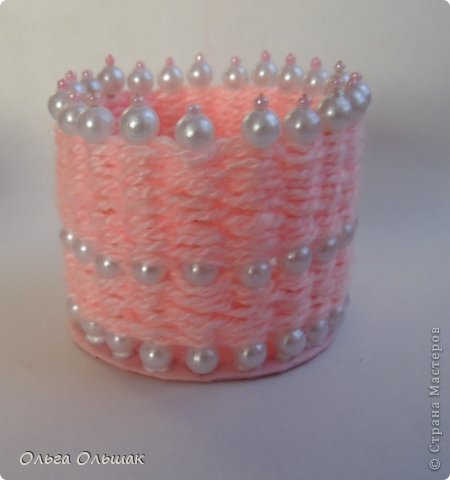
 That turned a set!
 Thank you to everyone who looks at the light! Be creative, self-confident and people!
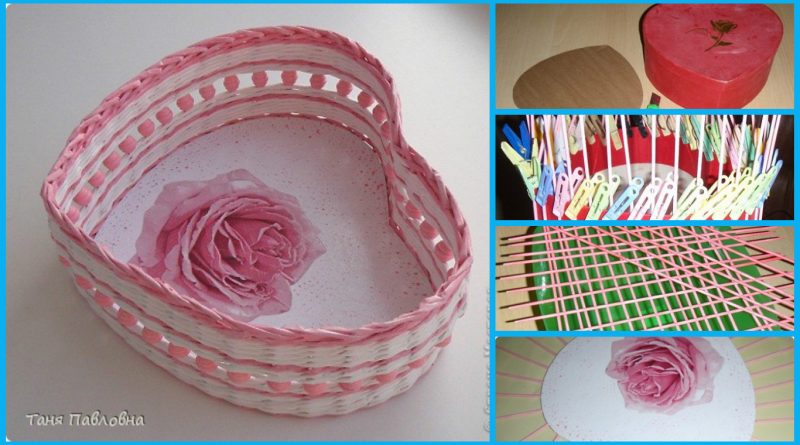
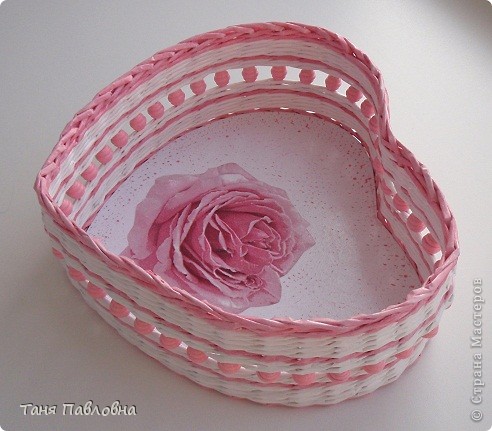
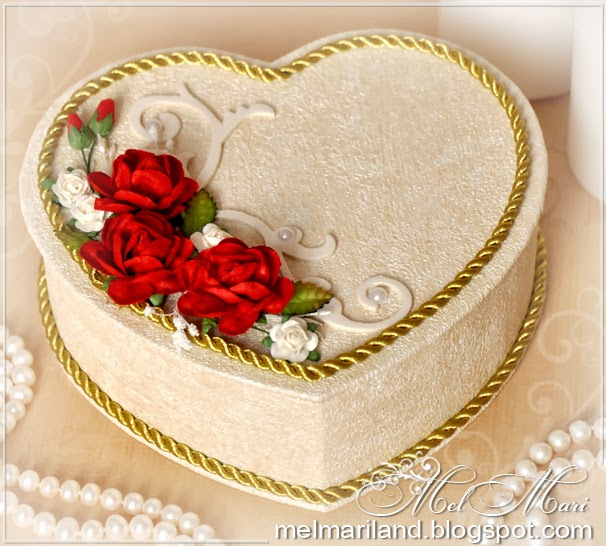
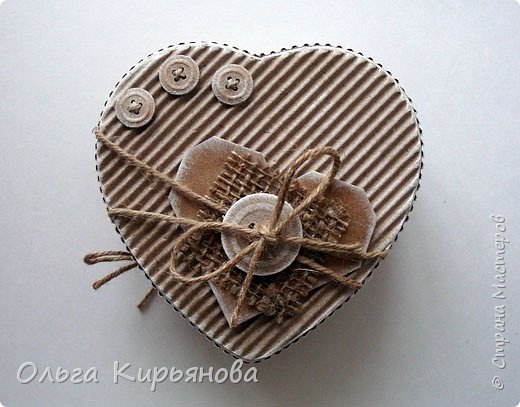 It – heart box-box, which can be stored for very different small things.
 And here’s a surprise! This tiny origami hearts. And these little notes with very necessary,
 Required Materials:
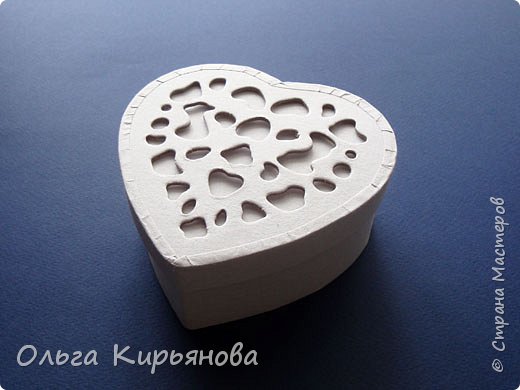 I start with a surprise. I wanted to make little origami hearts of kraft paper for sketches (80 g). Folding.Here is the . I square 5×5 cm. Ready hearts tinted white ink pad.
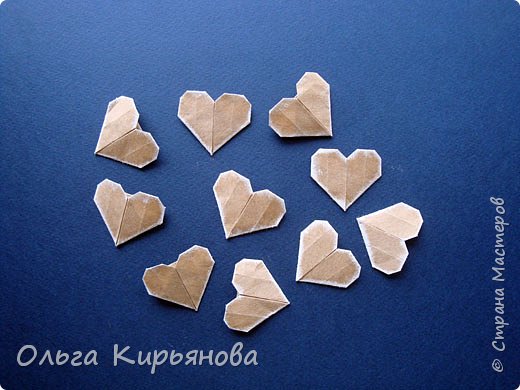 I really like these hearts! We with my students often do them. The heart has a pocket where you can put a note, souvenir or sweetness. However, I was the slightly pasted hearts front flap to the inner corner to the pocket has become more formalized. And the side corners folded differently. In the original MK proposed bend them back, and I replaced these folds with a “recessed inward” and too little glue.
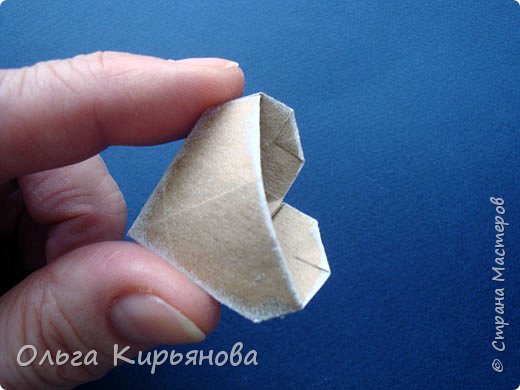 It prints on the same kraft paper, which makes up the hearts, the most important words.
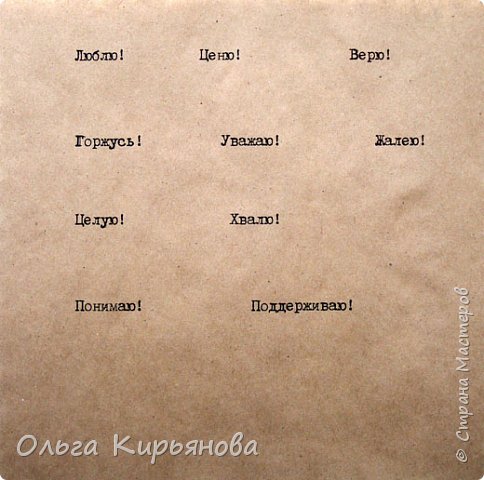 Cut the sheet into rectangles 5h3,5 cm so that each piece was one word. Twist rectangle tubes, the ends of the smoked white pad and put on a note in every heart.
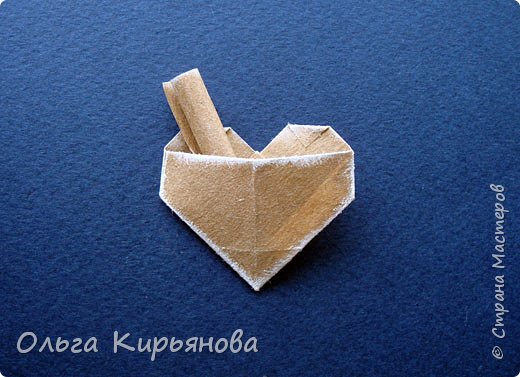 On the front side of each heart pasted a piece of burlap 2×2 cm. Because of kraft paper for sketches weight of 200 g cut down the little buttons using a hole punch embossed “Buttons” with a diameter of 13 mm. Glue them to the stiffness of 3 pieces pile and also smoked. He slipped into the holes thin jute twine …
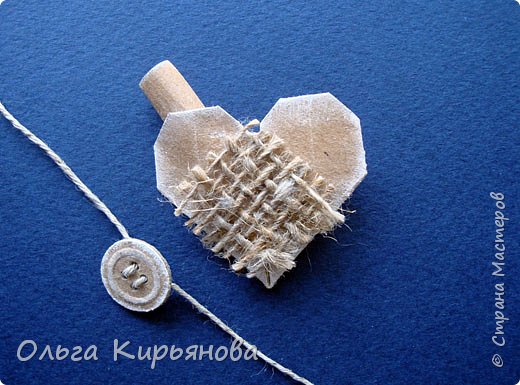 … And bandaged hearts.
 That’s how it looks from the other side.
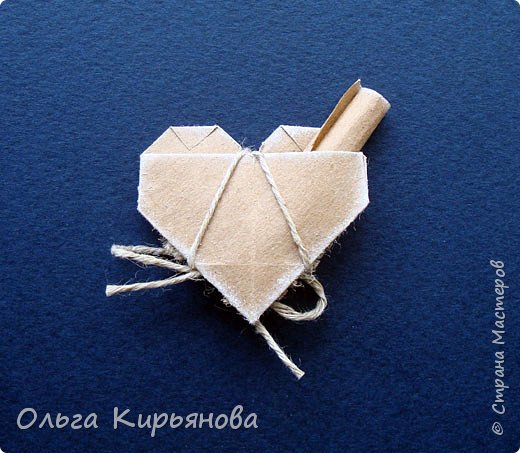 Ready hearts.
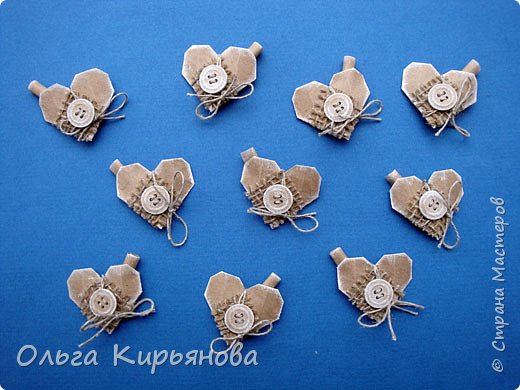 I estimate the cover design of heart boxes. From the sheet of packaging, cardboard cut out the heart, circling the box cover. I smoked white pad. I have no retail box (large) corrugated board and more shallow. This sheet was embedded in some packages, I do not remember from under that. To sustain style folded another heart origami from the same paper (9×9 cm square). Also, I smoked. Attach a piece of burlap 4×4 cm. Has made a button with a diameter of 2.5 cm (glued together 5 pieces) smoked. He slipped into the holes buttons thick jute twine and tied a bow. I tried “wrap” the heart of twine (slipped the ends of pieces of string under a layer of cardboard). Liked.
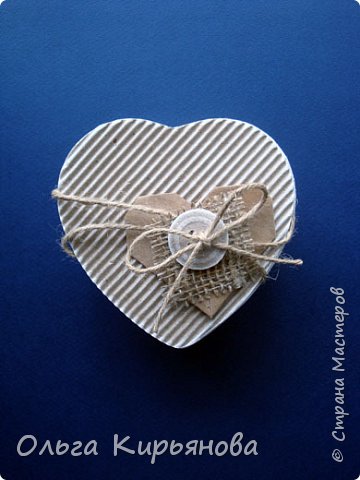 I decided to add three small buttons, as heart-surprises. They must first “sew” crosswise thin twine, glue the ends on the wrong side buttons.
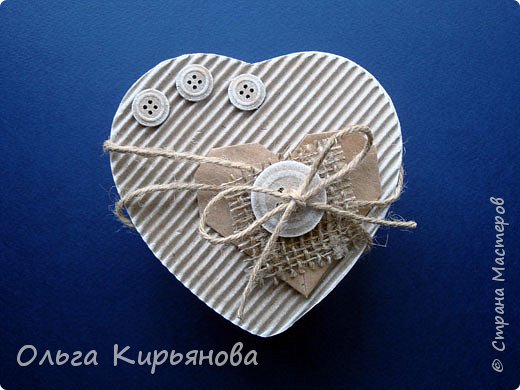 The end cap pasted strip of corrugated cardboard, ink pad walked on slices. Samu box also plastered strip and tied with string. Now you’re done!
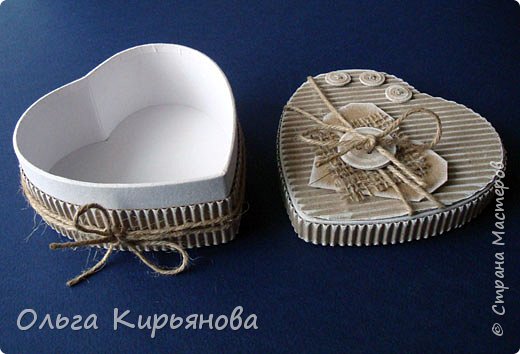 Heart box is empty.
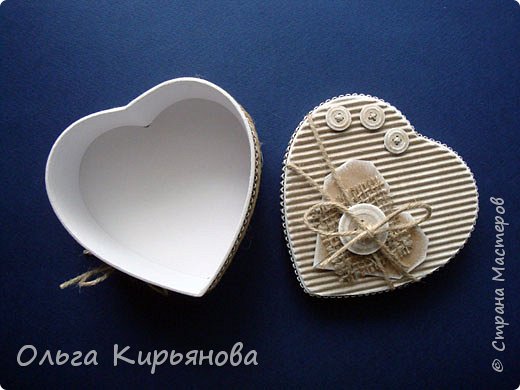 And then, finally, Surprise hearts take their place! Boll is not filled to the top, so you can add to it more and more hearts!
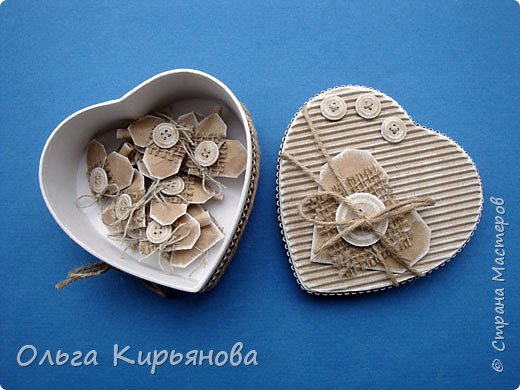
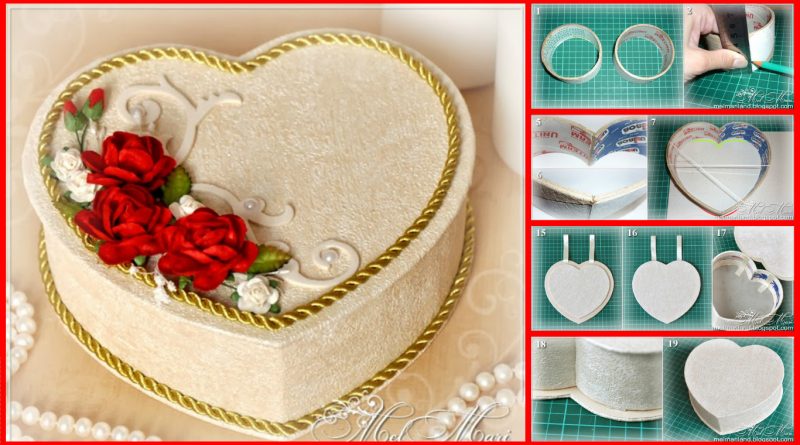
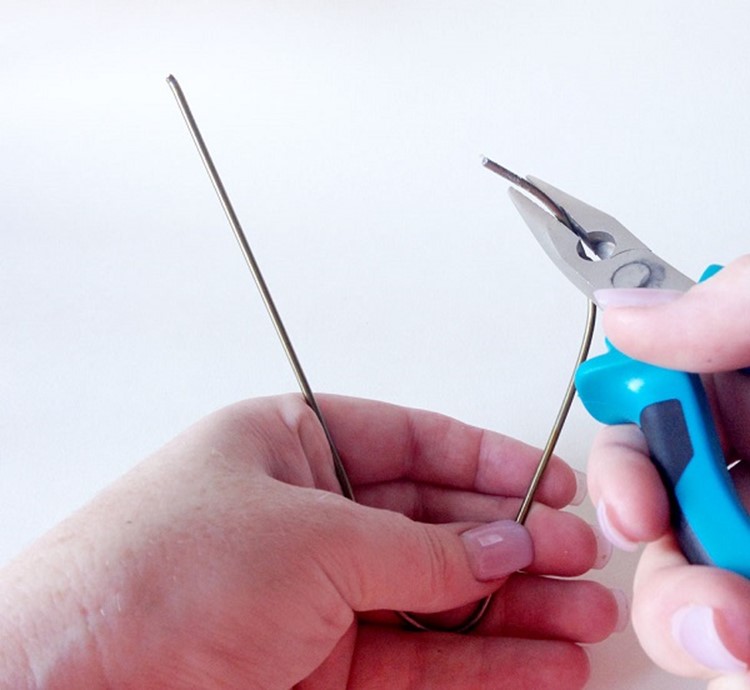
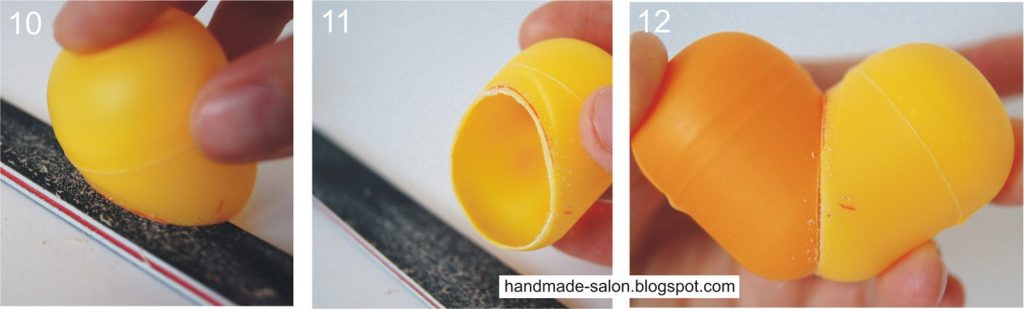
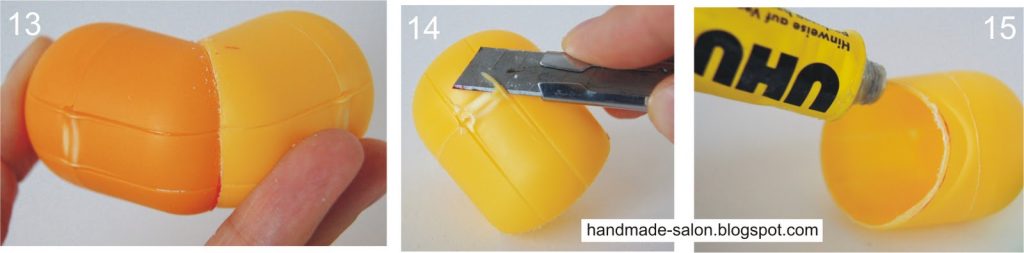
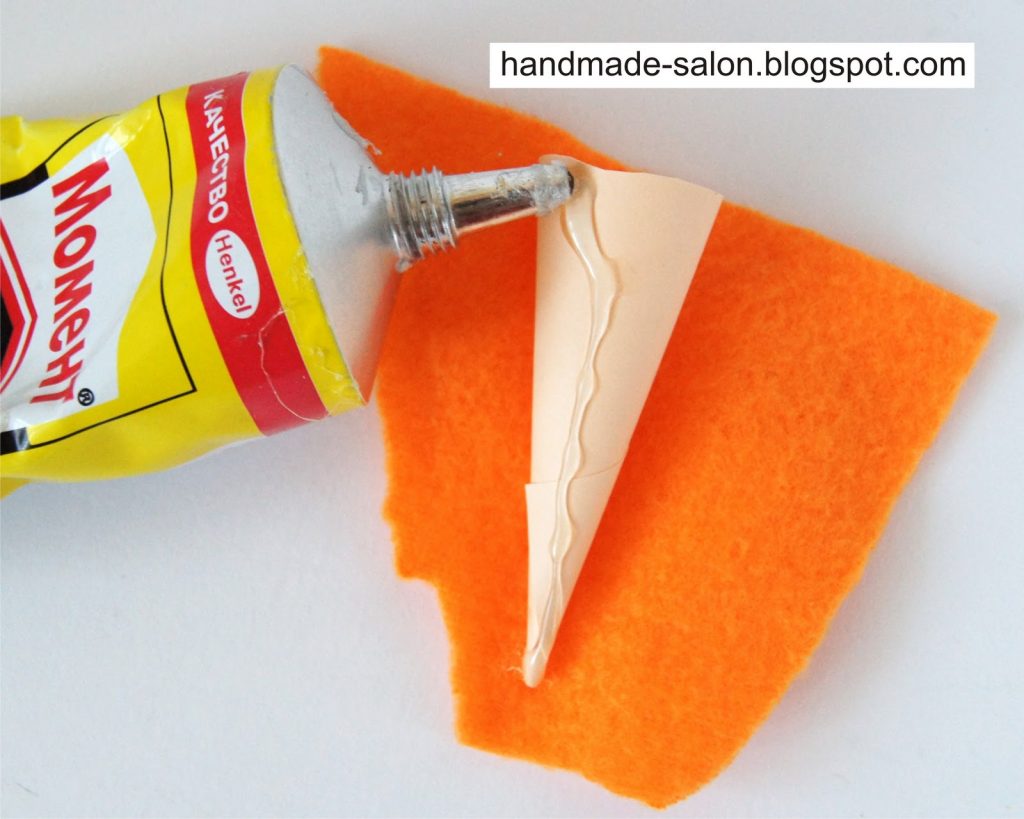
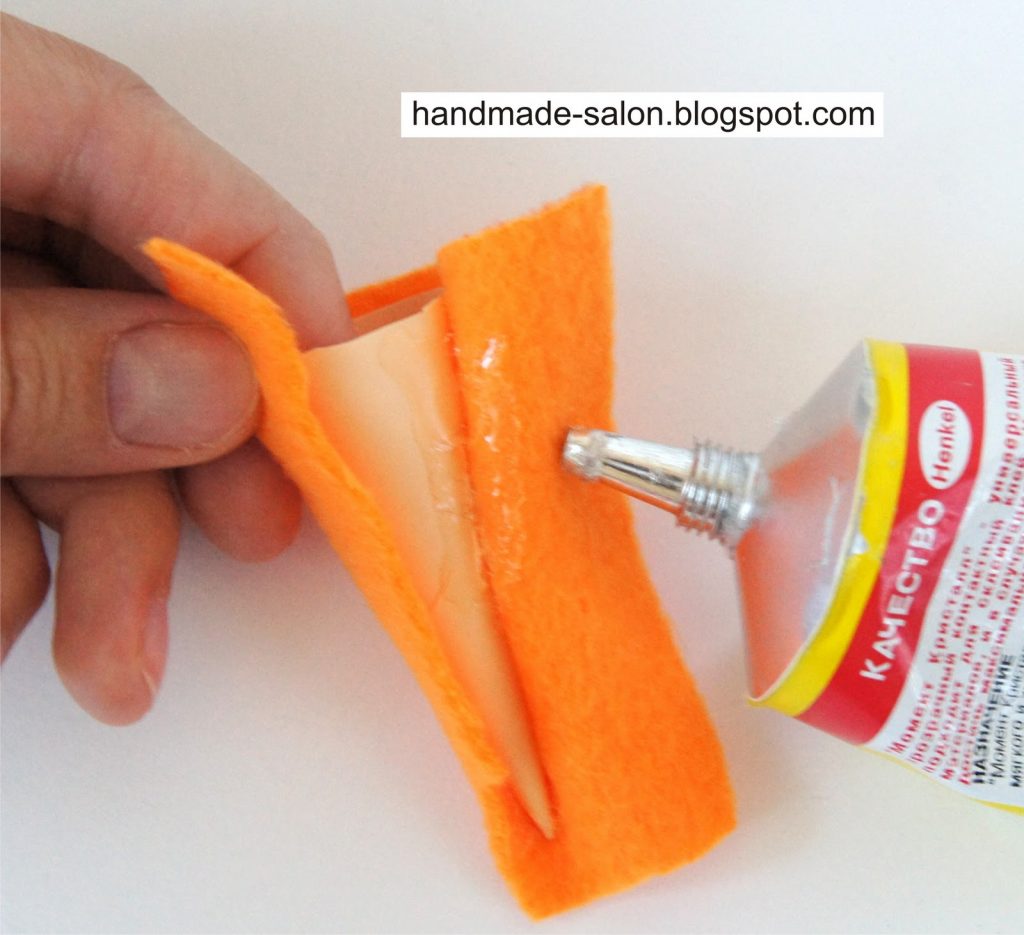
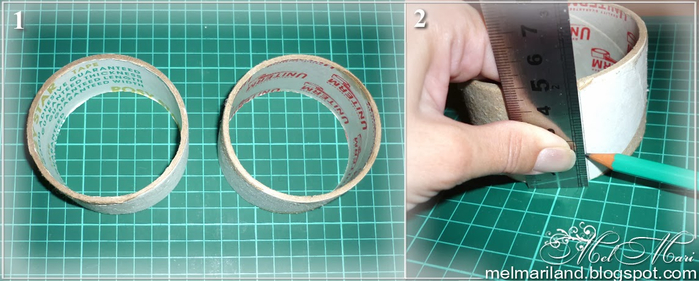 After the cut, the two spools, accurately straighten each one hand. To halves of the heart were symmetric, we put detail on each other and correct.
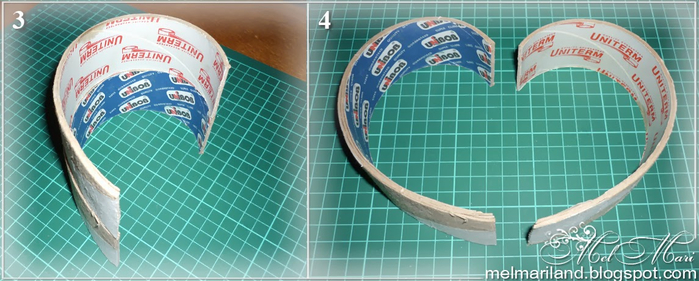 Now glue the seams. If the heart has turned out not quite symmetrical, you can drag it or rubber thread (photo 7), to give the desired shape, sprinkle with water and leave for several hours to dry.
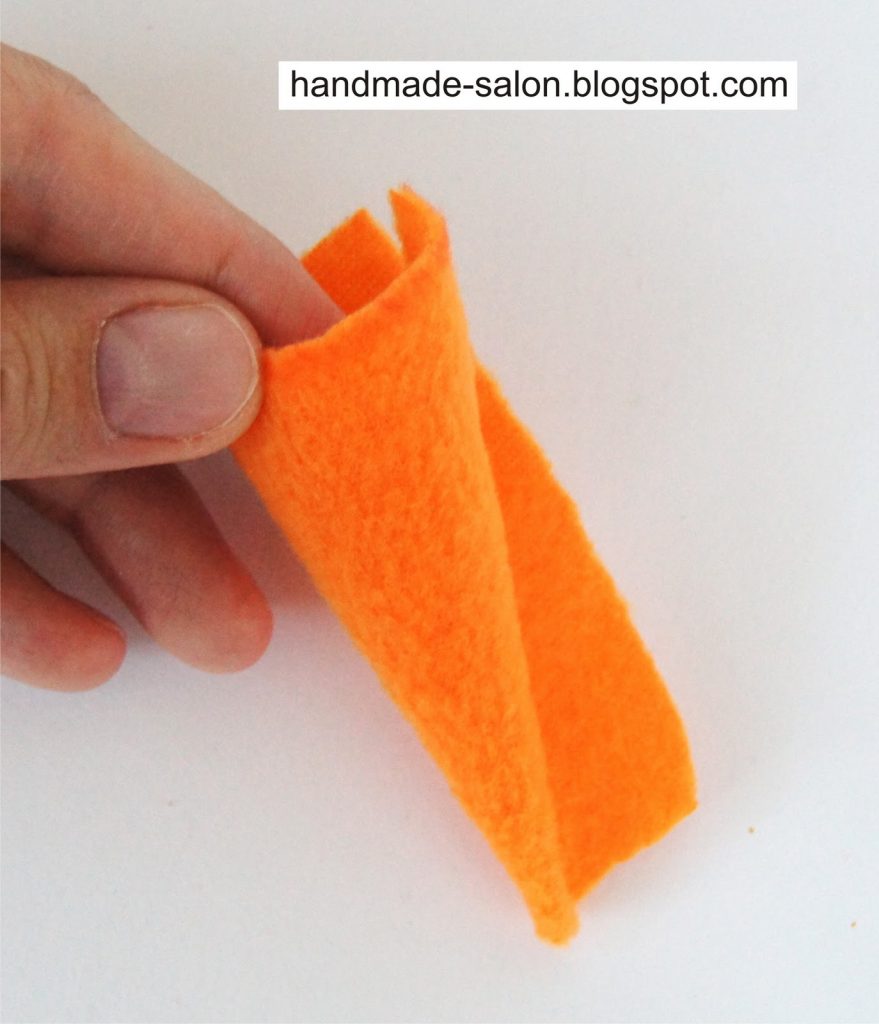
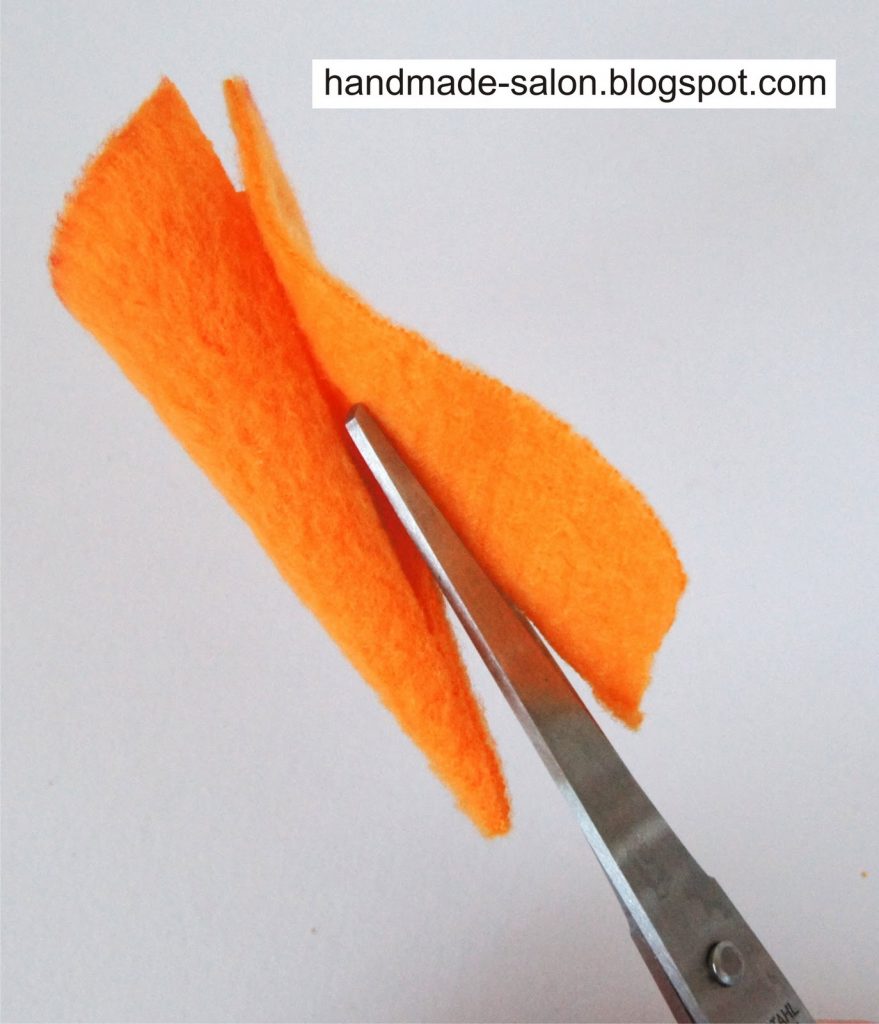
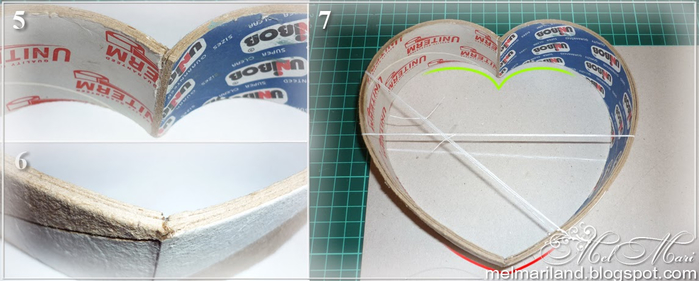 Should get 2 loops (as in the photo 8). Will be cut by the outer contour. Such details do 2 pcs. (for the bottom and lid).
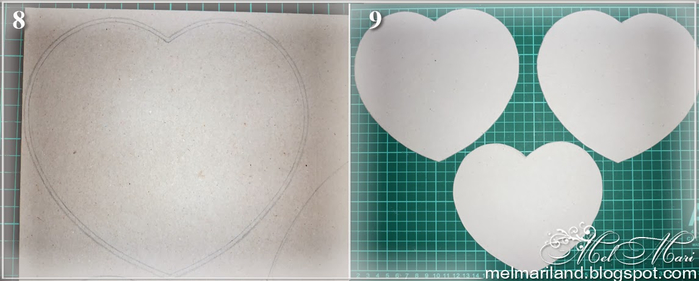 Paste paper design (or a tight-fitting cloth) all the details. Glue the bottom and proceed to the assembly of the cover. To make it look neat, cut out another heart made of cardboard a suitable color, that will cover all the bumps on the inside of the lid (photo 11).
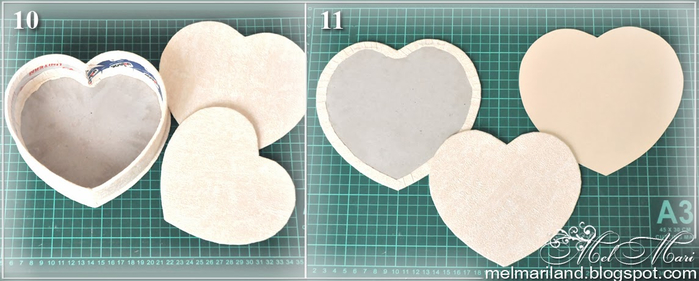 Make the cut at fixing and threaded them tape (for strength folded in half). The ends of the strips are glued to the underside of the board, turn it upside down and glue to the inside of the lid.
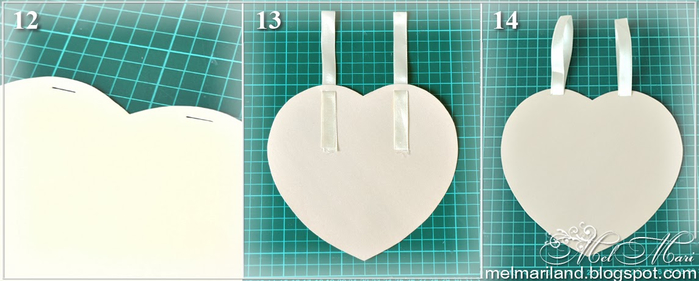 Top glue third smaller part (picture 15 – the inner side of the cover, pictured 16 – external). The free ends of strips glued to the walls of the casket.
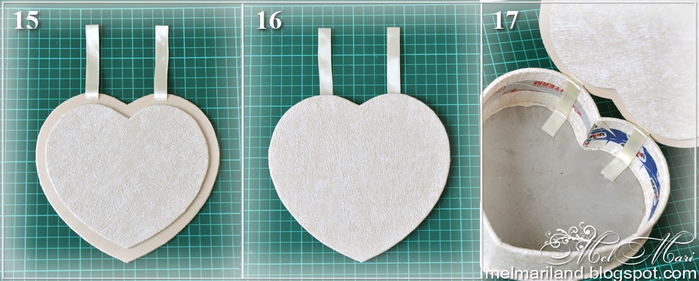 The photo box 18 upside down and seen how it should look like the mount on the outside.
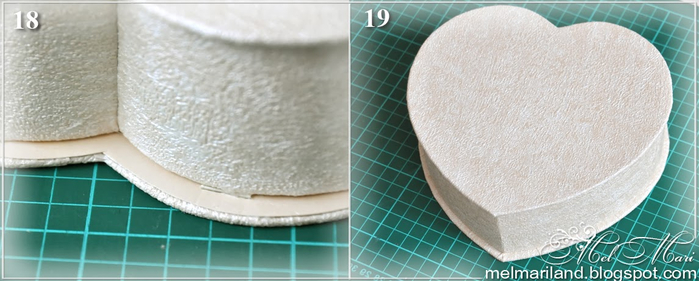 I used a twisted cord, cutting out chipboard, different flowers, stamens, leaves, and. Inside the velvet pasted paper.
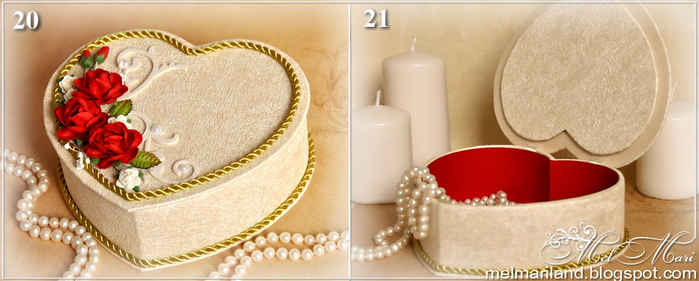


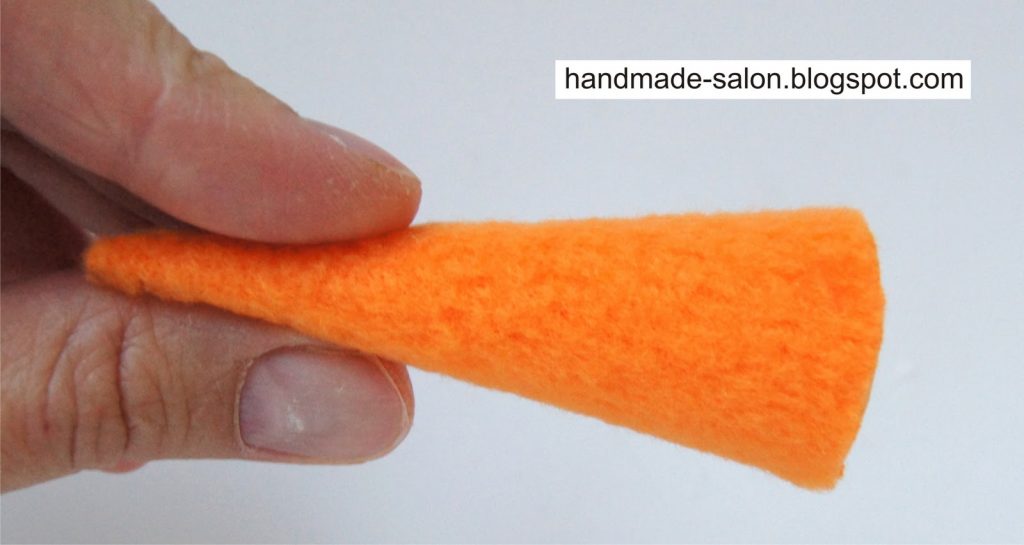
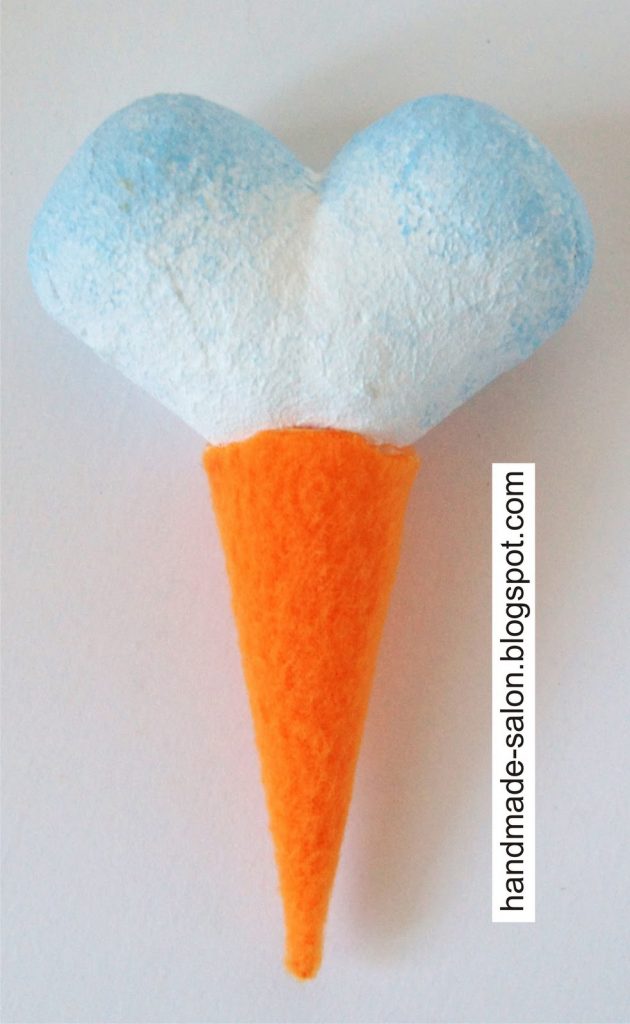
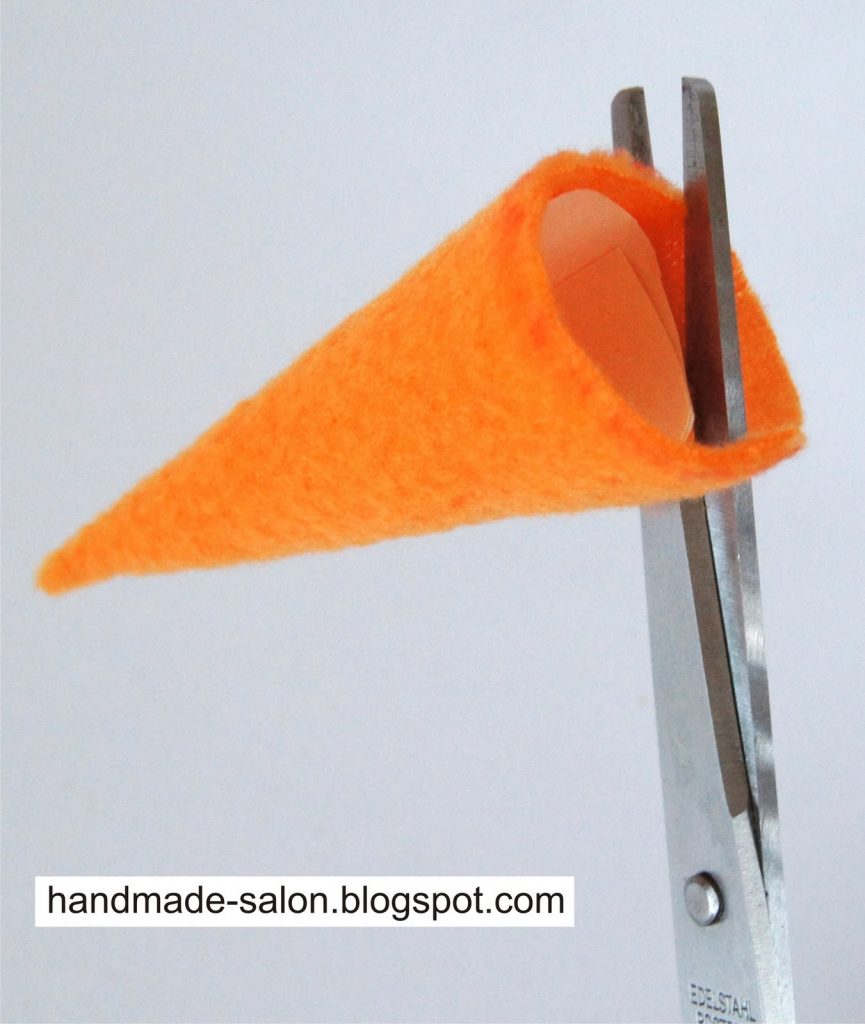 cut off the excess … cone ready