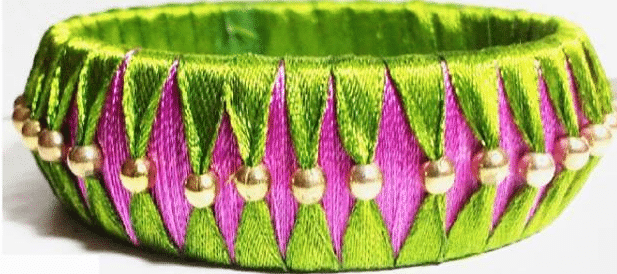
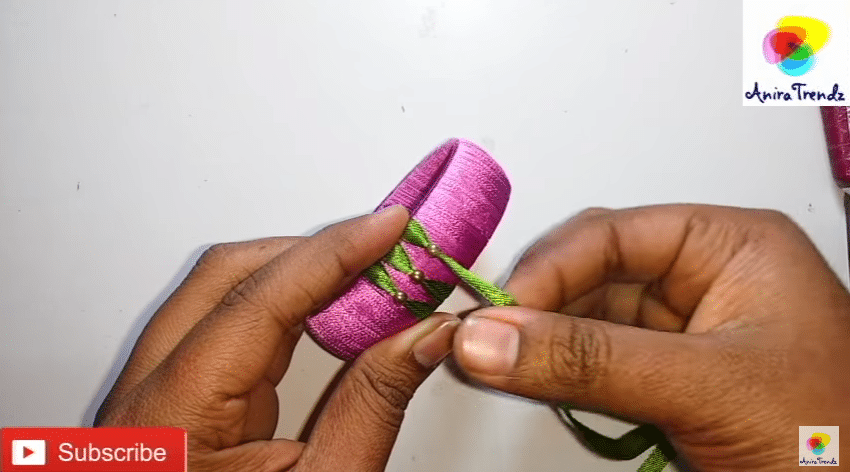
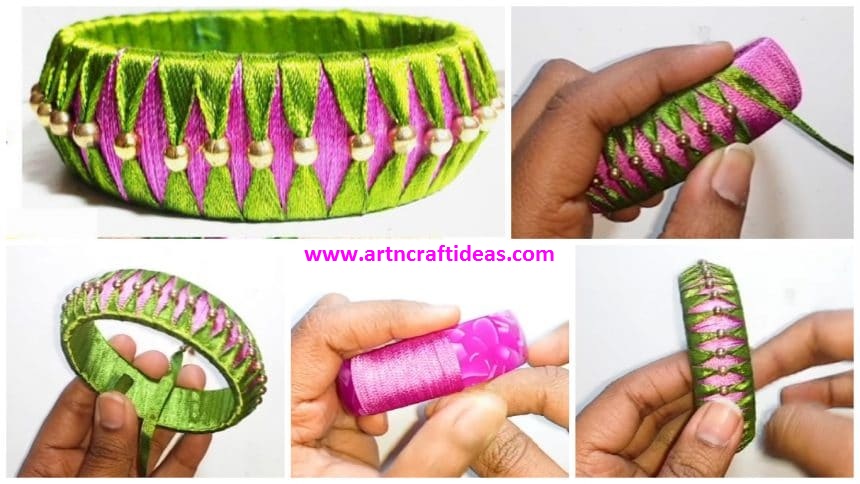
Explained how to make silk thread bangle using ribbon and beads.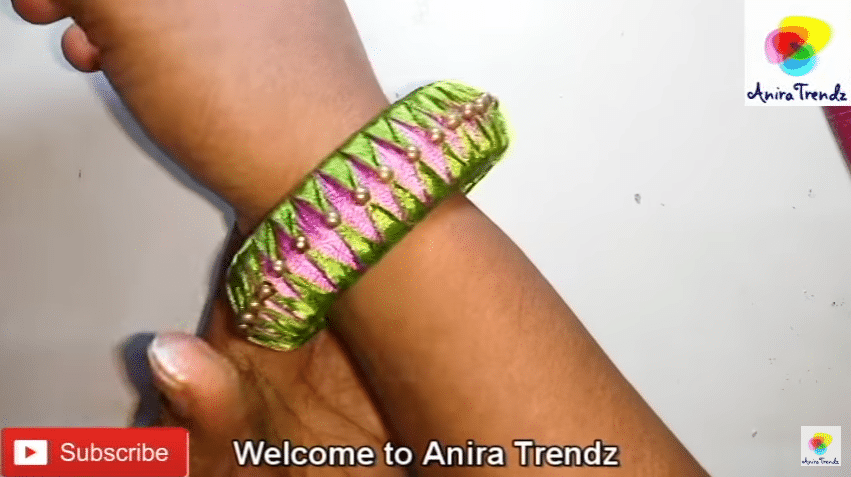
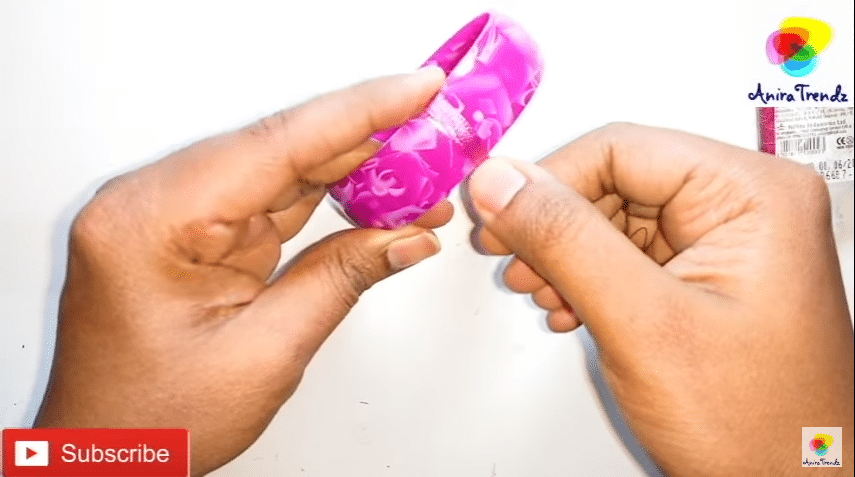
 Required Material:
- Ribbon (1cm or below)
- Silk thread bangle
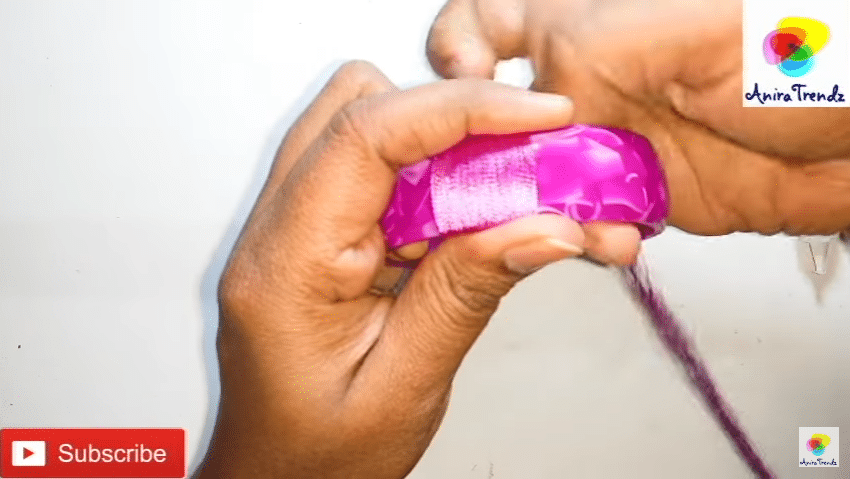
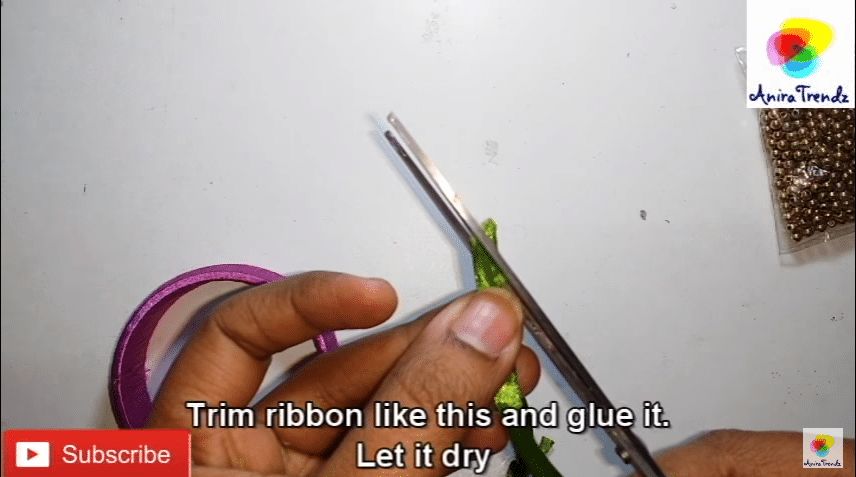
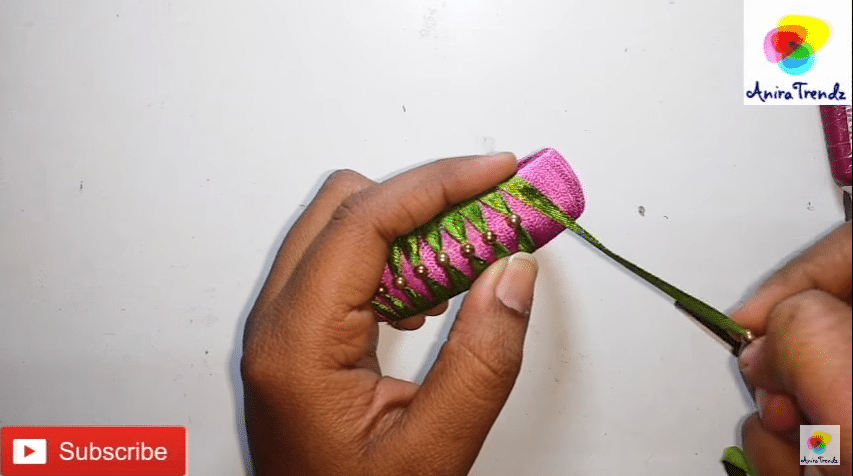
Beads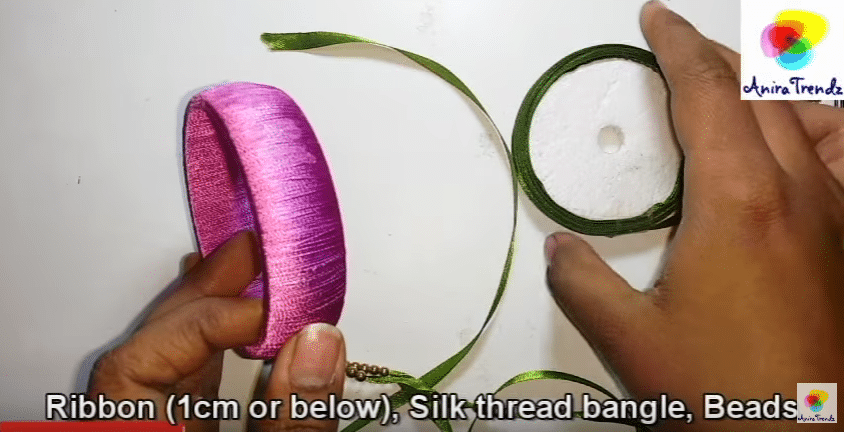 Trim ribbon like this and glue it.
Let it dry.
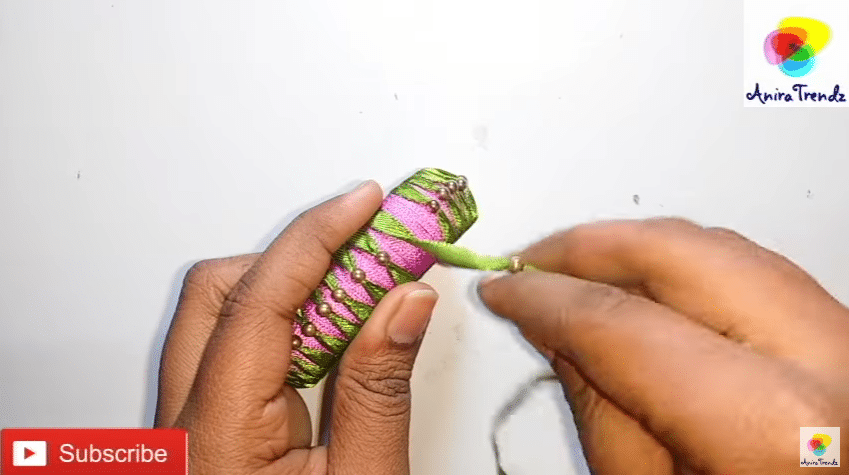
 Here is the finished bangle.
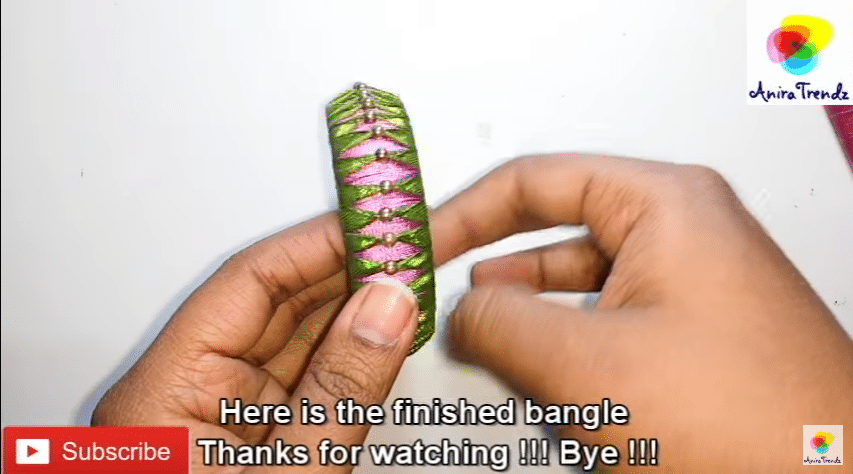
Get Daily Art and Crafts Ideas & Tutorials…
Explained how to make silk thread bangle using ribbon and beads. Required Material:
Beads Trim ribbon like this and glue it.
Let it dry.
Here is the finished bangle.
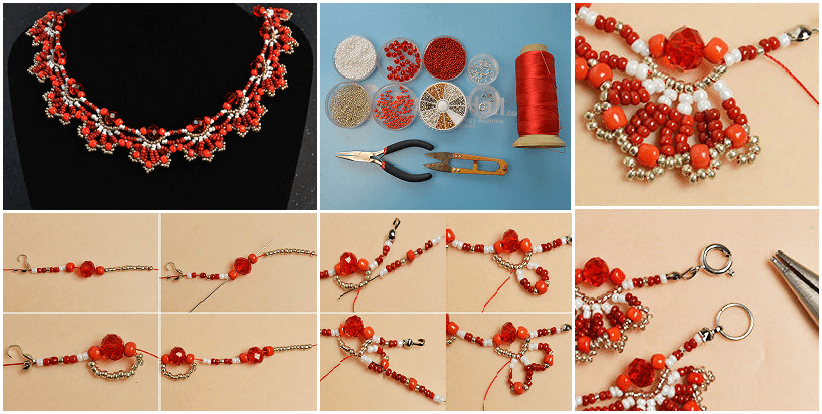
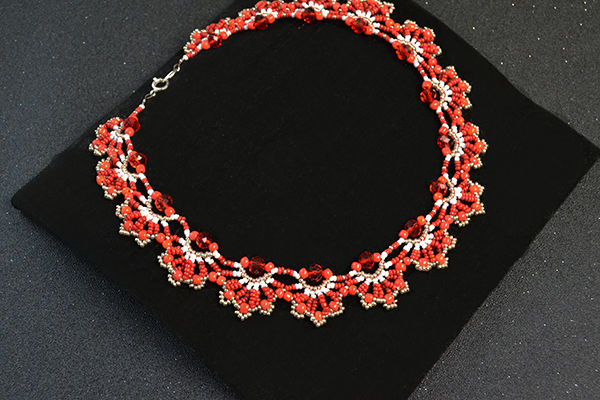
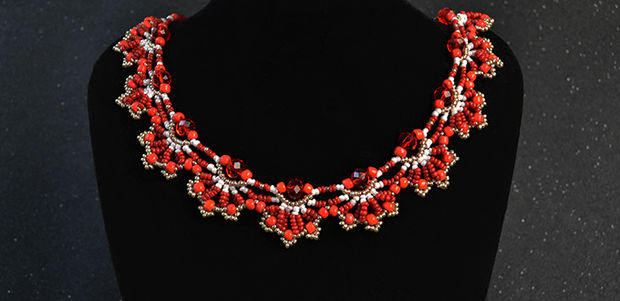
Today’s tutorial will show you how to make a very beautiful seed bead choker necklace, if you are fond of beaded choker necklaces, you shall never miss this one.
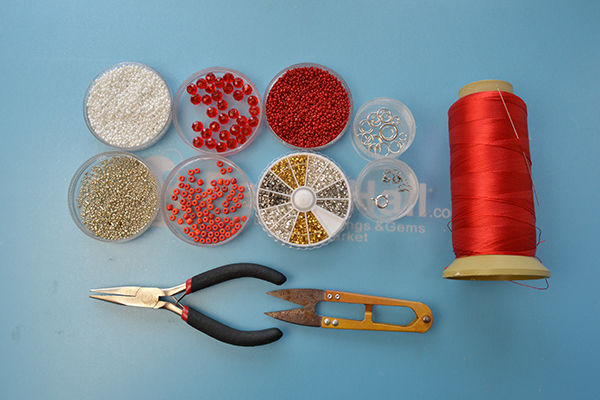
Step 1: Supplies Needed to Make This Beaded Choker Necklace
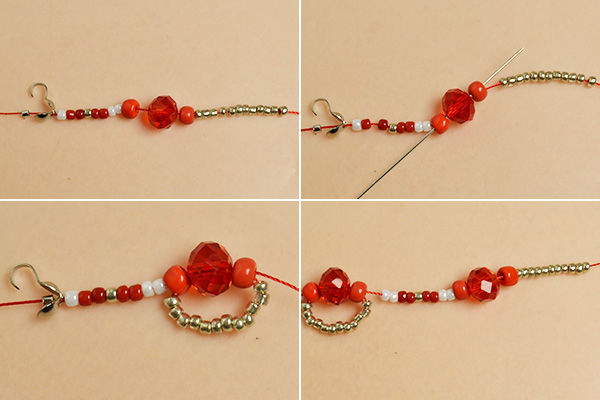
1st, prepare a long piece of red nylon thread, slide a silver crimp bead, a bead tip, a 2mm white seed bead, two 2mm red seed beads, a 2mm golden seed bead, two 2mm red seed beads, two 2mm white seed beads, a 4mm red seed bead, a red glass bead, a 4mm red seed bead, and twelve 2mm golden seed beads onto the thread;
2nd, cross the thread through the 4mm red seed bead, red glass bead, and 4mm red seed bead pattern, just like the following picture shows;
3rd, tighten the thread to finish the first basic flower layer;
4th, keep adding beads in the same way.
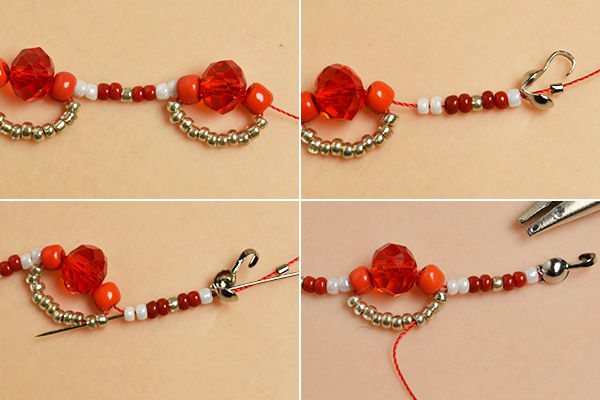
1st, repeat step 1 to finish all 16 flower layers;
2nd, slide two 2mm white seed beads, two 2mm red seed beads, one 2mm golden seed bead, two 2mm red seed beads, one 2mm white seed bead, a sliver bead tip, and a silver crimp bead onto the thread;
3rd, cross the thread back through the previous beads like picture shows.

1st, add two 2mm white seed beads, three 2mm red seed beads, one 2mm golden seed bead, one 4mm red seed bead, one 2mm golden seed bead, three 2mm red seed beads, and two 2mm white seed beads onto the thread and cross the thread through the third to fifth golden seed bead of the first flower layer;
2nd, tighten the thread to make a seed bead flower petal;
3rd, add two 2mm white seed beads, three 2mm red seed beads, one 2mm golden seed bead, one 4mm red seed bead, one 2mm golden seed bead, and three 2mm red seed beads onto the thread, and cross the thread through two 2mm white seed beads of the first petal and a 2mm golden seed bead of the first flower layer;
4th, tighten the thread to make the second seed bead petal.
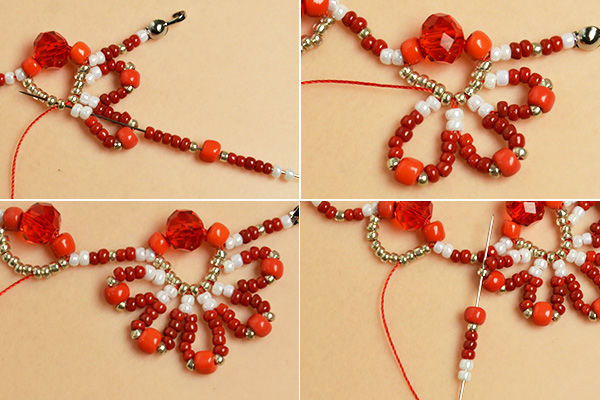
1st, repeat step 3 to finish all the five seed bead flower petals;
2nd, once all five petals are finished, cross the thread back through the nearby seed beads like picture shows;
3rd, add two 2mm white seed beads, three 2mm red seed beads, one 2mm golden seed bead, and a 4mm red seed bead onto the thread, and cross the thread through the golden seed bead on the last petal.
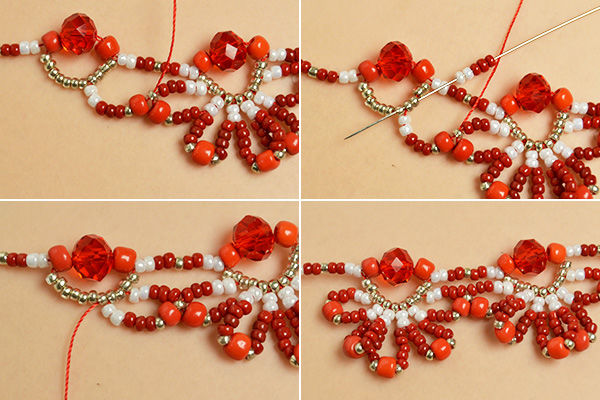
1st, tighten the thread to connect the first and second pattern;
2nd, add three 2mm red seed beads and two 2mm white seed beads onto the thread and cross them to the nearby golden seed beads like picture show;
3rd, tighten the thread to finish the first petal of the second flower;
4th, make the other four petals of the second flower in the same way.
1st, repeat step 3 to step 5 to finish all the second layer of the 16 flower patterns;
2nd, cross the thread back through the last few seed beads like picture show;
3rd, cross the thread through the lass petal like picture shows, and then add five 2mm golden seed beads onto the thread.

1st, tighten the thread to make a tiny golden seed bead petal;
2nd, add two 2mm golden seed beads to connect the nearby two petals together;
3rd, add five 2mm golden seed beads onto the thread, cross the thread golden seed beads and 4mm red glass bead on the second petal, then tighten the thread to make the second tiny golden seed bead petal.
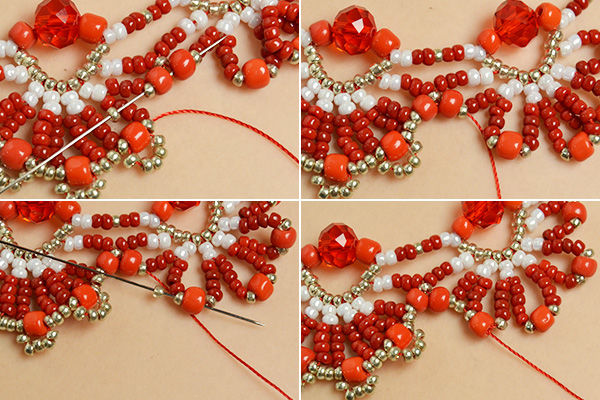
1st, repeat step 7 to finish all the third layer of the first flower pattern;
2nd, cross the thread through the connecting beads to the second flower pattern;
3rd, finish all the third layers of the flower patterns in the same way.
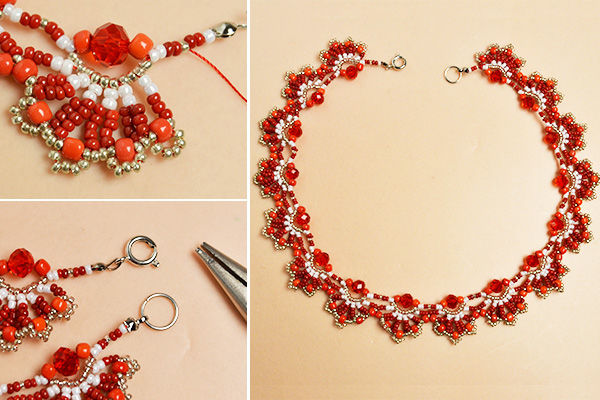
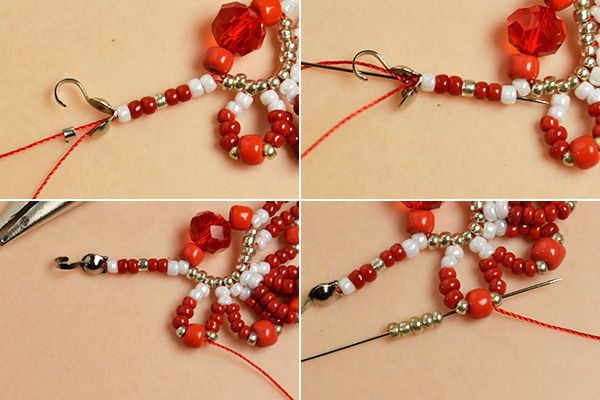
1st, cut off extra thread and close the crimp beads and bead tips;
2nd, add a spring clasp to one bead tip and a jump ring to another bead tip.
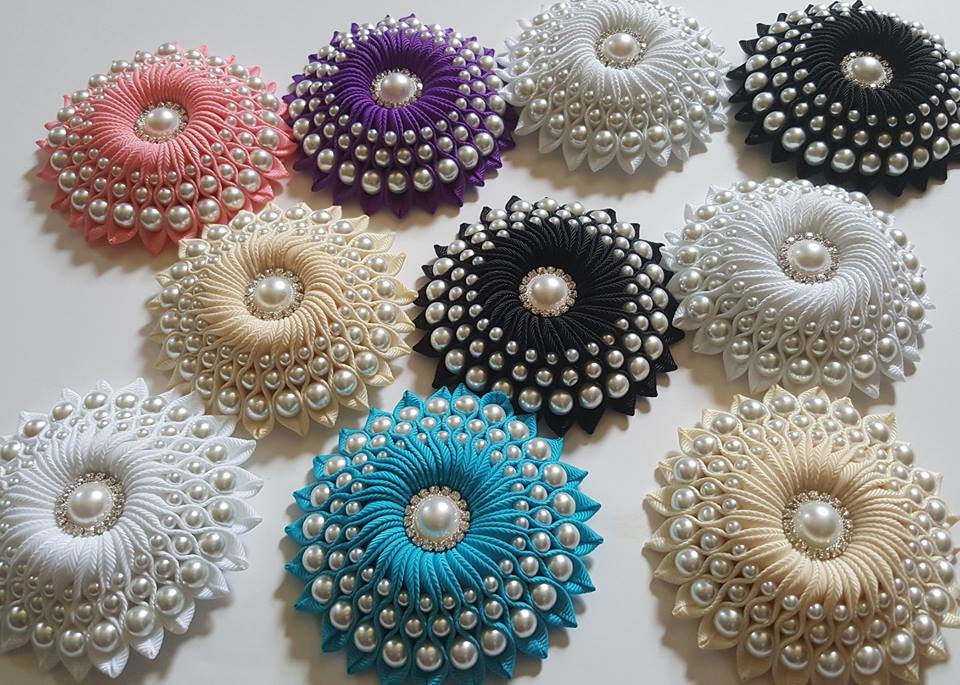
DIY Ribbon flower with beads / grosgrain flowers with beads tutorial: This is an art and craft idea that makes for an absolute Quick and simple DIY Project. That you can use in a variety of ways. These DIY Ribbon flower with beads are an awesome idea that make for an awesome Gift Wrapping Project and also appropriate for your DIY Sewing Projects.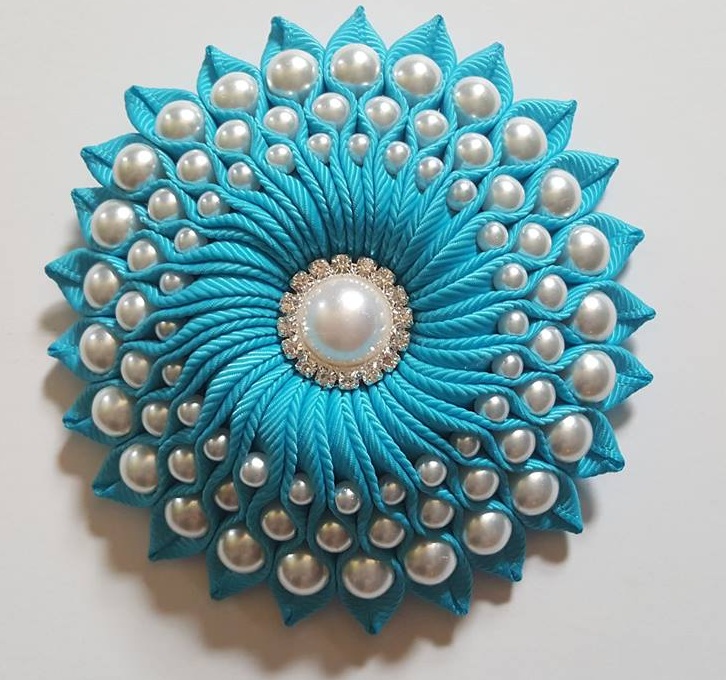
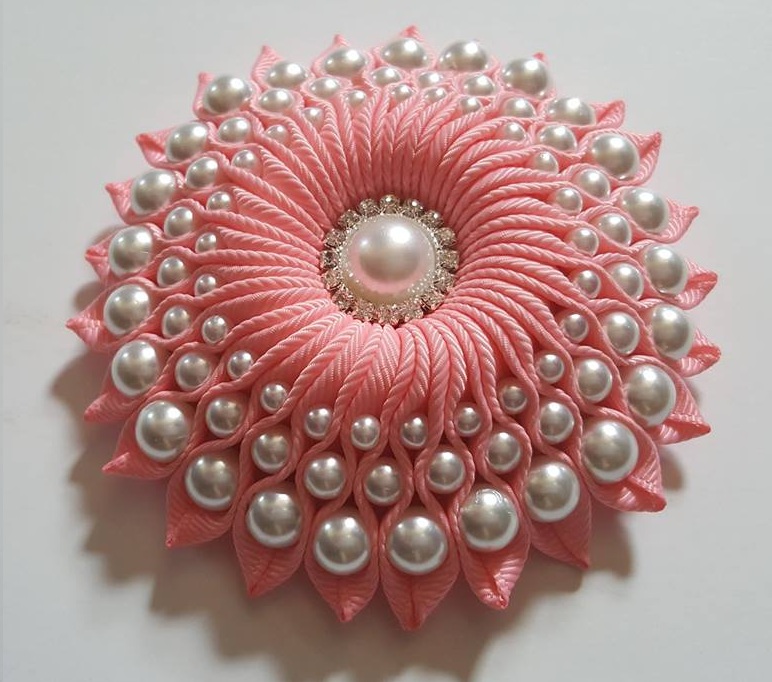


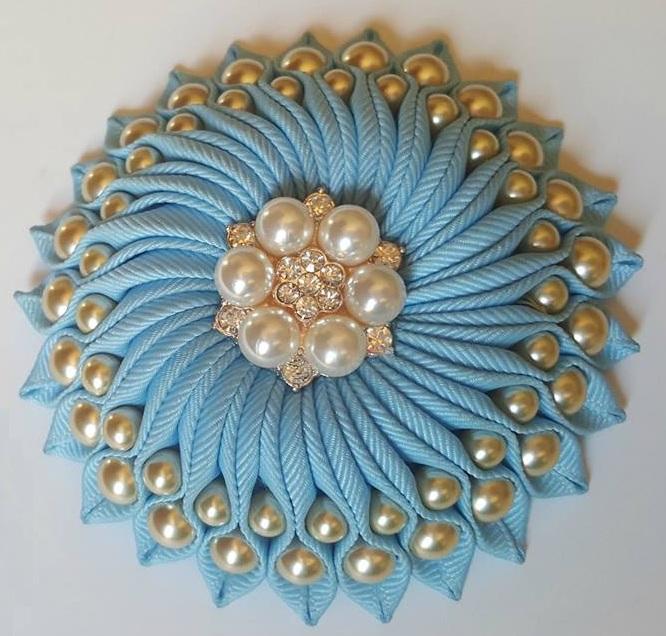
There is absolutely no need for any craft supplies that you need especially to make these fabulous DIY Ribbon Flowers. Just a few Satin Ribbons in different colors!
You can watch the complete video tutorial here:
Hope you like this tutorial. Please share in your social circle.
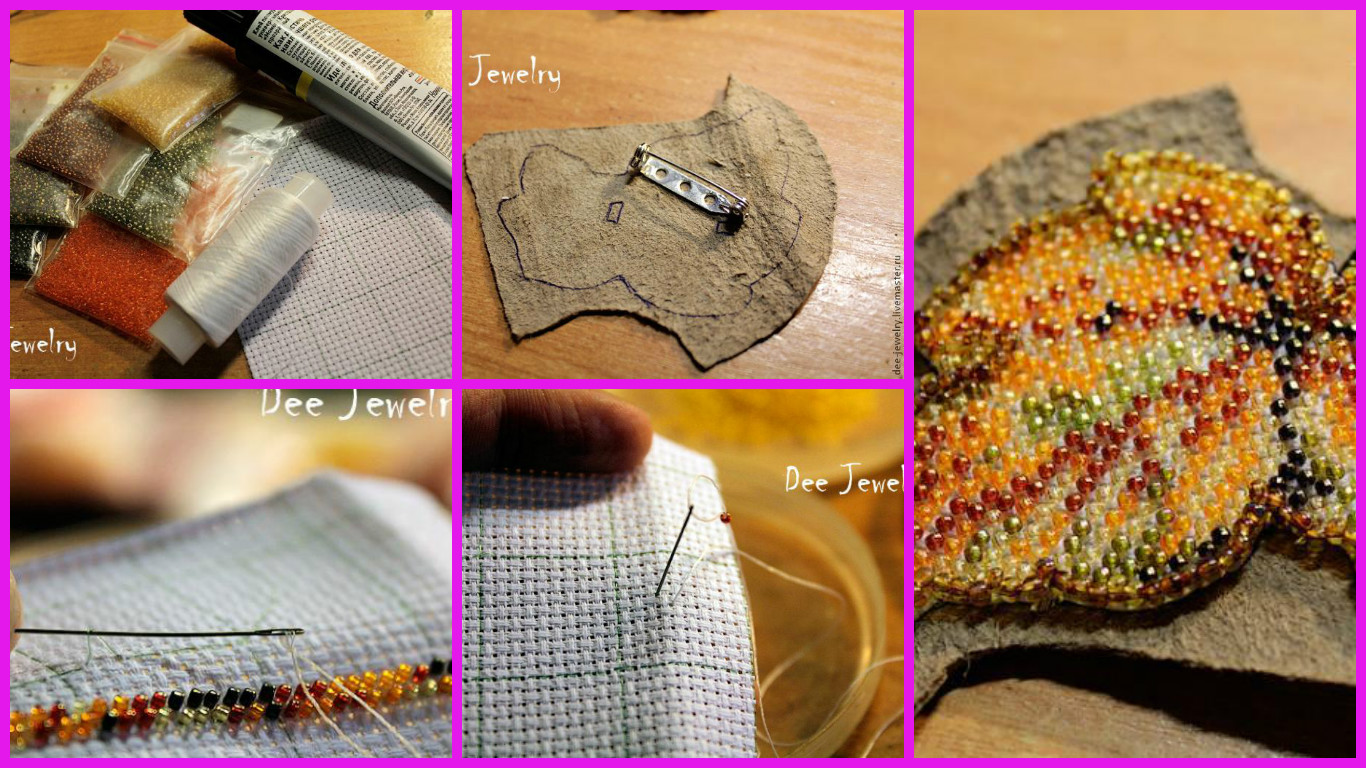
Embroider autumn) Bead work on an outline – autumn leaves.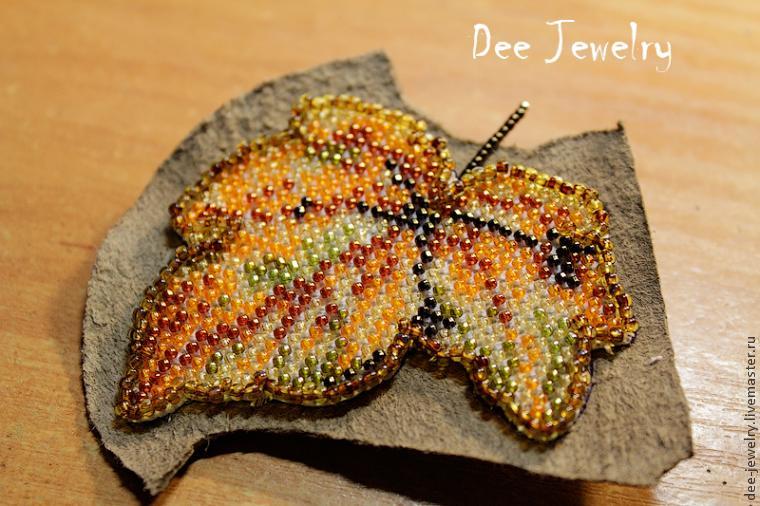
Today we are going to learn to embroider beads on canvas by the example of brooch “Autumn, fall …”. Embroidery on canvas – it is quite simple and fast, and fun! 🙂
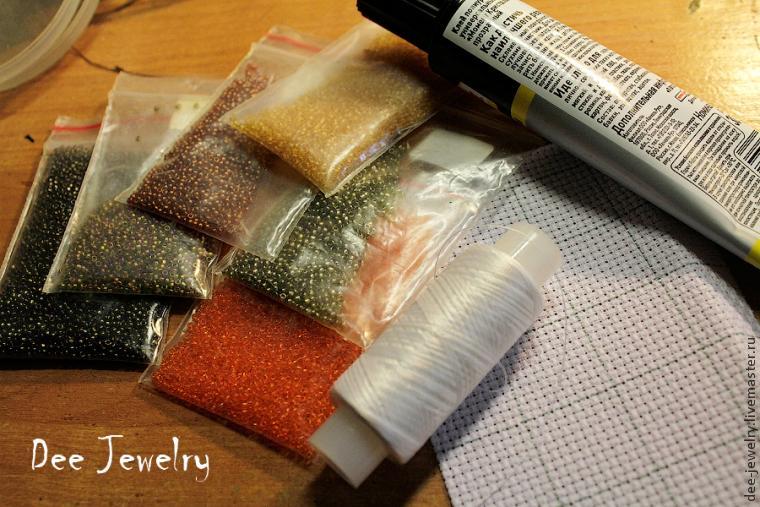
And for this we need:
1. Japanese Toho beads size 15 shades of 10B, 83, 459, 457, 329 and 2. If you use different beads, then pick up the shades themselves, you need to be colored dark brown, yellow, orange, red, green tea , yellow-brown.
2. Japanese Toho beads size 11 shades Y301 and 162B (brown and yellow), you will need it for a number of skin and the dead end of the series.
3. Canvas, I Aida 14, but it is better to take smaller, 12th or 18th. Modern canvas is sufficiently rigid so that the hoop will not be needed, only an outline.
4. A piece of white felt, piece of thick paper and a piece of genuine leather
5. A pin and brooches basis for the size of 3 cm.
6. Scissors, thread (I always lavsanovaja), glue chip time.
 Embroidery bead size will be 15. For the base, I took the scheme of this ornament:
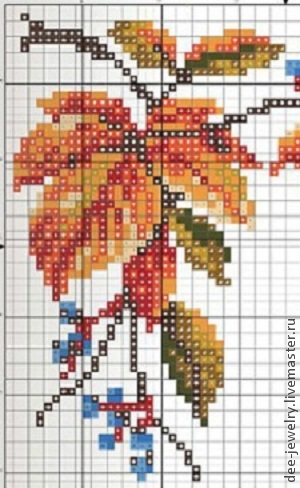
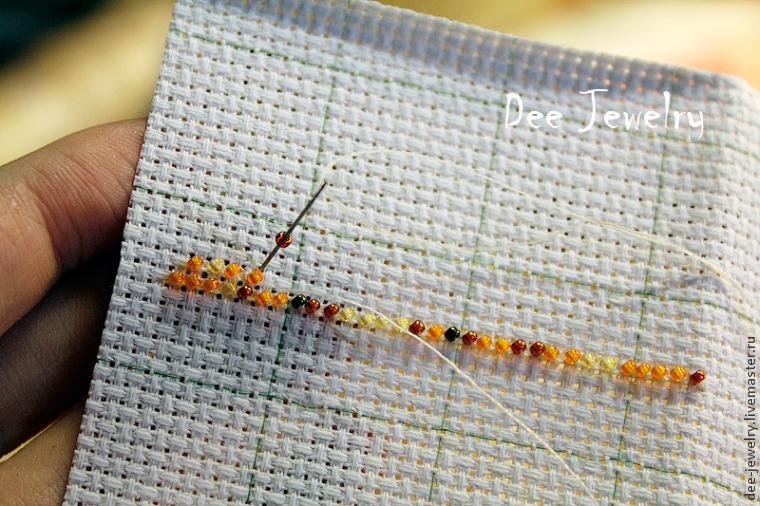
Remove all unnecessary and only embroidered leaf.
Canvas I take the fishing line once lined into squares, it’s easier to navigate. We need a piece of size 3,5h4 square. Canvas size bigger scheme necessary because at the end of the finished embroidery will cut the size of a millimeter to more than 2 beaded pattern.
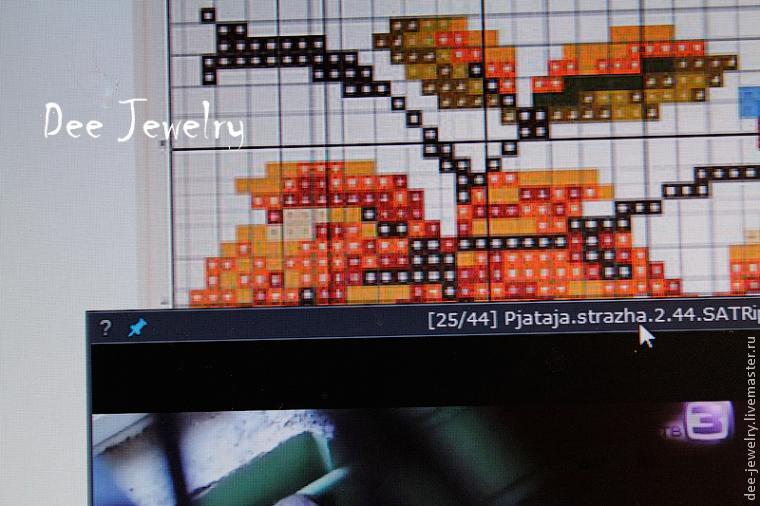
And begin. Mark up the scheme in a convenient location, close to the middle. I mark up on her screen with the movie player that listens during operation.
 We pass through the canvas from the inside, we collect a number of the first bead.
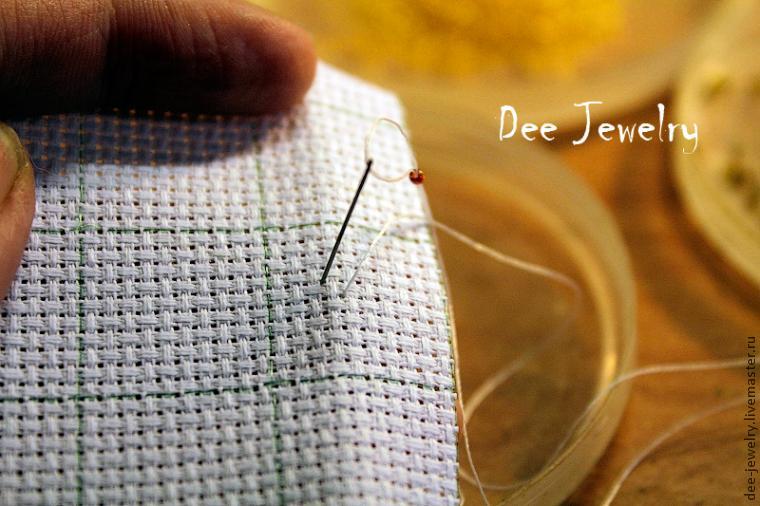 And from the inside anchoring thread on a triple knot.
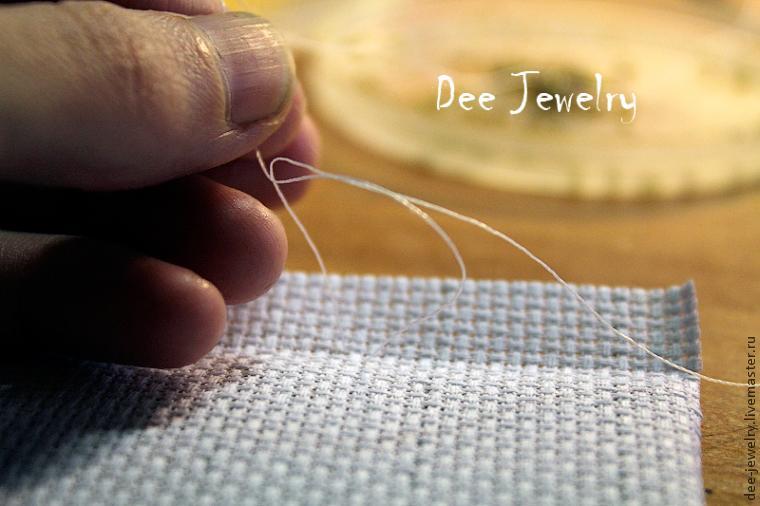 Go back to the right side and sew the first bead for another stitch.
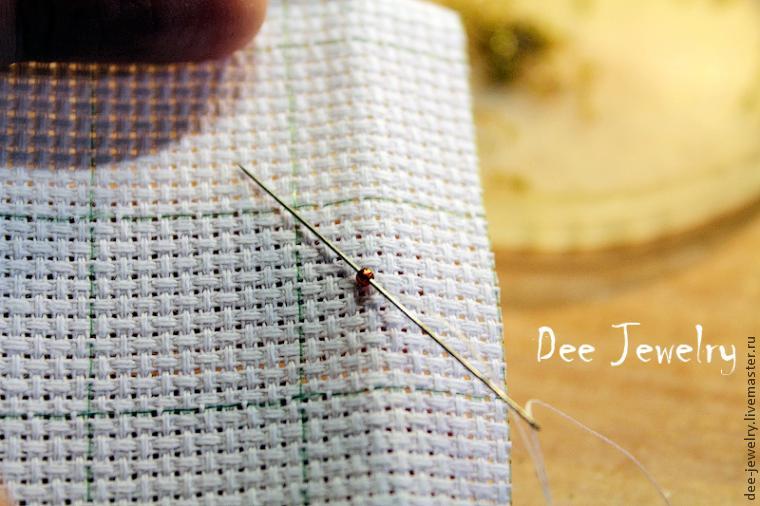 The stitches will be here in half-cross diagonally. The scheme presented in the half-cross technique.
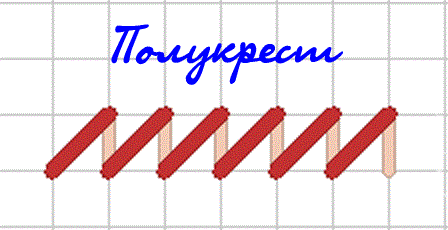 Embroidered number on the end and the final bead on again stitched two stitches.
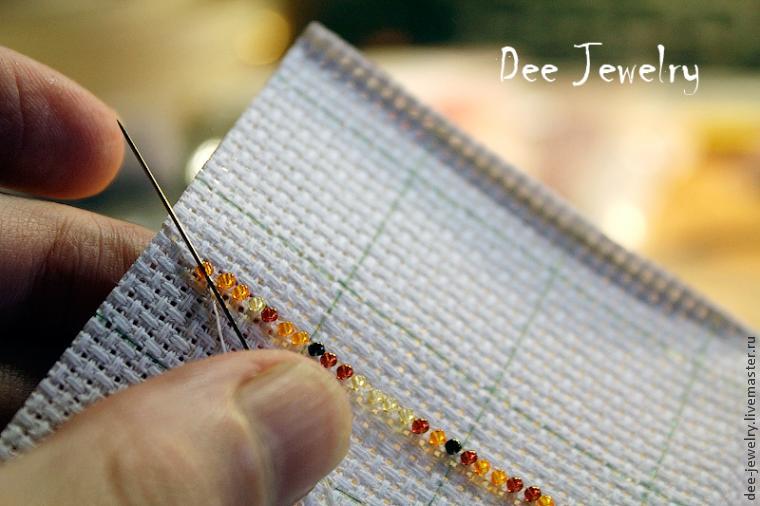 The first row is finished with the procedure, go to the number above.
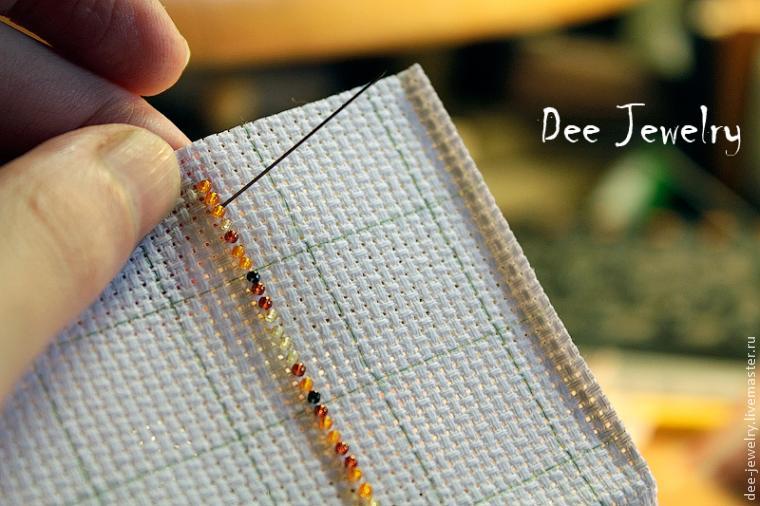 And the first number again bead stitched two stitches.
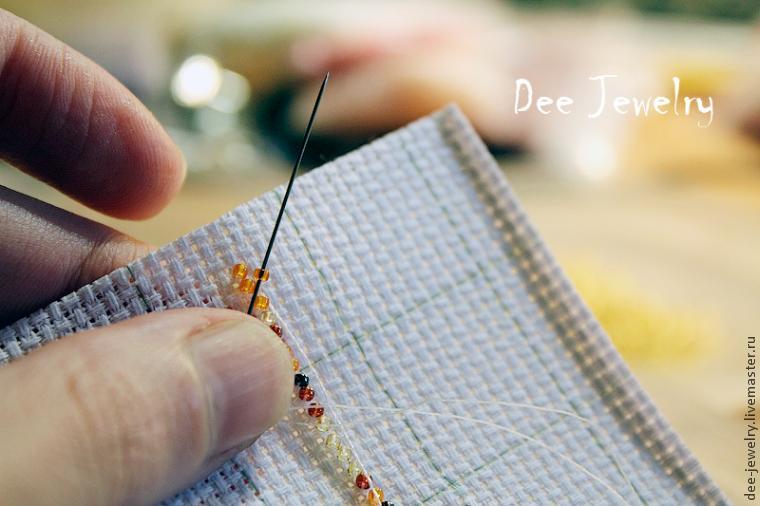
Remember this point: every first and last bead of each row necessarily stitched two stitches!
And we continue to embroidery, beads should be on the same diagonal of each other, moving on the canvas, following the pattern from right to left and left to right.
Two rows were done, you can now remove razlinovku of fishing line. I had never been to delete at once, it is easier to navigate, with a place to start embroidery.
We pick up the line and pull the needle. Not all at once, in stages.
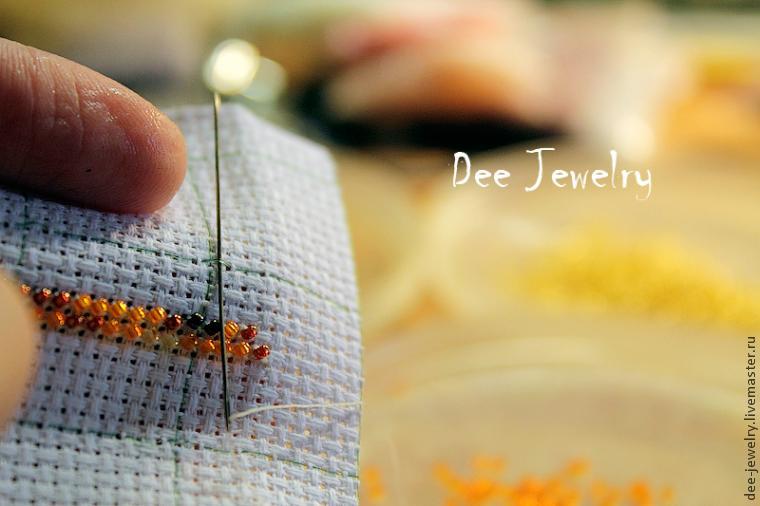
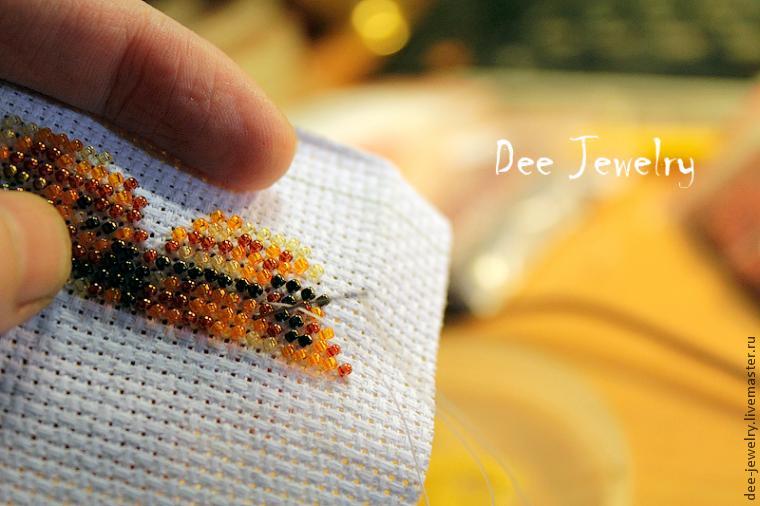
 Continue embroidery. As it comes to the matter in the scheme of projections, projections embroider entirely separately, then you can always go back.
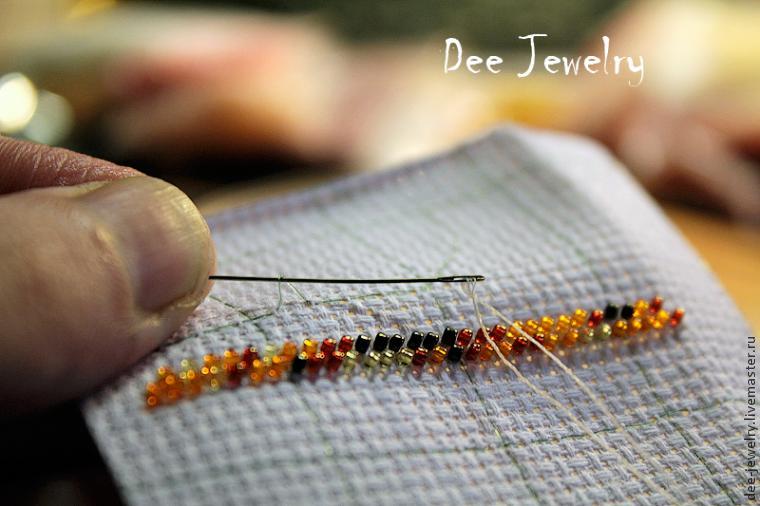
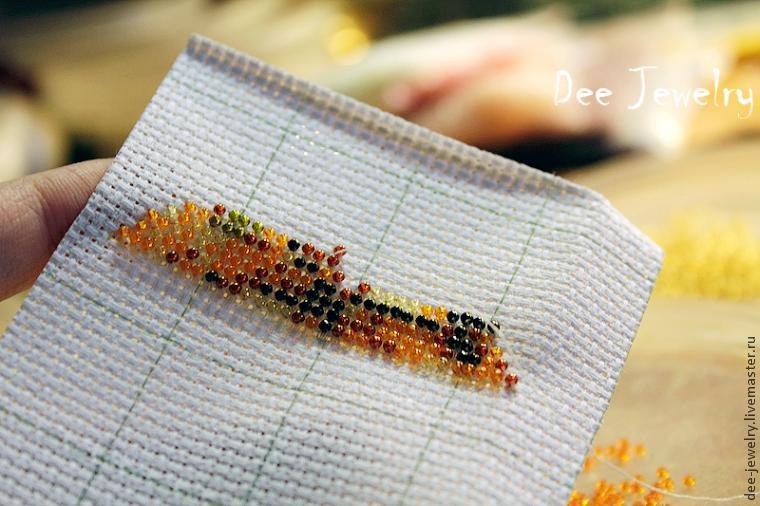 And half of our leaf is ready!
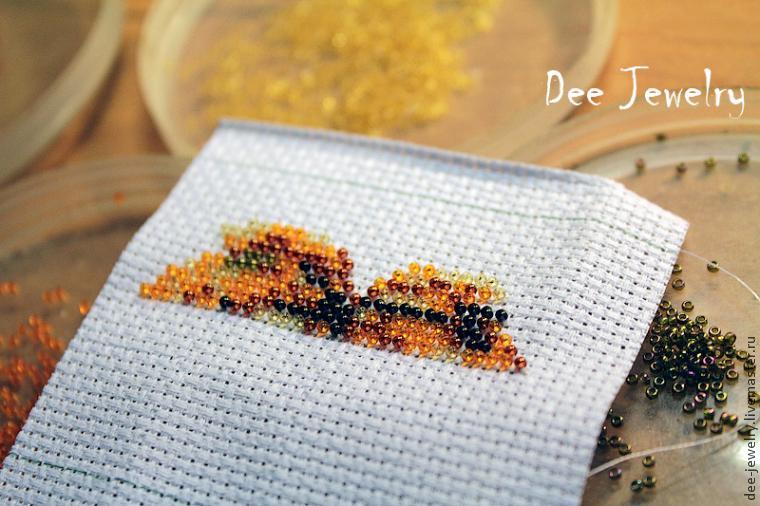 We go back to the middle of the embroidery stitches passing through the canvas cubes. Do not be afraid, these stitches will not be visible.
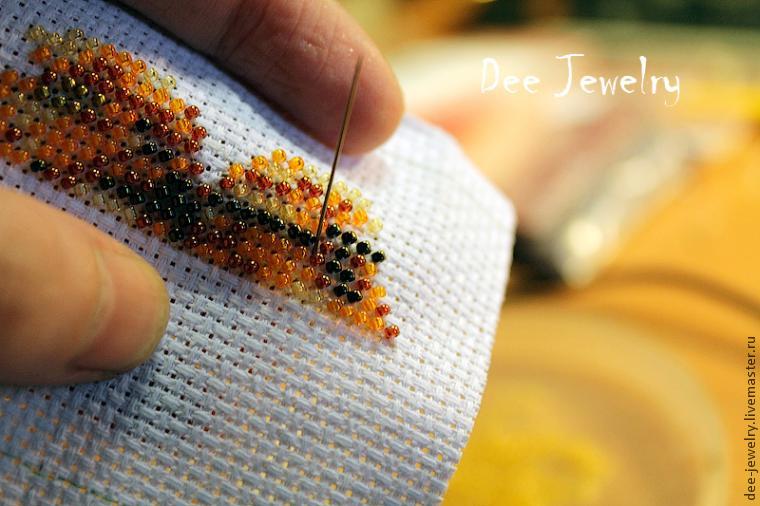
 Scheme respectively overturn, too, we find in it a number from which to start, focus, and continue to embroider leaf.
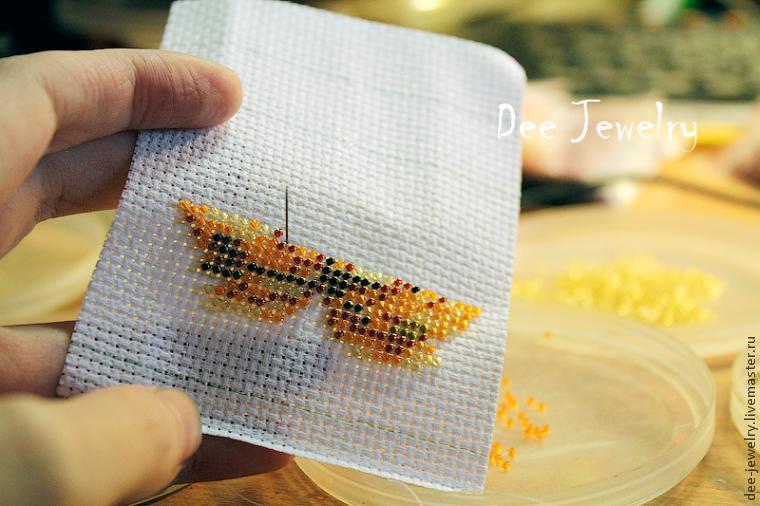 And pretty soon he’s ready!
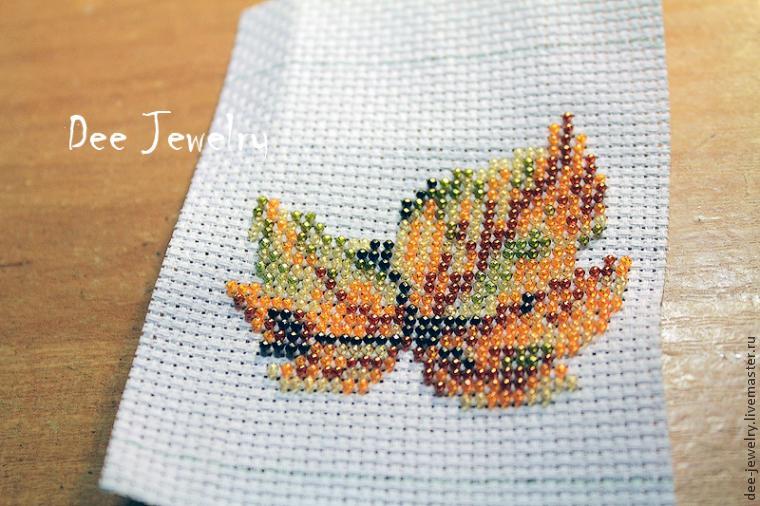 Wrong side:
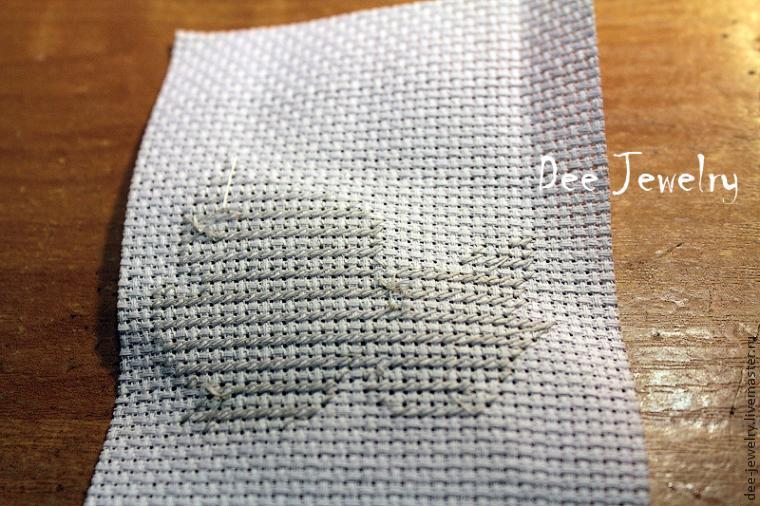 Carefully cut out our leaf, leaving a blank canvas embroidery around two millimeters allowance.
 Coat with glue inside out.
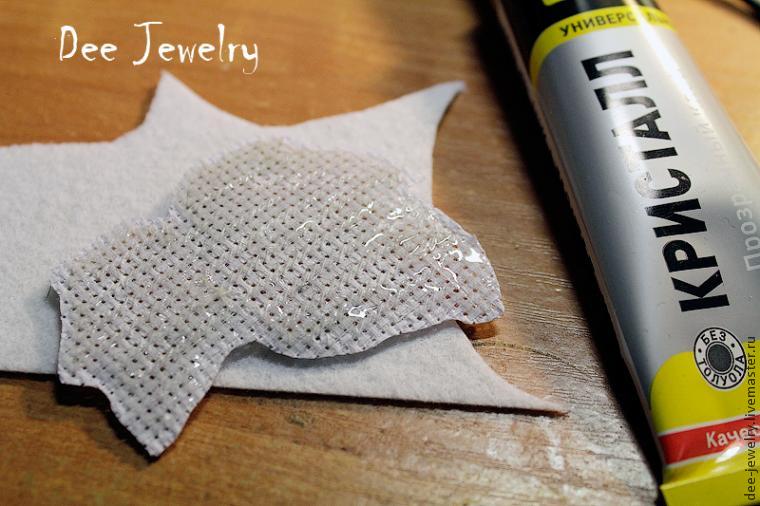 Planting on the felt.
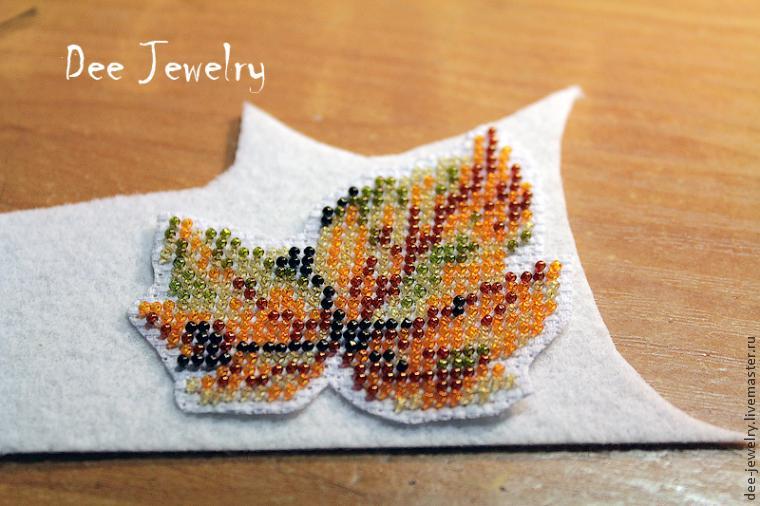
And put under the press minutes to half an hour. Longer possible less – no. As the press is perfect for any weighty book.
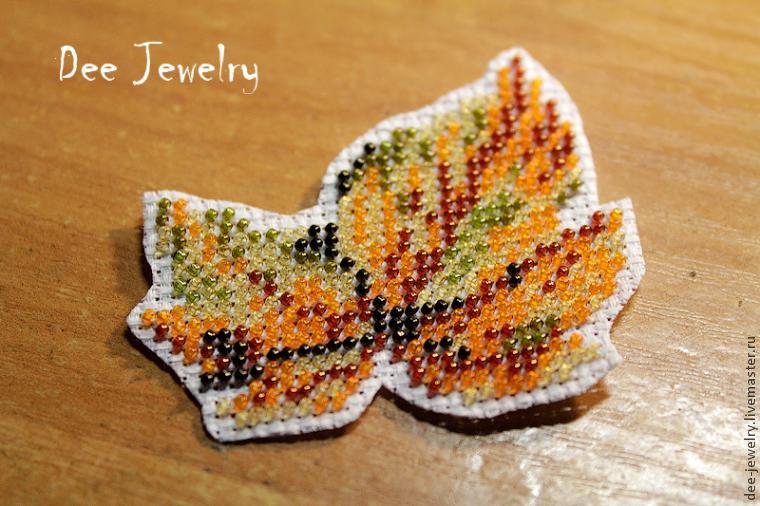
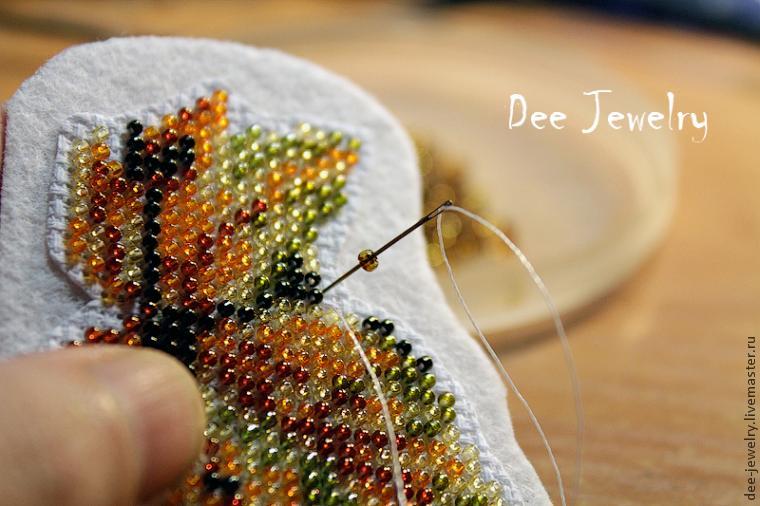
Half an hour passed, we take out our embroidery, cut off the excess felt (I recommend a slightly rounded strip all sharp corners, the lower thread will cling). And we start sheathing, for this, we need the shade of size 11 beads Y301 (brown). Withdraw the needle from the wrong side on the front side, leaving a tail of thread on the wrong side, and sew the first bead.
 And back to the thread inside out and fasten it there a triple junction.
 We withdraw the needle behind the first hemmed beads, pass through the bead.
 Hemming two more beads, trying to sew them as closely as possible to the extreme rows of our embroidery.
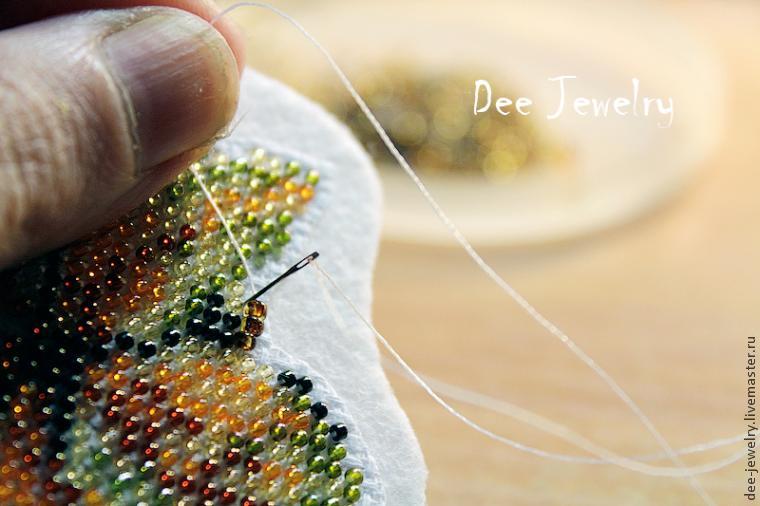 And back to the wrong side on the front side of one bead back.
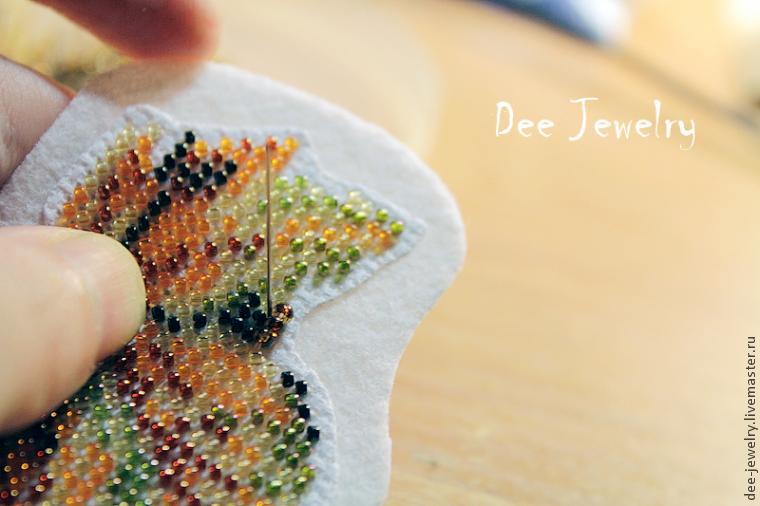 We pass through the first bead.
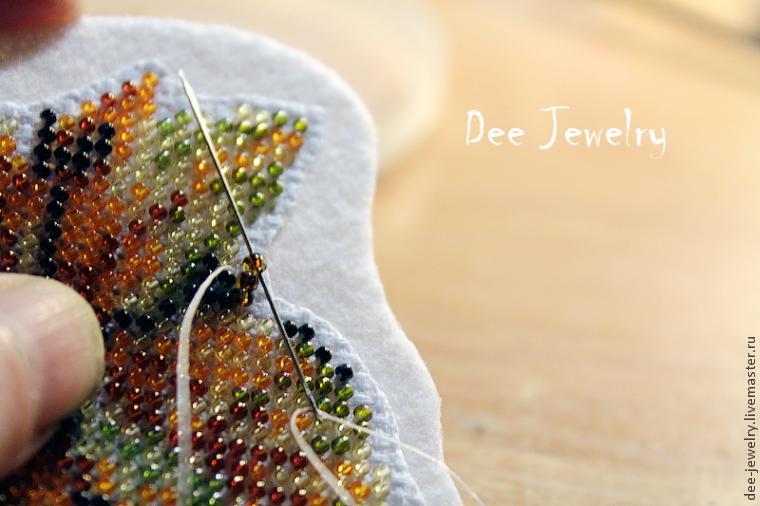
And recruit two more, and sew.
And so – two sewn, one back, passed through it, two more scored, sewn, one-back, passed through it … and to the end, pressing this number as close as possible to the embroidered pattern.
 Row over, that’s what we’ve got
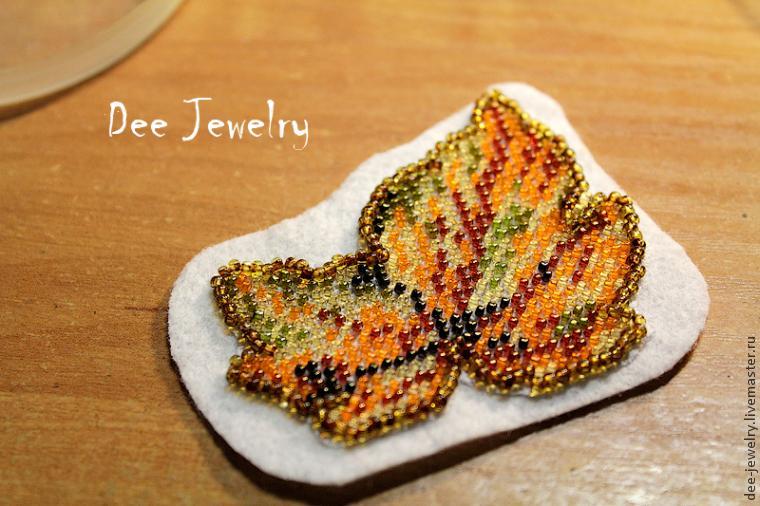 Carefully cut off the excess felt, then encircle our leaflet on thick paper.
 Cut a piece of paper and drawn once clipped him on the edge of a millimeter or two. And while putting off to the side.
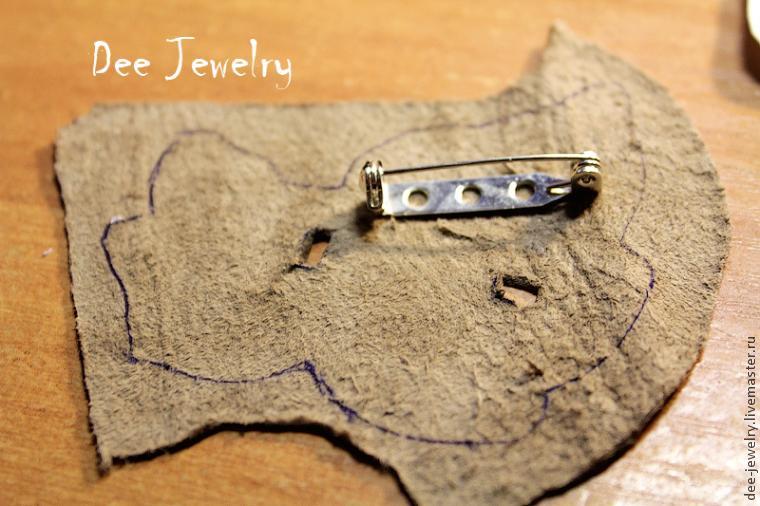
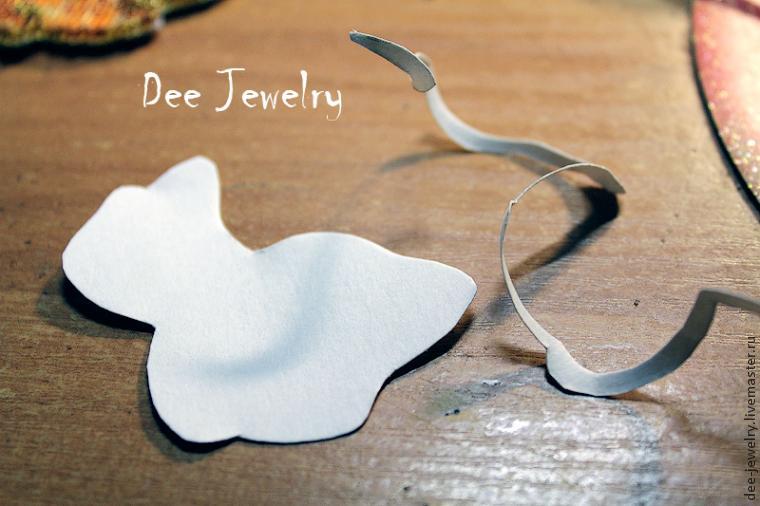 And prepares the skin for the foundation for brooches – mark up the position from which will go towards the pin, cut holes.
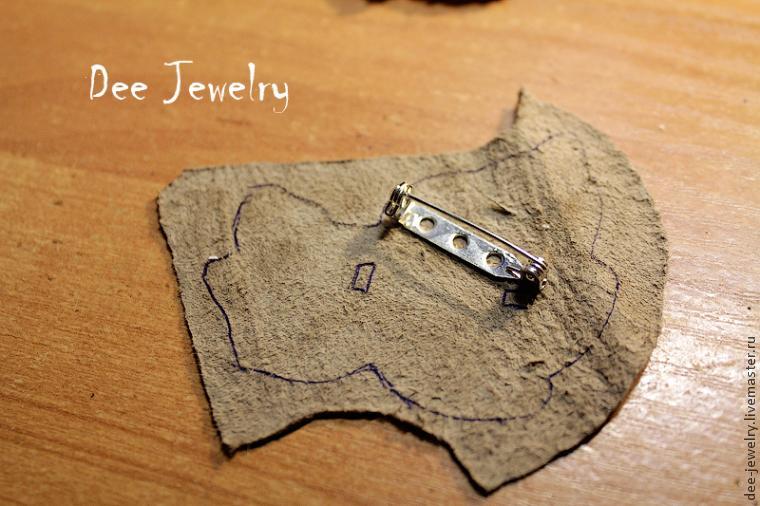
And, too, has been postponed all the way.
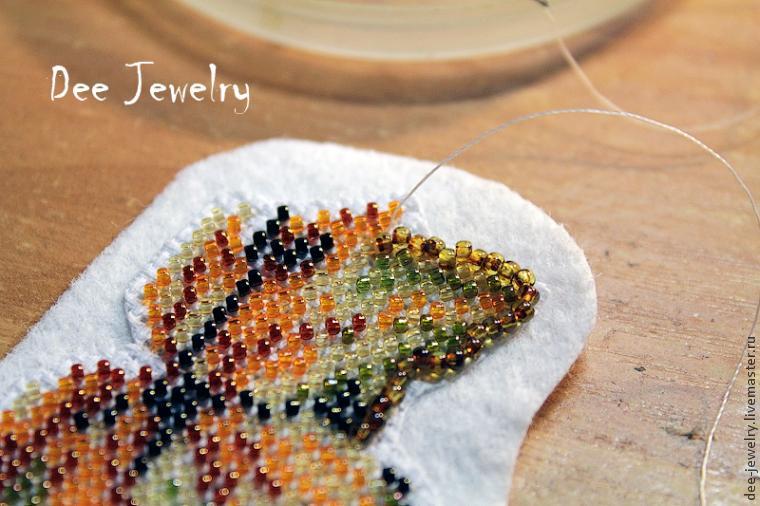
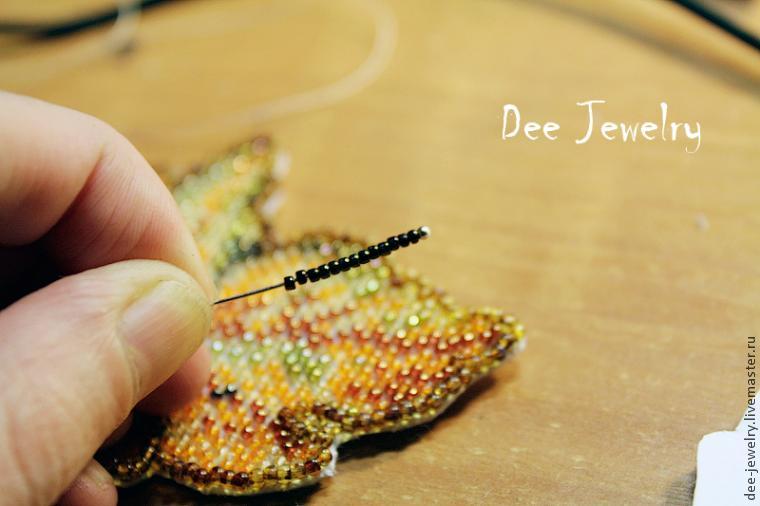
Take pin recruited him 13 beads size 15 color 83.
And, too, it has been postponed to the side, but close 🙂
Paper gasket coat with glue. Pins is located in the center of the leaf from the inside, pin, we will represent the leg, hold it with your fingers. The pin must be between the felt and the paper gasket.
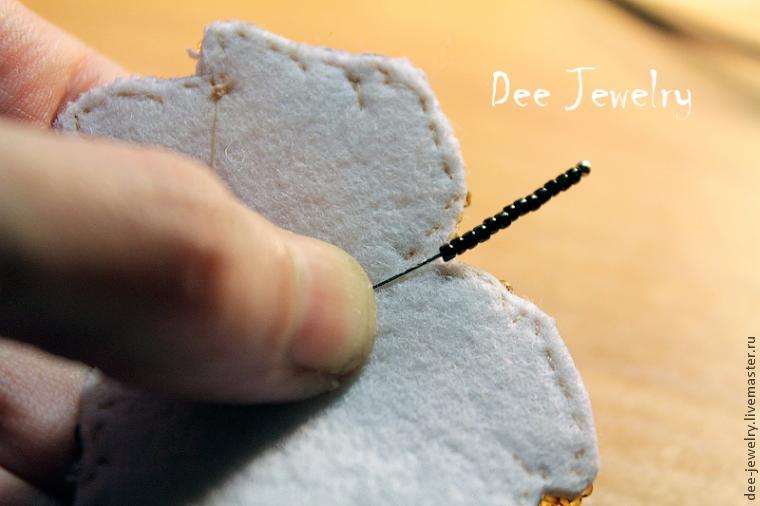 And pasted paper gasket.
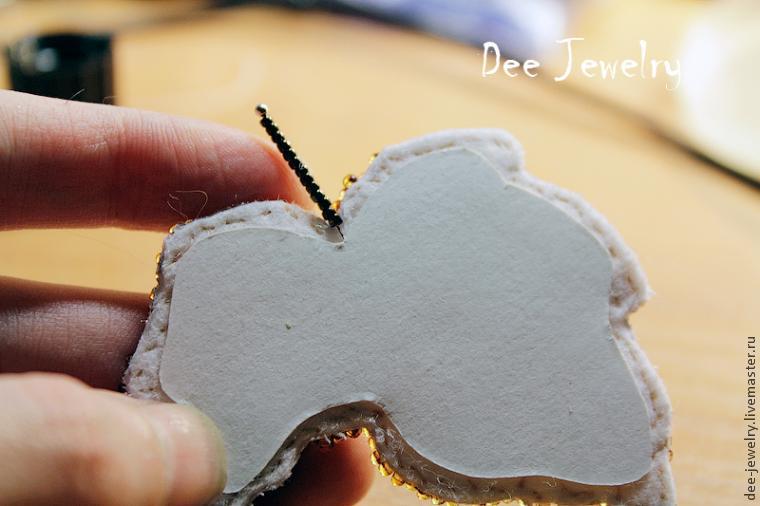 Then stitched basis for brooches, we coat the entire underside of the embroidery glue and put it on the skin.
 After an hour and a half, you can cut the excess skin and hem Termination number. Termination For a number we will take the beads 162B (yellow) color size 11 And our autumn brooch ready!
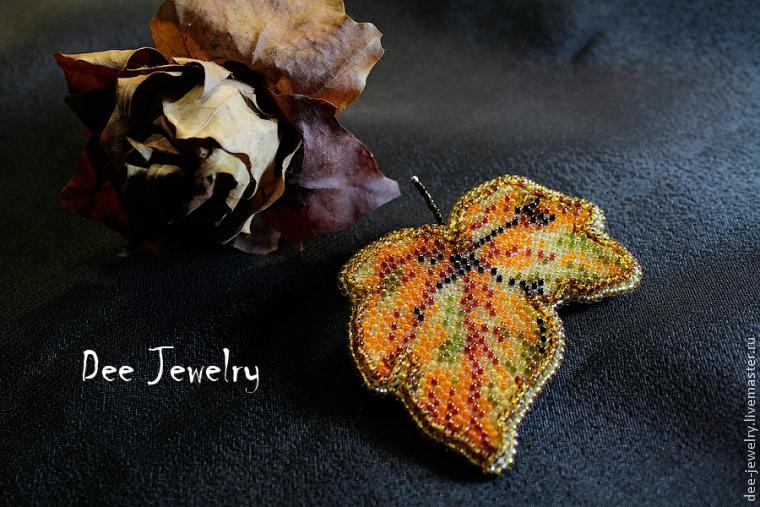 On the basis of this knowledge of the MC, you can embroider on canvas favors of any kind and size. They can be used as freely distributed schemes items for cross stitch, and make your own.
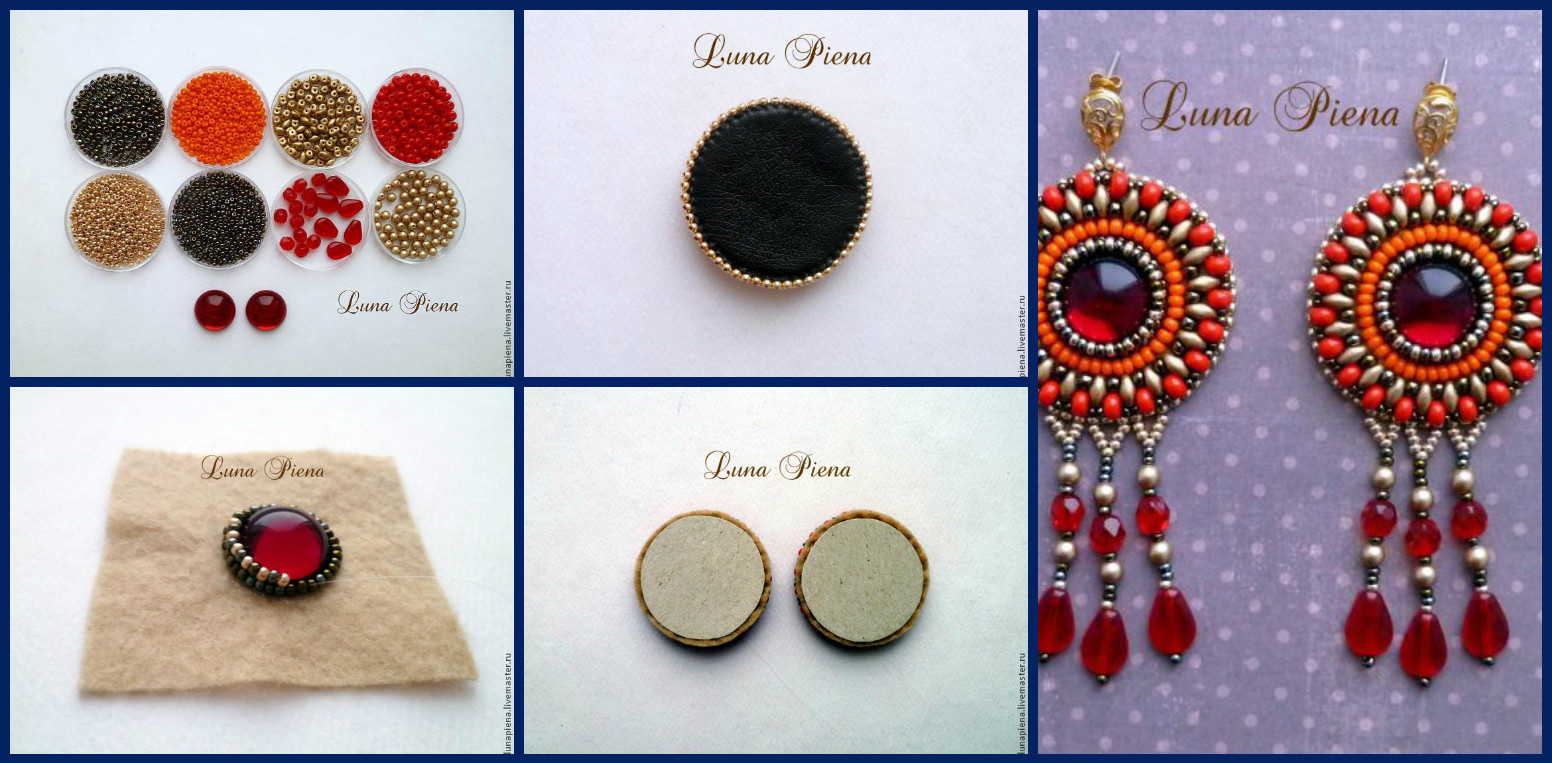
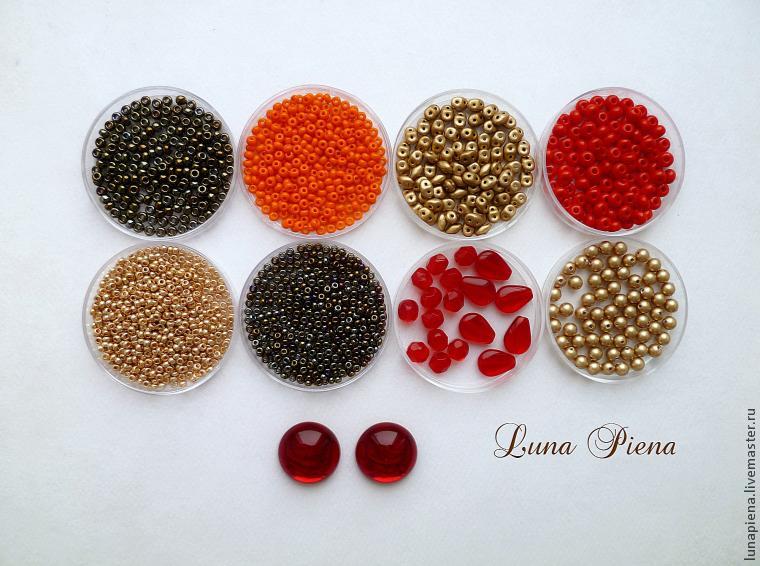
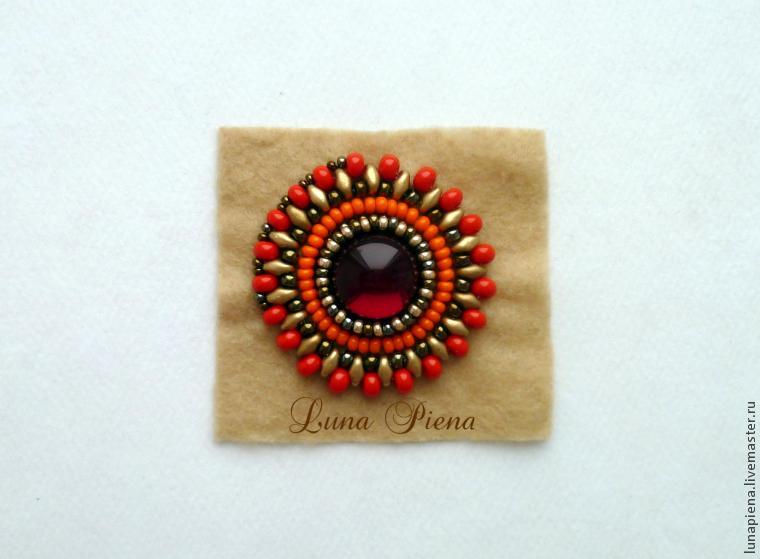
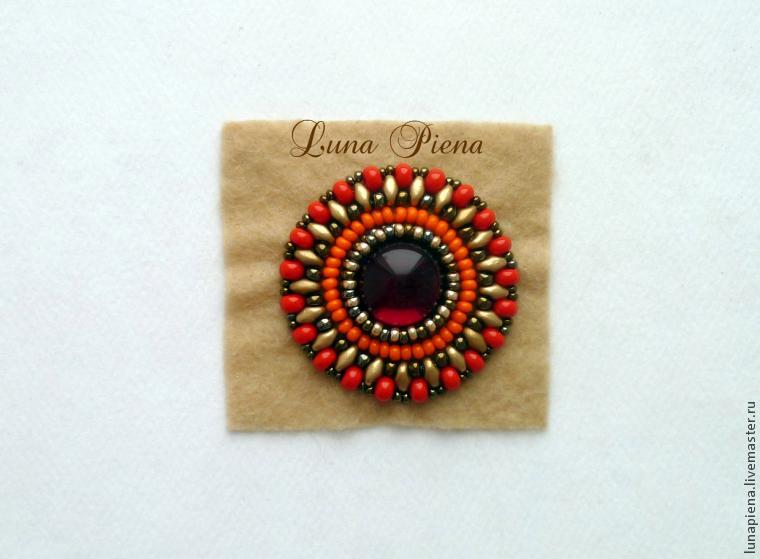
I present to you a simple, creating bright oriental earrings
Required Material:
 Getting Started. Glue felt on the glass (I use superglue for glass) and is sheathed in the technique of tapestry weaving. I will not dwell on the description of this technique, The first row of sheathed with brown beads №10
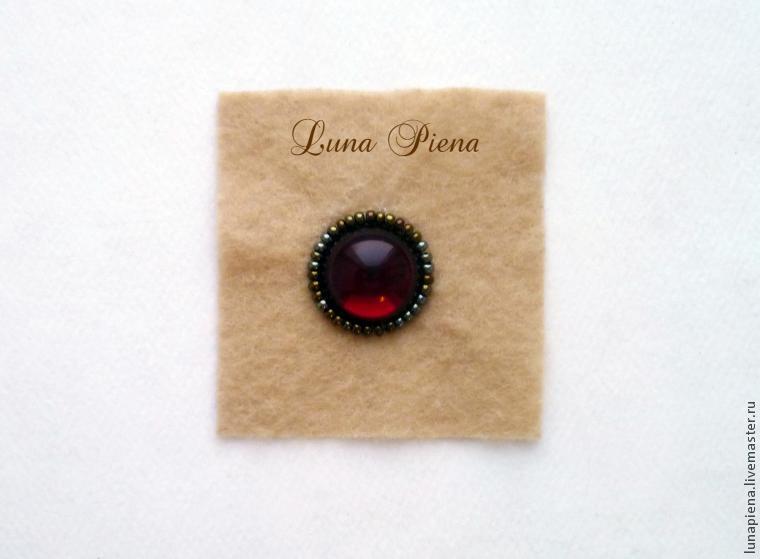 Further, alternating, sew beads №10 gold and brown.
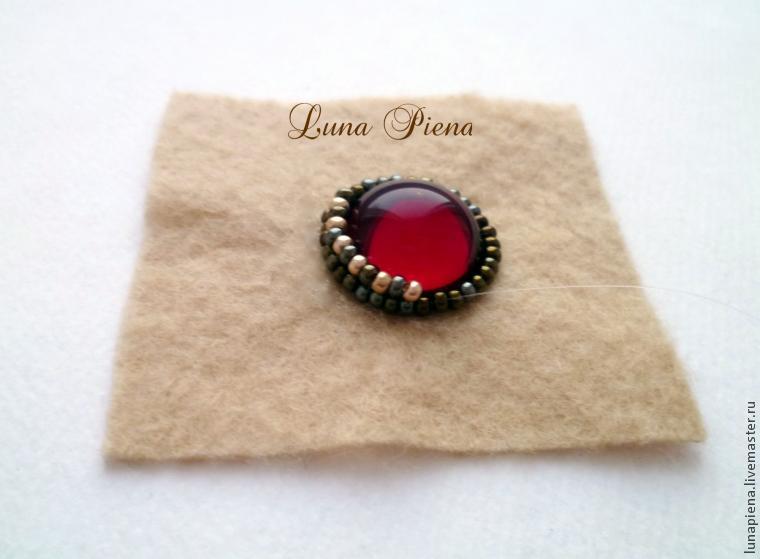
 Here is the steering cabochon:
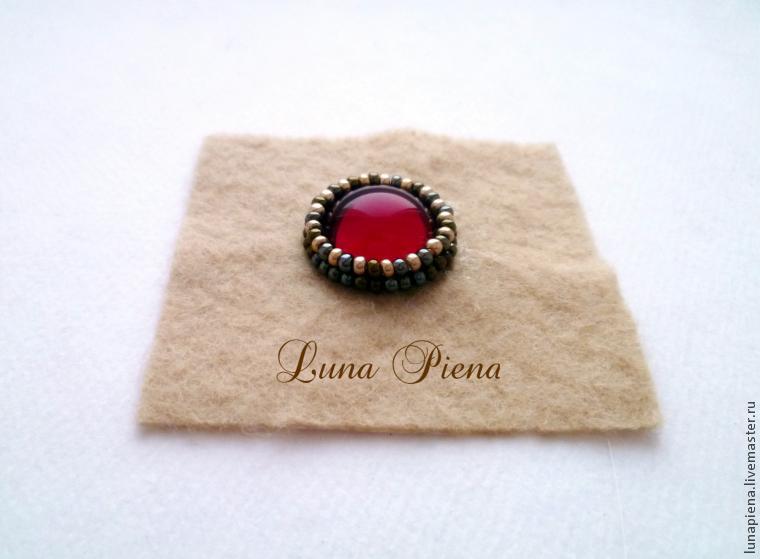 Around cabochon beads sew a number of №9 orange. I advise you to sew on a bead, so it will be smoother
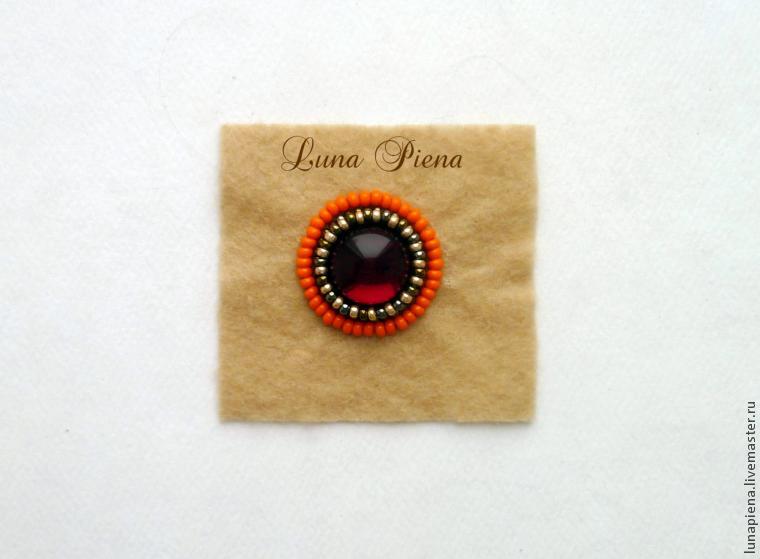 We proceed to the beads Superduo. Sew them, alternating with brown beads №8.
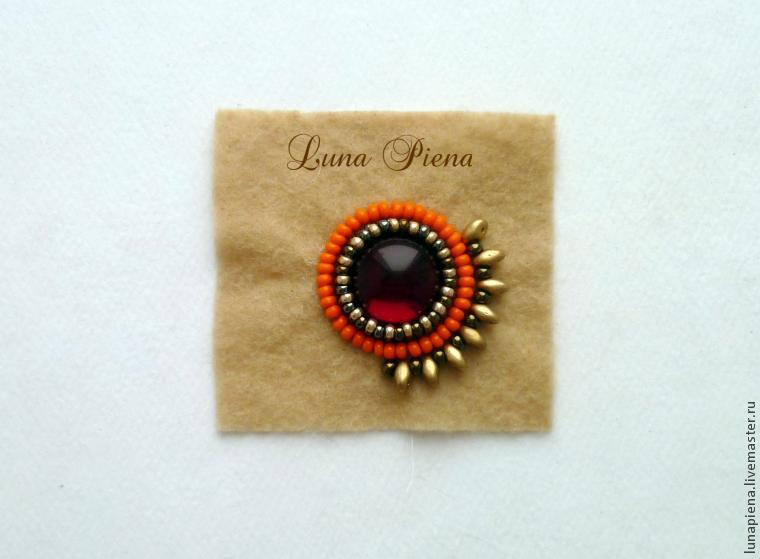
 Above brown beads sew red beads №6, passing through the second hole beads Superduo.
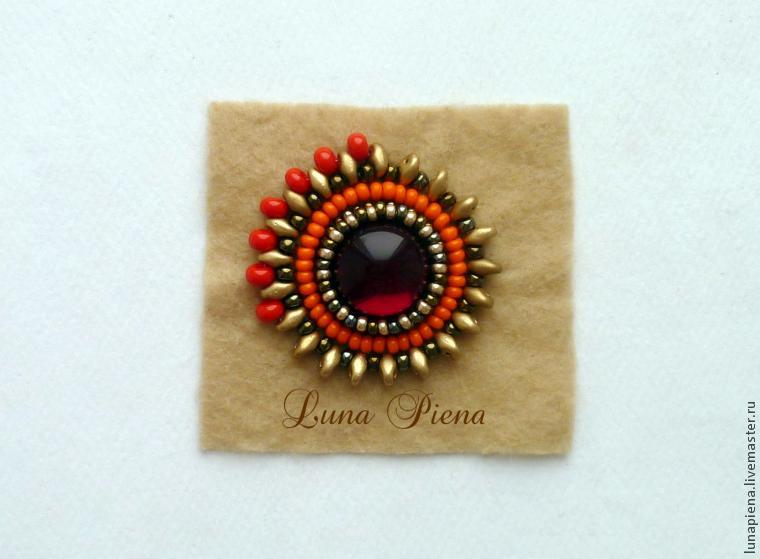 Over Superduo sew beads on the two brown beads №11, passing the needle through the large red beads.
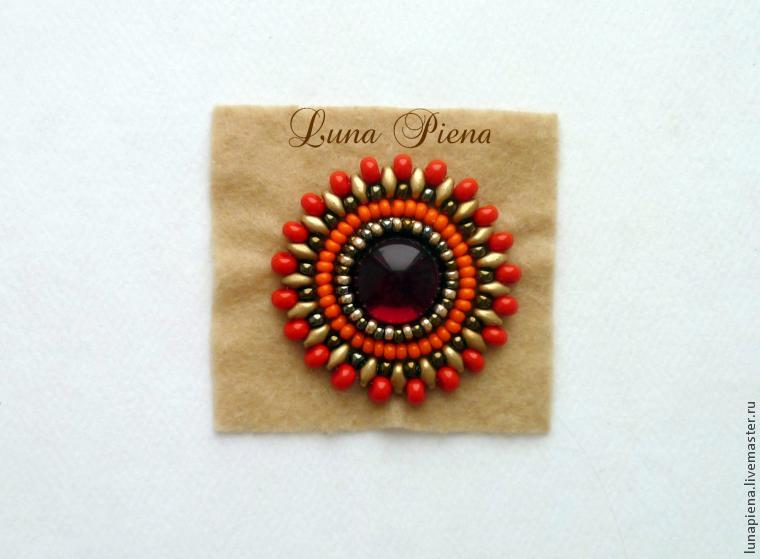
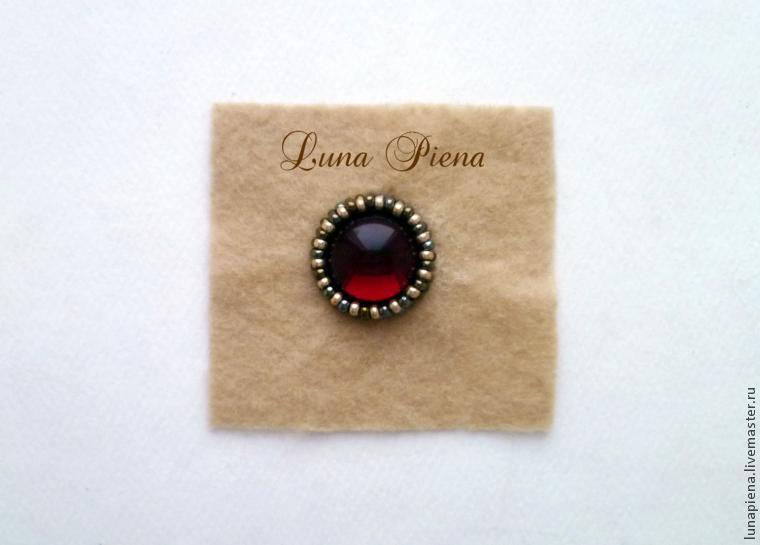
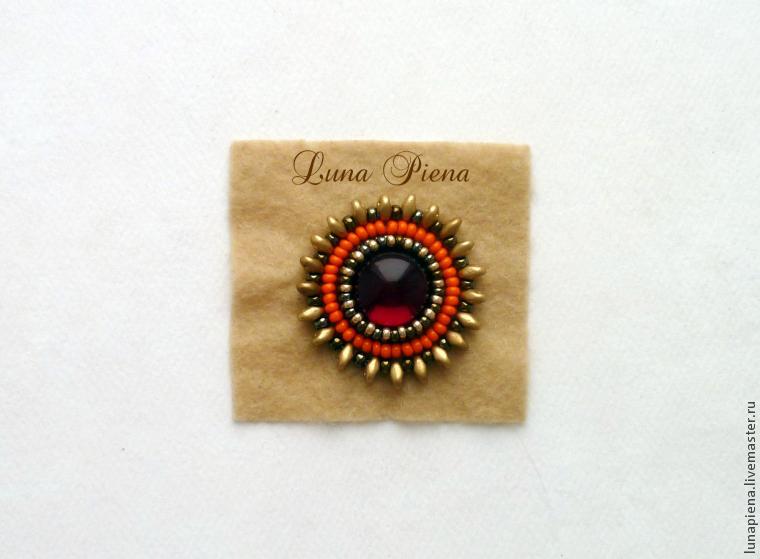
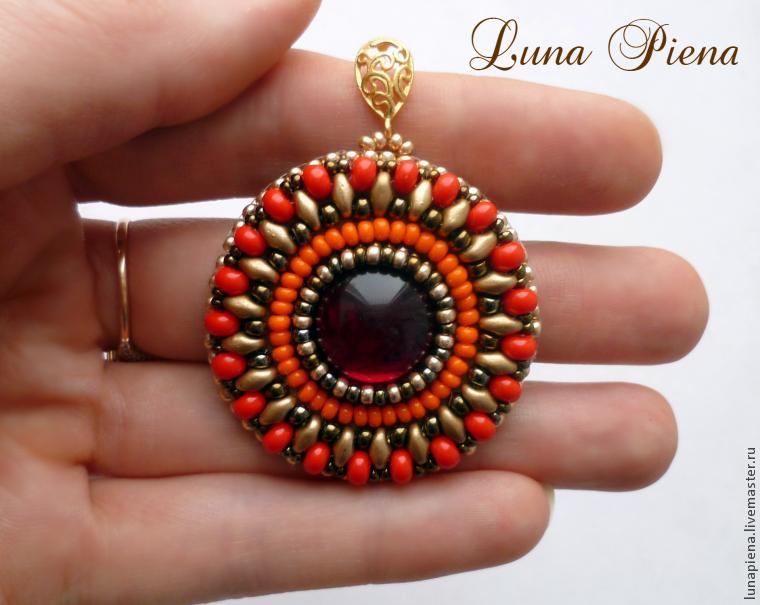
 Cut embroidered items and proceed to the wrong side. I stick to seal cardboard and then glued to the skin.
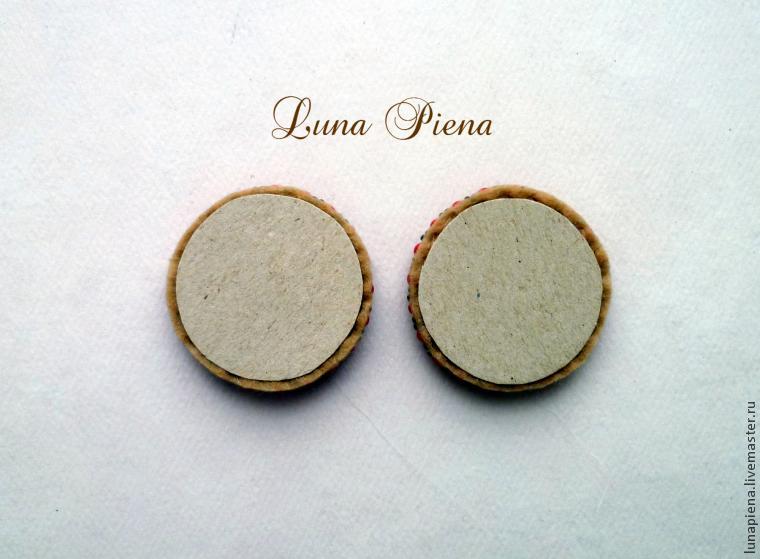 When the product is dry, carefully cut out and proceed to the processing of the edge beads №10 gold. Pass the needle through the beads strung edge products and display the needle from the front.
 Tightens and pass the needle under the beads from the bottom-up, so the entire edge sewn products.
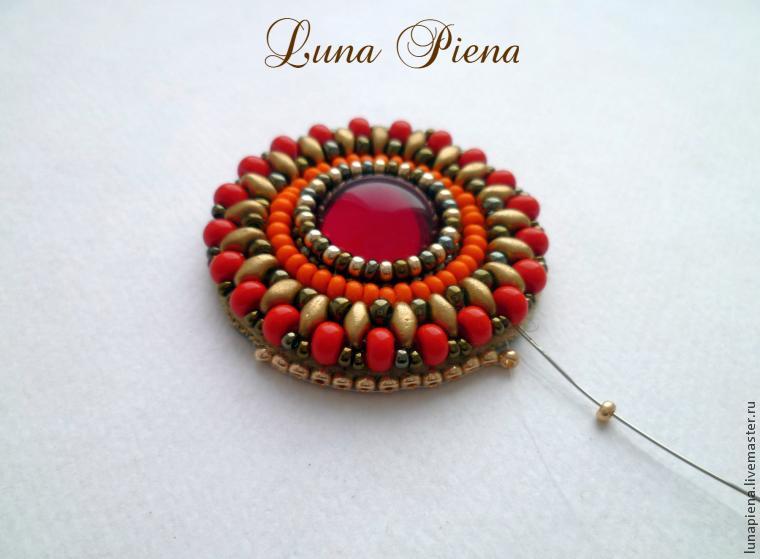
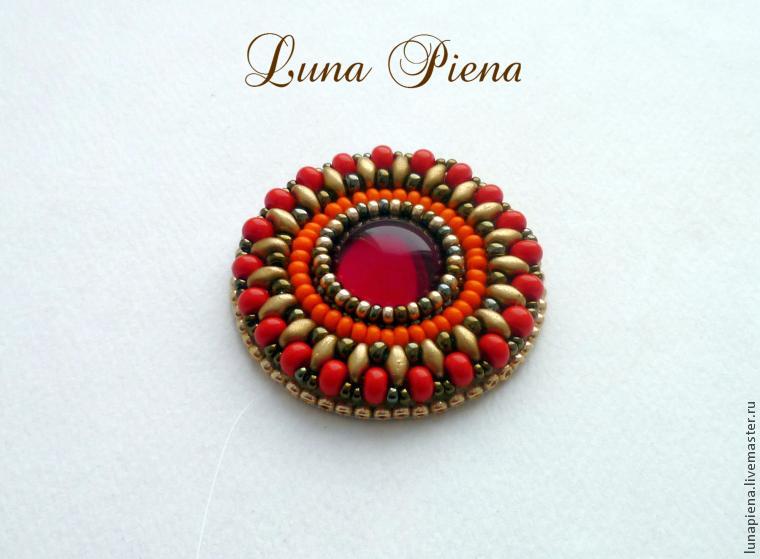 It looks like the reverse side:
 Fasten fastener. Draw the thread through the bead of the treated region. We collect two gold beads, fastener and again two beads. We form a loop and fasten.
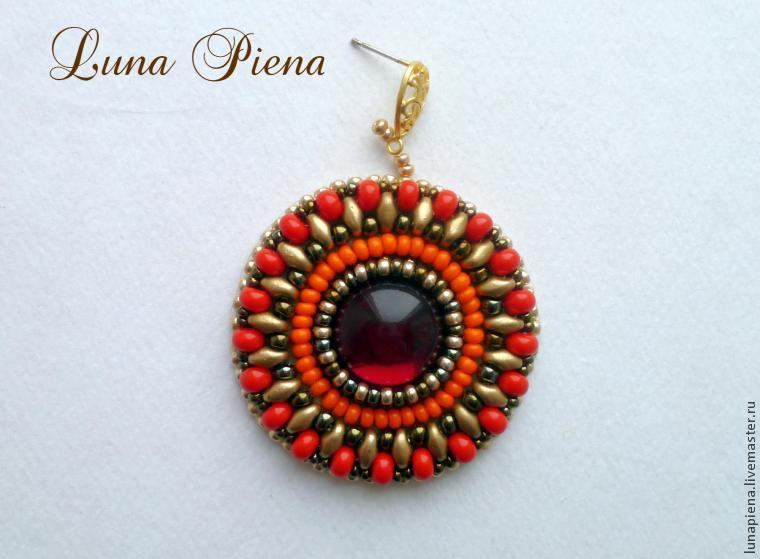
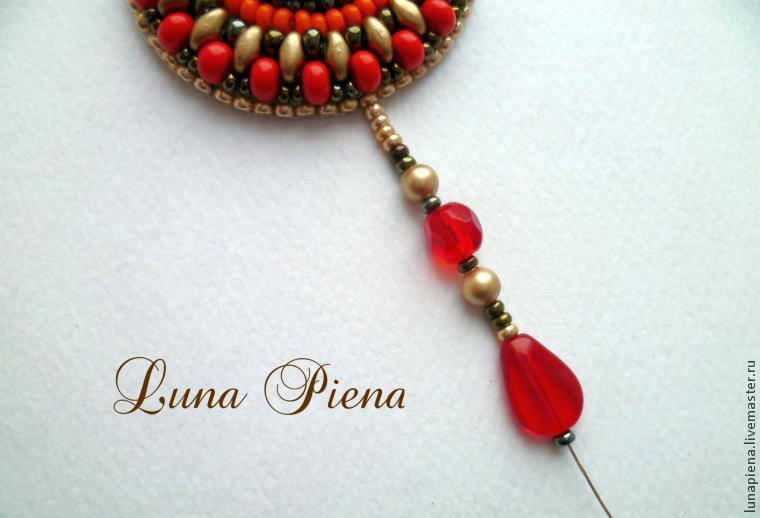 The second suspension will be slightly longer. Third legalize same way as the first.
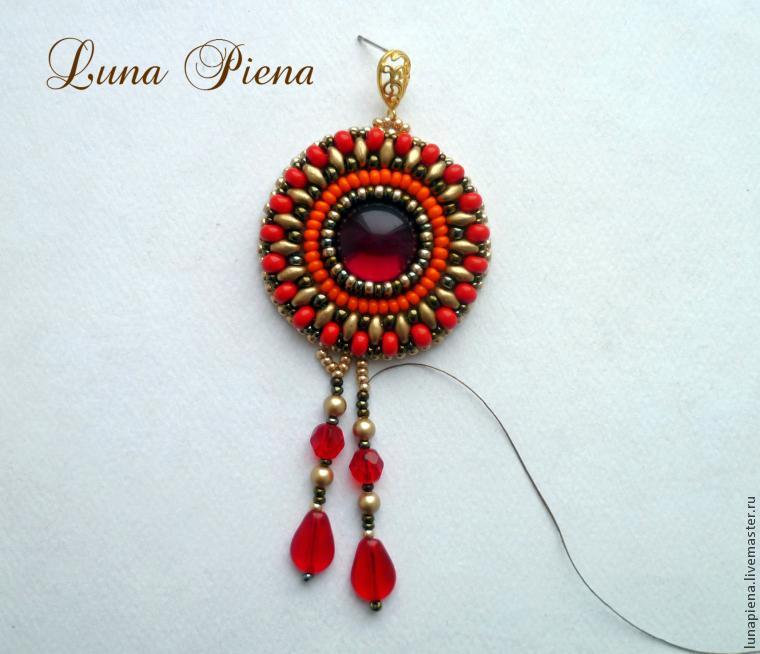 Finished with pendants, fasten thread. Our earrings are ready!
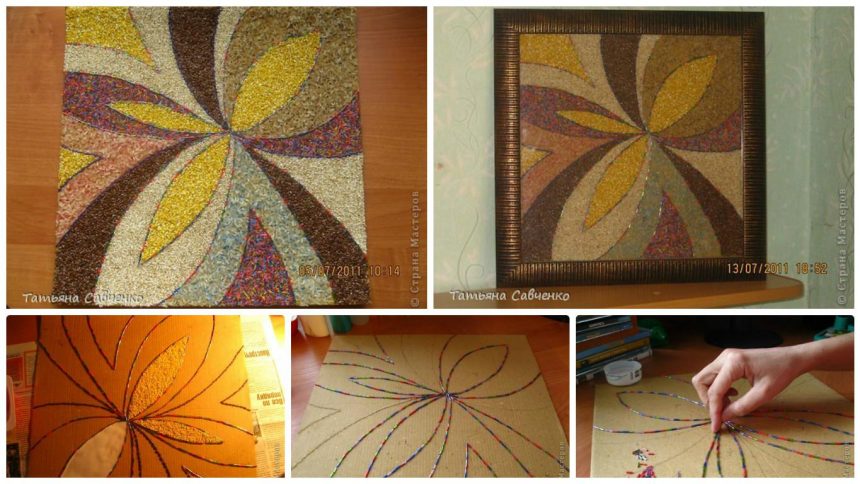
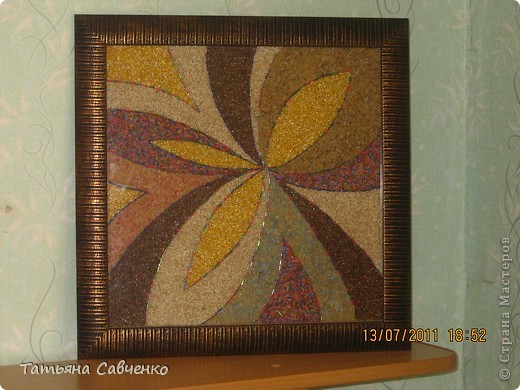
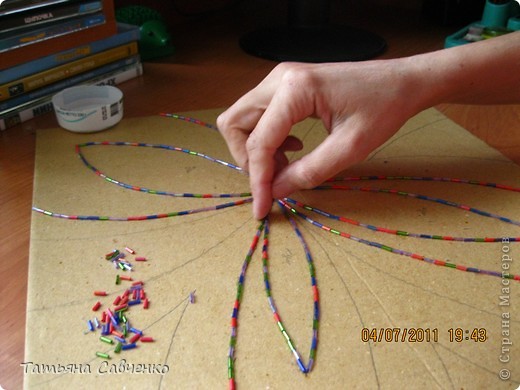
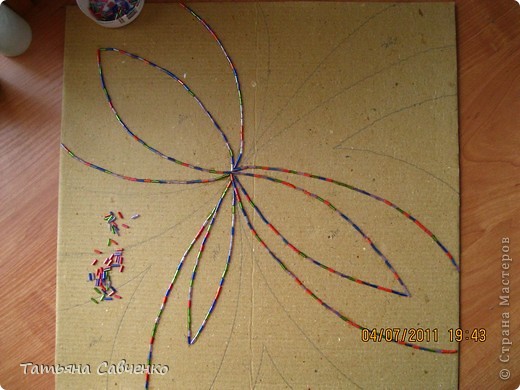

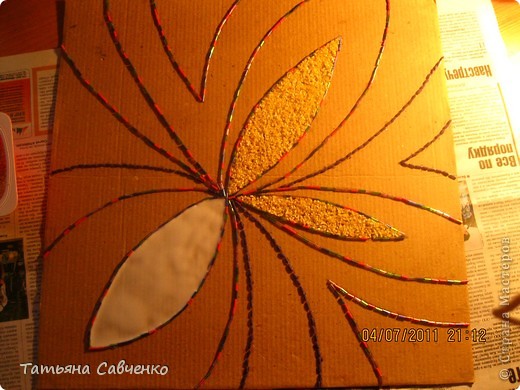
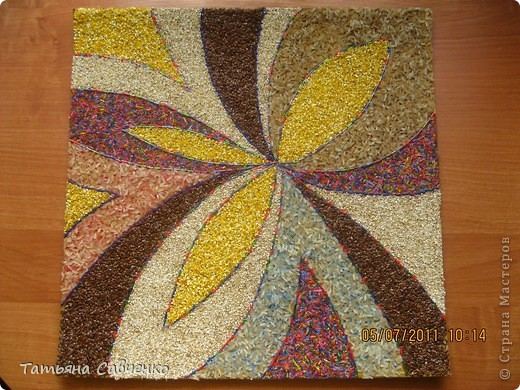
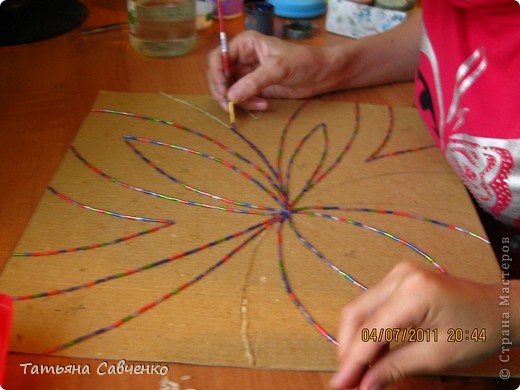 The space between the contour smeared PVA glue and then bombarded the desired grains. Translucent rice on top of more sprinkled colored sand, which remained from the picture-bought “semi-finished”. Thus obtaining a light blue, red and brown.