Embroider autumn) Bead work on an outline – autumn leaves.
Today we are going to learn to embroider beads on canvas by the example of brooch “Autumn, fall …”. Embroidery on canvas – it is quite simple and fast, and fun! 🙂
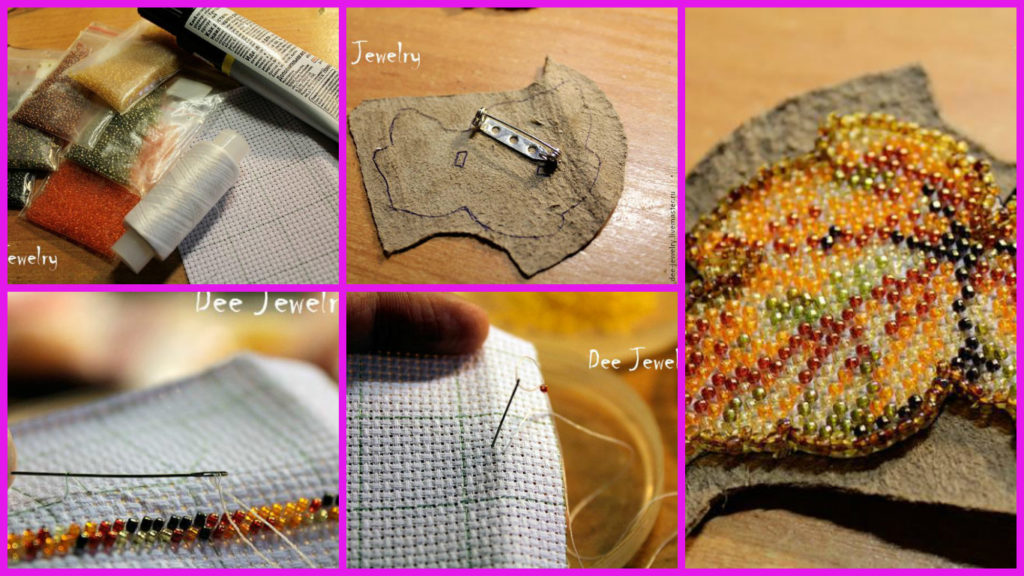
And for this we need:
1. Japanese Toho beads size 15 shades of 10B, 83, 459, 457, 329 and 2. If you use different beads, then pick up the shades themselves, you need to be colored dark brown, yellow, orange, red, green tea , yellow-brown.
2. Japanese Toho beads size 11 shades Y301 and 162B (brown and yellow), you will need it for a number of skin and the dead end of the series.
3. Canvas, I Aida 14, but it is better to take smaller, 12th or 18th. Modern canvas is sufficiently rigid so that the hoop will not be needed, only an outline.
4. A piece of white felt, piece of thick paper and a piece of genuine leather
5. A pin and brooches basis for the size of 3 cm.
6. Scissors, thread (I always lavsanovaja), glue chip time.
Remove all unnecessary and only embroidered leaf.
Canvas I take the fishing line once lined into squares, it’s easier to navigate. We need a piece of size 3,5h4 square. Canvas size bigger scheme necessary because at the end of the finished embroidery will cut the size of a millimeter to more than 2 beaded pattern.
And begin. Mark up the scheme in a convenient location, close to the middle. I mark up on her screen with the movie player that listens during operation.
Remember this point: every first and last bead of each row necessarily stitched two stitches!
And we continue to embroidery, beads should be on the same diagonal of each other, moving on the canvas, following the pattern from right to left and left to right.
Two rows were done, you can now remove razlinovku of fishing line. I had never been to delete at once, it is easier to navigate, with a place to start embroidery.
We pick up the line and pull the needle. Not all at once, in stages.
And put under the press minutes to half an hour. Longer possible less – no. As the press is perfect for any weighty book.
Half an hour passed, we take out our embroidery, cut off the excess felt (I recommend a slightly rounded strip all sharp corners, the lower thread will cling). And we start sheathing, for this, we need the shade of size 11 beads Y301 (brown). Withdraw the needle from the wrong side on the front side, leaving a tail of thread on the wrong side, and sew the first bead.
And recruit two more, and sew.
And so – two sewn, one back, passed through it, two more scored, sewn, one-back, passed through it … and to the end, pressing this number as close as possible to the embroidered pattern.
And, too, has been postponed all the way.
Take pin recruited him 13 beads size 15 color 83.
And, too, it has been postponed to the side, but close 🙂
Paper gasket coat with glue. Pins is located in the center of the leaf from the inside, pin, we will represent the leg, hold it with your fingers. The pin must be between the felt and the paper gasket.

