How to draw beautiful flower shaped rangoli design | Poonam Borkar Rangoli Designs … Easy and beautiful rangoli design.
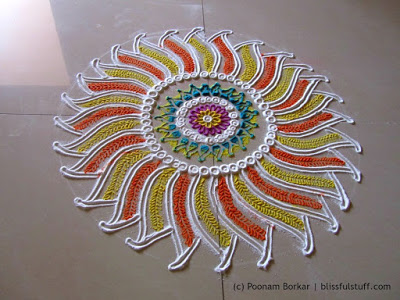
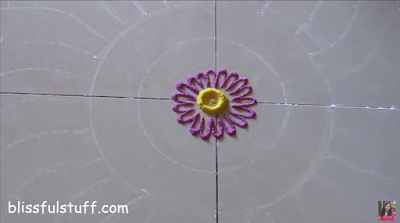
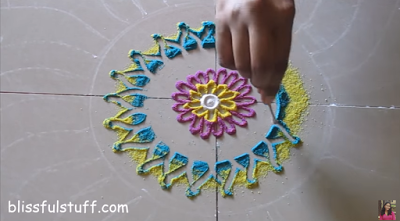
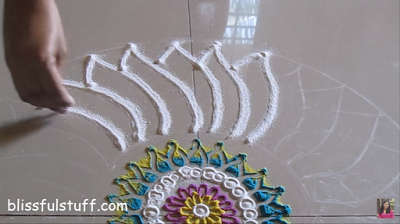


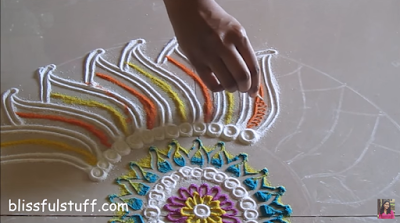
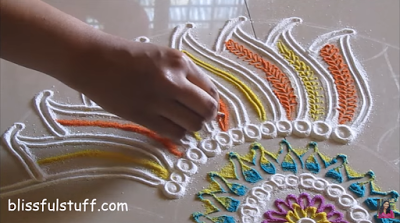
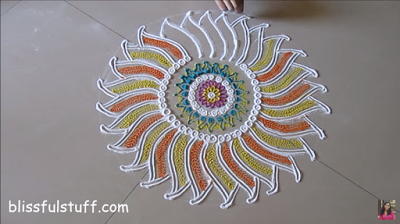
Watch video tutorial:
Get Daily Art and Crafts Ideas & Tutorials…
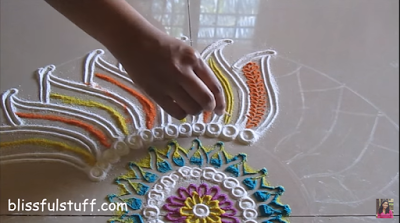
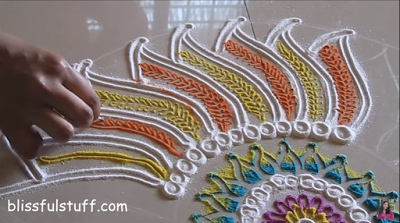
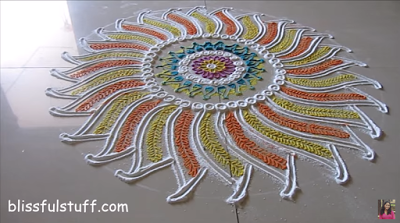
How to draw beautiful flower shaped rangoli design | Poonam Borkar Rangoli Designs … Easy and beautiful rangoli design.
Watch video tutorial:
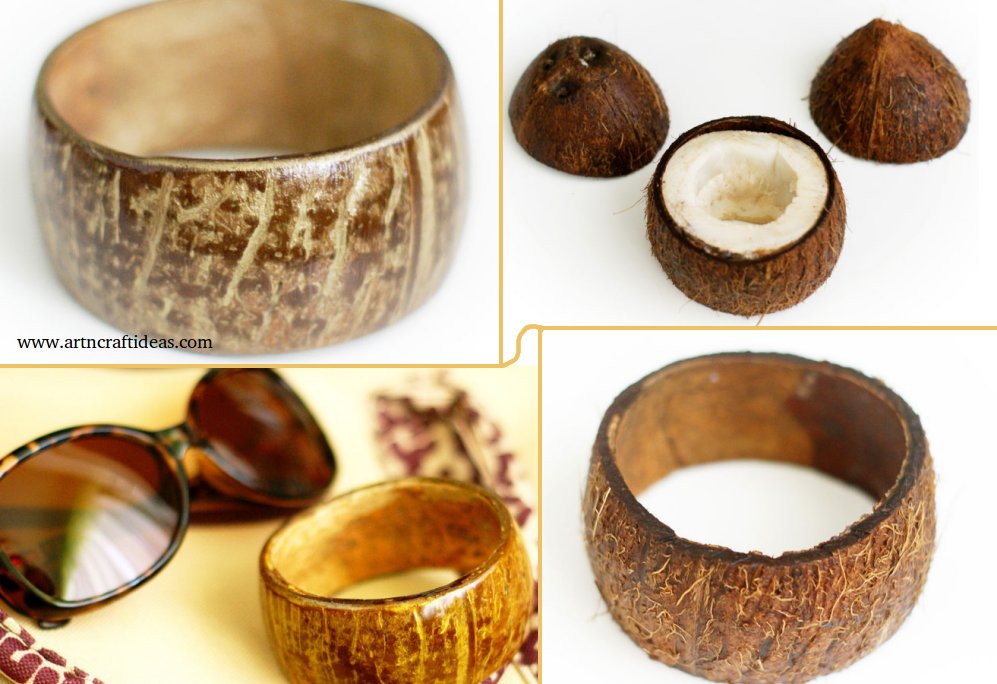
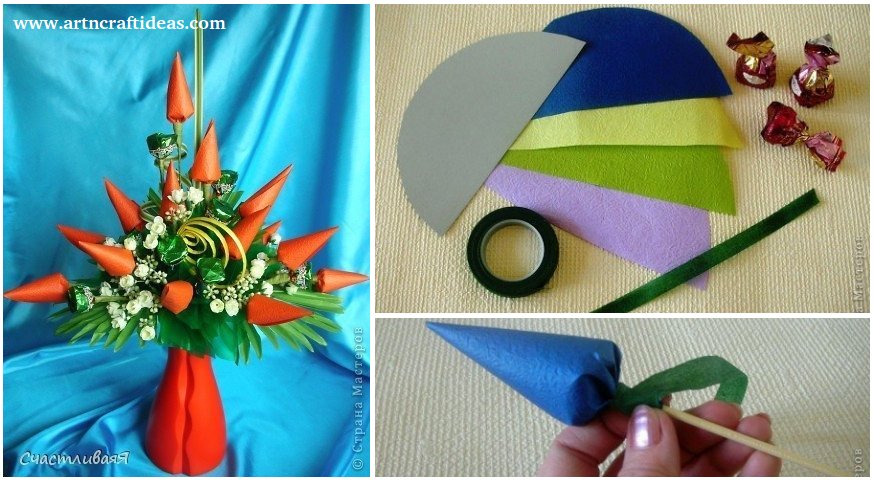
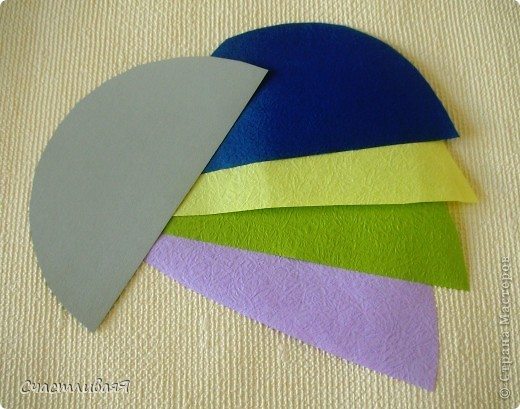
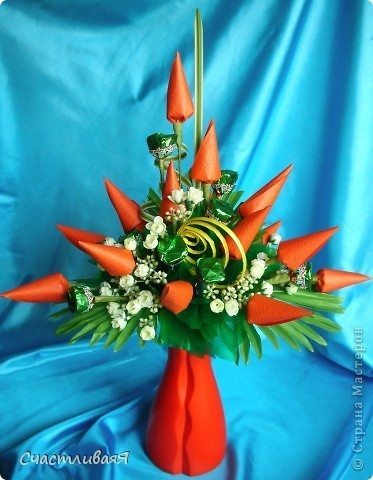
The beautiful arrangements for party and bouquets of sweets are now increasingly using different colors of crepe, and cones, in my view, unfairly bypassed. I want to share with the inhabitants of the countries of the Masters, it is easy to make the cones and spectacular bouquets with them.
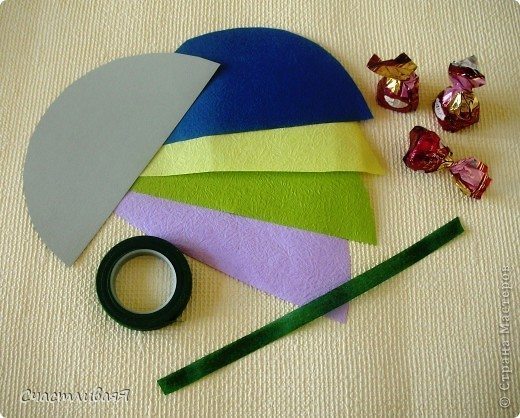
So, we need: scissors and a template from cardboard (less than half of the circle). Its size depends on the size of candy, which will pack.
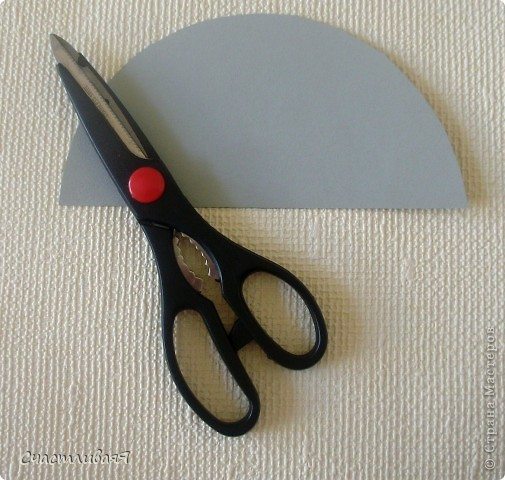
Using the template cut blank, I use any wrapping paper.
Now we need the tape and candy.
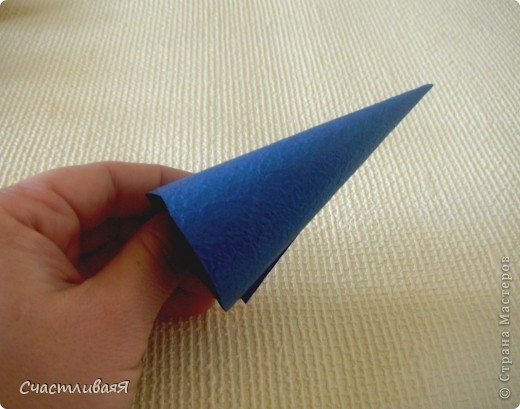
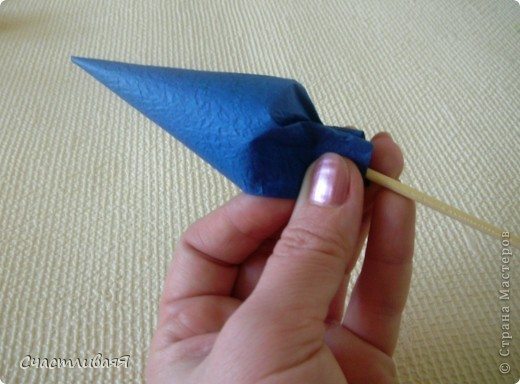
We turn off the work piece into a cone.
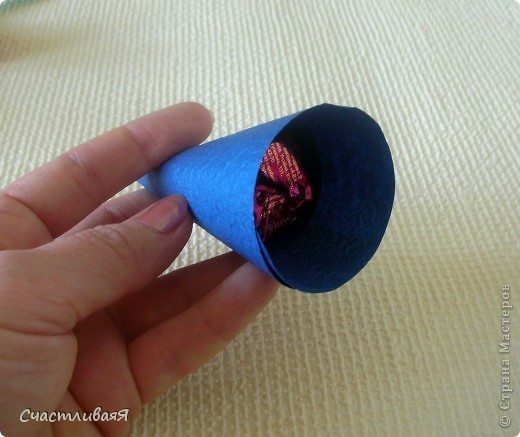
We put candy.
Insert skewers and stifle the paper.
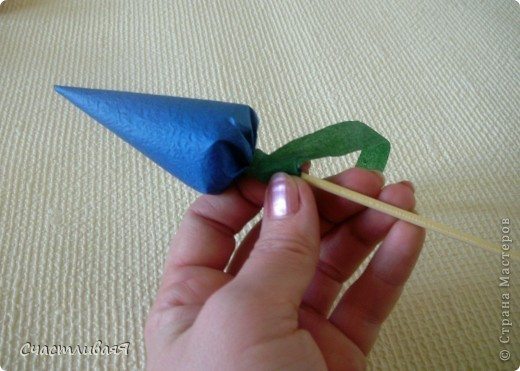
Teypiruem foot cone.
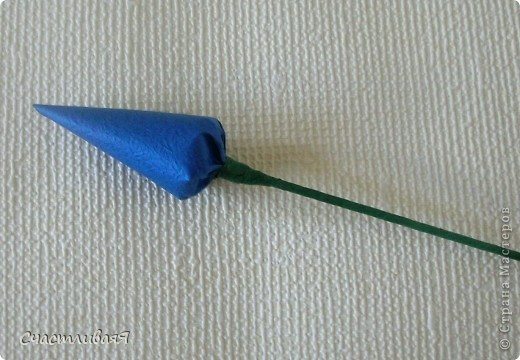
Cone is ready.
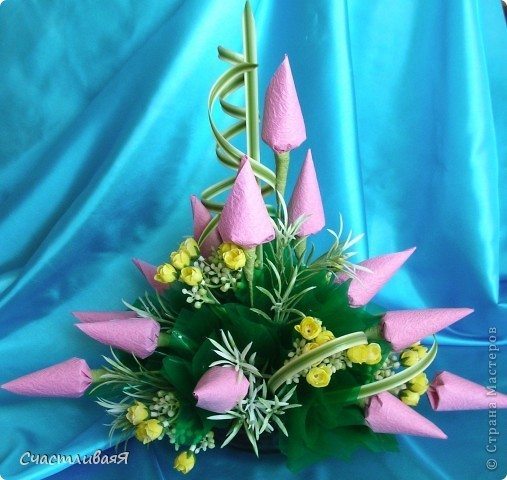
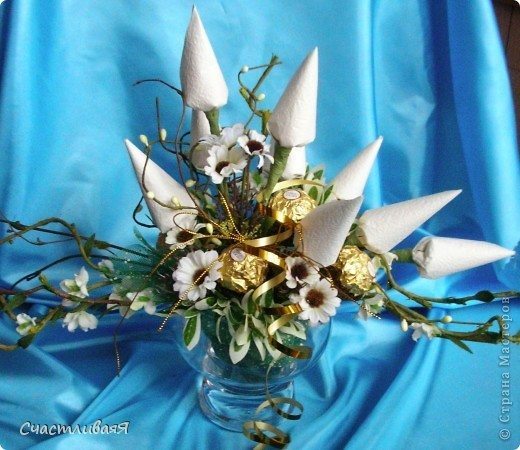
Another composition using cones.
Source: stranamasterov.ru
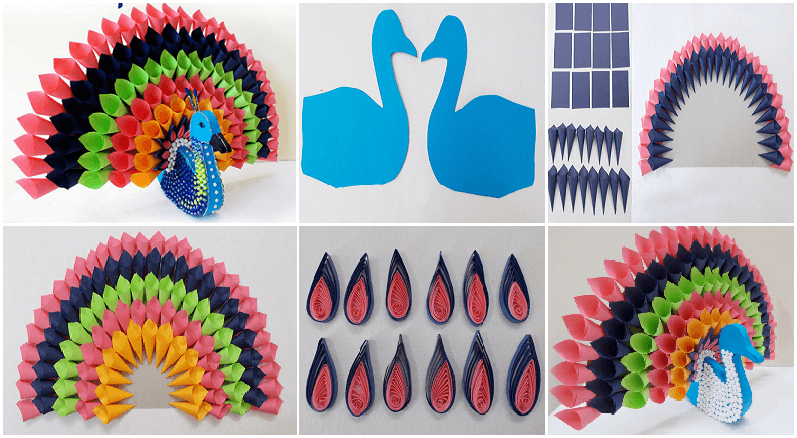
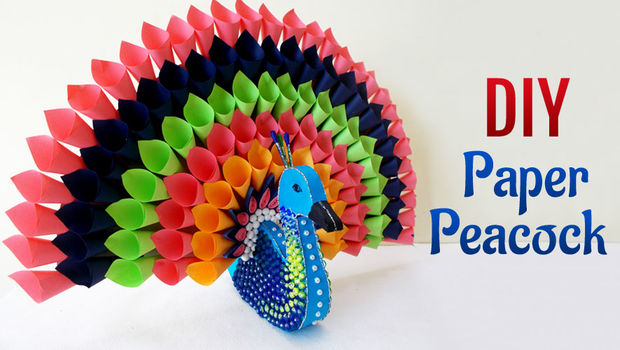
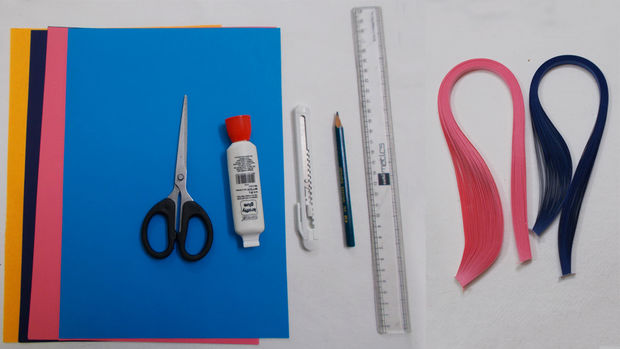
An interesting DIY Paper Craft Project can consist a wide variety of easy Do It Yourself Paper Craft Ideas for you to make at home. This Step by step tutorial with instructions on how to make Multicolored Paper Peacock for Home Decor project is something, that you must watch in order to ensure, you make this wonderful paper craft idea in an easy and systematic way. Peacock design paper craft ideas are always searched for by avid crafters.
Capture the sheer majestic presence of the beautiful peacock by making it as an awesome and easy paper craft idea.Being a fun art and craft activity for kids, you can also make this Multicolored paper peacock for kid’s school projects.Use this amazing Multicolored Paper Peacock as a creative handmade home decoration Idea for your home.
Come! let us learn how to make the pretty Multicolored Paper Peacock.

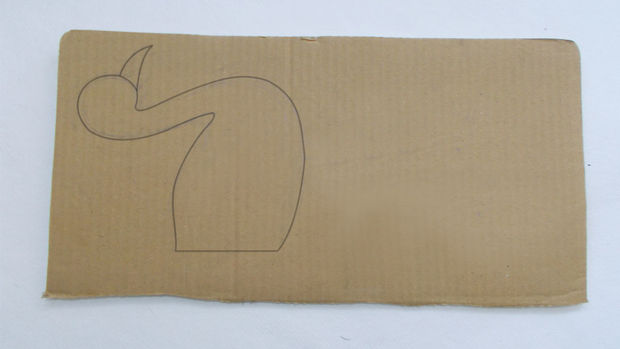
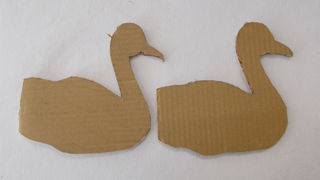
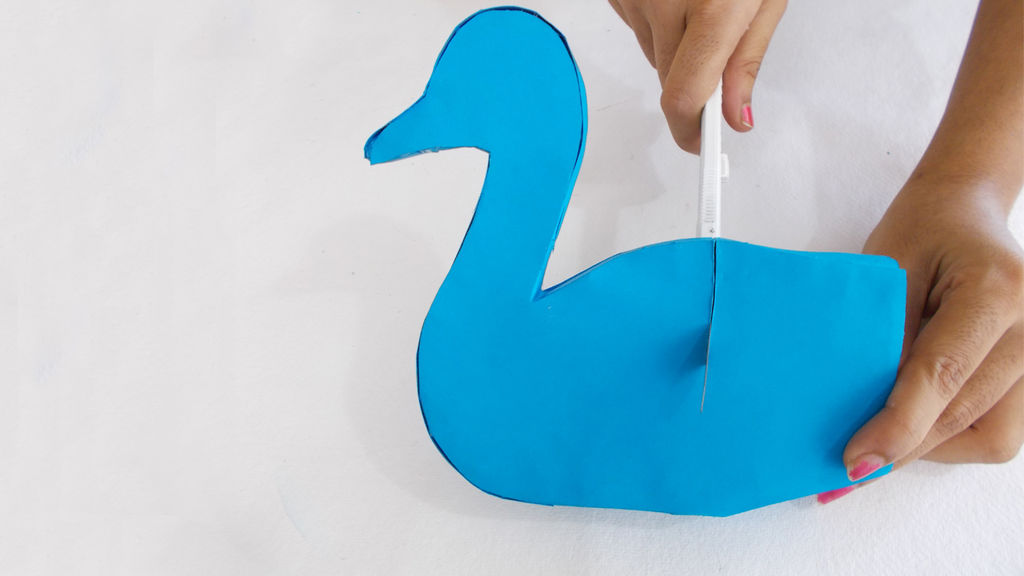
Make the base of the craft by drawing the shape of the body, neck and the beak of the peacock, on a thick cardboard and make two similar cut outs like this.
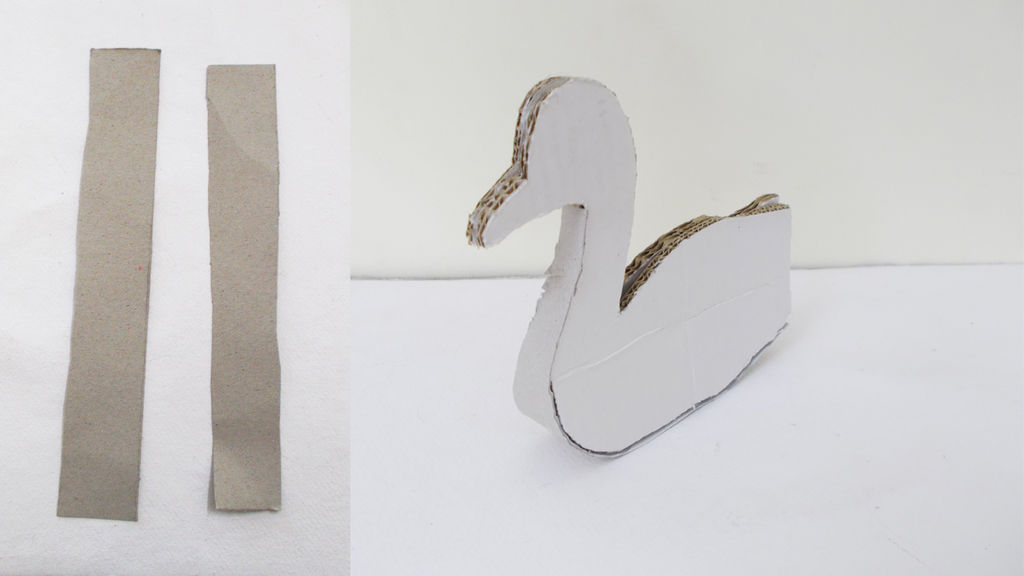
Paste and join the two cardboard cut out together with glue gun.
Cut thin cardboard strips and cover the gap remaining between the two bodies of the Peacock.
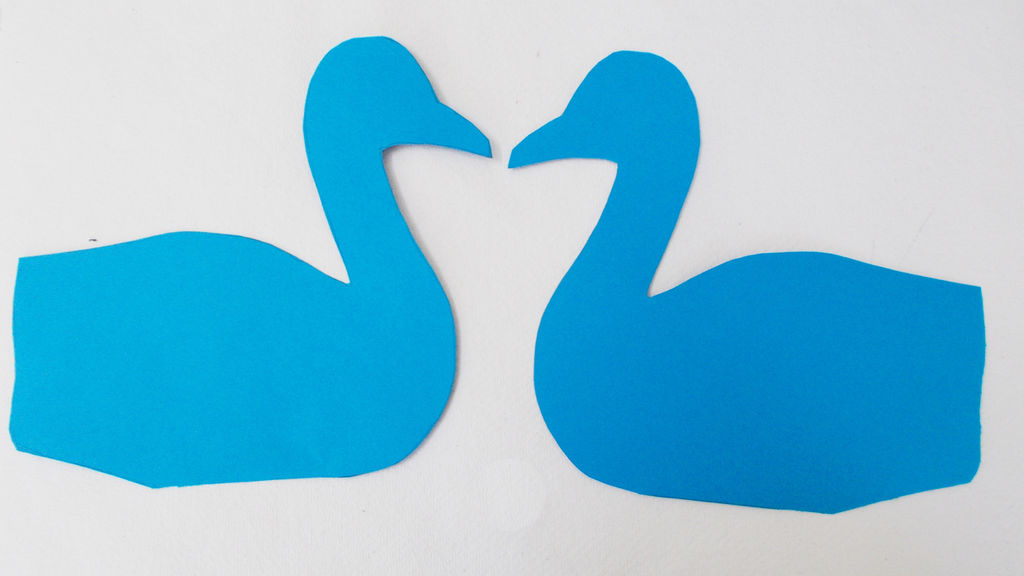
Make 2 blue paper cut outs of the same measurement as that of the cardboard.
Cover the bodies of the peacock with blue color paper.
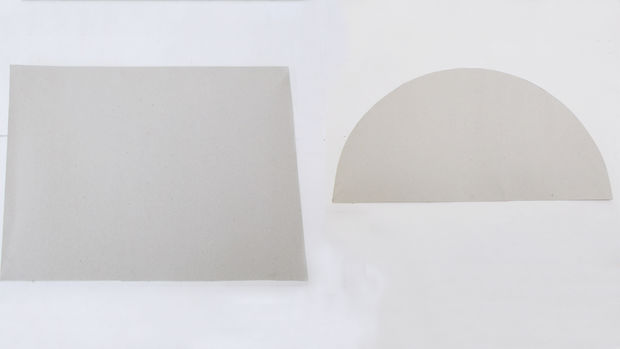
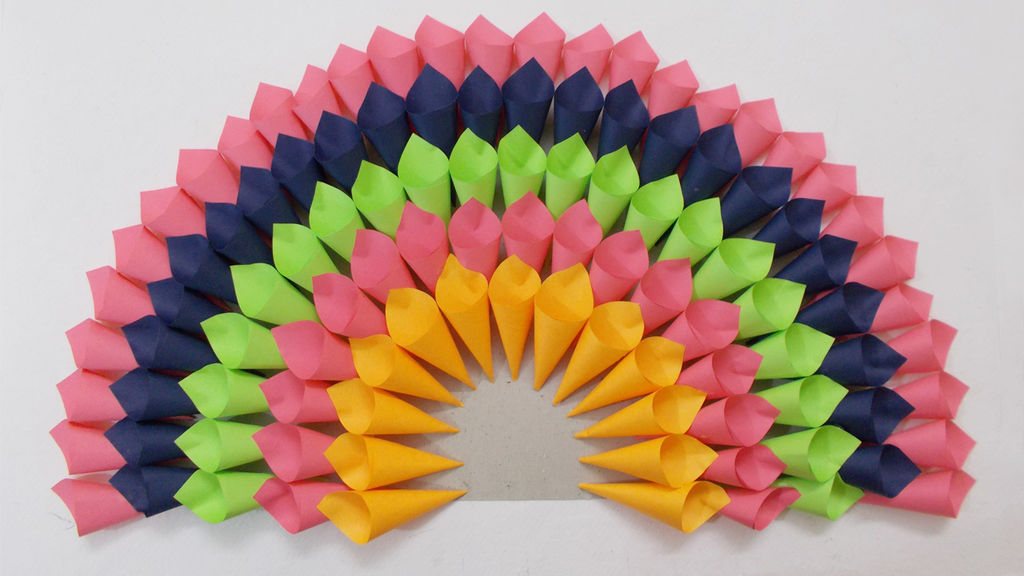
Cut out a semicircle measuring 28 cm in diameter, from the thin cardboard.
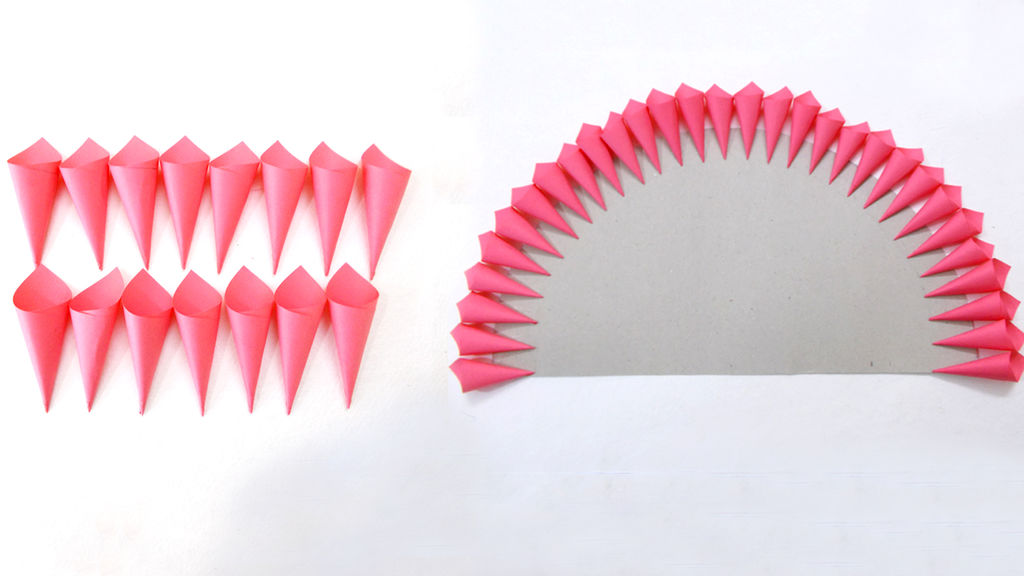
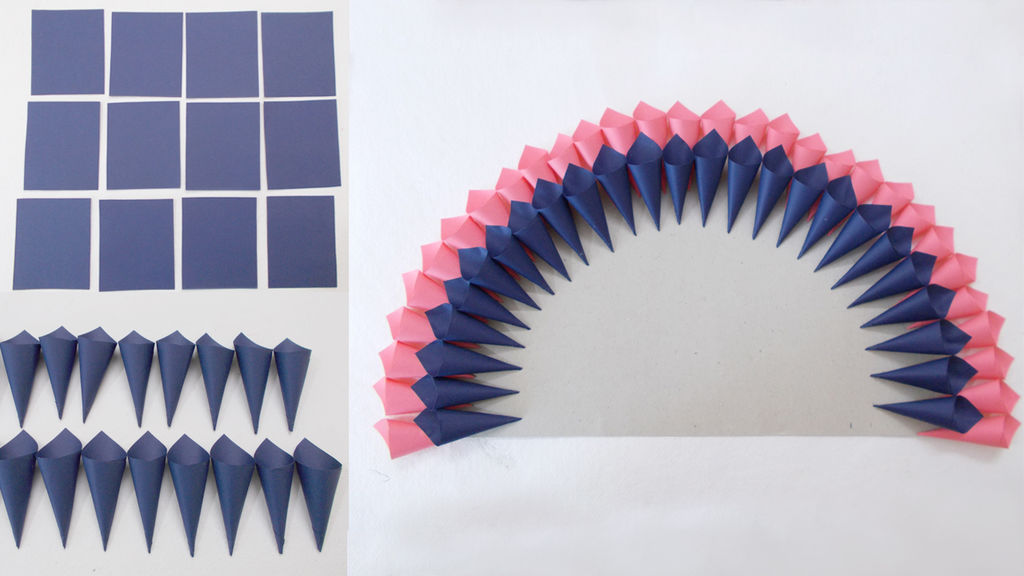
Cut out square shaped pink color papers measuring 5 cm x 5 cm and make multiple cones with them.
Paste them on the edge of the semicircle, with craft glue, to form the first layer of the peacock feathers.
Add a layer of blue paper cones after the pink one in the peacock feathers.
Keep adding different colors of paper cones to brighten up your peacock!
Keep a small space, blank, in the center.
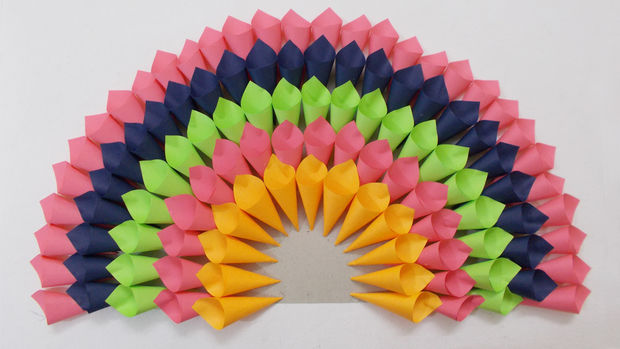

Make paper cones in 5 different colored layers.
Now take the cardboard body of the peacock and make a slit using cutter.
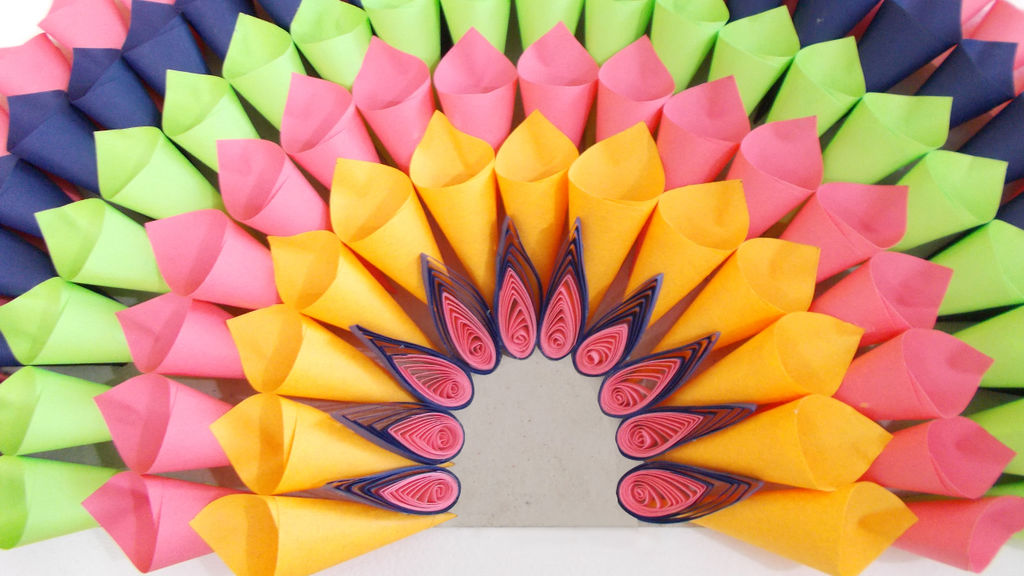
Insert the paper cones semi circle in the slit and ensure it is firmly fixed.
Paste and join two different colored quillings trips and make tear drop shaped coils with them.

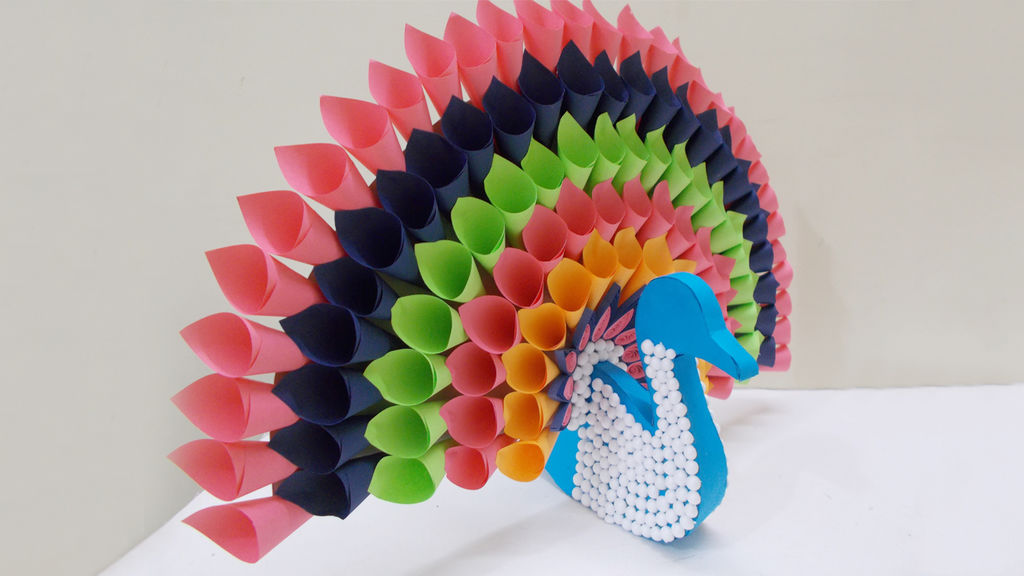

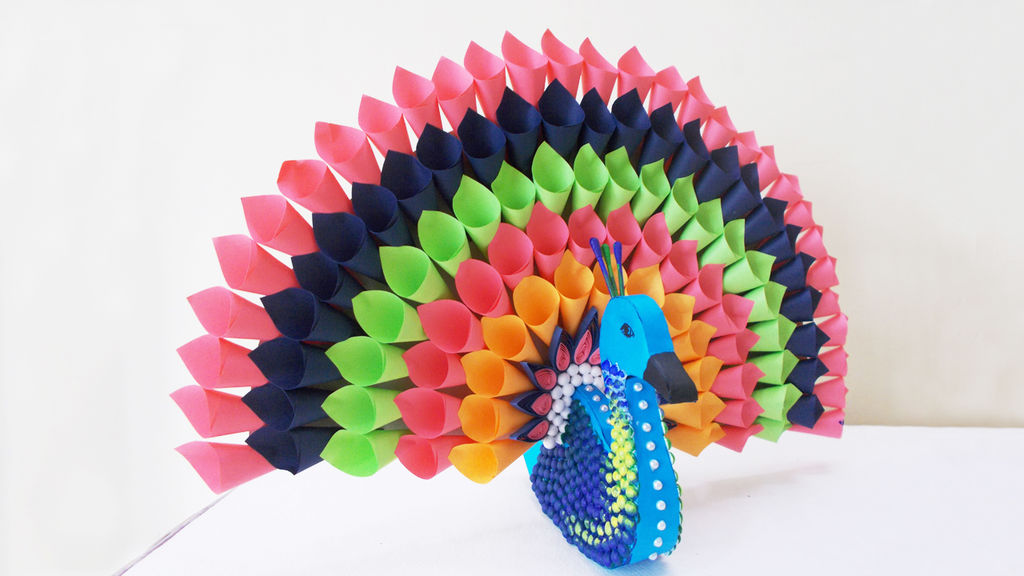
Cut styrofoam balls in half and paste them on the peacock’s body and the remaining space in the semicircle.
Color the beak and draw the eyes using black sketch pen and line the neck of the peacock using decorative pearls.
Paint both the ends of a few earbuds and cut the stick in the center.
Paste them on the peacock’s head to form the crest.
Add some glitter to the earbuds to be used as the crest.
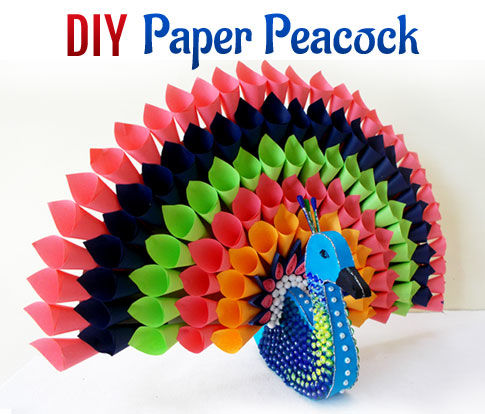
Within no time and a few basic steps of easy paper craft ideas, you have a beautiful DIY Multicolored Paper peacock ready to adorn the room decor of your living room. This pretty looking colorful Peacock design Craft idea for Home Decorations is one such cool craft that can bring an instant energy to your otherwise boring looking Home Decor.
Courtesy: StylEnrich
As a bookworm myself, I’ve always had a hard time letting go of books, even the ones I didn’t really like, or have outgrown. Good thing I found a way to breathe new life into them – by turning them into DIY book clutch!
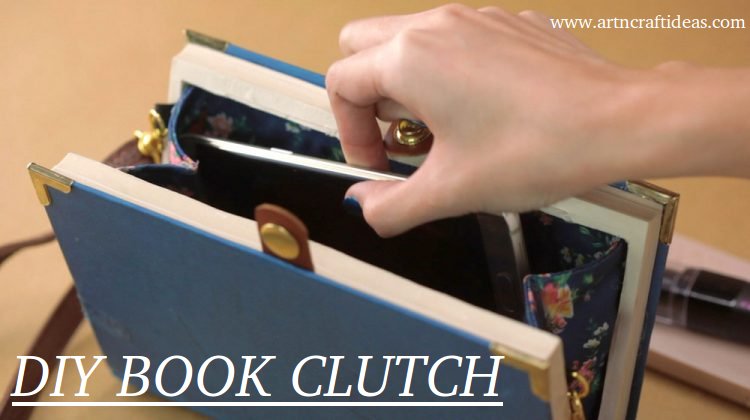
Recycling different items to create something entirely new is one of the tenets of crafting! I personally get more creative when faced with old items I’m about to throw away. It also saves me from spending too much on gifts for family members or new purchases. I’ve even started upcycling my old clothes, from draft stoppers to skater skirts! But my favorite has to be turning old books into cute DIY book clutches, since I’m a self-proclaimed bag lover. Do you want to learn how? Read on below!
Required Material:
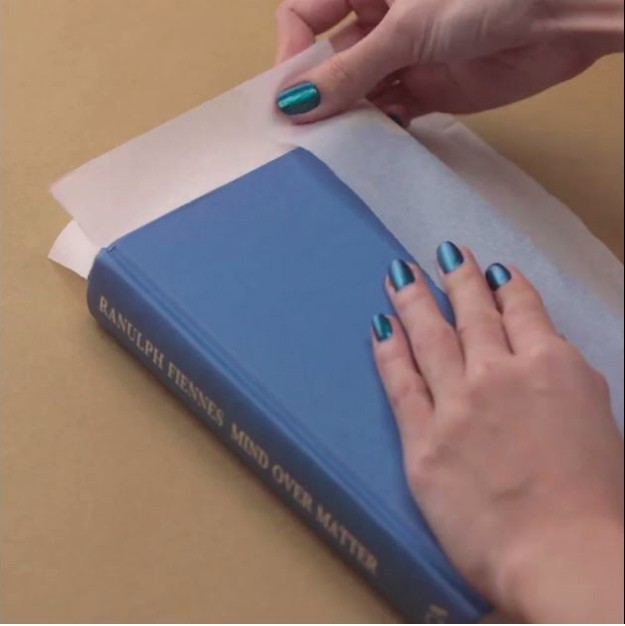
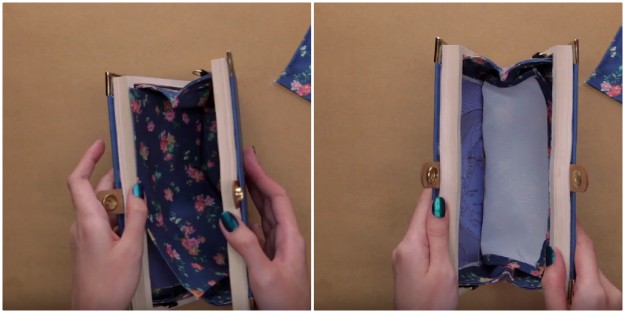
Insert the rice paper at the back of the front cover, middle of the book and at the back of the back cover. Make sure you’re covering the fore, top and bottom edges of the book and do this on both sides.
Using a brush, paint the edges of the book with Mod Podge so the pages would stick together. This would be the fore, top and bottom edges. Do this for both sides and let it dry for two hours.
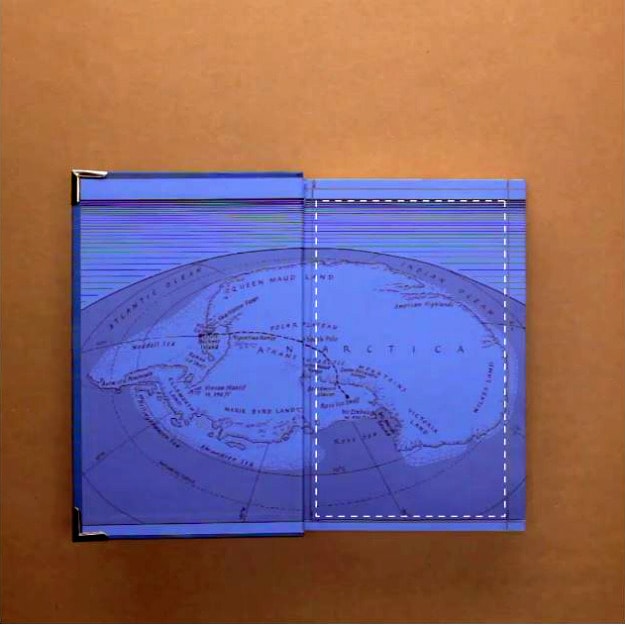
Remove the rice paper. Then, open the book on its first endpaper and draw a border. Use your ruler to measure the borders, at least 3/4″ on all sides. Start tracing the rectangle using a precision knife or cutter. Do the same on the end leaf of the back cover.
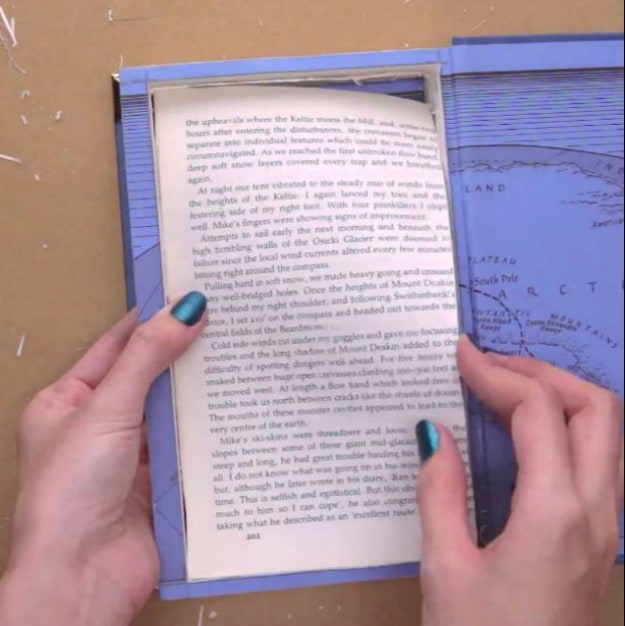
After cutting out the rectangle from the first page, hollow out the book.
TIP: This would be easy because of the cutout, but if you start to have a hard time, just retrace the edges with a cutter.
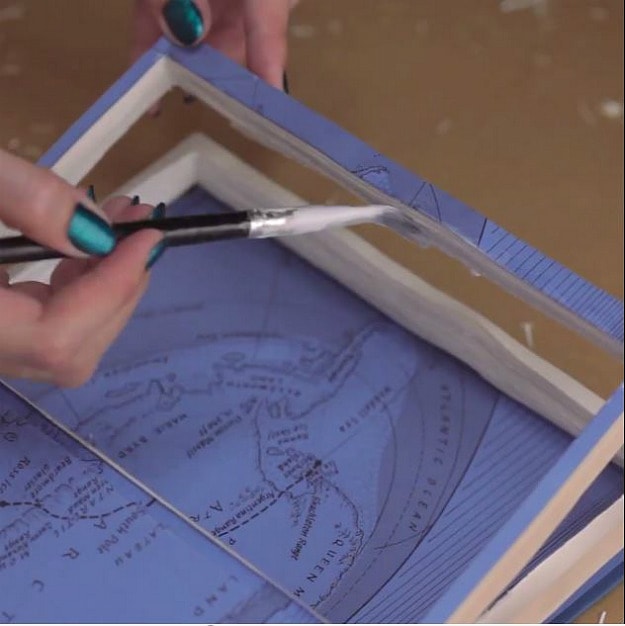
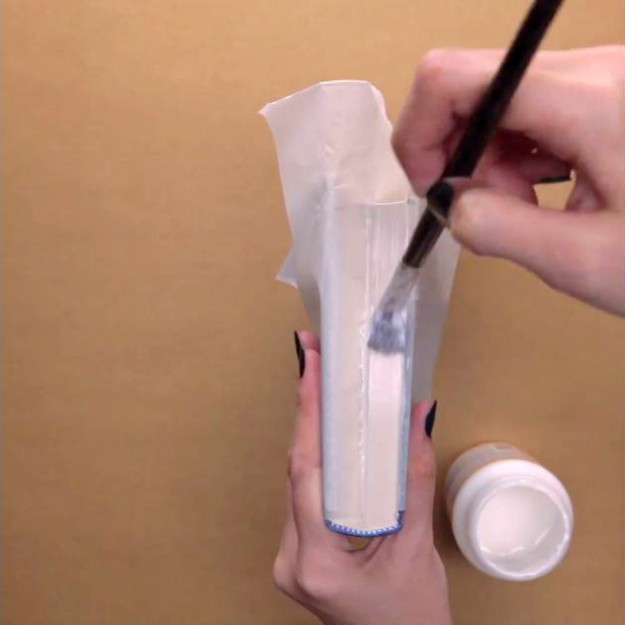
Now you have a hollow book split down the middle with two frames. Paint the inner borders of the frames, this means the book’s inner spine and the sides of its edges. Place a rice paper between the frames and leave it to dry for two hours.
TIP: Make sure not to put too much Mod Podge to prevent the pages from wrinkling. If several coats are necessary, let each coat dry up before adding another coat.
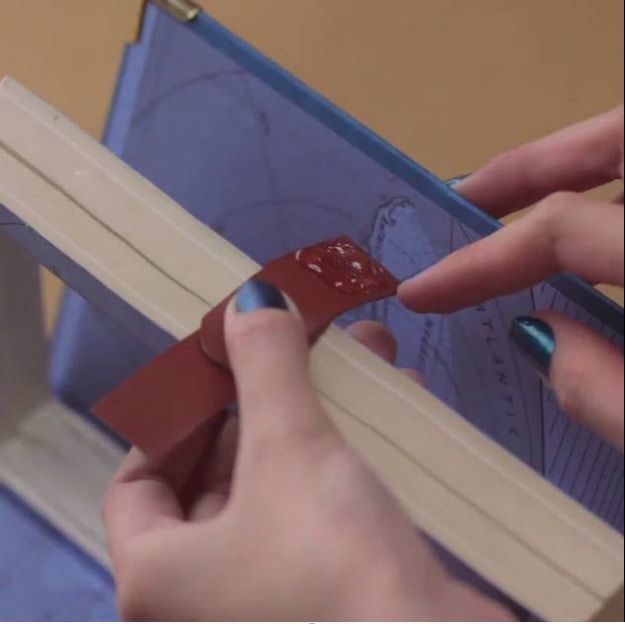
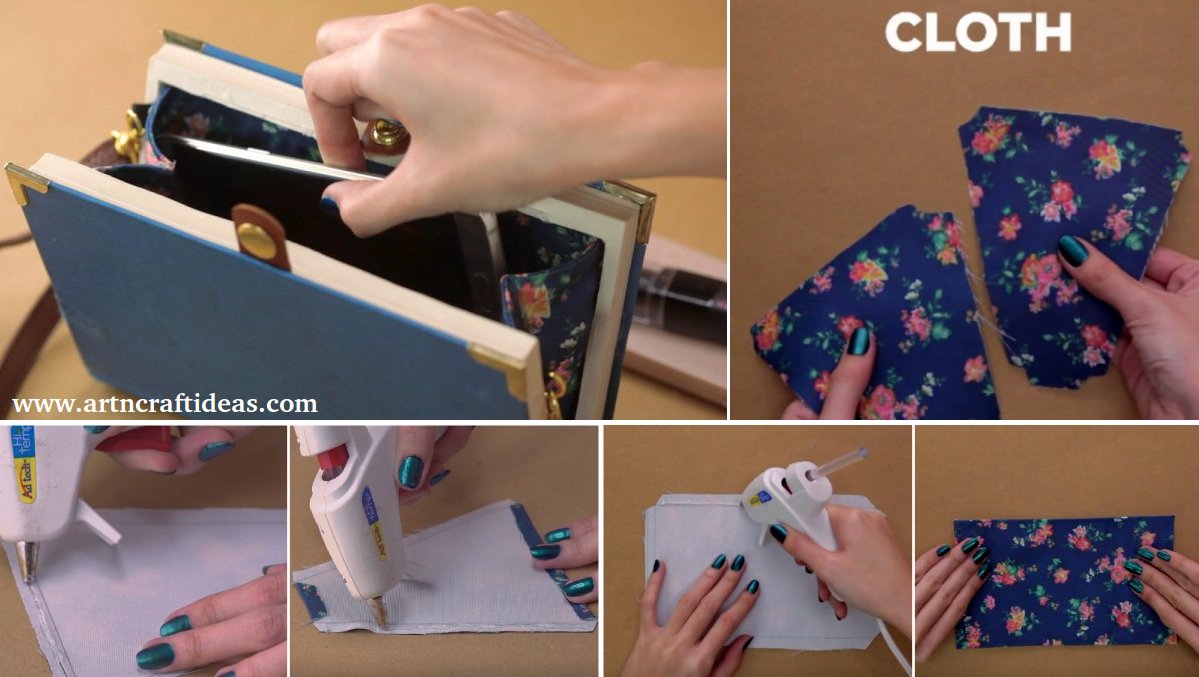
Take an old snap bag clasp, and make sure the leather strip has two separate pieces – one for the socket and one for the stud. Glue the end piece of each strip on the inside of each book cover. Make sure they are perfectly aligned by testing out if you could securely close the leather clasp.

Using your glue gun, glue the edges of the two frames on each book cover. This will create a solid hollow book. Press the covers with your weight to get them to stick!
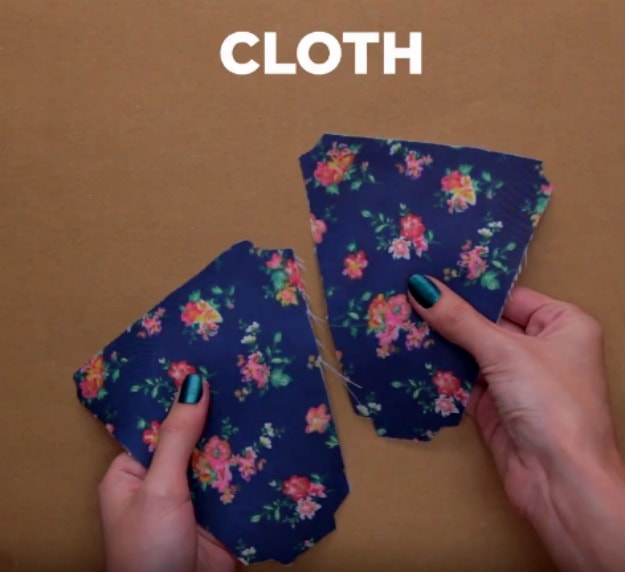
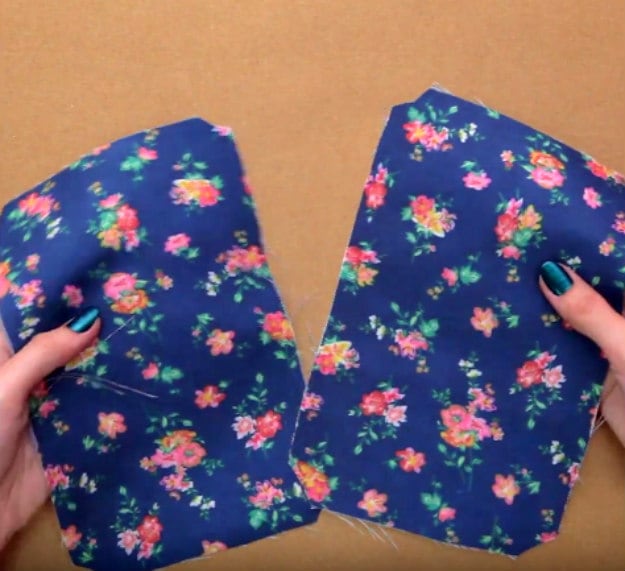
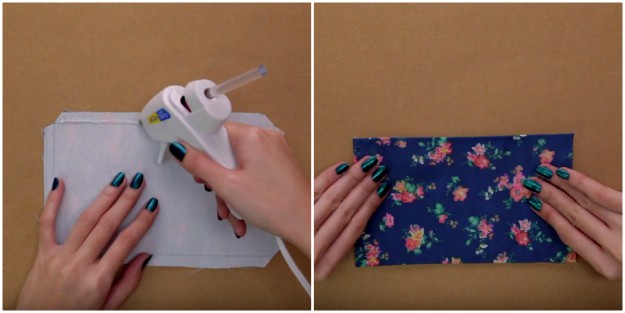
Cut two triangular pieces of fabric. To achieve the shape above, trace a parallelogram inside these pieces of fabric, at least a centimeter away from the fabric edges. Afterward, cut the two corners of the triangle as well as its last corner. After cutting the last corner, cut two slanted squares at its base.
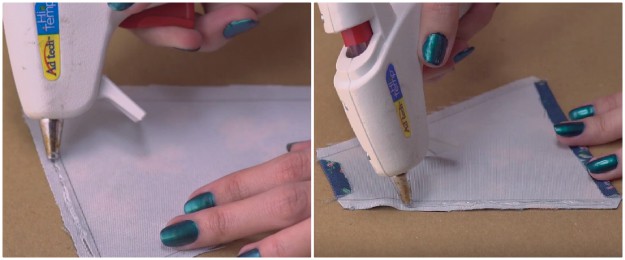
Using a glue gun, fold the fabric following the guidelines made by parallelogram traced earlier. Only fold the shorter sides of the fabric. Press these sides to make sure they’re secure.
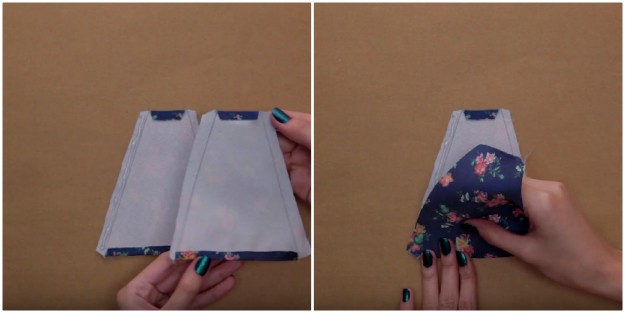
Glue the two triangular cloths by using your glue gun. Attach these pieces of fabric with their wrong sides facing each other. Glue all of the sides together and don’t forget to smooth it over afterward!
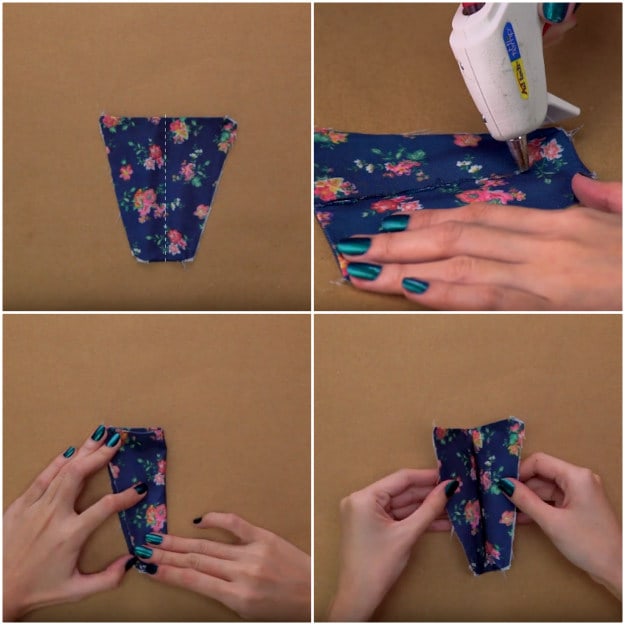
Flip the fabric piece upside down, with the shorter side at the bottom. Fold the fabric in half, unfold it and apply hot glue on the crease created by the fold. While the glue is hot, fold the fabric. This will result in a secure fold.
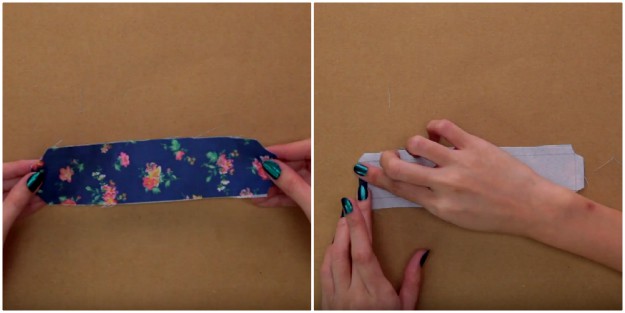
Cut two pieces of rectangular pieces of fabric. Draw a rectangle on the wrong side of the fabric, a centimeter away from the edges. Afterward, cut the corners of the fabric.
Apply hot glue on the sides of the fabric, outside the drawn rectangle. Following the guide, fold the edges and make sure they stick by pressing the fabric with your hands. Set this aside for later use.
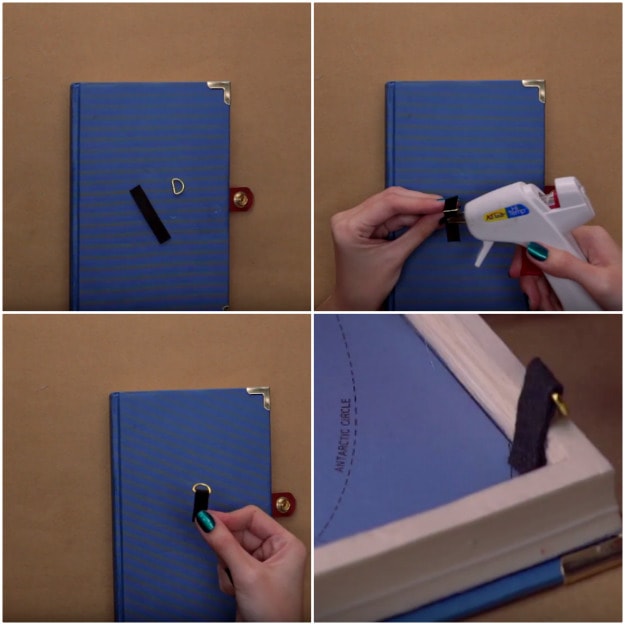
Insert the felt strip inside the d-ring and make sure that both ends are equal. Apply hot glue on the inner side of the felt strip and press the two ends together. Glue this at the inner corner of the book.

Using the long rectangular piece cut earlier, cover the middle of the book. Apply glue on the inner side of the spine, and then press the fabric.
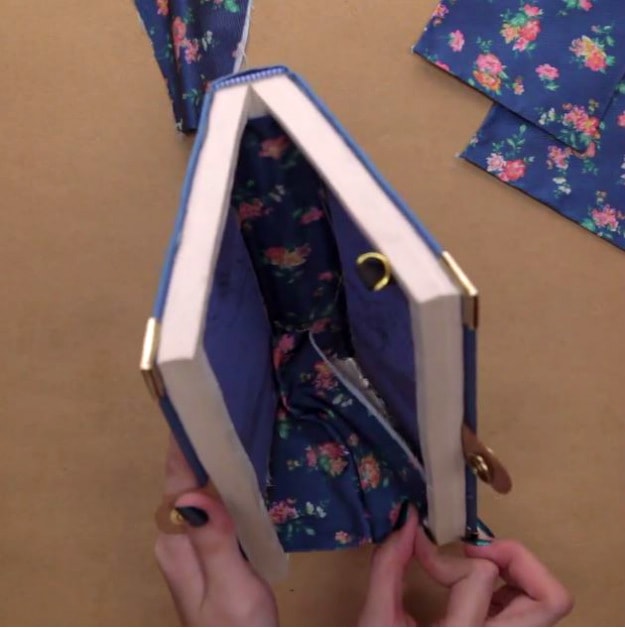
Use the triangular pieces you set aside earlier as inserts. This will bind the frames together. Do this by gluing the strips of fabric on the bottom and top edge.
Cover each paste down of the book using the rectangular fabric you set aside earlier. Use glue gun to fix the fabric. This will create a polished and unified look in the inner part of your book clutch.
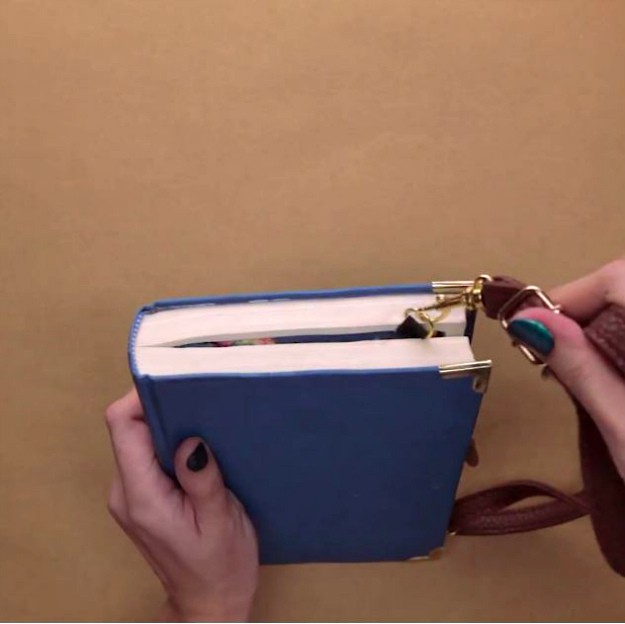
Finally, add an adjustable and detachable sling strap. And that’s it!
To get a more visual instruction, check out our video!
Hope you like this tutorial.
Source: diyprojects
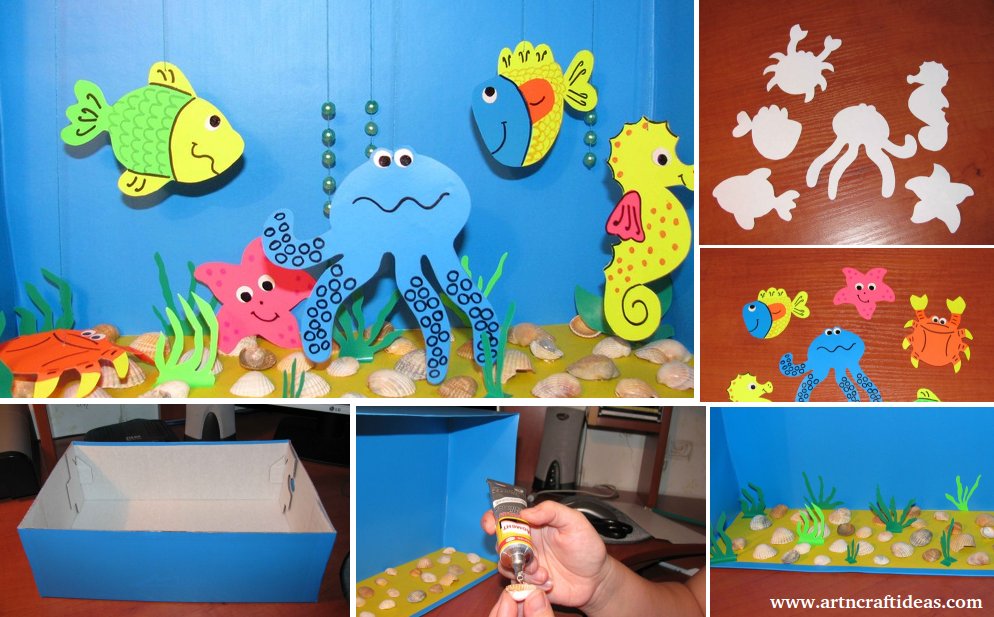
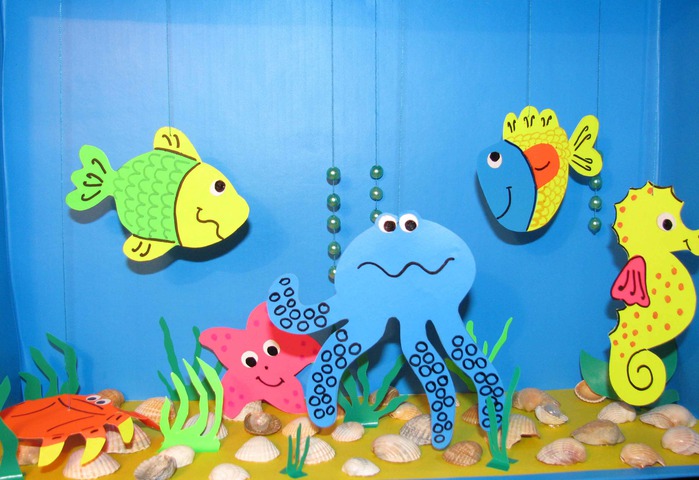
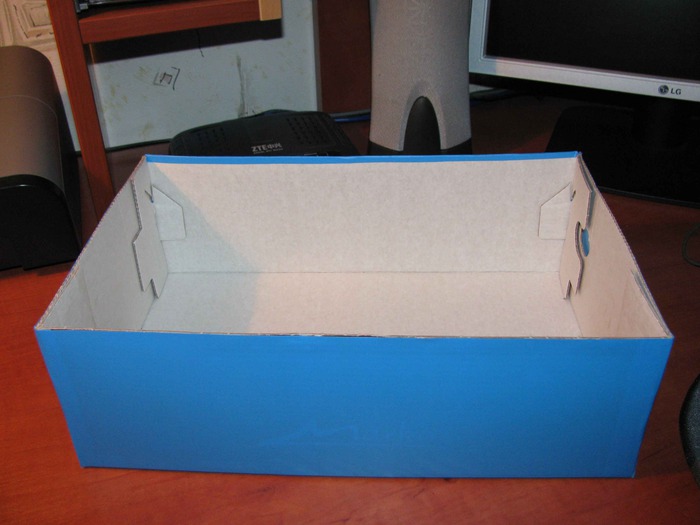
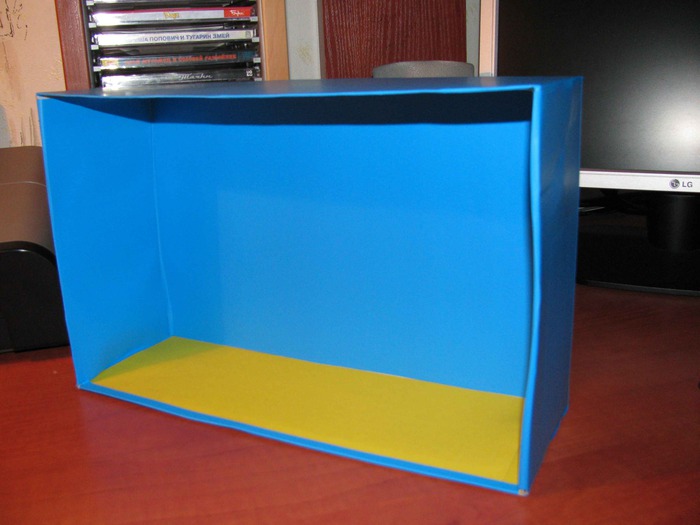
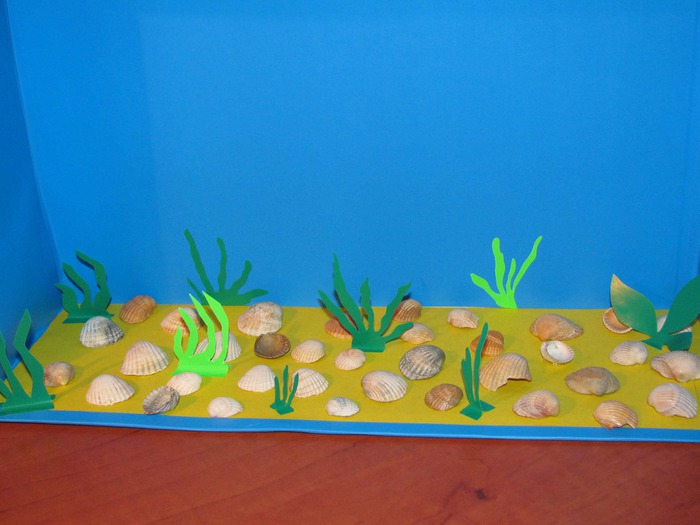
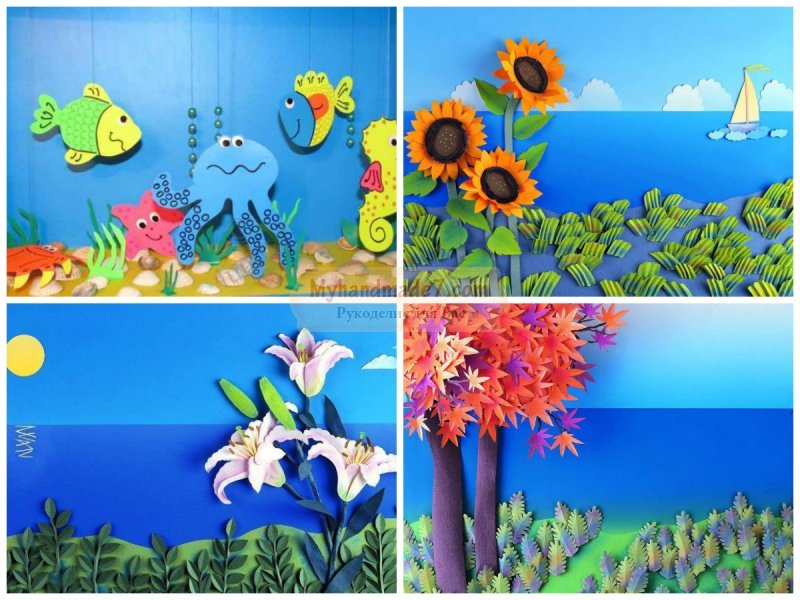
Aquarium Crafts for children from the box and color paper: The underwater world is fascinating, adults and kids. We Andrei tried to create a marine area directly in a cardboard box. We now have on the shelf, you can hear the sound of the surf and enjoy the beauty of the ocean inhabitants.
We took the usual box from under the shoe and pasted her self-adhesive film.
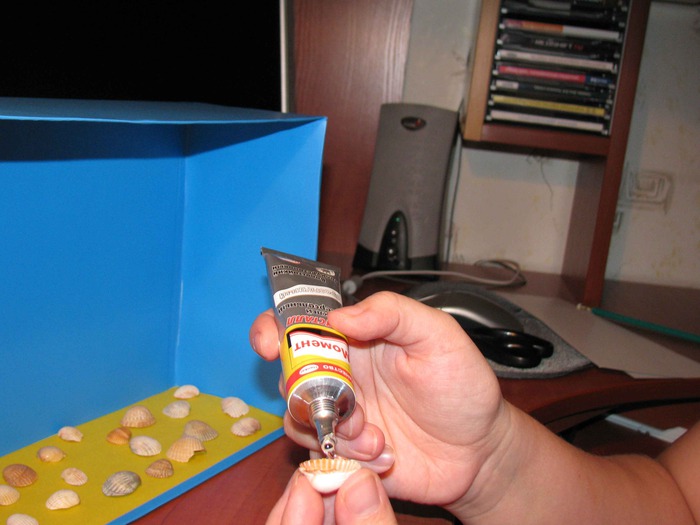
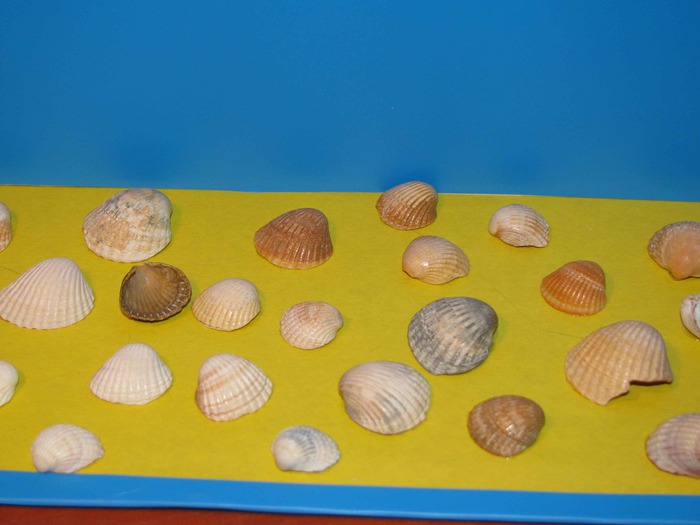
Glue “Moment-crystal” glued shells on the bottom of the “aquarium”.
In the same color film made algae.
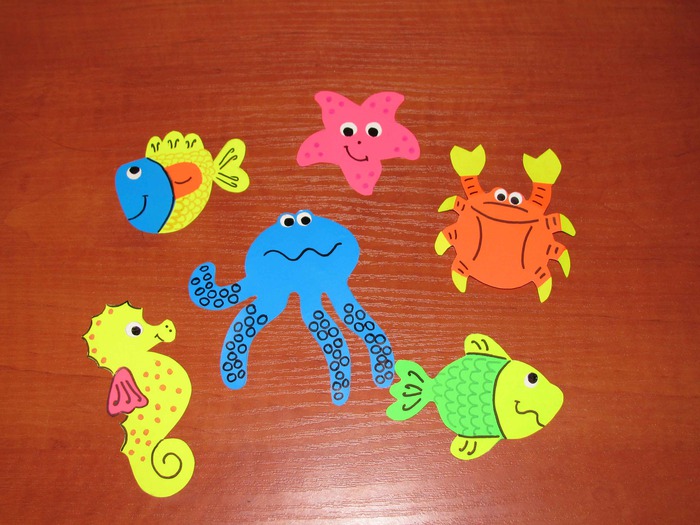
We have prepared the future inhabitants templates.

They completed their two-sided application in engineering.
Hung our “animals” on the strings and set them to the top of the wall, “aquarium”.
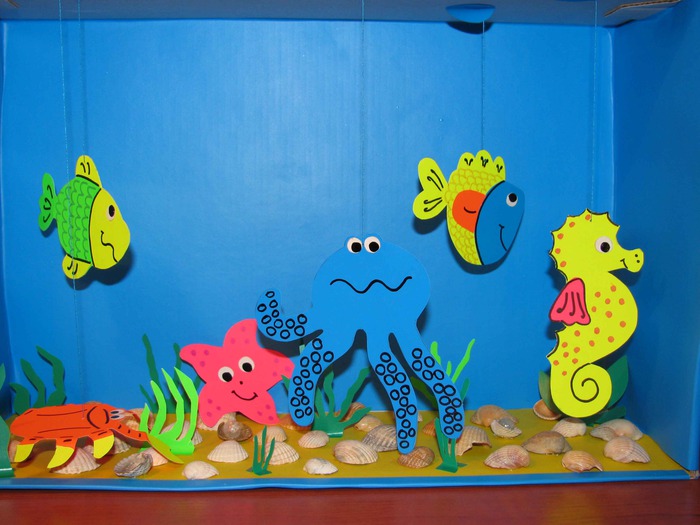
Of beads made “air bubbles”, and also hung them.
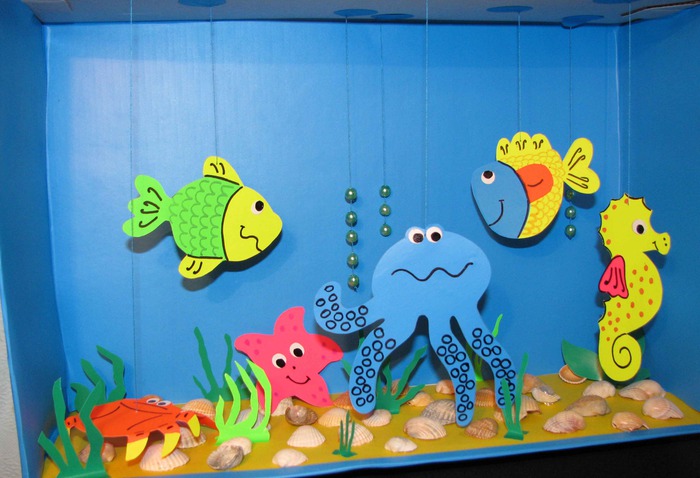
Our underwater world is ready, it remains only to put it on the shelf and enjoy !!!
Hope you like this tutorial.
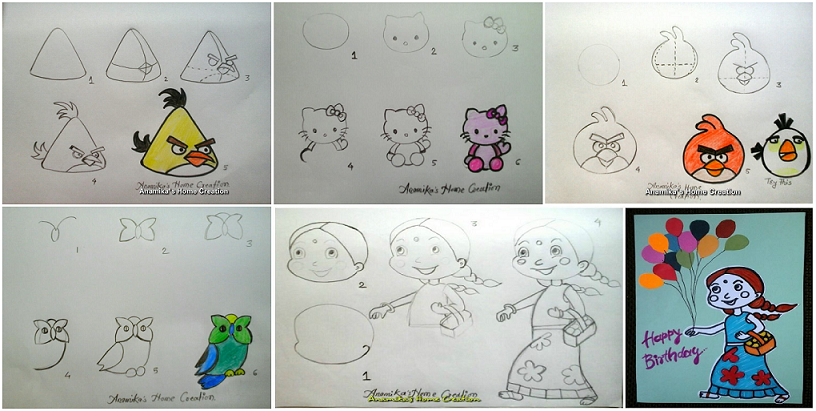
How to draw cartoon characters step by step: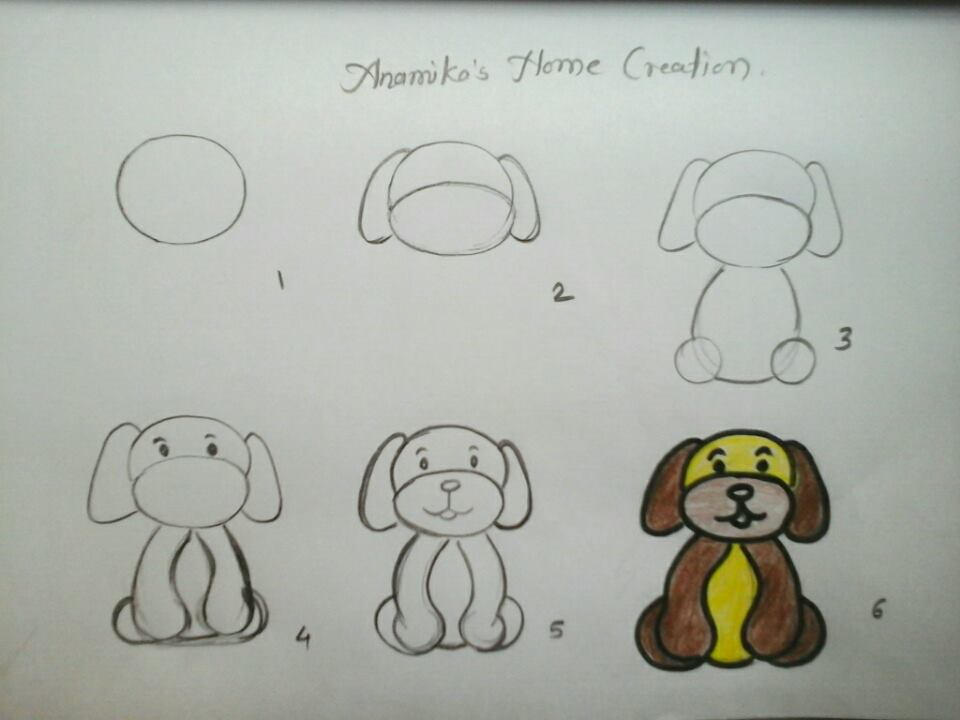
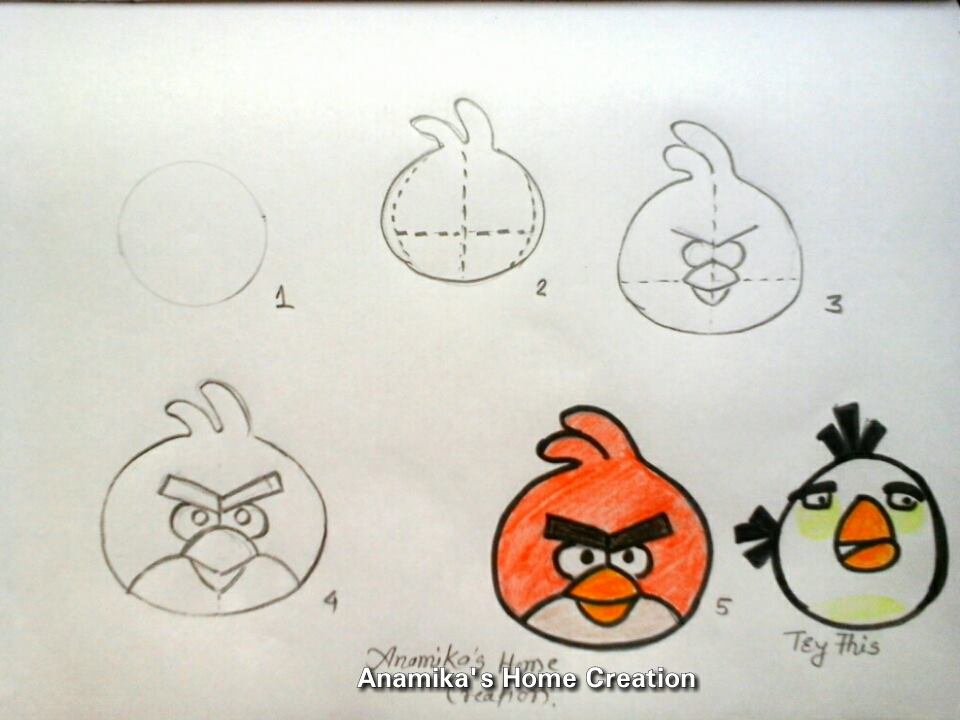
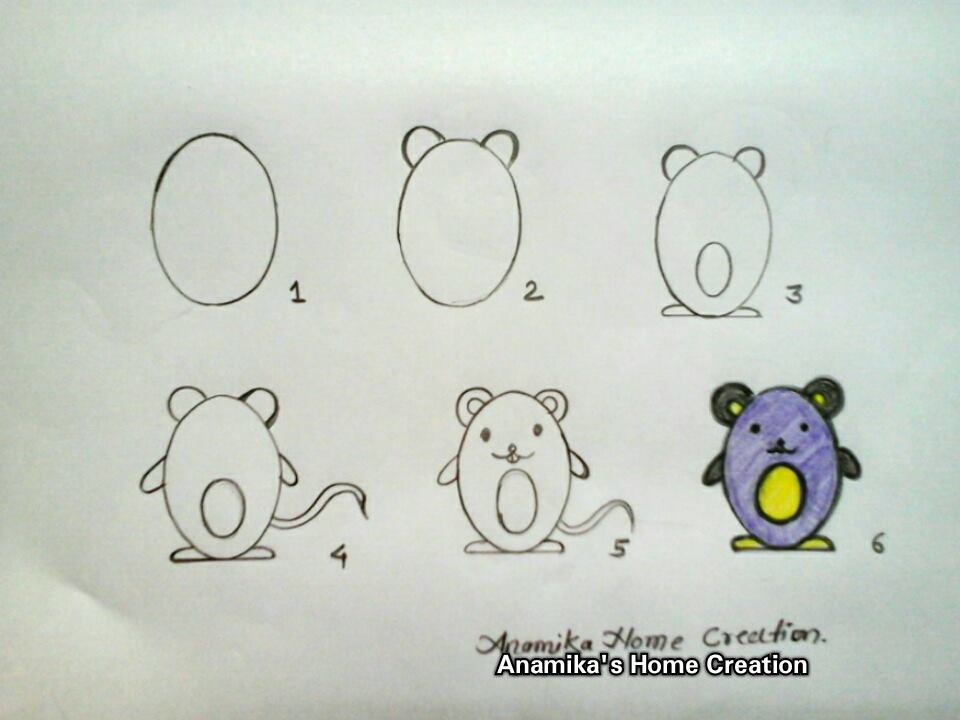
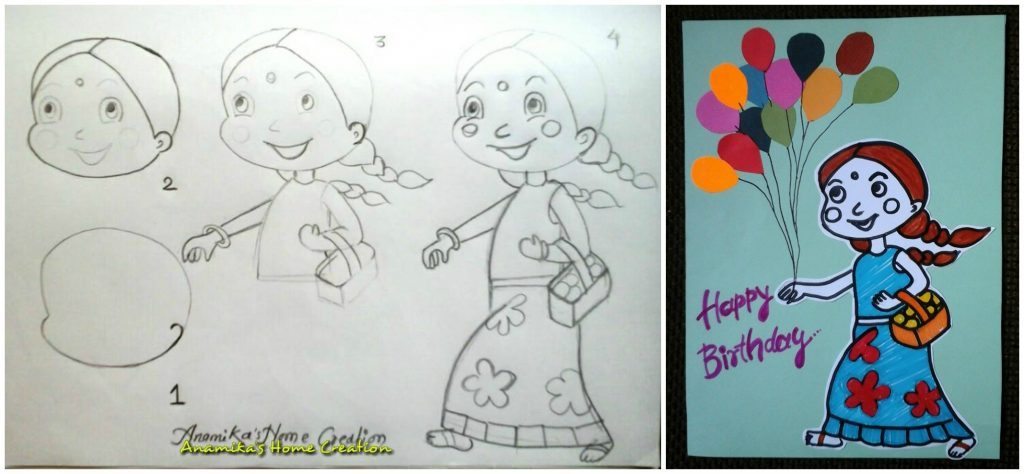
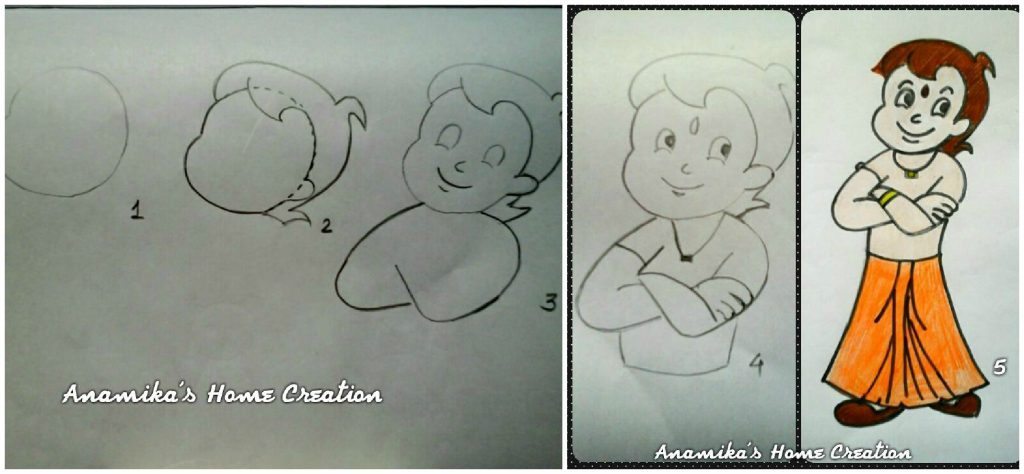
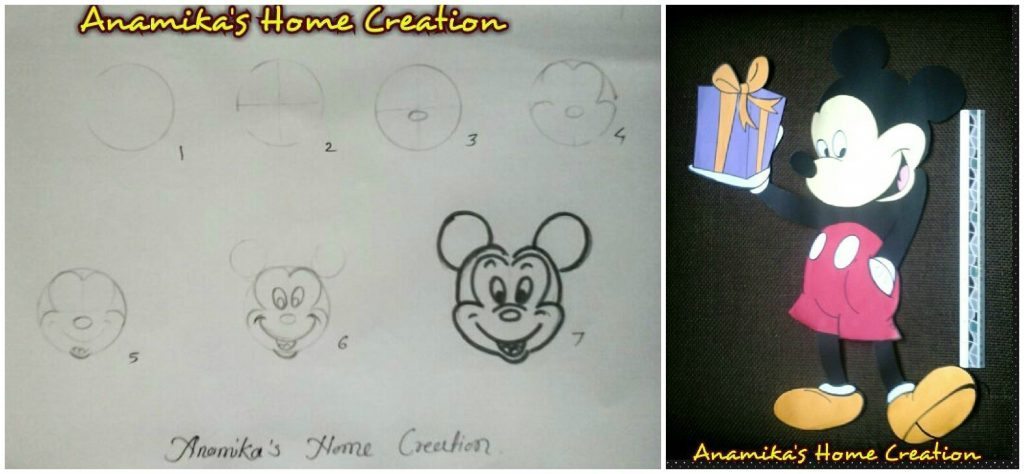
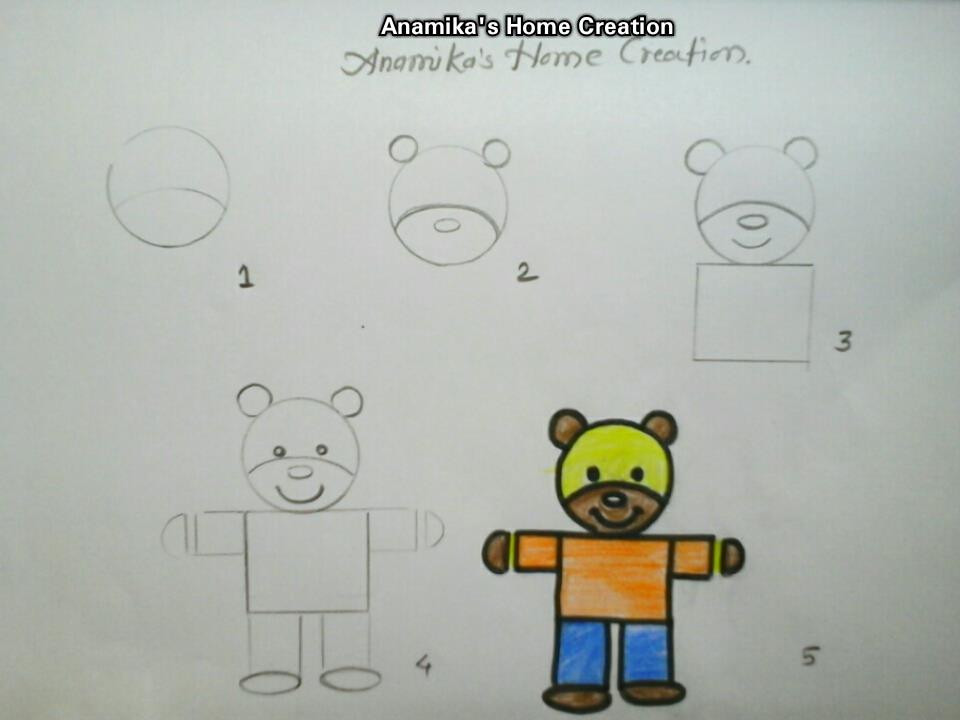
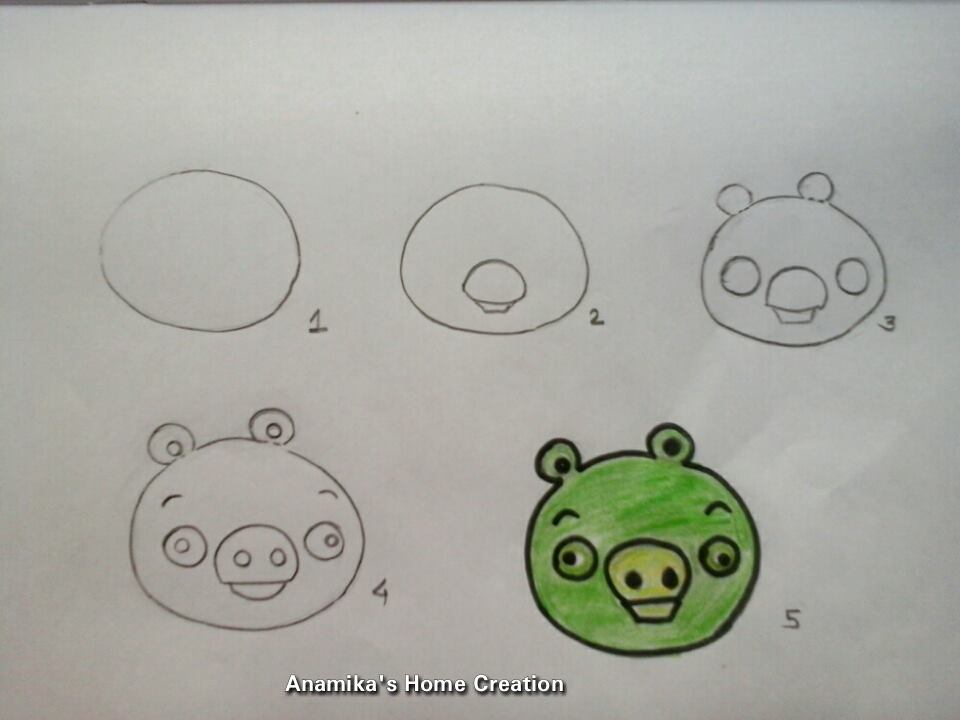
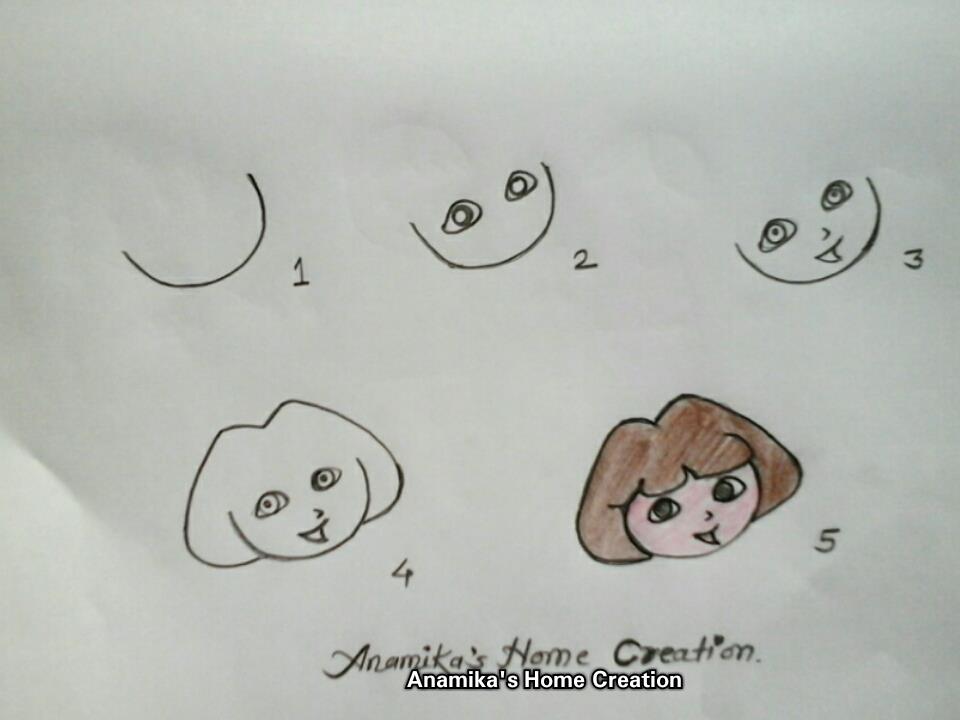
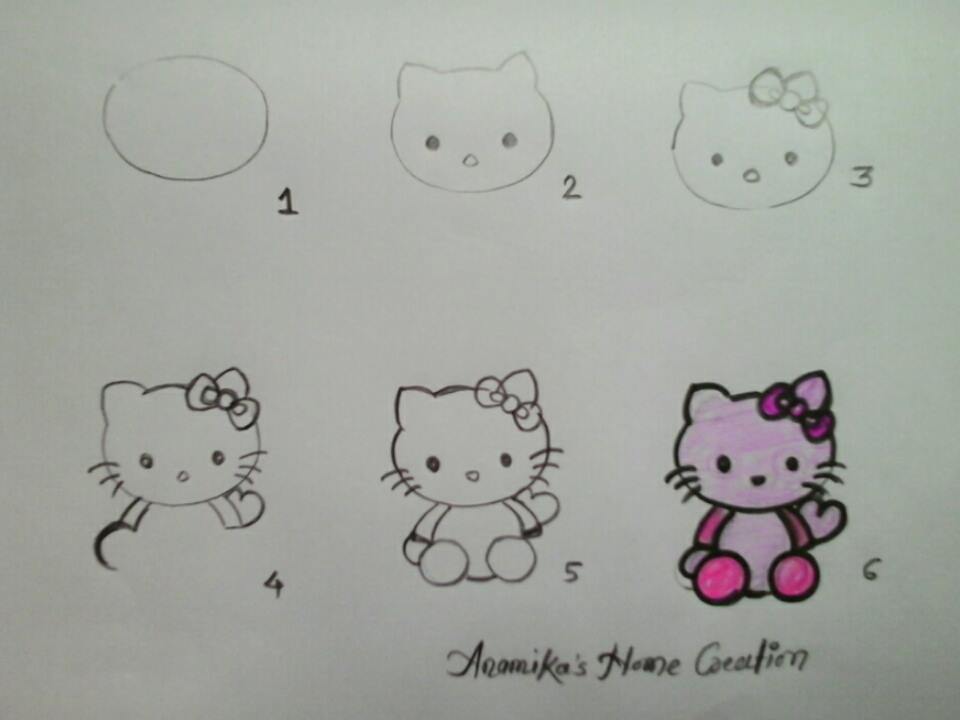
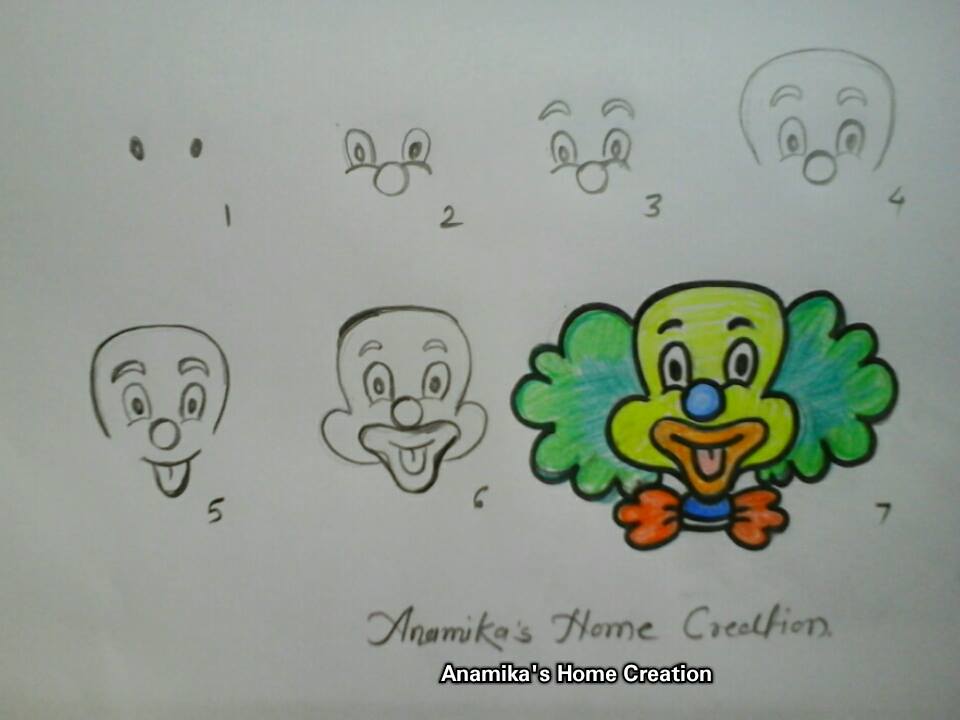
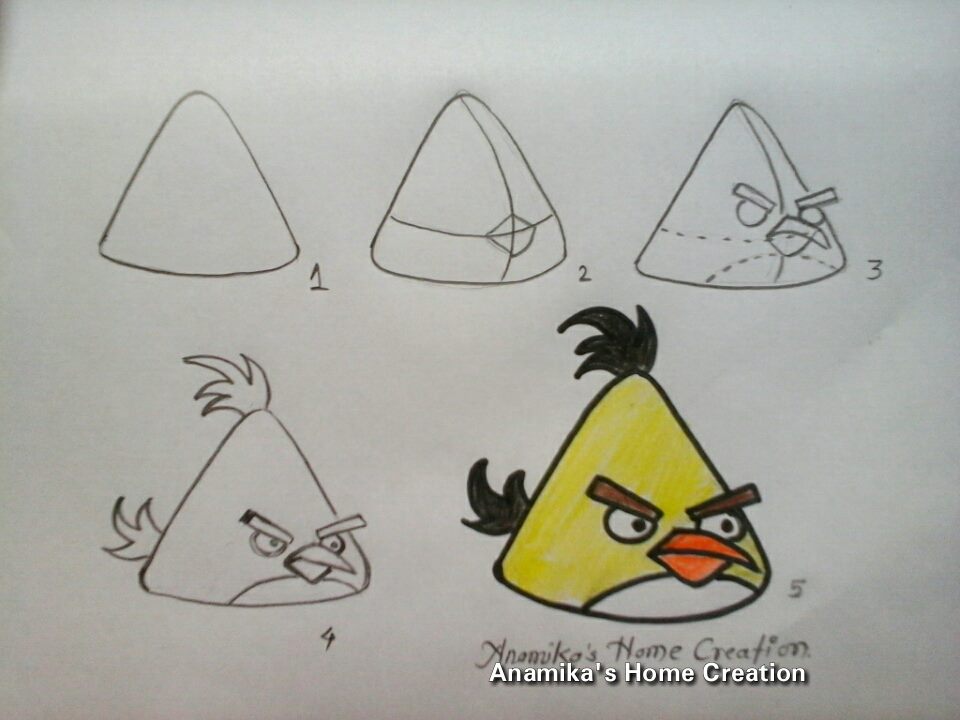
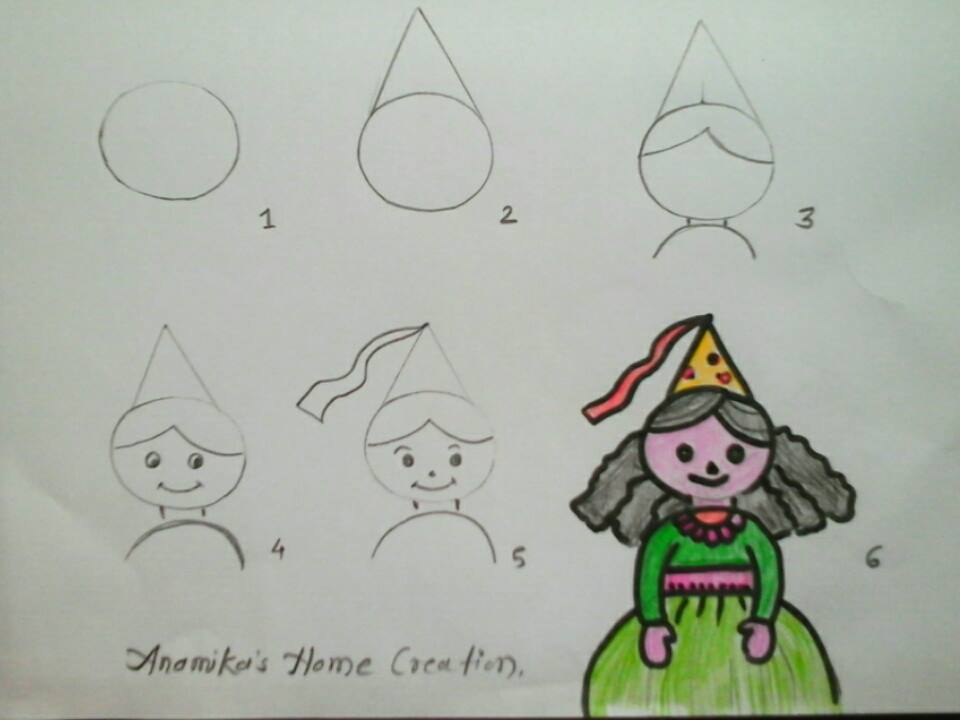
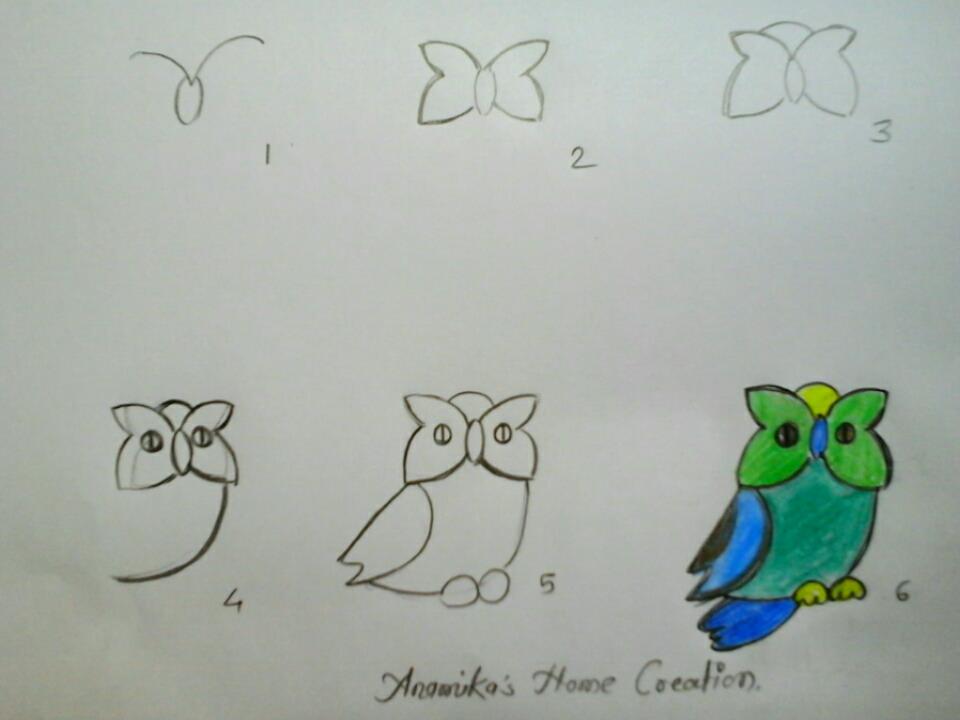
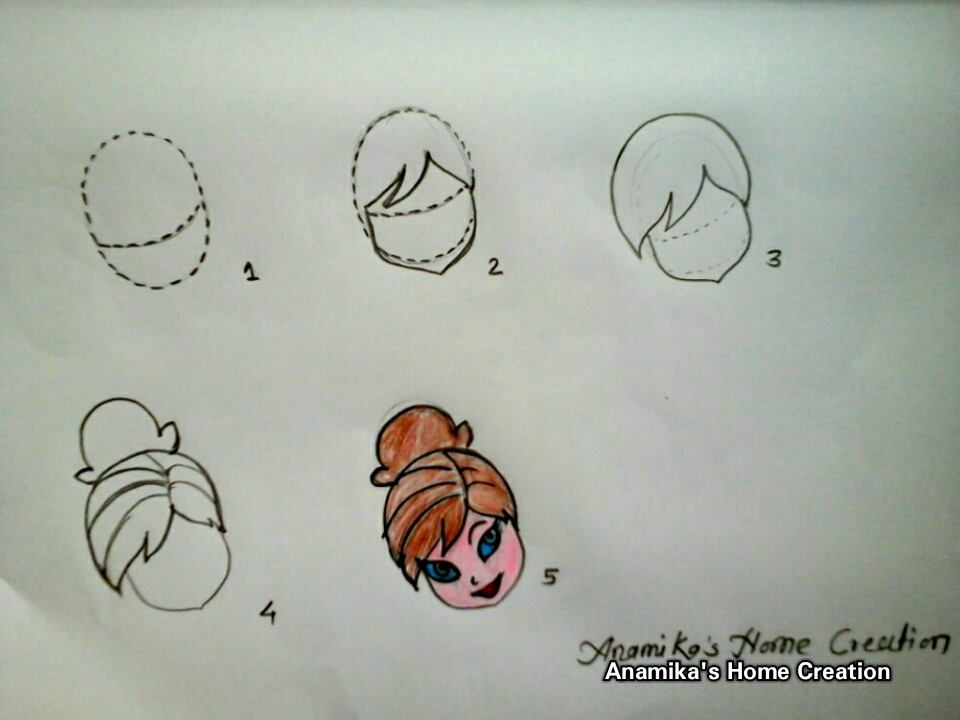
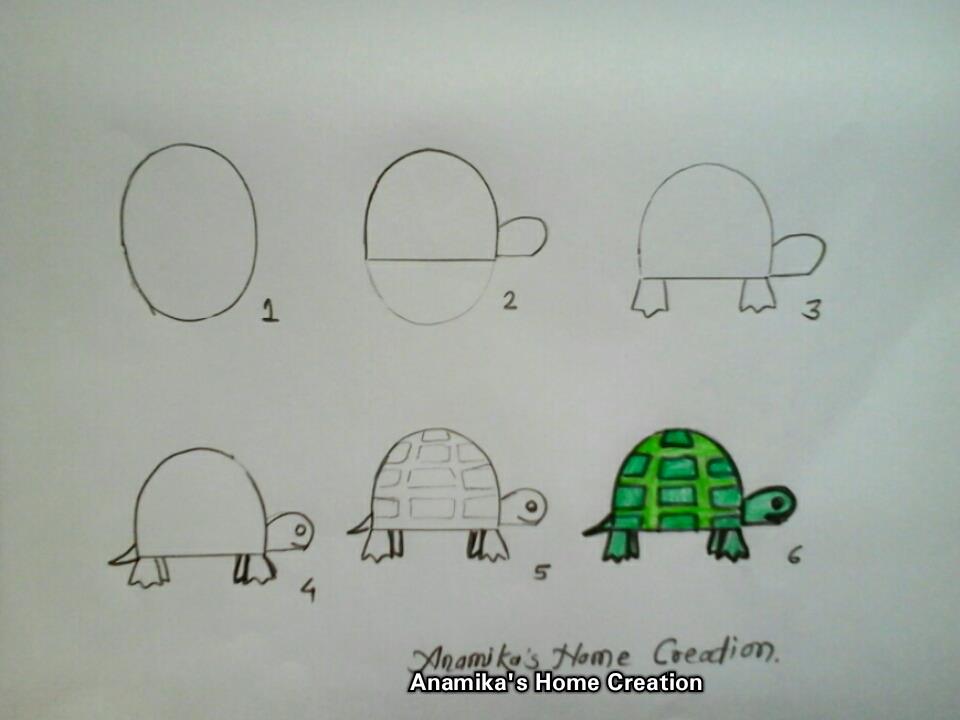
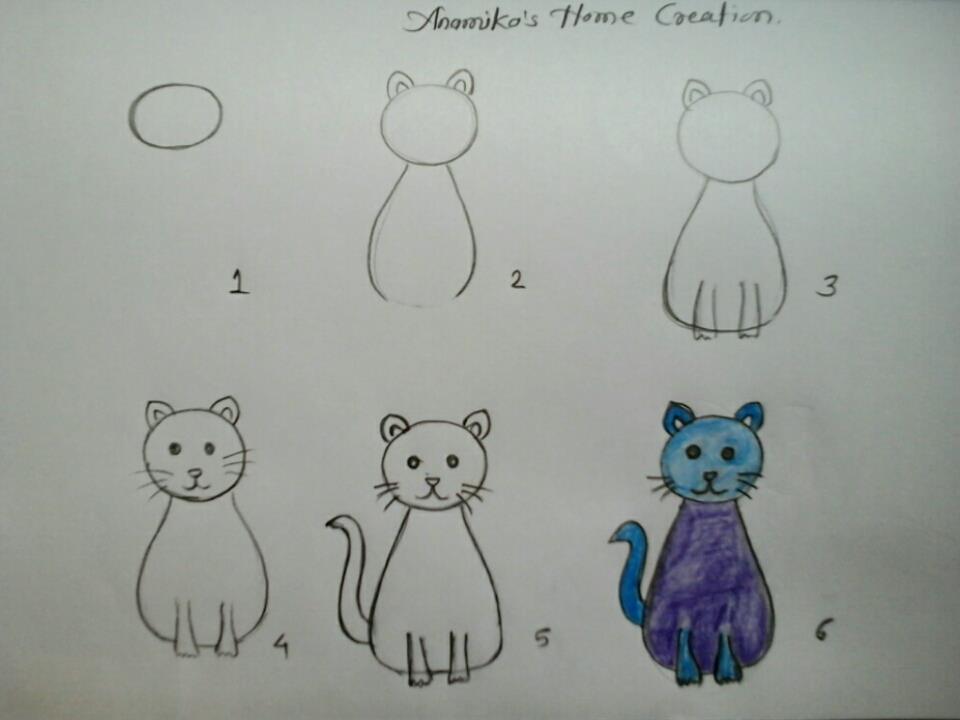
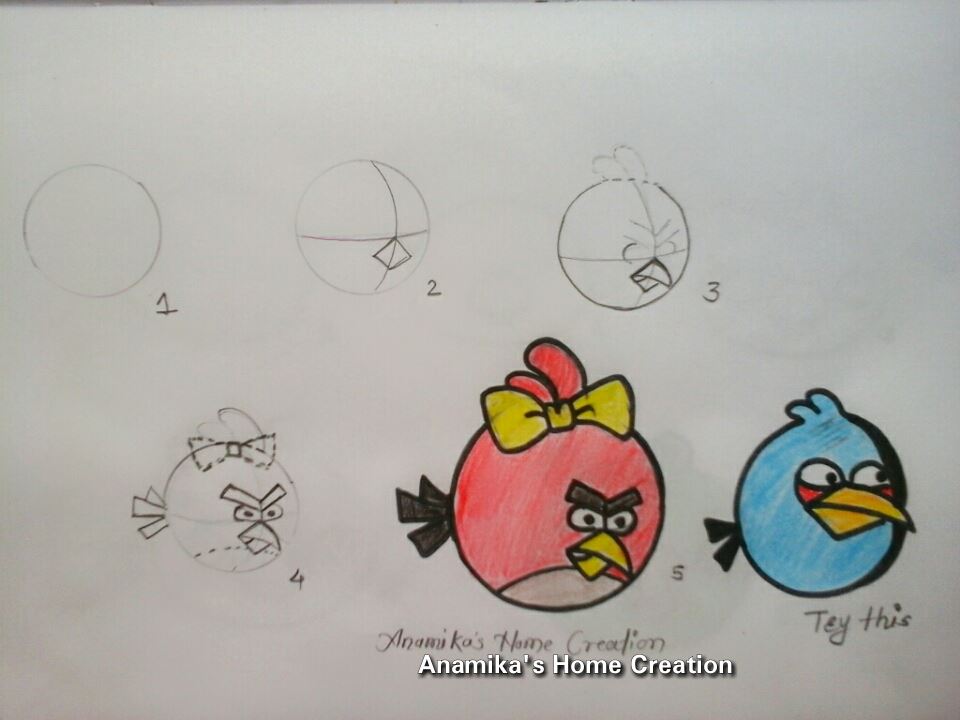
Courtesy: Anamika’s Home Creation
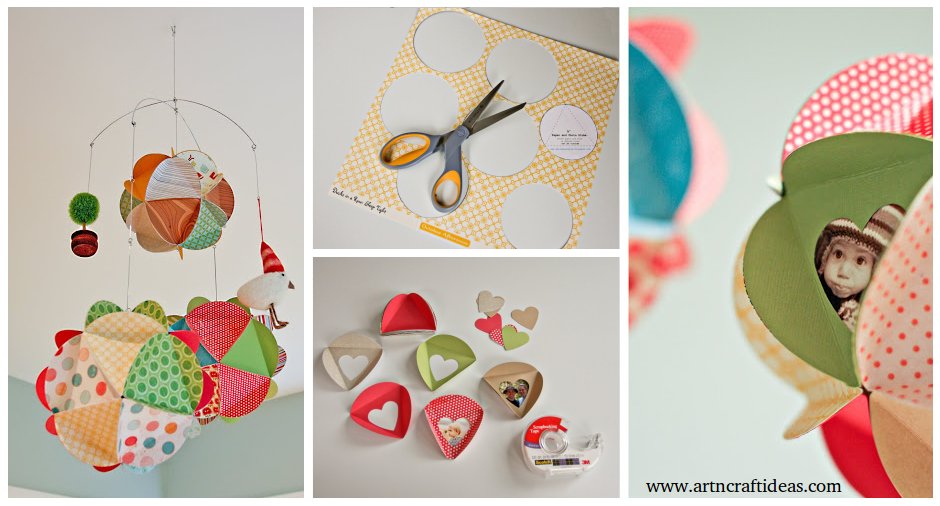
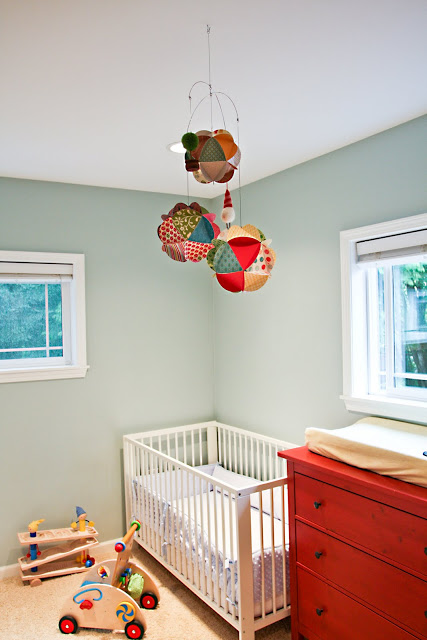
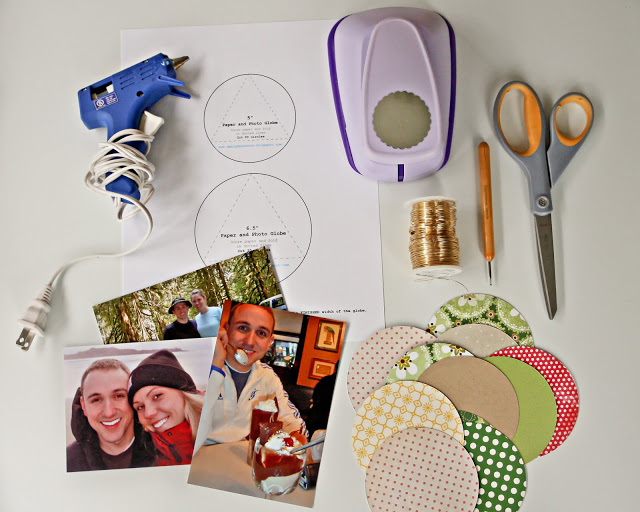
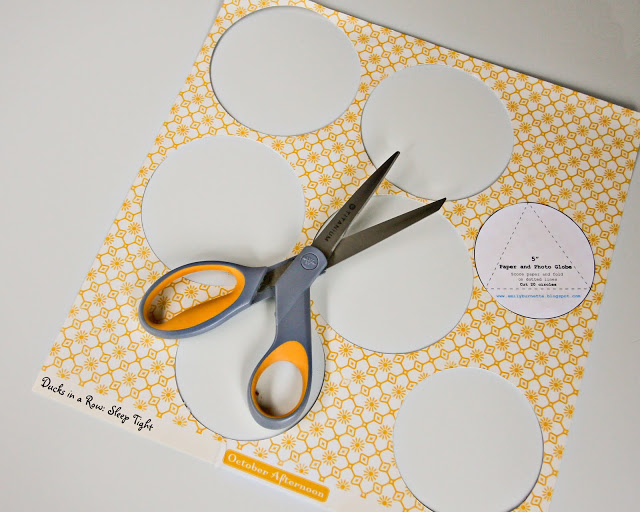
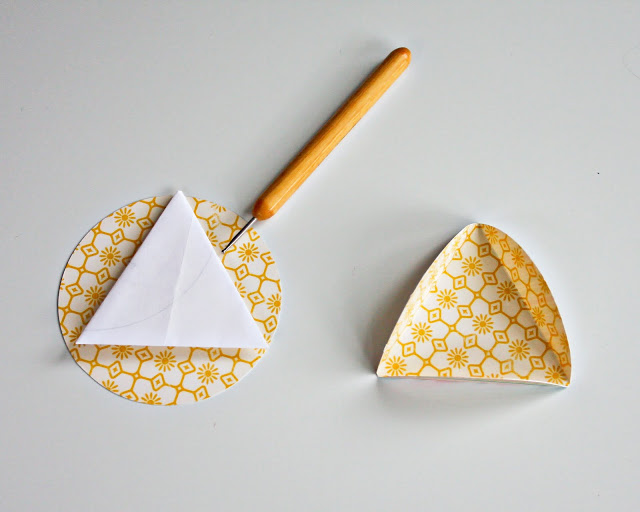
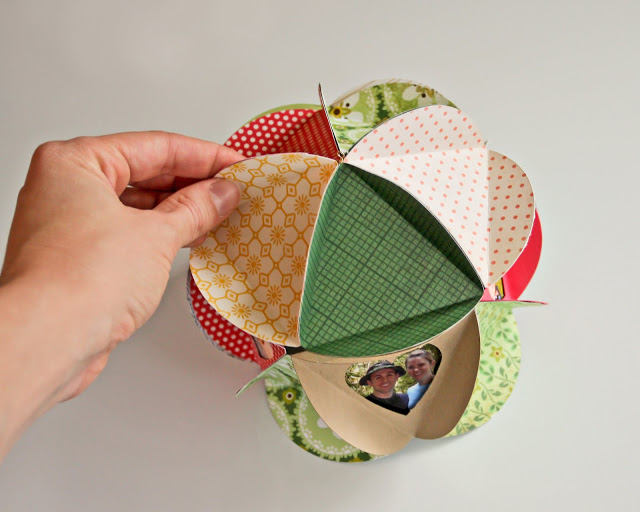
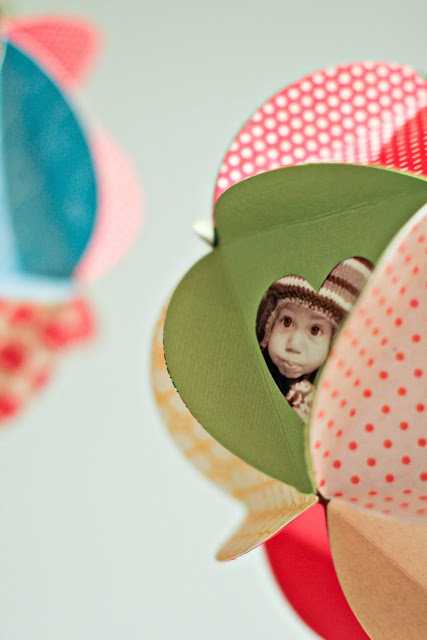
This tutorial show you how to make beautiful paper craft photo globe mobile that will look great whether they’re hanging in your house, given as a gift, or stranded to spice up your party!
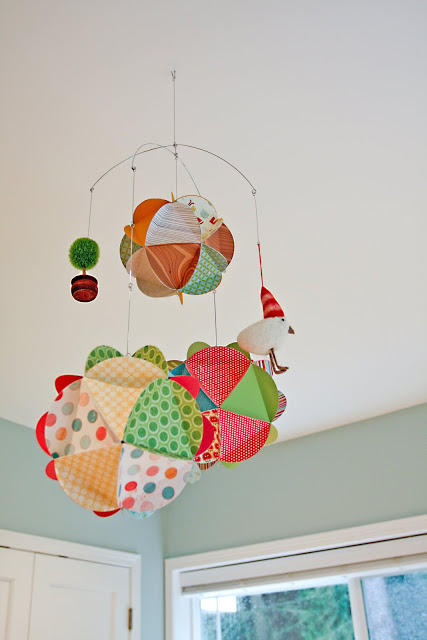
It’s hanging in my son’s room now and he loves to point out mommy, dad, and himself 🙂


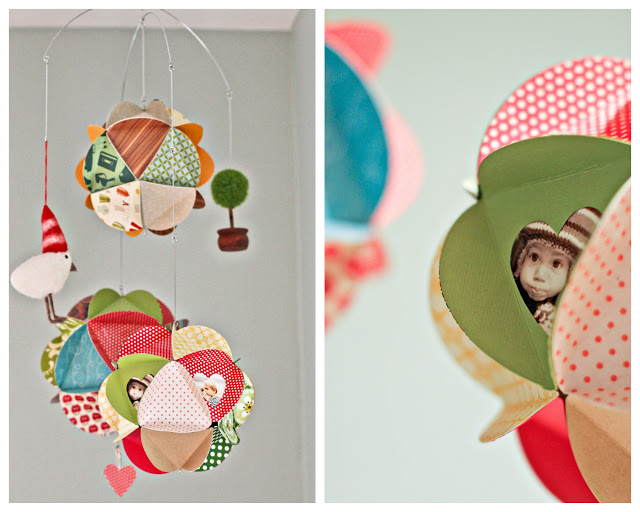
Hope you like this tutorial.
Source: emilyburnette
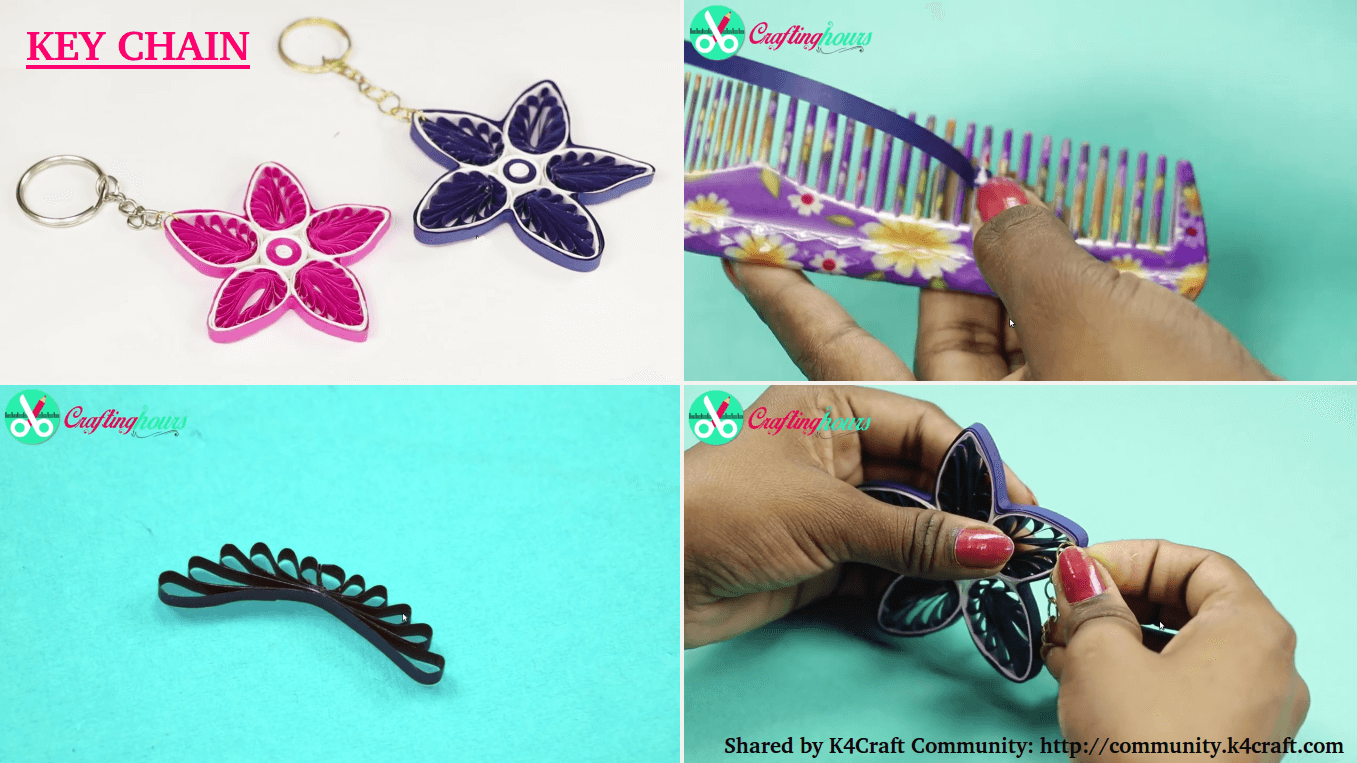
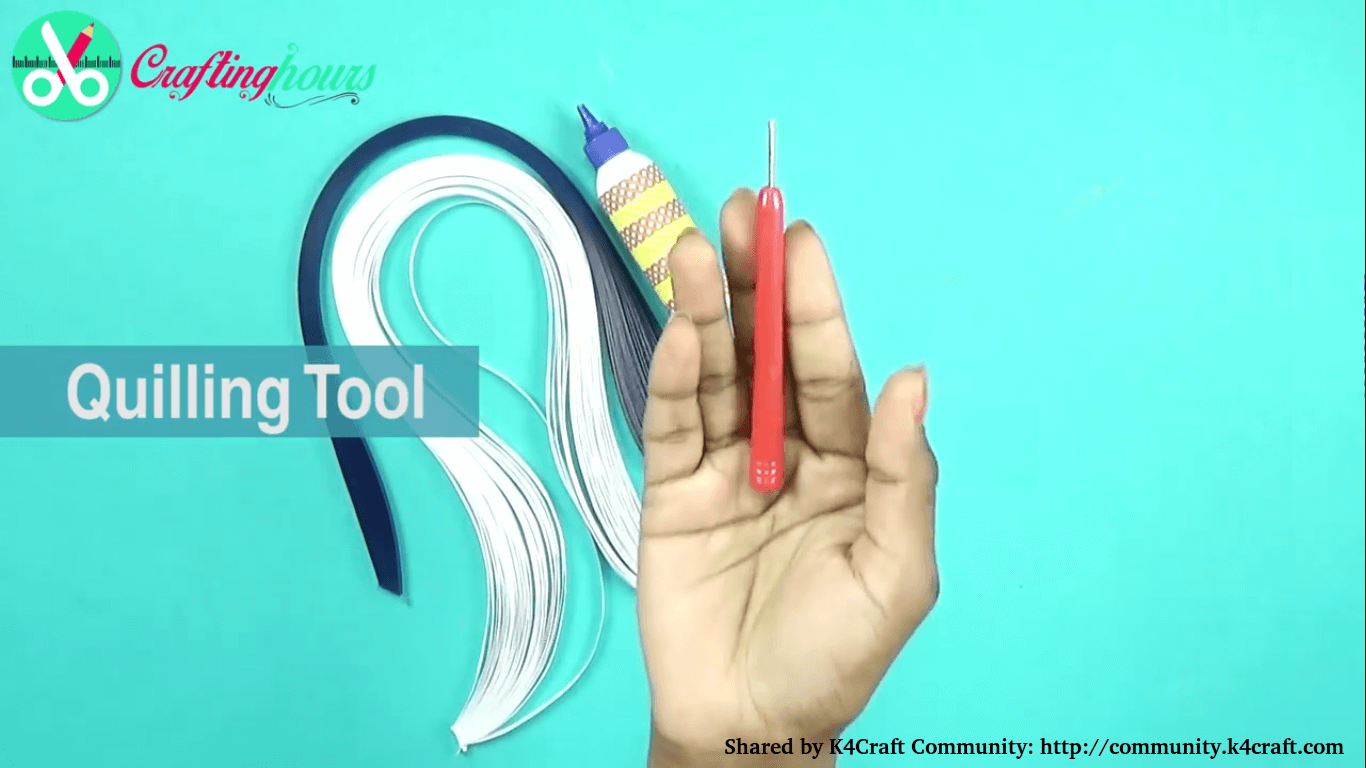
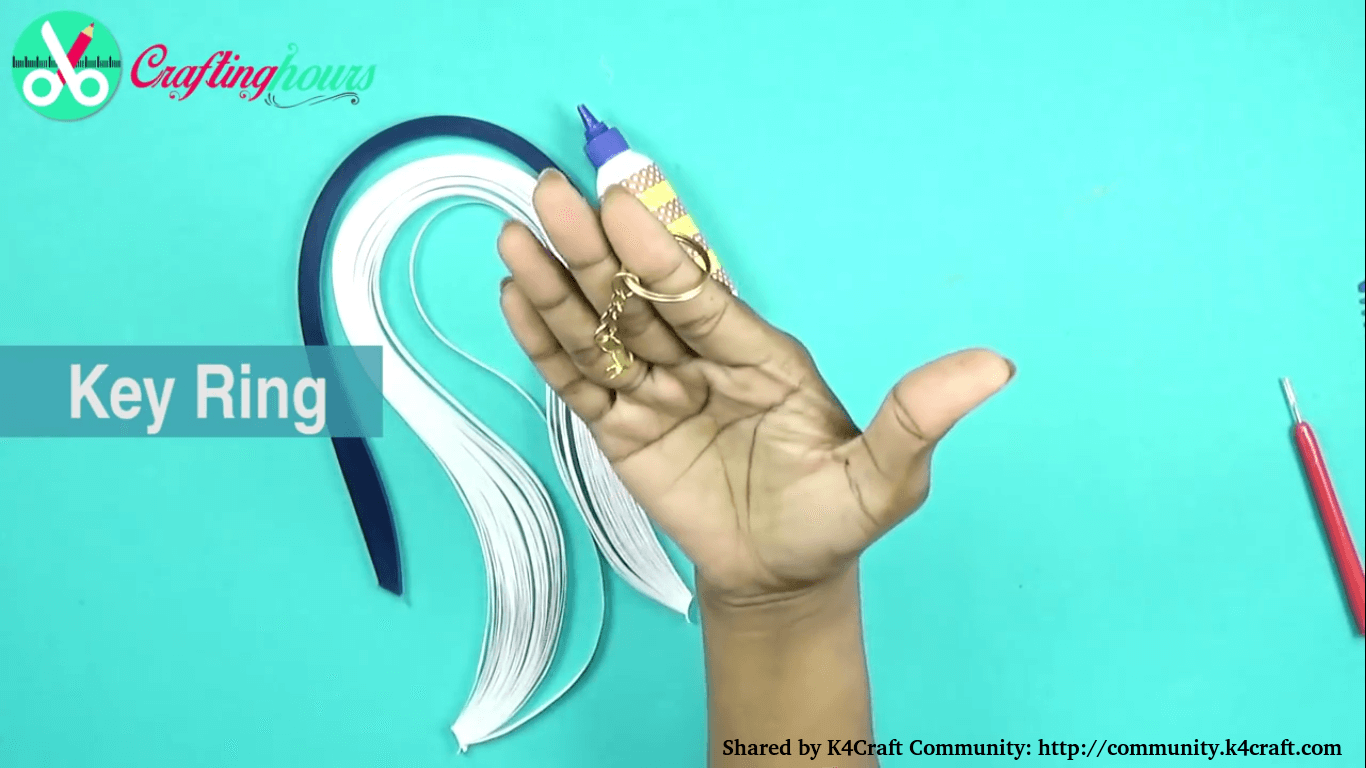
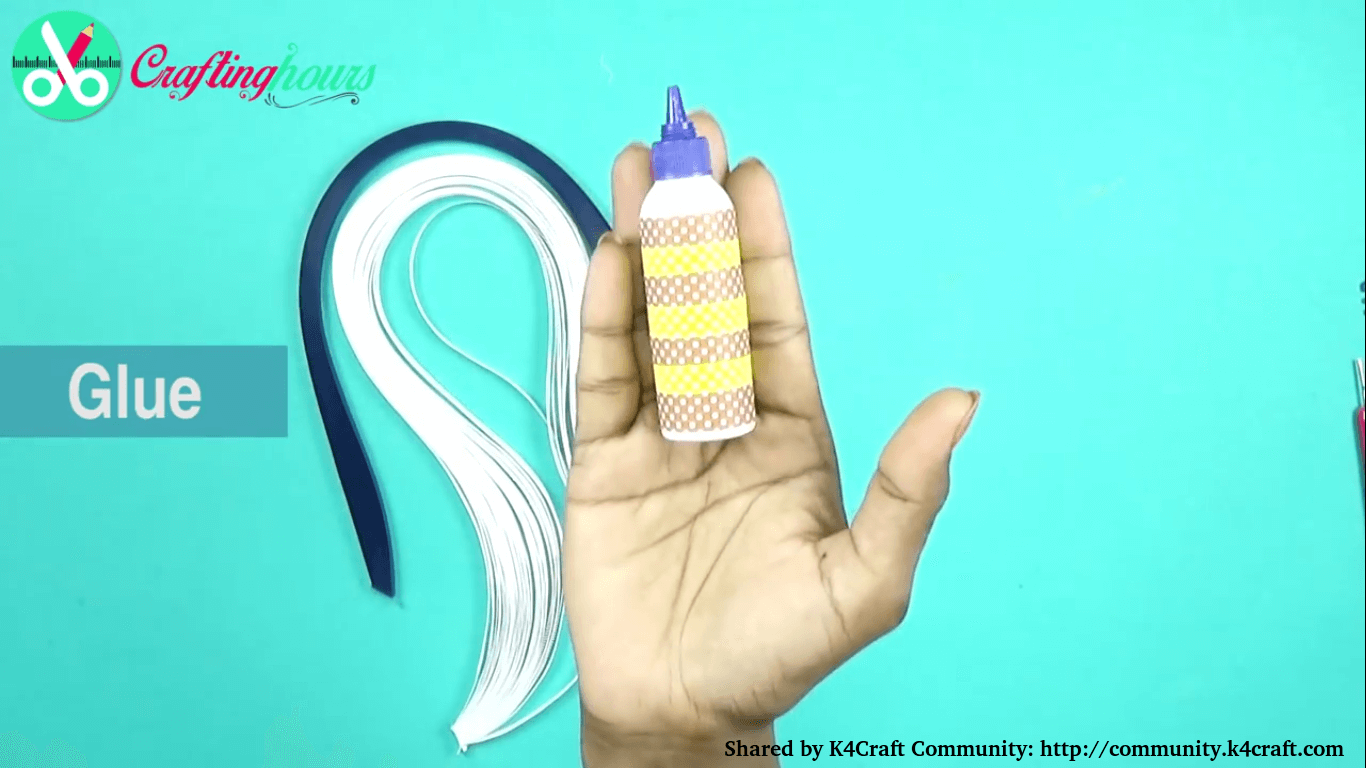
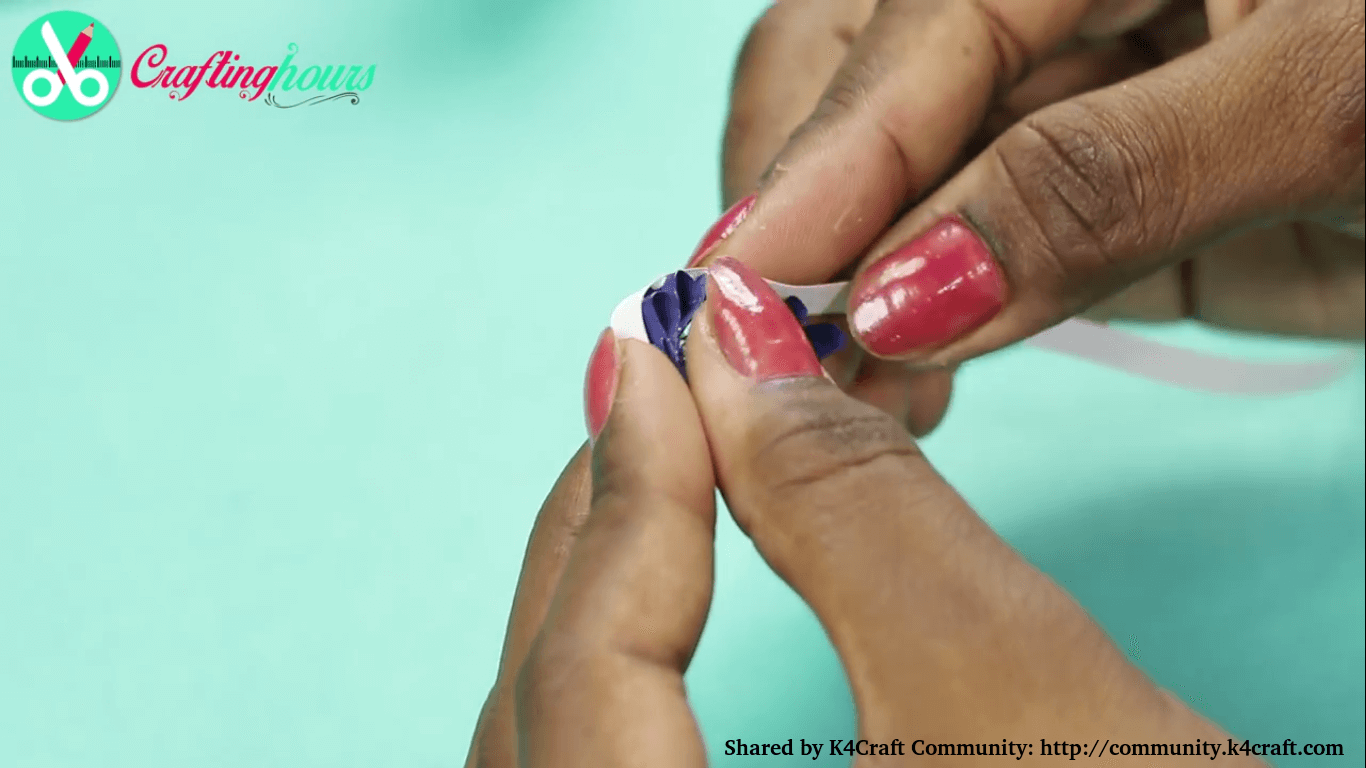
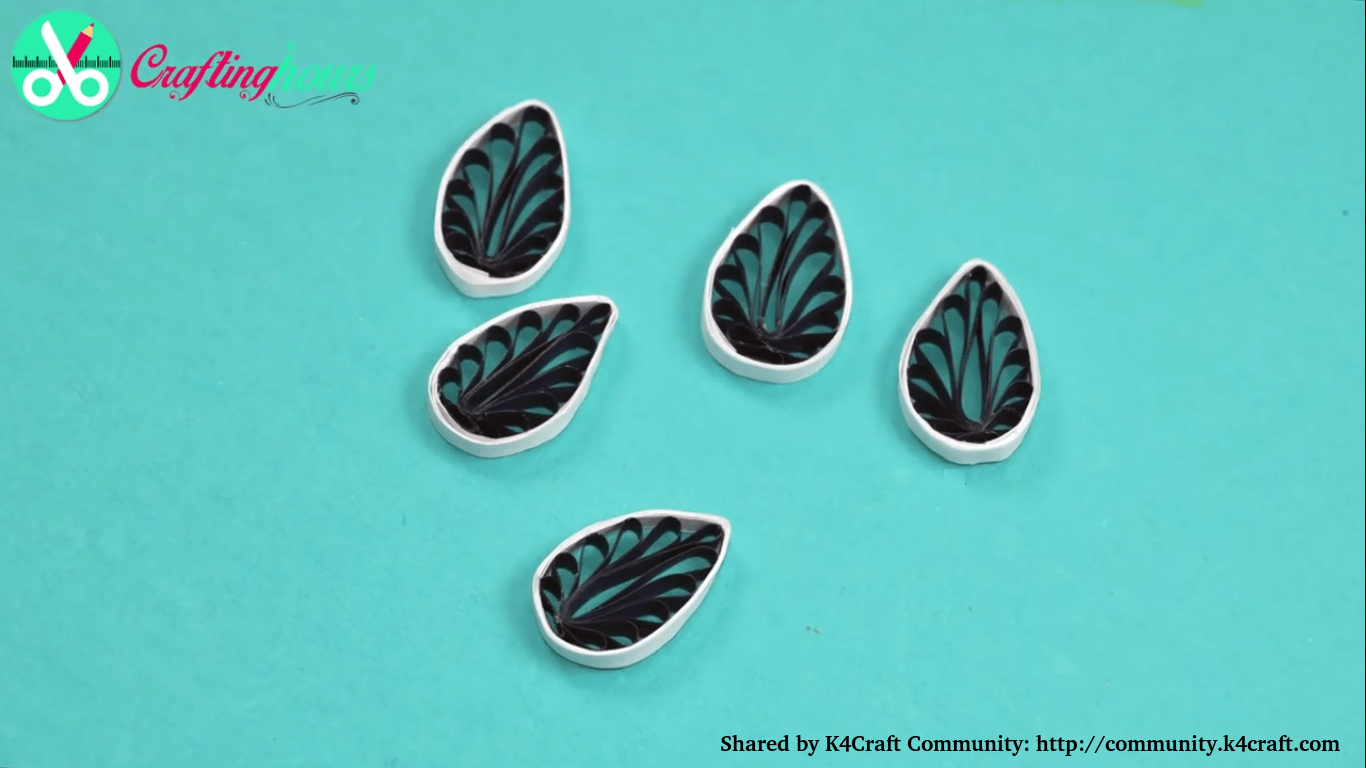
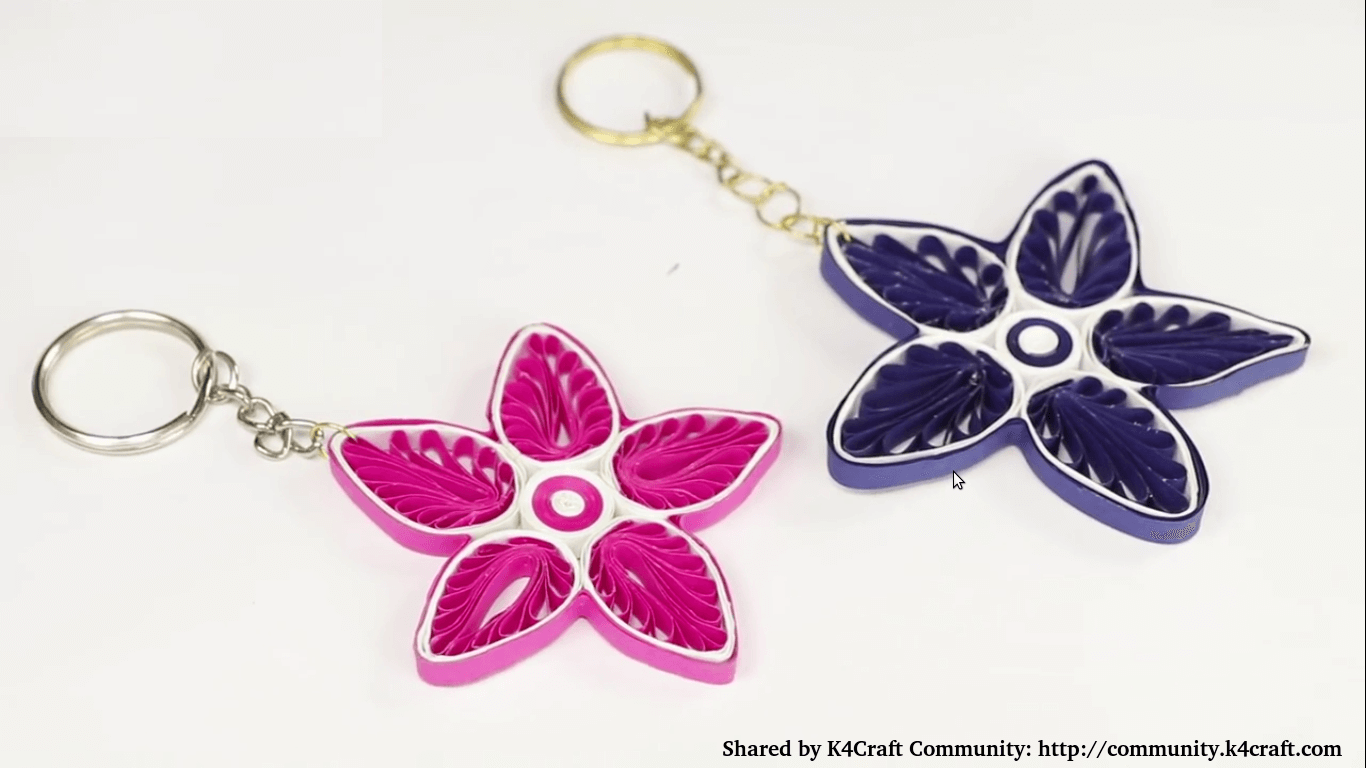
In this tutorial you will learn how to make a beautiful paper quilling key chain at home just in 4 minute. You need not to be worry if you haven’t done any paper quilling activity before,you will find this video quite simple. You just need to follow easy steps. Making key chain with paper is one of the best quilling ideas you will ever find! So, what are you waiting for? Let’s get started.
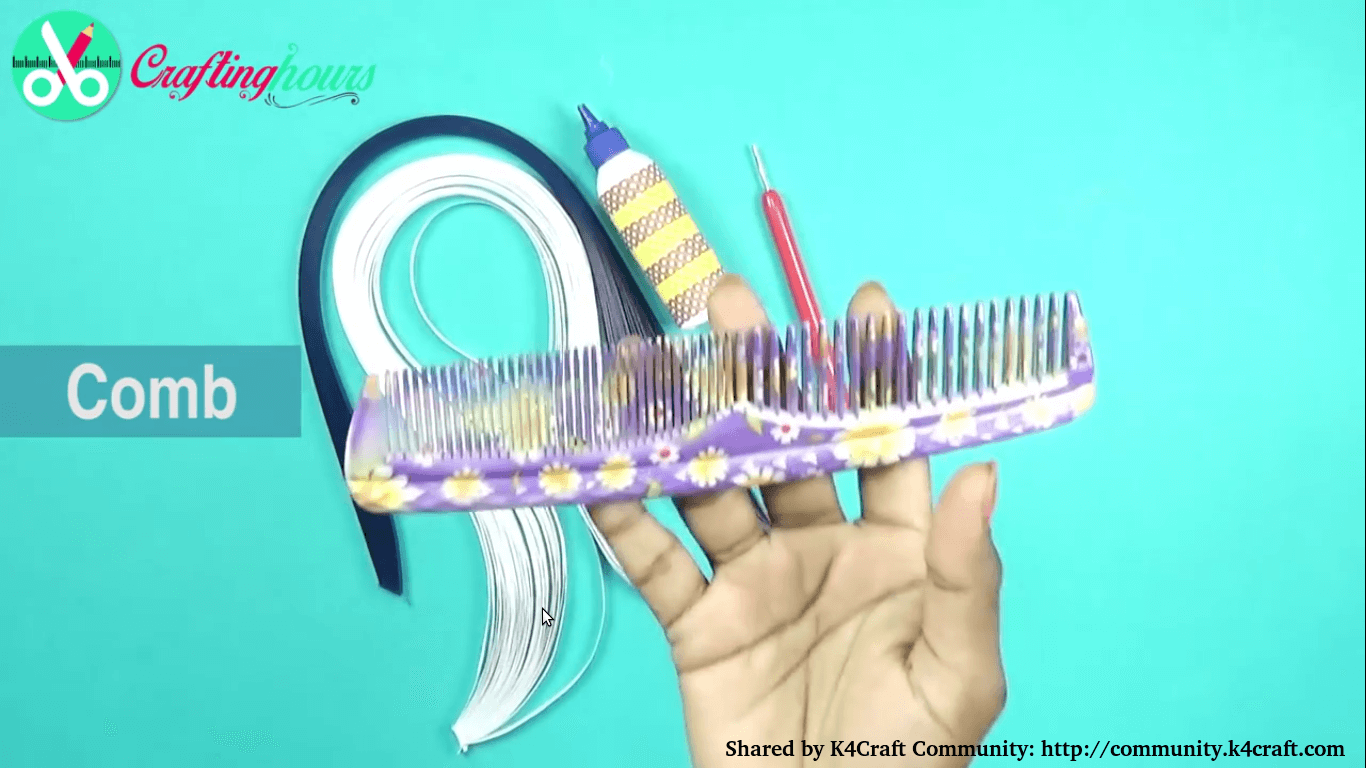
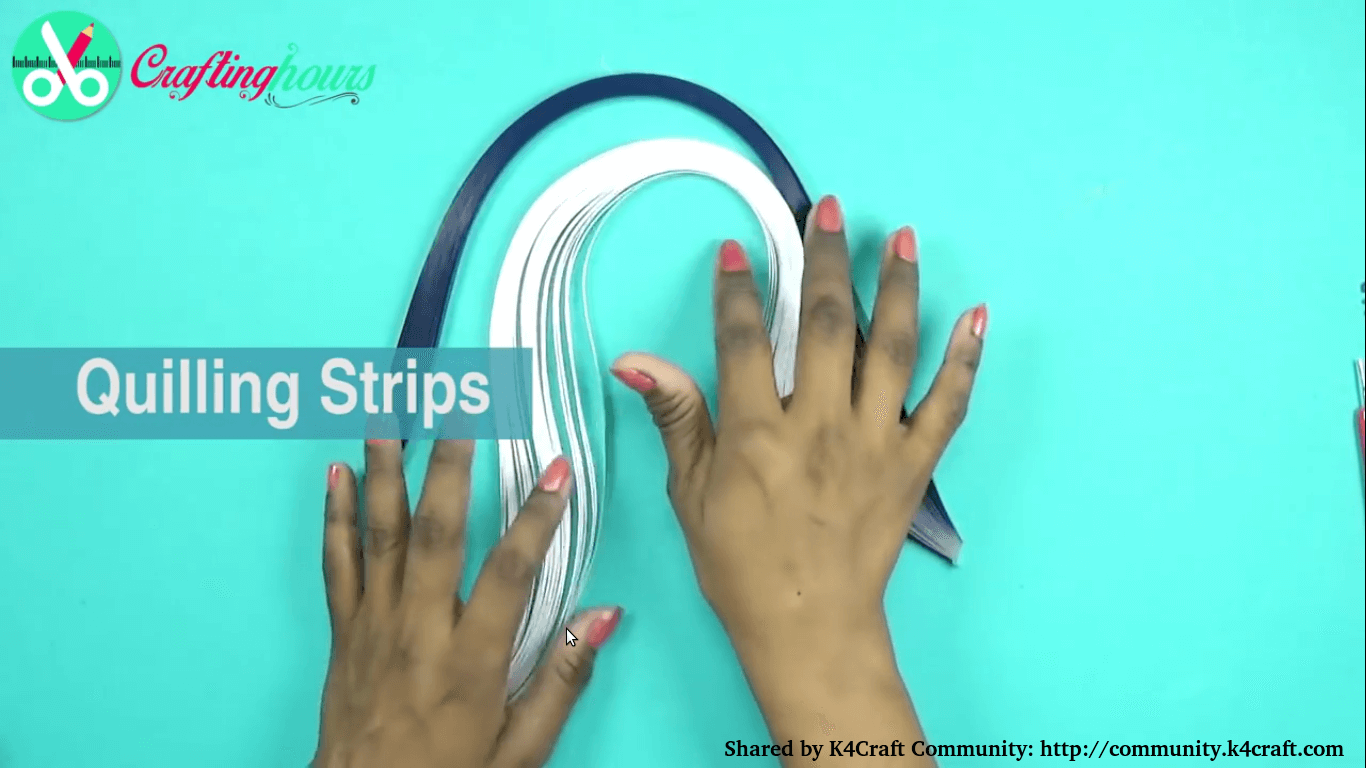
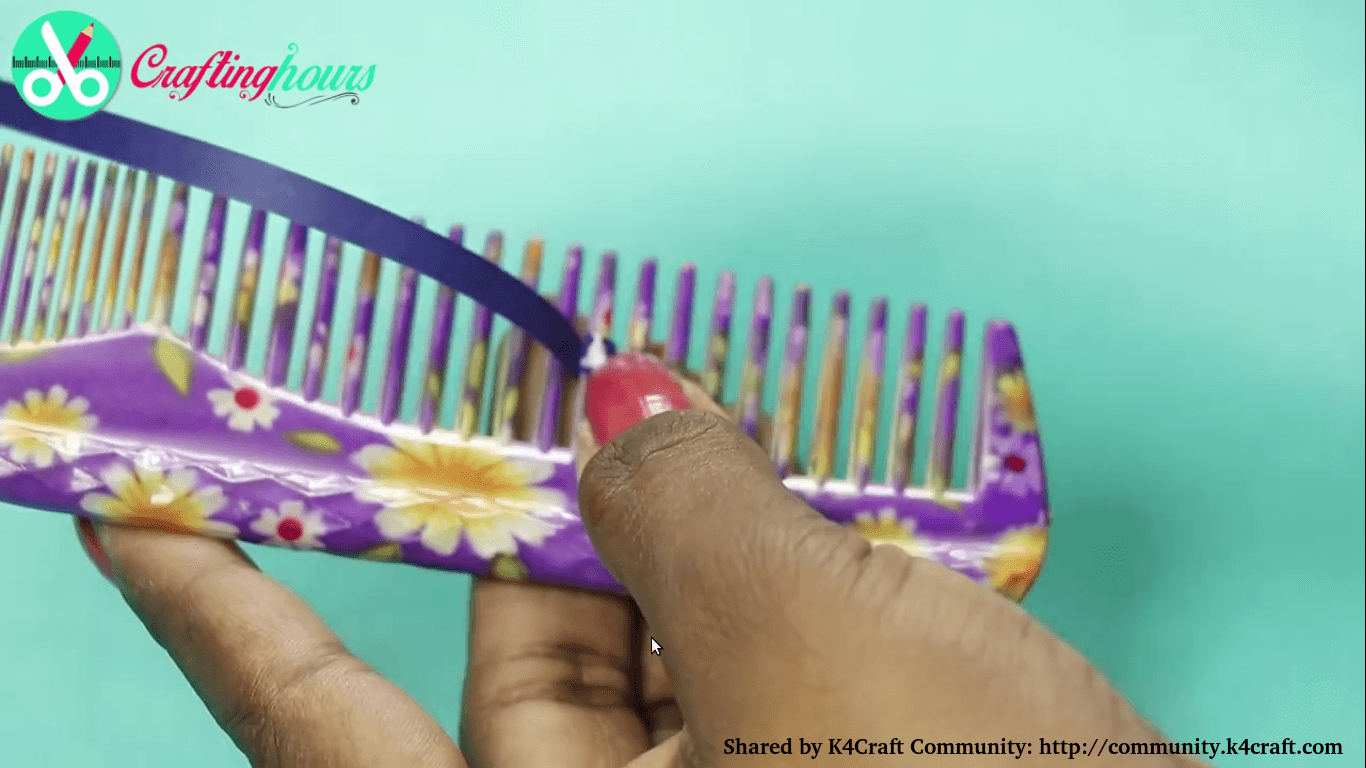
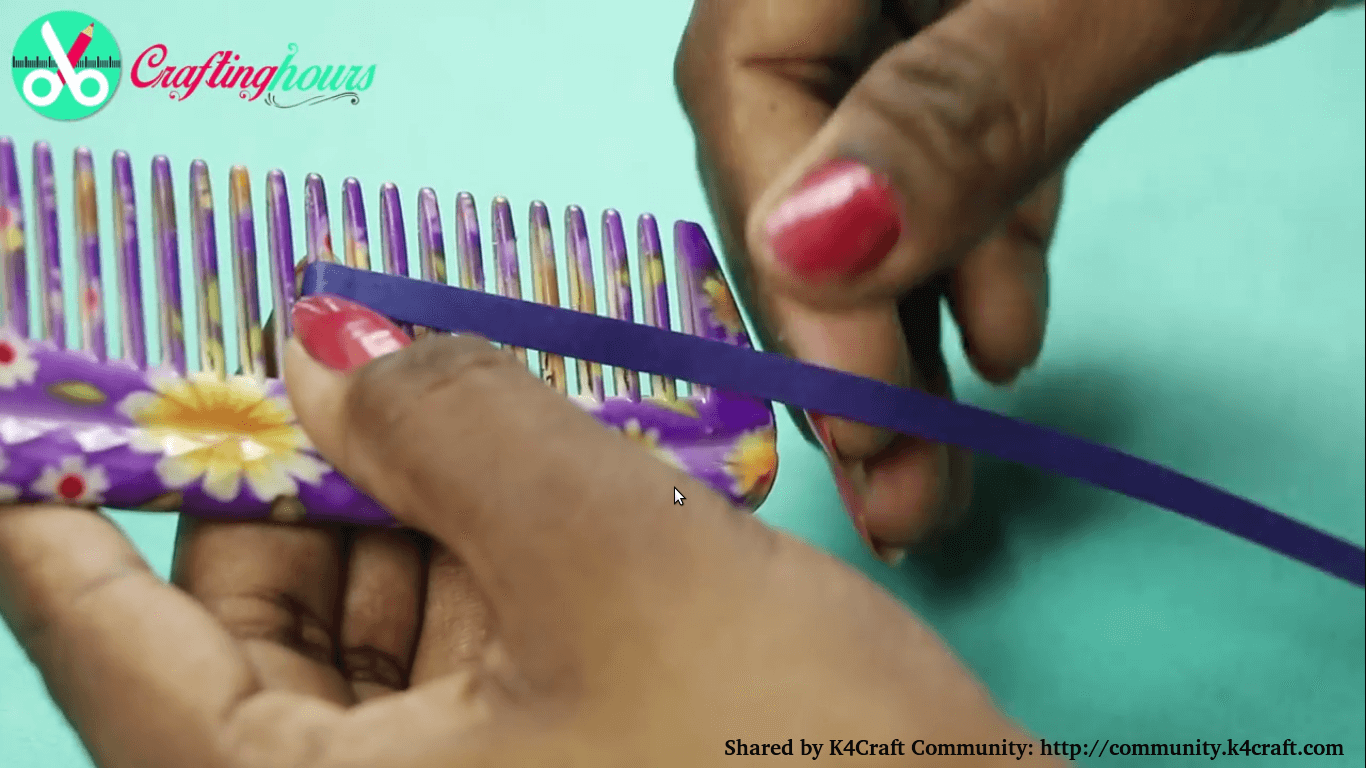
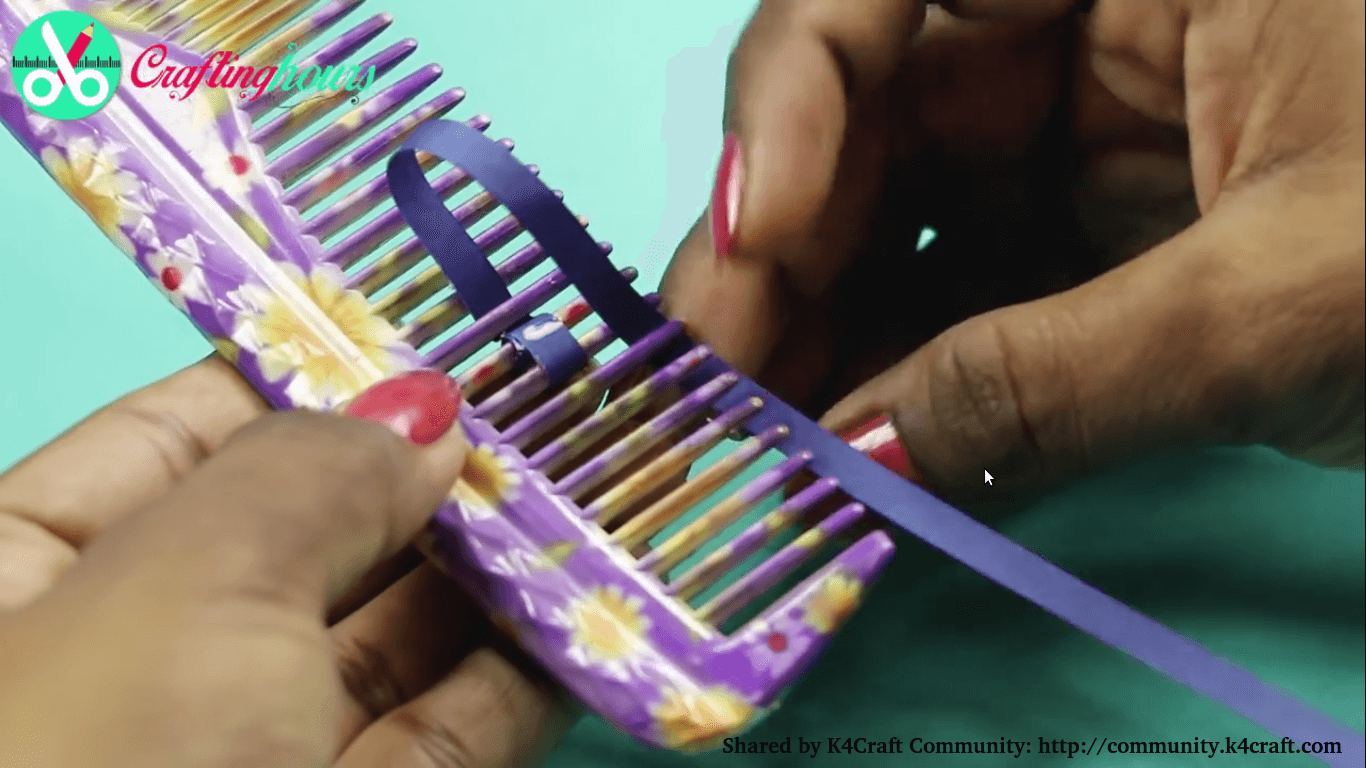
1) Take one quilling strip and roll it on comb tooth (as shown in video)
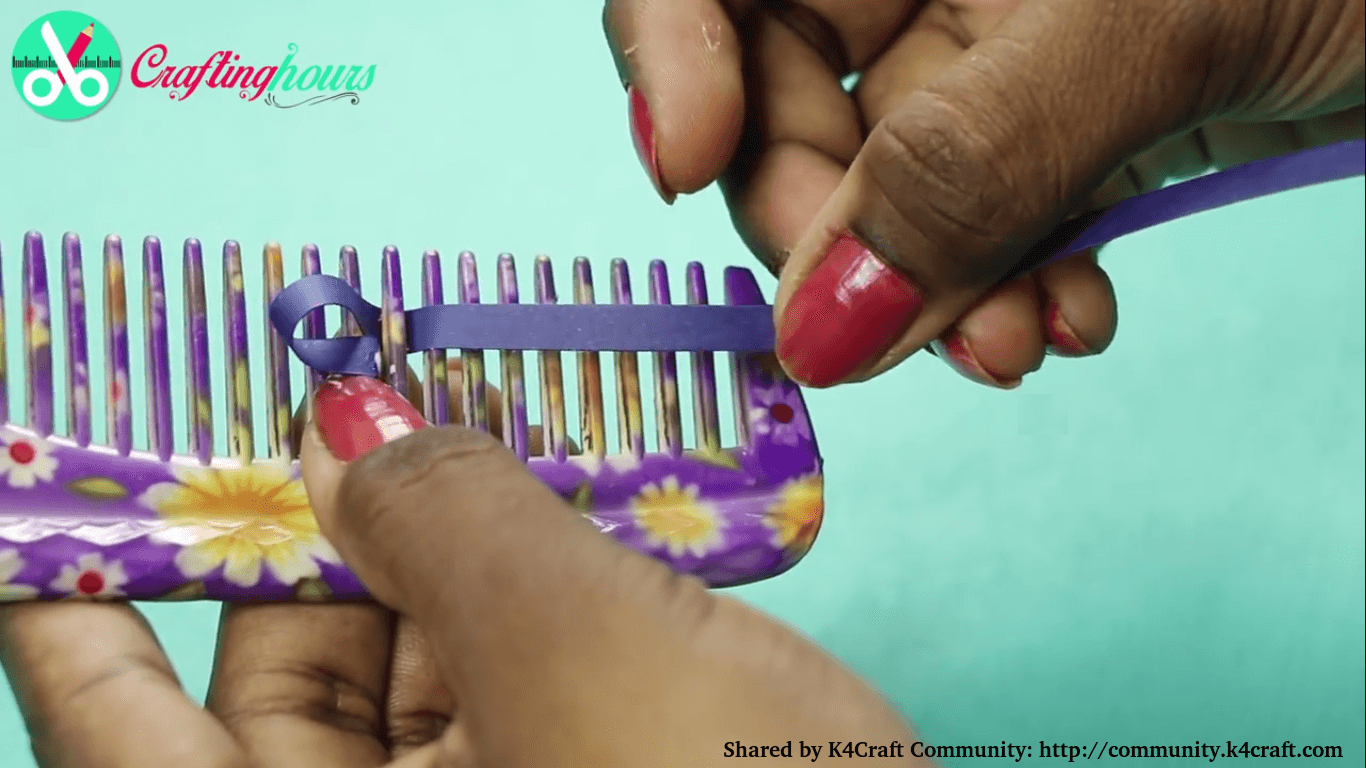
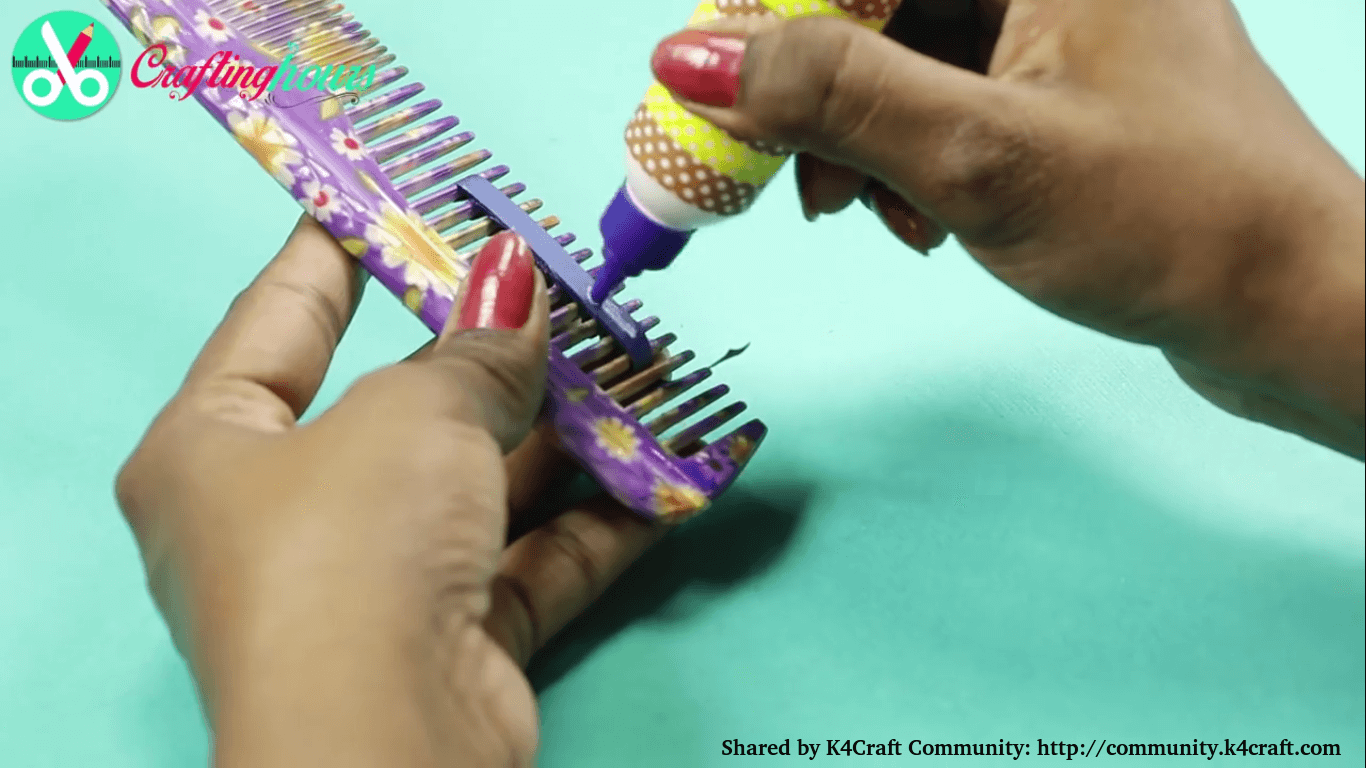
2) Now, fold that design into half and paste another quilling strip on it as done in video.
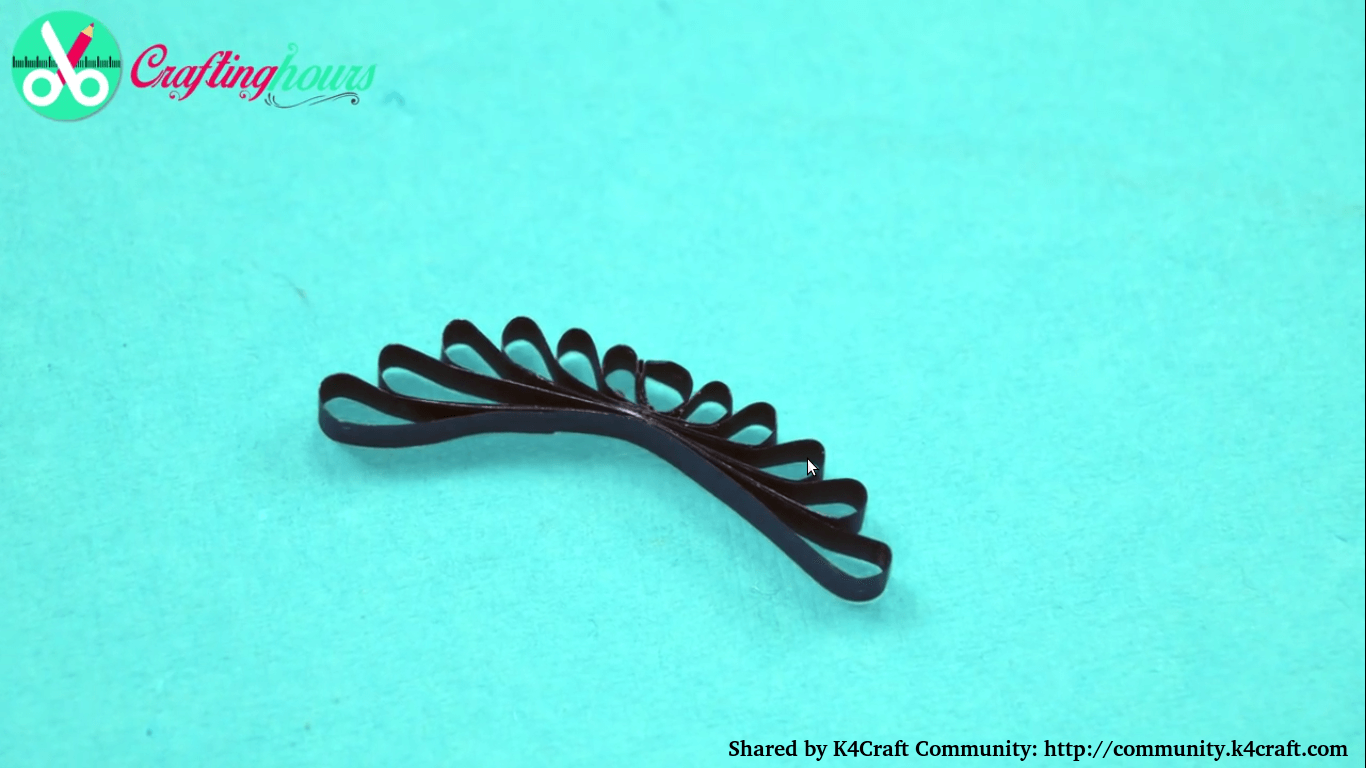
3) Repeat above steps for more design.
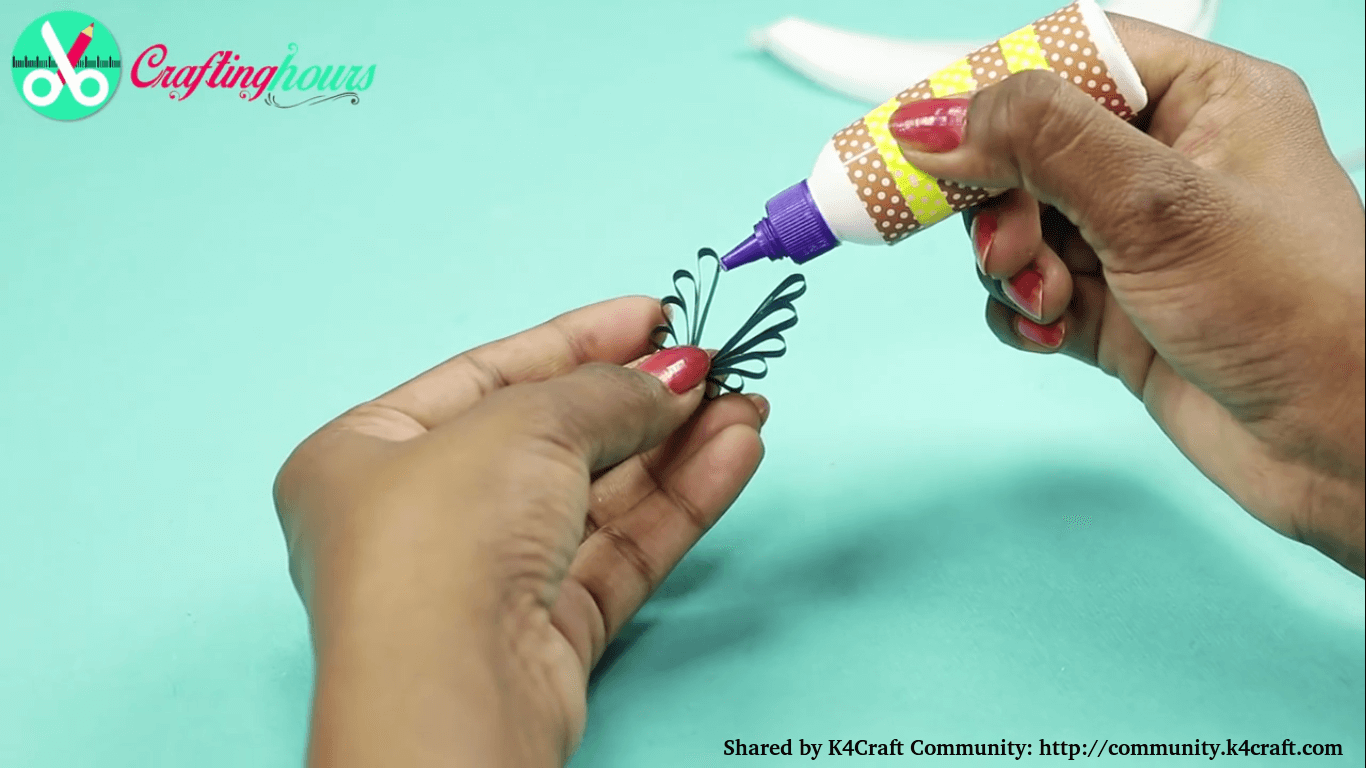
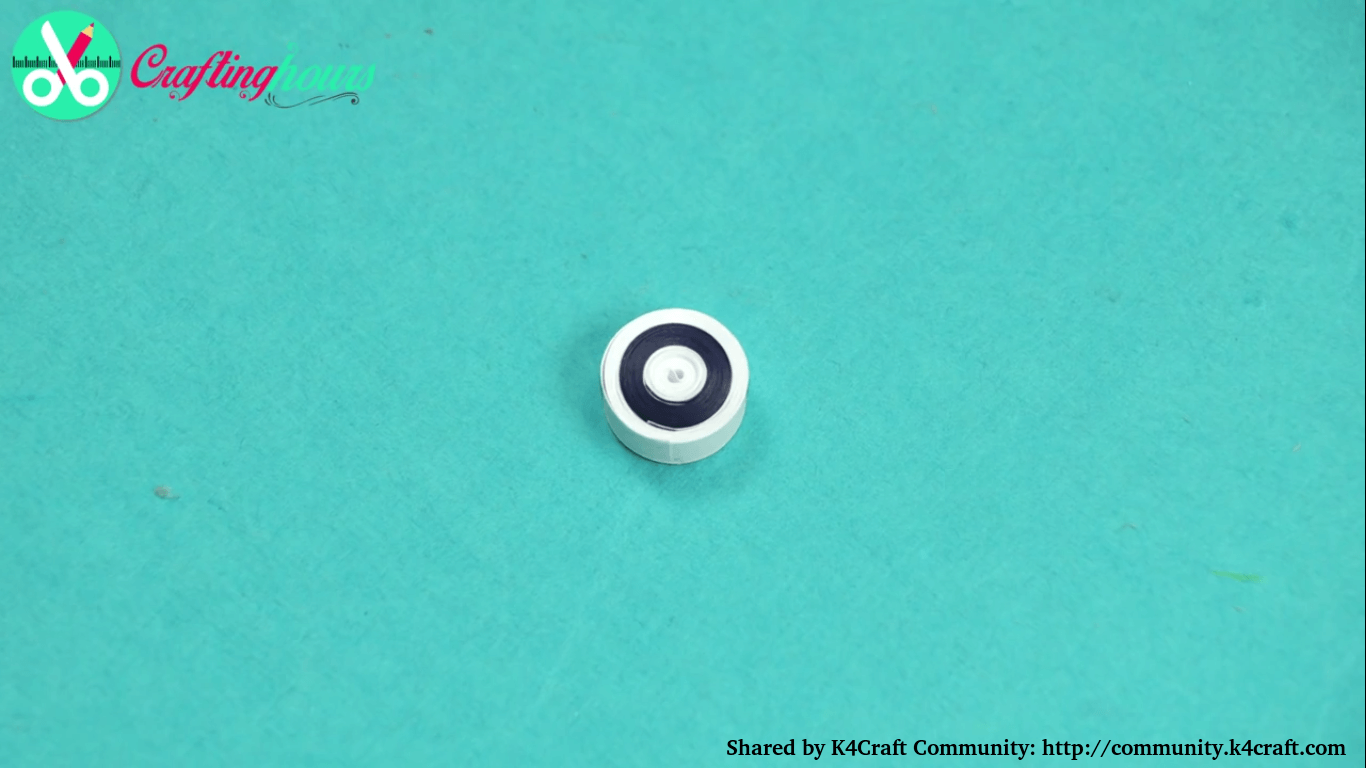
4) Now, take 3 quilling strip of different color and roll it using quilling needle.Paste all the petals on that circle to form a flower.
5) After pasting all the petals together,cover that flower with another quilling strip and hang key ring on that flower. (as shown in video)
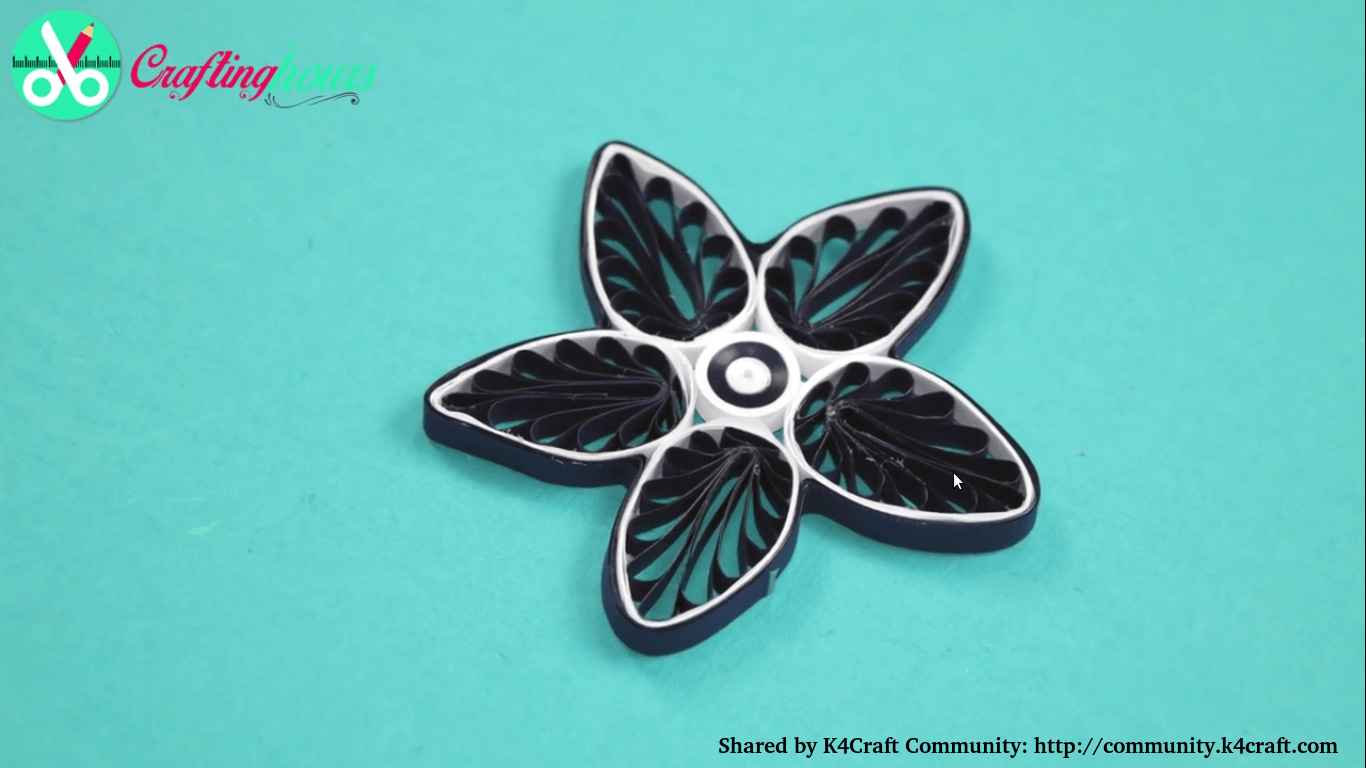
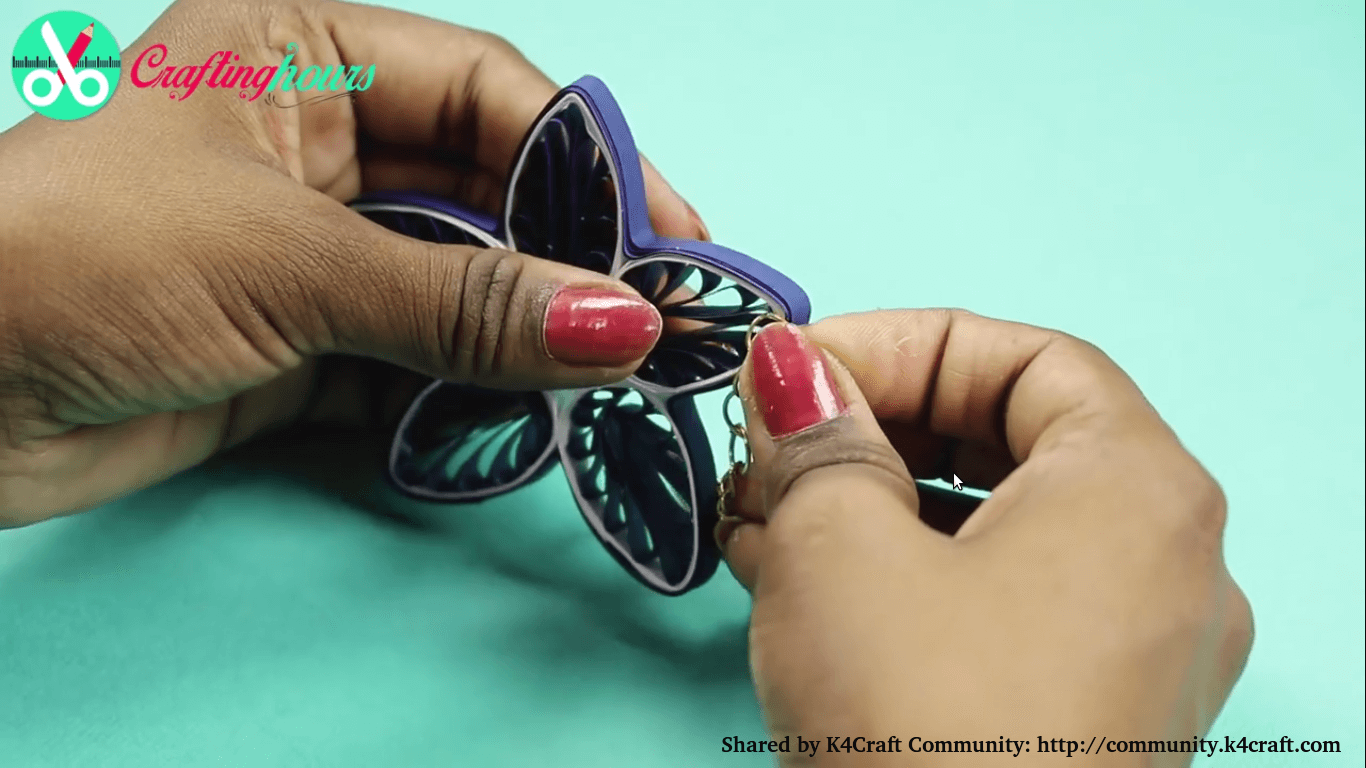
Your beautiful DIY paper quilling key chain is ready. Hope you liked it. Stay tuned for more crafting tutorial.
Everyone loves to keep beautiful key chain. How wonderful it would be to make your own key chain at home! Crafting Hours brings you this exciting DIY Crafts activity on paper quilling to help you learn how to make key chain with paper!
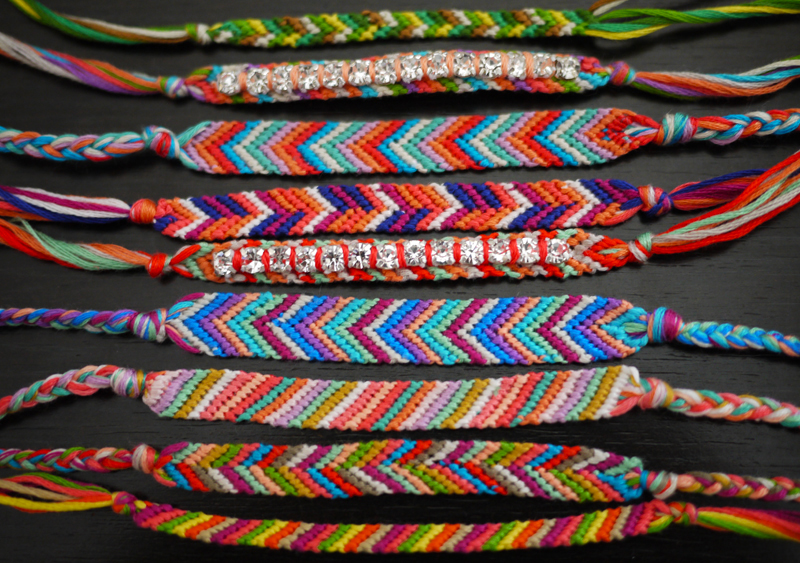
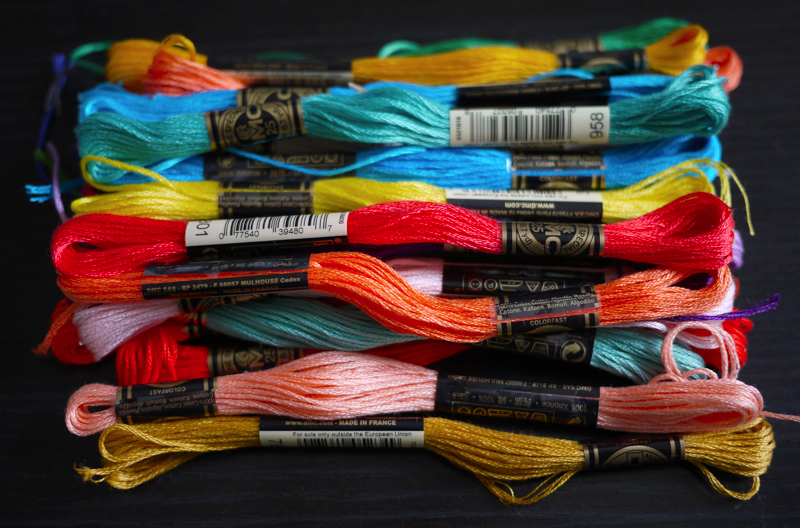 Start by cutting several strands of embroidery thread at about 24 inches each. Make sure there are two sets of each color. Combine the threads and tie a knot, leaving at least 3 inches of slack. Tape it to a flat surface or safety pin it to a pillow. Separate the two sets, arranging the strands in a mirror-image pattern with the outside strands the same color and so on moving inwards.
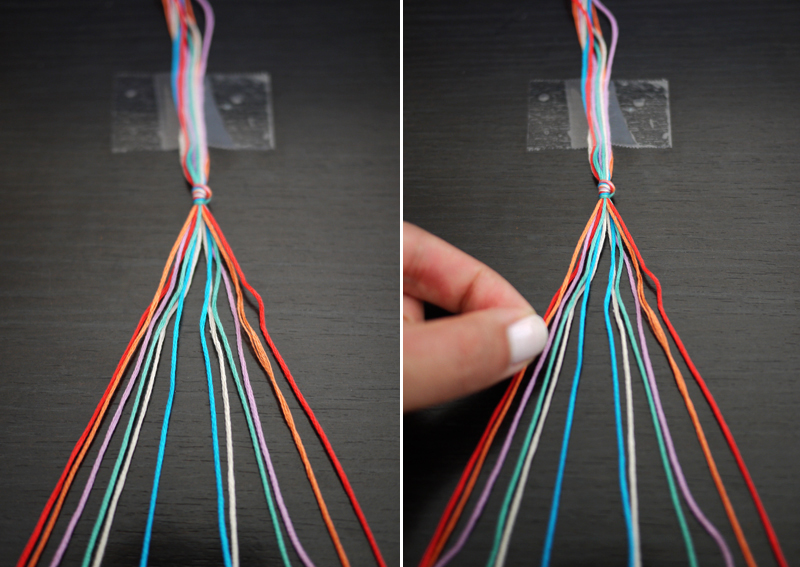 Start on the left side with the outermost color (shown here in red) and make a forward knot by creating a 4-shape over the 2nd color, loop it under and back through the opening.
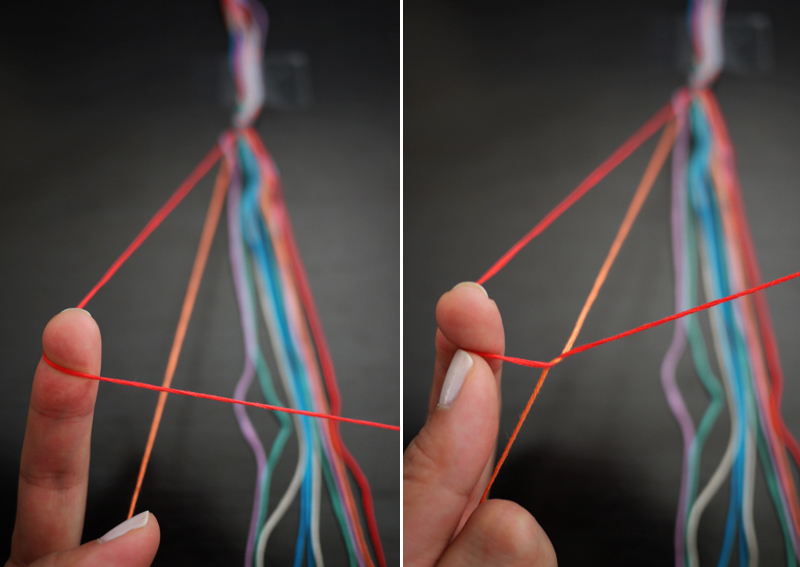 Pull up and to the right to tighten. Make the same knot twice over each color. Continue knotting over each color, towards the right, until the outermost color has carried over to the middle. This is one half of the chevron pattern.
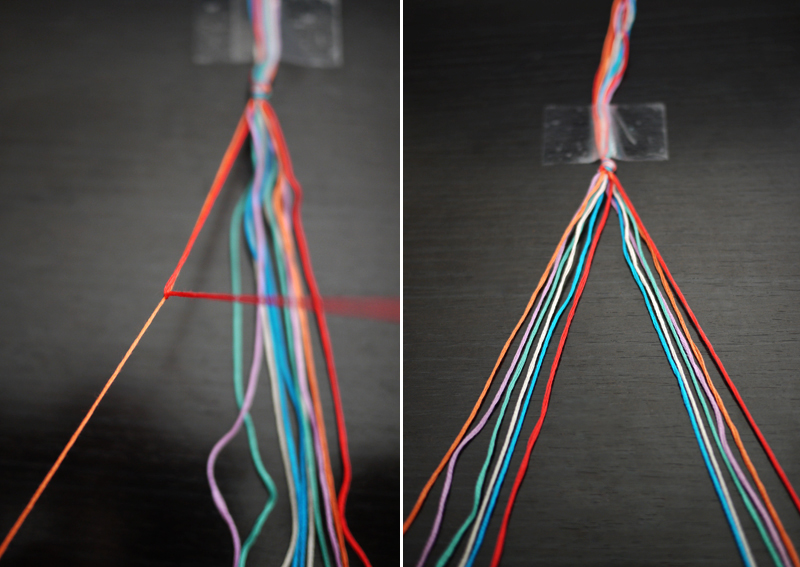 Now pick up the outermost color on the right side (show here in red) and make a backward knot, creating a reverse 4-shape over the 2nd color, loop it under and back through the opening. Pull up and to the left to tighten. Don’t forget to knot twice over each color!
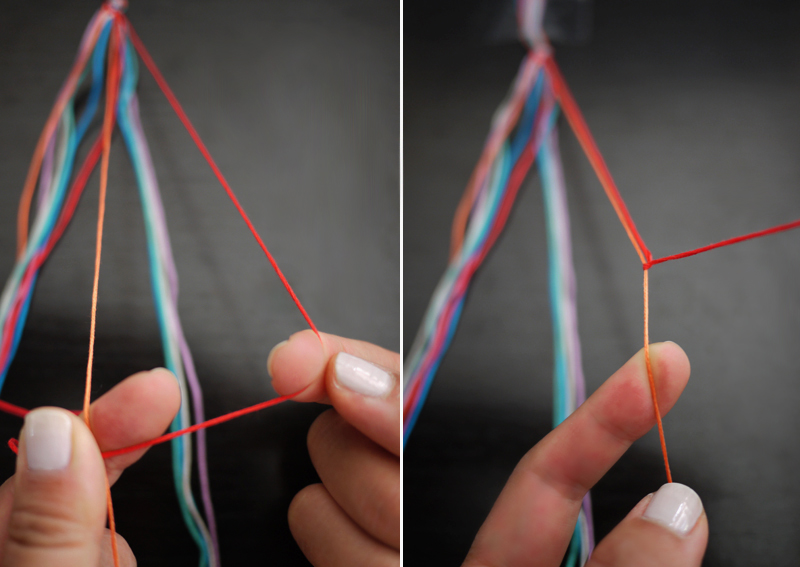 Continue knotting towards the left until the outermost strand reaches the middle. Tie a backwards knot with the two middle strands to connect the two halves. Did you remember to knot twice? The first chevron row is complete! Continue with the the next color, which is now the outermost strand . . .
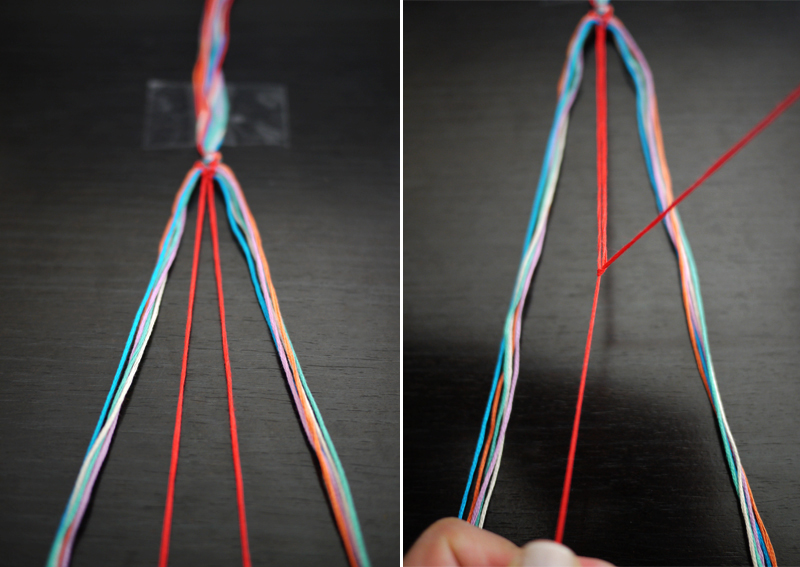 Remembering the color order is important for the first few rows but after the 3rd or 4th row, the strands will fall nicely in place. Finish it with a knot and a braid.
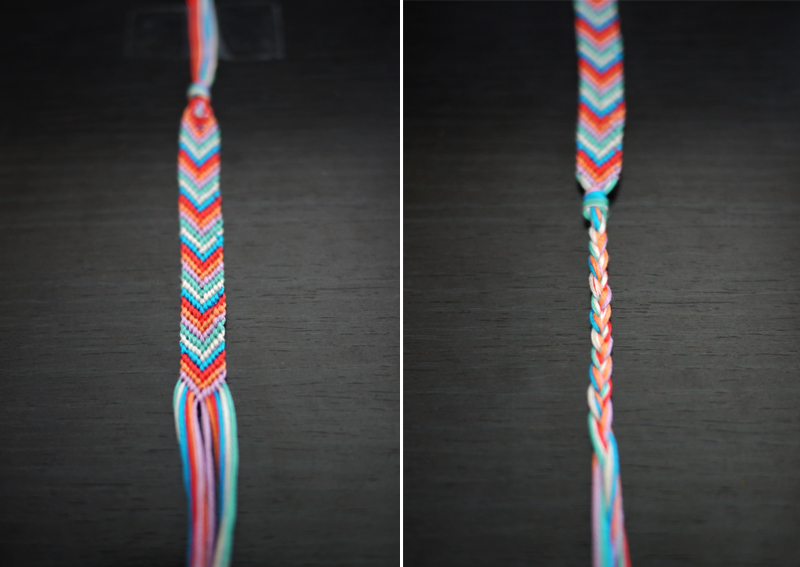 For a striped bracelet, cut one set of colors and simply carry the outermost color all the way through to the right side. For an assymetrical chevron, mix the colors when dividing them into 2 sets. Be sure to count the number of strands so you know when to stop in the middle each time. For an embellished bracelet, take a small piece of rhinestone chain, glue it to the top of the bracelet and stitch embroidery thread between each rhinestone with an embroidery needle.
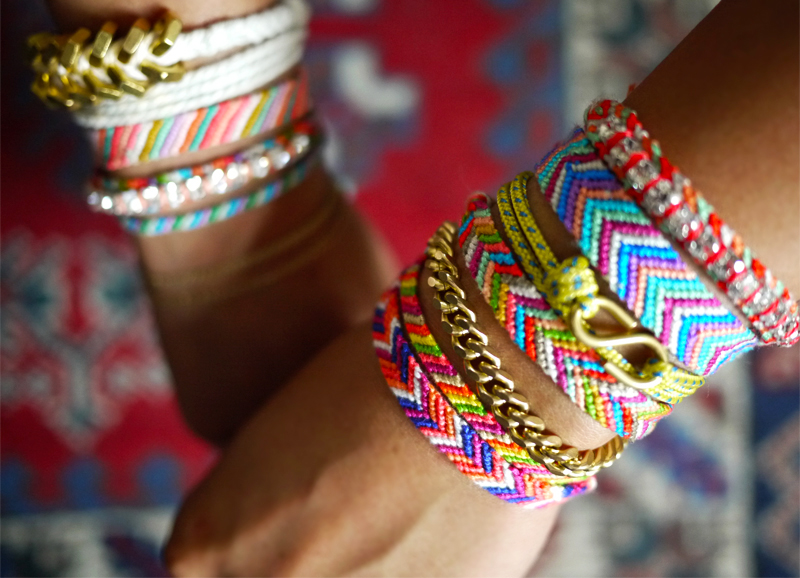 Source