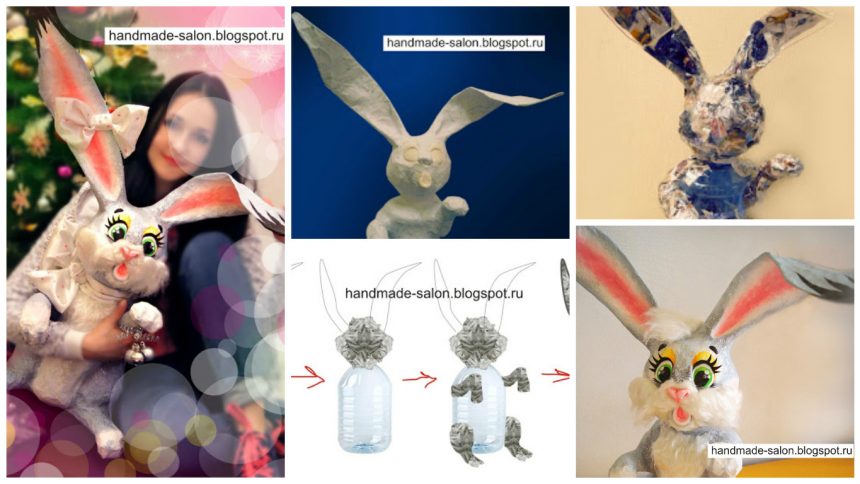
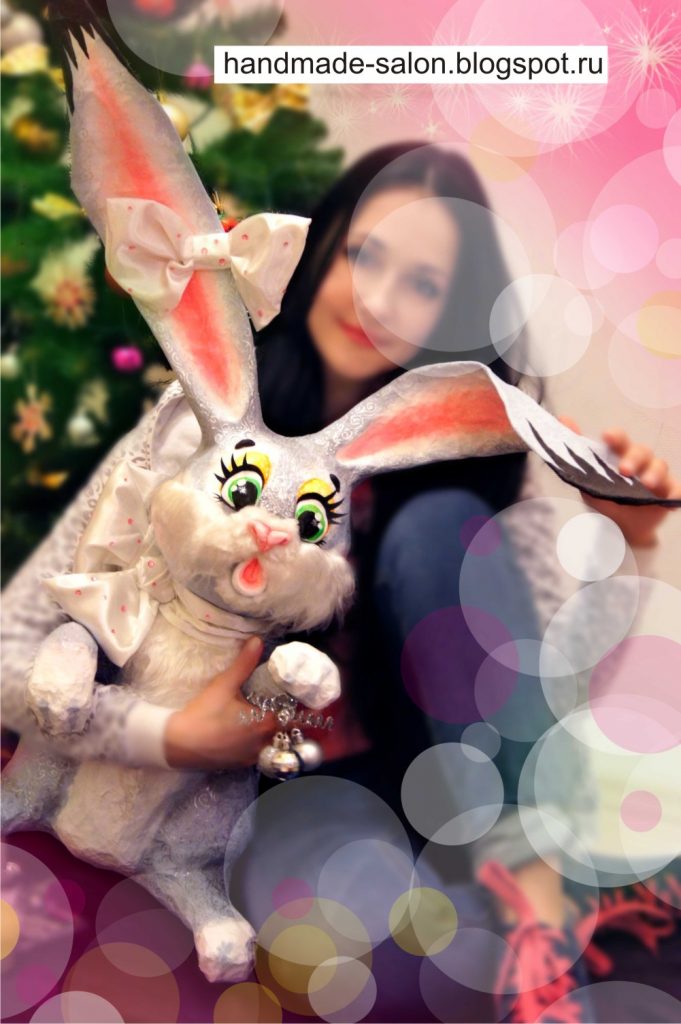
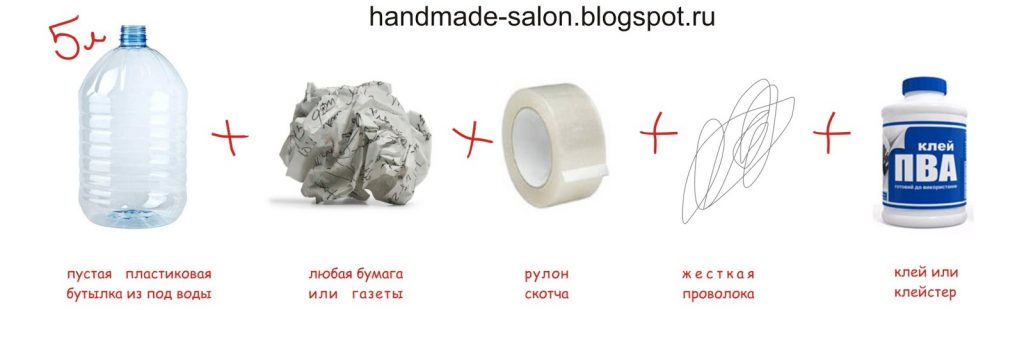
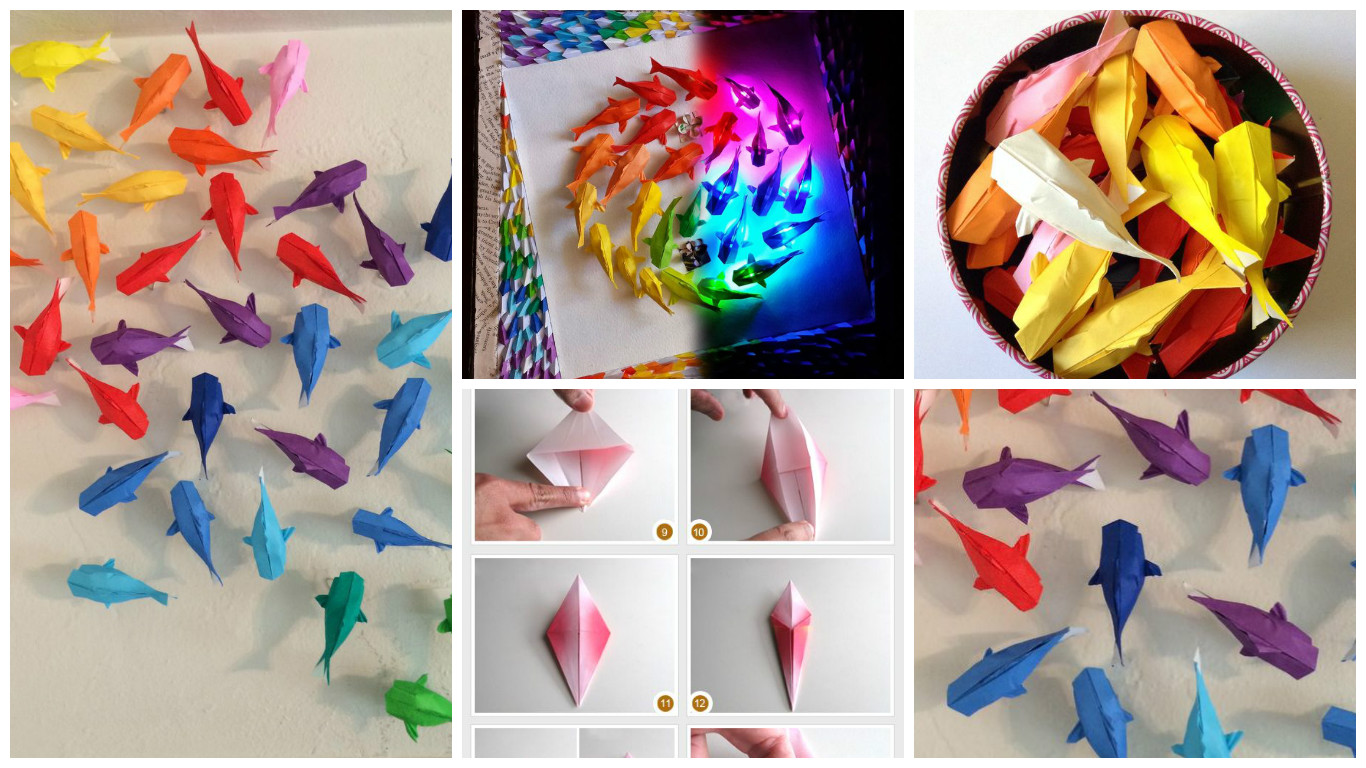
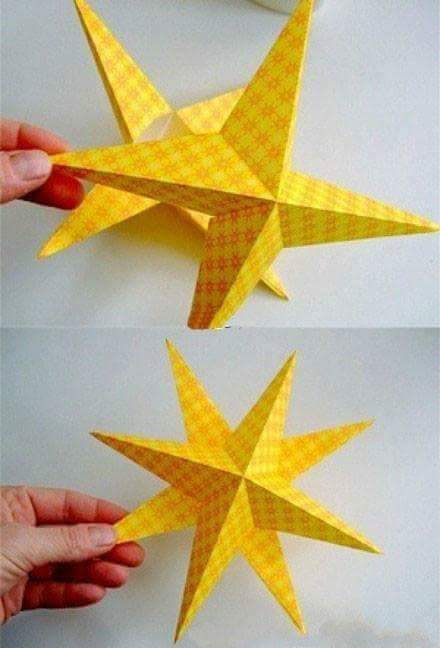
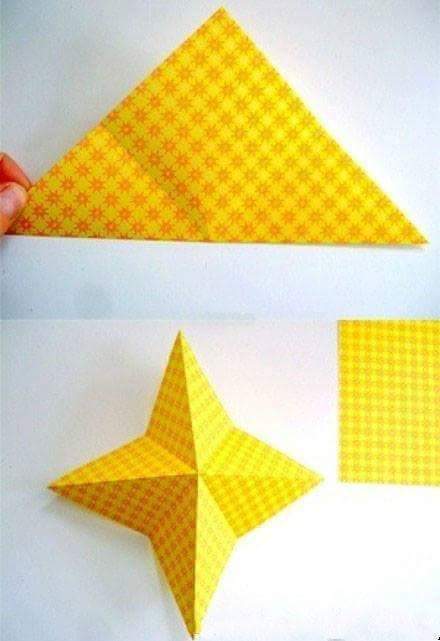
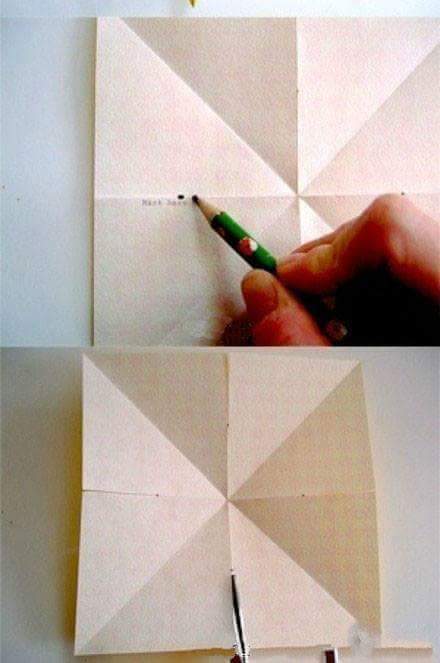
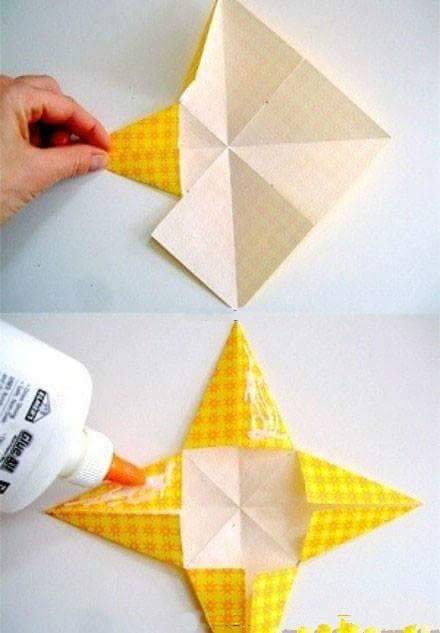
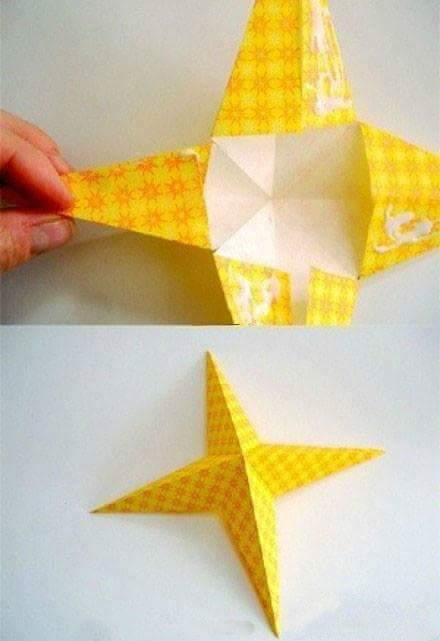
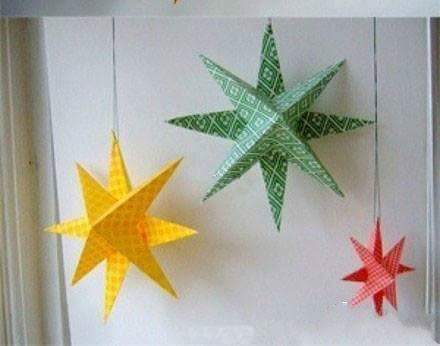
How to change the matted hair on the doll’s head to the new – Step By Step

hair on the dolls 1

We need the scissors, about 100 g of yarn (the little head out and even less than 50g). cut into yarn on a yarn length as we need to. Note that at the back should be longer thread than under the back of his head. This is useful if the yarn is small and it is necessary to save her.

Now we still have a long special needle. I bought this for 16 rubles in some ordinary sewing.Ona was so acute that the ability to all the fingers in the blood hair while I was doing. Be careful with it and do only when your children went to bed (for their safety).

Here’s a needle needed.
Now we start to work.
Stick the needle from the top down, as the top is more convenient if the head of a Barbie can be on the top and bottom. In my case, only the top down. On the head-holes were points from the previous hair that’s in there and stick the needle and take it out of the head, so you can thread your hands to grab. By turns (close together) are stuck on queue 3 strands and remove them from the head. Then, exactly 3 strands bind simple single node in a single whole. 3- Why? If 2 unit- long if more than 3 begin to constantly get confused when the top pull-up, tired hook correct.

Now, I’ll show how I fix the thread 3.

Next stage- should carefully pull all these strands 3 upstairs. We carefully pull slowly, alternately pulling the thread of one or the other, and then immediately pull all 3. Look inside, if not all sput Anno STI- well. Begin to make the other 3 threads.

And so on all head, fastening thread 3. Made strands in a braid or remove the anchoring rubber so as not to interfere with our work.

As a result, we get just such a head dolls.

But other dolls, which have undergone a -the hair restoration. Now those restored dolls have a lot. Priznatsya- I am delighted with such hair.

Thank you for your attention!

How to make beautiful bench for toys

bench for toys 1

work needs:
-fanera 6mm
-palochki for eating sushi
-Bamboo napkin
-kley “Moment”
-shkurka abrasive
-balonchik paint

I took a 6 mm plywood and painted just such a preform sidewall bench and cut her jigsaw, then mark a point for insertion of stiffeners and drill  – 4 holes.

Here’s what happened – but I know that you will bear with me and little Kosyachkov not notice …
Now is the time to remove all burrs and barbs – for that I took, abrasive sandpaper and grind workpiece edge.

The holes that I drilled – put rods of land, slightly eroded tips, pre-lubricated and sticks and holes glue “Moment”, who says it was necessary to take the PVA, but I got used to working with this adhesive.

It has turned out here is the base – is the glue is not frozen – it is necessary to equalize.

On the edge of the sidewall nano she again glue “Moment” and wait for 5-7 minutes.

And then I put a bamboo napkin and strongly pressed.

We need only look to the napkin is flat.
 And now we have to paint it – took the paint, I like balonchike, easy to apply, dries quickly, and color stable.
eleven.
 That’s the end result – a bench for -zo lotis Togo color toys.
 And of course my new inhabitant Mishkin house

How to make a bed for Barbie dolls – Step By step

bed for Barbie dolls 1

Today we talk about a double bed for a loving and gentle doll couple.
And it was so ……

Look, conceived I then himself bed make sketch already sketched out … How do you help?
– Why not help – smiling Max – with the right!

they took a piece of polyethylene foam

chopped and glued glue “moment”, but followed that to the length and width is the just right bed was

How well that a close friend is always ready to help!

that lie, both on the beach ……

the back of the bed is assembled from three elements

sheathe her pink crepe satin helped herself Julia

feet bed carved solid, stable, from the same polyethylene foam. and also sheathed with a cloth.

When the legs and rest were sewn to the bed, it has become more or less finished look

Gleb does not miss the opportunity to feed Julia light dinner on the new bed)))))) (for some reason he always thinks that she eats little)))

from a piece of foam on the bed sewed comfortable mattress

A top – a sheet

She lay down good)))

Blankets have the very thing that Julia embroidered Gleb freebie

And now – the fun !!! Top cover – for beauty which is embroidered with lace and pearls and sequins

And the amazing thing … !!! On the underside, the white side also got a good result!

Sew to the veil “apron” and admire the white side

Overturn veil – and get pleasure from the pink side

now sew the pillow … look at it … surprise grimacing, frowning, twisting his lips and a puzzled trying to understand how in a time of sewing one small pillow at the person might abyss all sense of proportion and taste … yeah … we refer to this product in the trash and safely it to reset:

the pillow we come from a very different end – make them as cover – two-color – large pillows for dad-bear (pink side)

and white

Medium pillows – to bear mom)))) pink side

and a white side

and very tiny pillows for a little Mishutka))) pink face

and white

So we get two completely different design of the bed – soft like a peach petal – white

and rich, luxurious – pink

Julia already was putting the last pillow and suddenly: “Oh-oh-oh-oh-oh !!! Hleb, CUTE, IMMEDIATELY CALL Aunt Frida !!!!!!! “-” Of course, my dear, is already calling that, beginning “(and he even scared)?

Aunt Frida arrived promptly helped and three hours later we had a girl

Gleb could not hide feelings – “Dear, you have me so well done, so clever !!!!!!!”

My Girl, I love you

How to make ostrich puppet – Step By Step

ostrich puppet 1

We need materials:
Fleece red (can be pink, orange, yellow, magenta).
Sintepon 1 cm thick.
Faux fur with long pile 20 * 20 cm.
Leatherette 13 * 7 cm.
Foam ball 6 cm.
Decorative cord lengths of 50 cm and 10 cm.
Two skewers.
2 cut toothpicks (4 sticks).
The line of 1.5 m.
4 beads.
Matches.
“Master” Clay.
Scissors.
Needle with thread.
Ruler.
The sharp knife of stationery.
Pencil.
A small hand saw.
Screwdriver with a drill.

Step 1: The body and the head.
Drawing on the size of 16.5 * 8 cm (height) and 12 * 6 cm (height) of the underside of the fur two rectangles. It is important that the fur from top to bottom.

Take stationery knife and start cutting the fur, with fingers slightly stretch fabric. In one place, you can take a knife a few times until there are two halves. Use scissors to cut the fur can not be as srezhet nice long nap). Important! The knife must be sharp!

Take a long stretch – this is our body. On one side of the middle two small slits do (5 mm) at a distance from each other by 2 cm. And on a small piece (head), one slit 5 mm.

Now fold in half with fur inside. Refill getting out inside the pile, so as not to interfere with it when sewing. Sew the two sides (on the machine can and can hand). Below and to the right.
Important! To fur by adding the correct lay: from top to bottom.

To turn out on the front side.

Thread the two ends of the cord length of 50 cm through a hole to get out cords on the front side. Aligns strings to the same length, we catch thread c Wrong side near the slots to ostrich legs do not over-tighten in the future.

Take folded in half and inserted into the body fur and head through the hole, which is not stitched.

 Take the cord match ends so that it is not dissolved.

Thread a needle in one addition. Take the cord 10cm long, inserted into the body at a depth of 1cm and a needle in the middle we catch to the fur. Fix the thread circle small stitches.

Tighten thread and fasten thread. Crop. You should get tightness body, from which emerges the cord – a neck and two legs from below.

Step 2. Head.
Take a piece of fleece 6 * 6 cm.

 Cut along. It took only one triangle. This beak ostrich. Fold in half face inward.

 Sew the side of the acute tip to the wide part. To turn out on the front side.

Insert beak into the hole in the head. And the circle is very neat, small stitches sew beak around.
Important! Once layer 4 is not sewn. 1 cross-linking fur coat and 1 layer of fleece in a circle.Nothing complicated, just be careful.

 We connect the head and body. Spreading the fur on the head and insert the cable to a depth of 1 cm in the slotted hole, sew tight.

Step 3: Legs. Part 1 .
Cut saw the foam ball in half. It can be a knife with small teeth (mind your fingers!).

 It is our soles, shoes ostrich. Take a piece of artificial skin, put on his half of the ball and encircle it. It should be two circles. Cut circles with scissors.

Step 4. Making cross – ostrich management.
Cut the two pieces of fishing line length of 50 cm. The match melts ends, to get the thickening.

 Each put on the line for beads.

 Cut the two pieces of fishing line length of 30 cm and 22 cm, and the ends of the melt down on the bead stringing. Crowding together in order not to get lost fishing line.

 Take the skewers, cut a length of 18 cm and 30 cm, hell stripes, which will cut the grooves. On the short stick in the middle, and at the end of retreating 8.5 cm and draw a segment equal to the thickness of the rod (about 5-6 mm).

Take a small handsaw and Scroll saw groove depth of 3-4 mm on each stick. Now connect the rod groove into the slot and glue. Put under the press (press down 2-3 books). Give dry.

Take a screwdriver, insert the tip of the drill 2 mm at the ends of short rods for drill holes. And on a long stick drill holes: the first – at the junction, the second – in front (on the shorter part of the) long sticks.

Step 3: Legs. Part 2.
Cut the fur is 15 cm long, 2 cm high office knife. Fur is from top to bottom.

 Now cut the fur 2 cm high and 10 cm long.

Sew each piece in half.

 The upper edge of the circle and contractible, but so that there was a small hole (to the feet climbed cords).

 Now the threaded holes in the foot-laces on the front side in the wrong. Good sew them to the fur.

 Foam shoes smeared with glue. Fur also recommend sizing. Now we take a lap in hand and put on to the top of the foam shoe, straighten, presses his fingers. And leave to dry.

Step 5. Assembly.
Take the long needle is inserted 50 cm line and pierces fur shoe in the middle from the bottom up, through the foam near the drawstring pull out the needle and pull until the bead comes into contact with the foam. The same thing with the second shoe.

 Take the cut from artificial leather circles and glue to shoe soles.

 Now attach the fishing line with beads of the body and head. Pierces the body from the bottom up through the middle. Also with his head.

Now we take a scaffold that holds the head insert hole in the front, from the bottom up, wrapped around the stick 1 time and again inserted into the hole, dripping a drop of glue and a toothpick stuck tightly to the fishing line is not rushed. Cropped toothpick so that it stuck out 7-8 mm above the stick.
The same thing we do with the body of an ostrich, but the line is stuck to the central hole, a drop of glue and a toothpick. Cropped toothpick so that it stuck out 7-8 mm above the stick.

Now his feet. Fishing line stuck his left foot into the left stick, and do turn again into the hole reducing up. Vstalyaem toothpick. Trim to 7-8 mm is stuck on a stick. We do the same with the other leg.
Important! When the stick toothpicks in the holes for the legs , glue, we do not prokleevaem holes . This is to make it easier to untangle his legs ostrich (children continually confuse them) simply pull a toothpick to straighten the line and re-fill the holes in the line. toothpick so that it stuck out 7-8 mm above the stick.

It remains to glue the eyes, the main sticking them to the level of the beak, but the width between the eyes can be chosen arbitrarily. Eyes directly on the fur.

Ostrich is ready!

Make a papier-mache cow using an empty water bottle and toilet paper rolls – Step By Step

cow 01 1

Required Material:
Two big plastic bottles, the more rigid the better
4 toilet paper tubes
Shoelace for the tail
Cocktail straws for the udder
Wooden toothpicks
Knife, scissors, and all
Crafts glue
Paint and brushes
And a lot of old newspapers
1. First of all, let’s make the tail. Pierce a hole in the bottle’s bottom, thread a shoelace through it so that its end reaches the bottleneck and tie a knot there. Then pull the knot inside the bottle.

Tie another knot outside the bottle, as close to the bottle as you can (the second knot isn’t shown in the photo). Add a crumpled piece of a newspaper to the outer part of the bottom if needed, secure it using masking tape. Masking tape is used widely in paper-mache because you can glue paper easily onto it.

The rear part of the cow looks like this:

2. I used a bottle with a special shape to make the neck, but your cow can be without a neck at all, that’s OK. You have only to make ears and snout. You might also want to add two horns if you like. For the snout remove the bottle’s neck to get a little bit wider opening.

Fold a thick strip of newspaper and roll it into a tight “snail”. Leave a short loose end.

Secure the snail with a piece of masking tape, and insert its end into the opening. Attach it with another piece of tape.

3. The ears can be made from another bottle. Leave a small rectangle at one end of each ear when you cut it out, then make two slits in the head and insert the rectangles into the slits.

Using this trick I wanted to create the right shape and rigidness for the paper mache ears.

This is how the head looks like when done.

4. Toilet paper tubes wanted to be cow’s legs, and we let them.

Make two semicircular cuts one opposite the other at one end of the tube where it will be connected to the bottle.

Attach the tubes using masking tape.

In this photo, you can see a leg with a hoof, the tail, and the udder. So, let’s make the udder.

5. We are about to make treats out of drinking straws (pink ones:)

Crumple a small ball from a newspaper, then make a U from a straw and pierce two holes in the places where it bends. Insert toothpicks through these holes and stick them into the paper ball.

Cut the toothpicks if needed. Make another pair of teats and attach the rudder to the body. The horizontal part of U will be covered with paper.

6. It’s time for papier-mache layers. We had 6 to 7 layers of pieces of newspaper dipped into craft glue mixed with water. Use a stronger glue mixture and white newspaper margins for the upper layers. You might want to check out other Web resources for basic and advanced papier-mache techniques, for example Getting Started with Papier Mache.

7. Decorate your cow, paint or glue a pair of eyes. That’s it.

How to make Bear of balloons

How to make Bear of balloonsfeatured

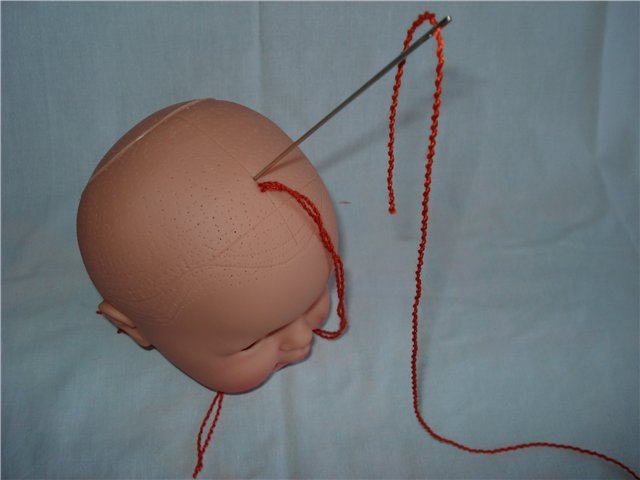
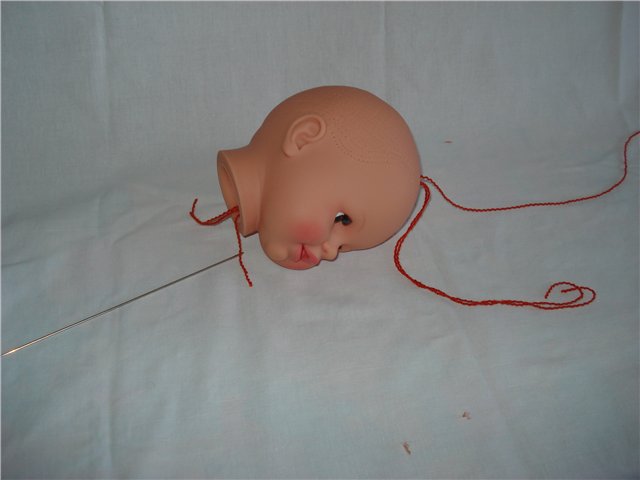
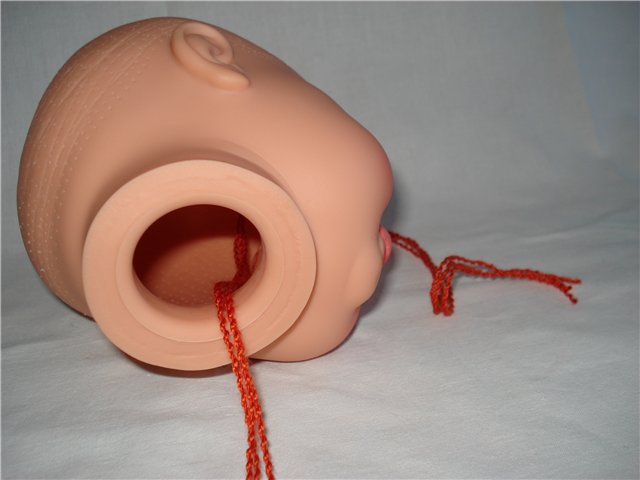
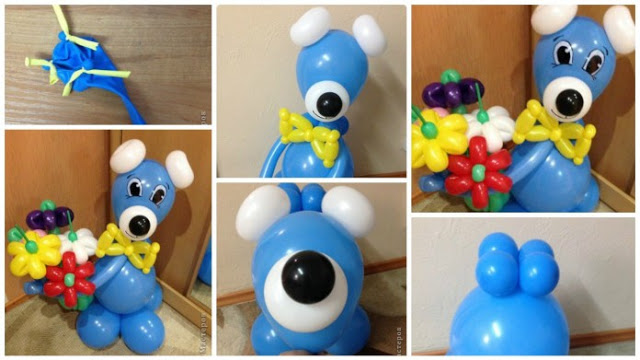
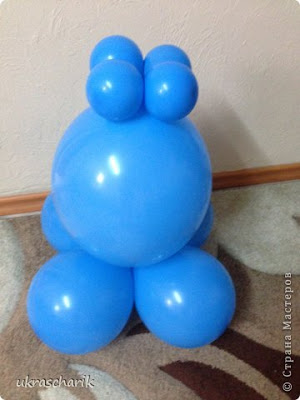
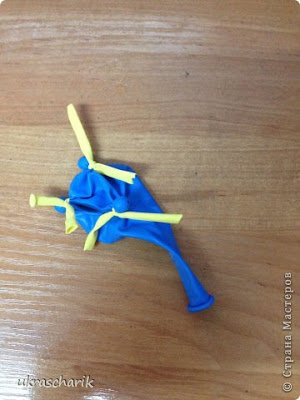
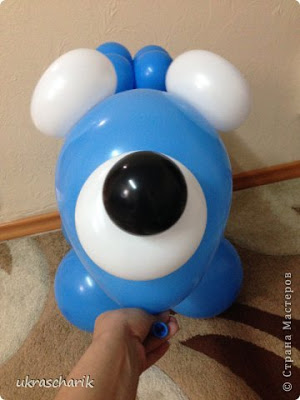
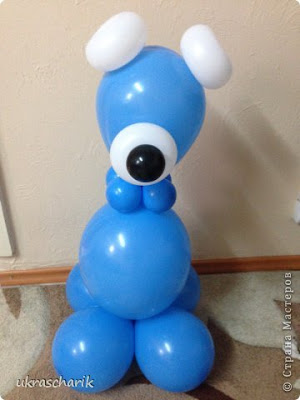
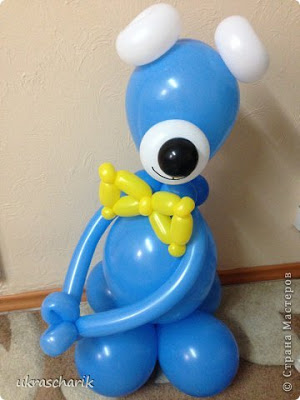
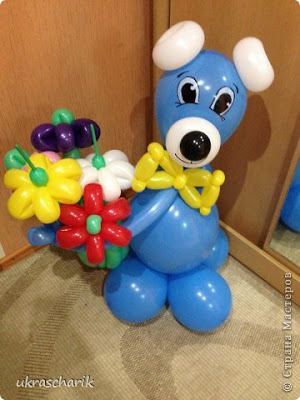
We have the best gift for that special someone, friend or family.Balloon Bear will bring a smile to the recipient guaranteed. It’s Easy, Tell us what you would like . We will create a custom design for you, so you can make that special person extremely happy.
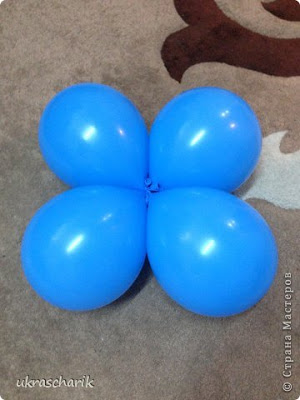
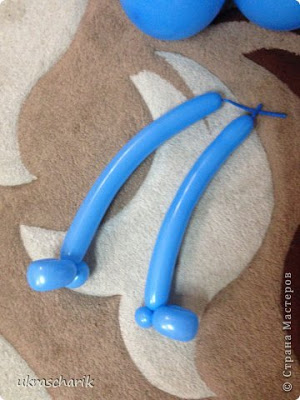
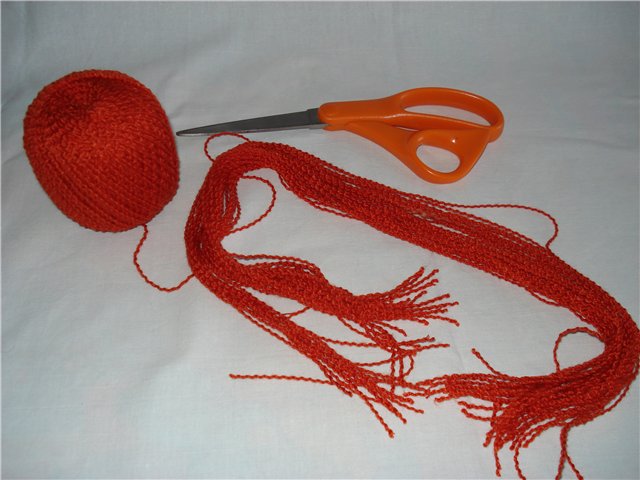
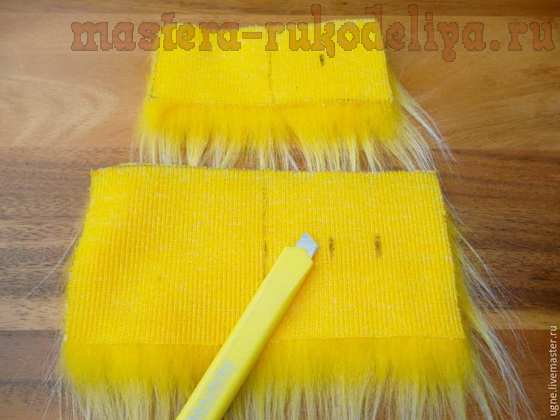
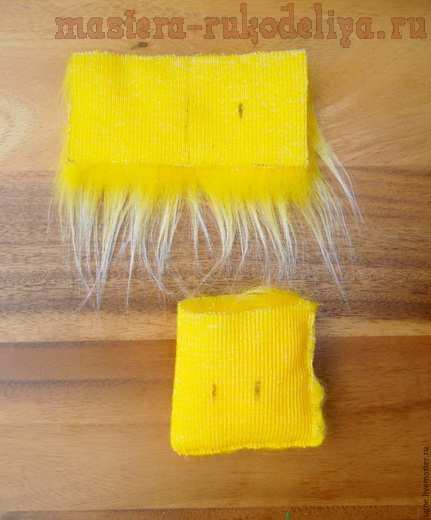
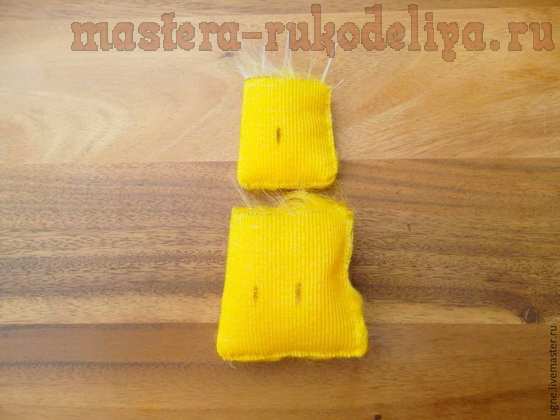
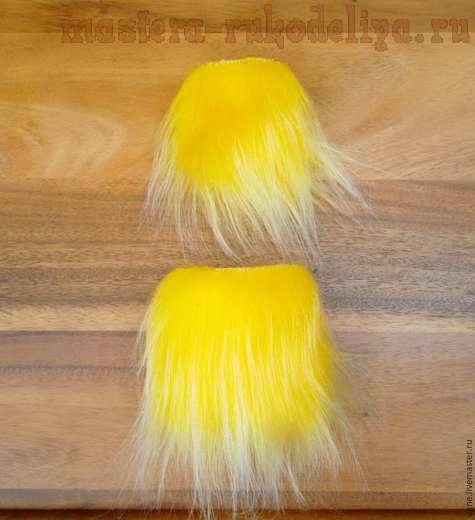
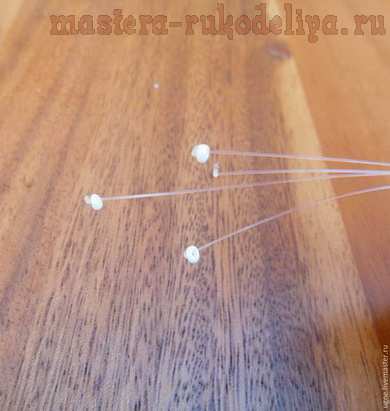
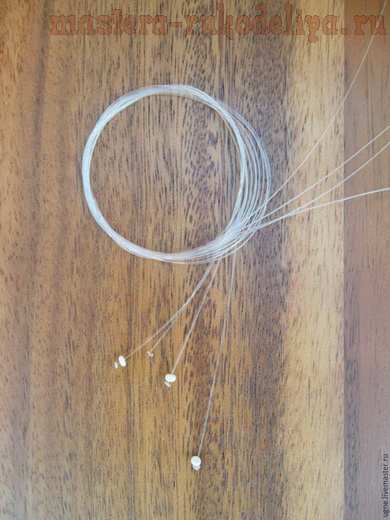
Required Material:
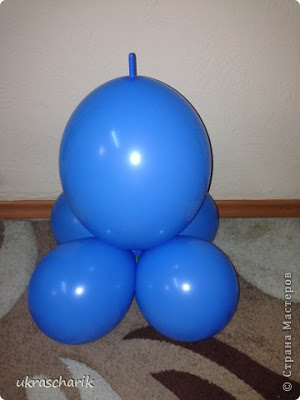
– 6 ball 12 inch blue … or 5 balls and one linkolun (more on this later)
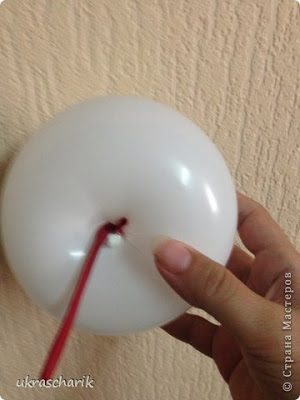
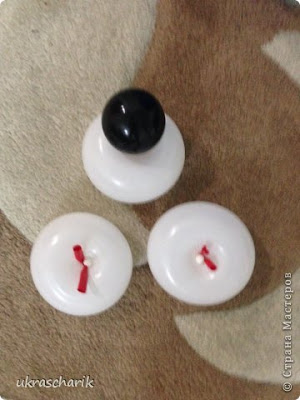
– 3 5 inch white ball
– one five-inch black ball for the nose
– 4, 5 inch blue ball
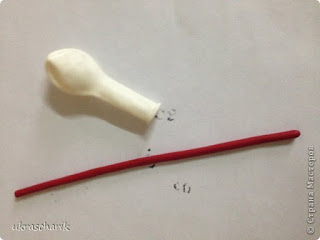
– 2 260 shdm pen
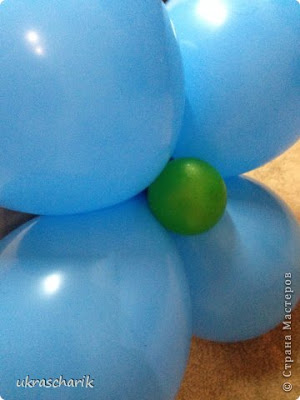
– a small ball sinker for any color
– permanent markers beads
– shdm pruning
– a pair of hands

How to make rabbit – Step By Step

rabbit 1

Technology all the familiar and beloved by me – papier-mache …

wire in the ears immediately to shape and bend …

sticking out of the bottle went very well for the brisket bunny …

finishing layer of white paper …

painted the colored acrylic paints, patterns caused by a loop volume silver …

cilia-black construction paper …
nose plaster paste for modeling …

tied bows, gave balls and ready to Sugar!

I hope my work will inspire you and like creature !!

How to make colored Easter idea- chocolate eggs

bright colored Easter ideya chocolate eggs 1

What we need. Confectionery tinted white chocolate, but if you do not take a look at the usual white tile and add a drop of food coloring in different colors. Chocolate must be melted in a water bath and let it harden very little that was not too liquid.

Inflate balloons small size

from a pastry bag with a narrow nozzle or simply cut package to squeeze a little corner, messy tangling, strips.

Allow to solidify, hanging on to a glass tube.

cutting off a piece remove a ball

if you want to fill with bright sweet candy jelly beans

Done!