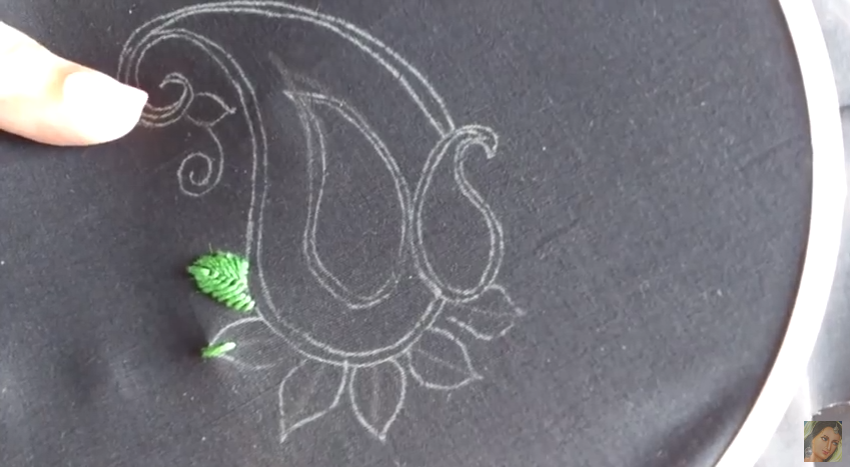
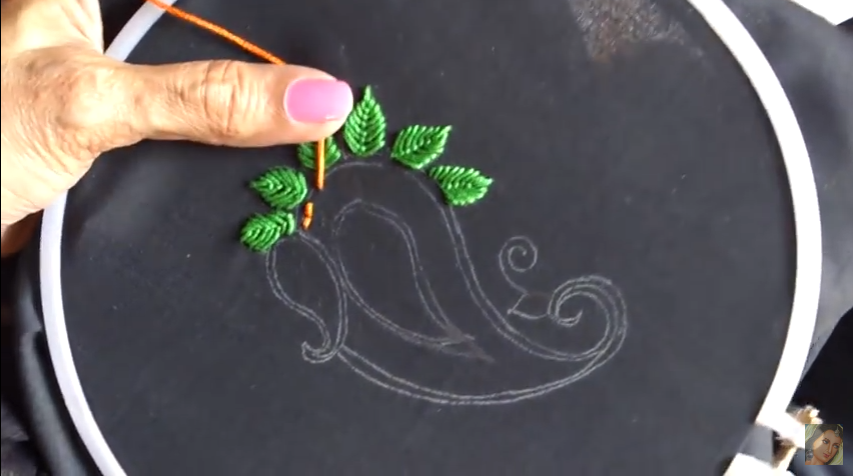
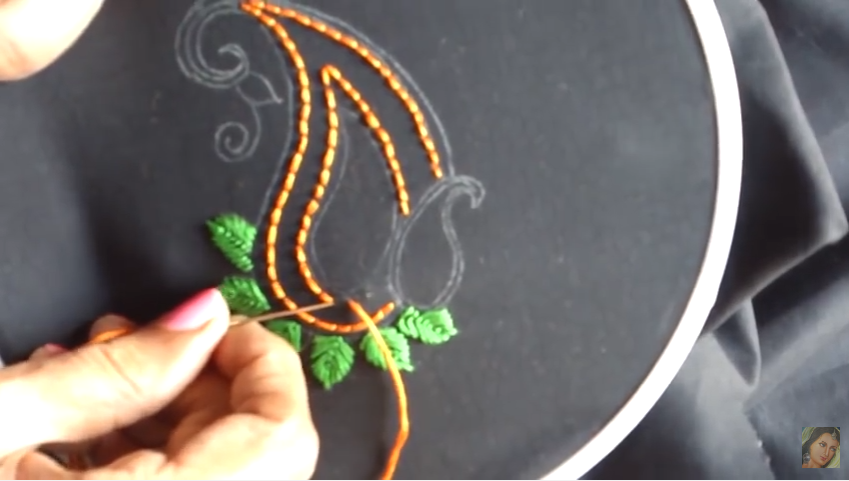
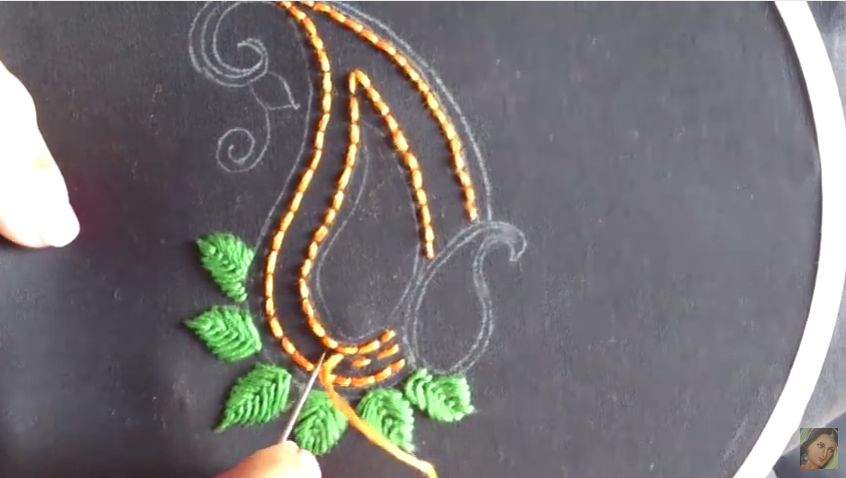
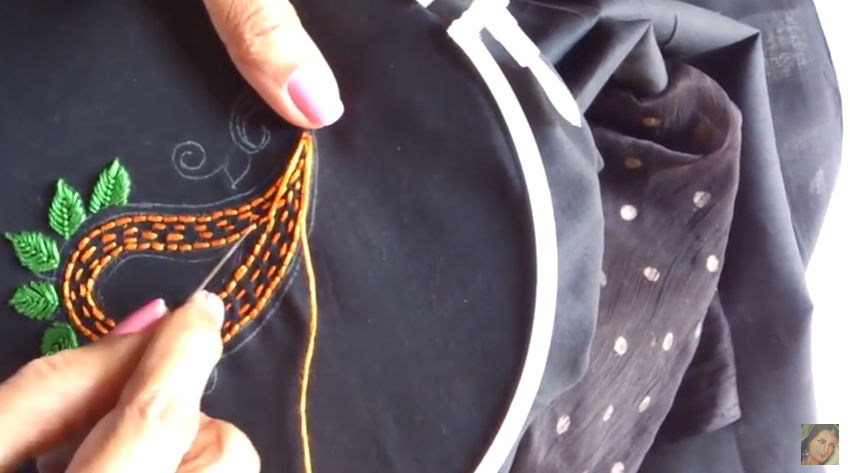
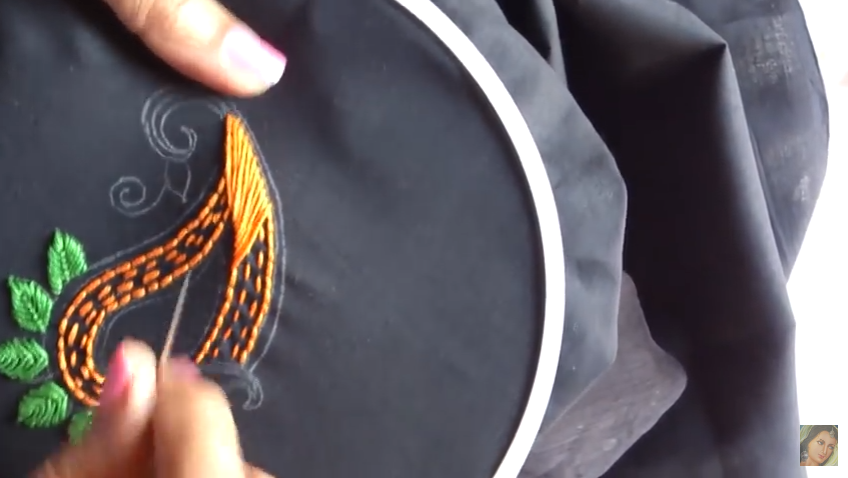
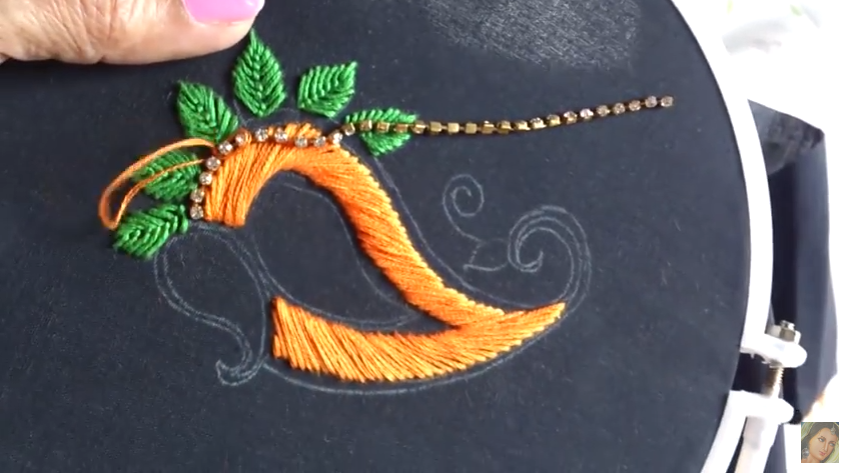
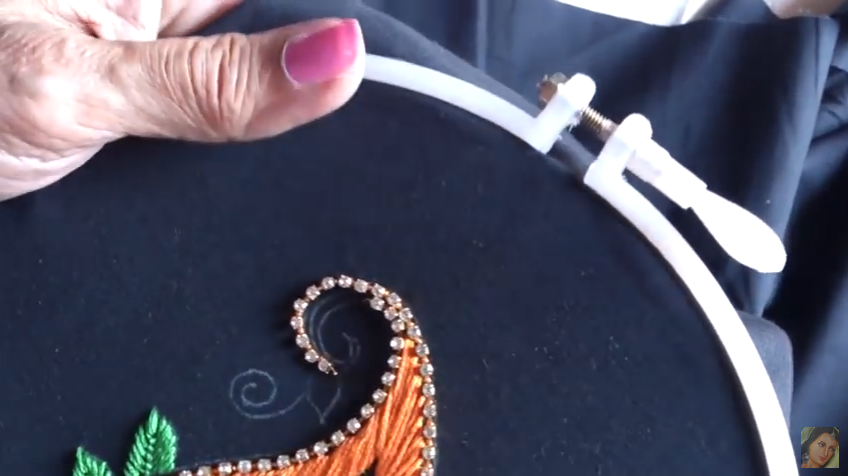
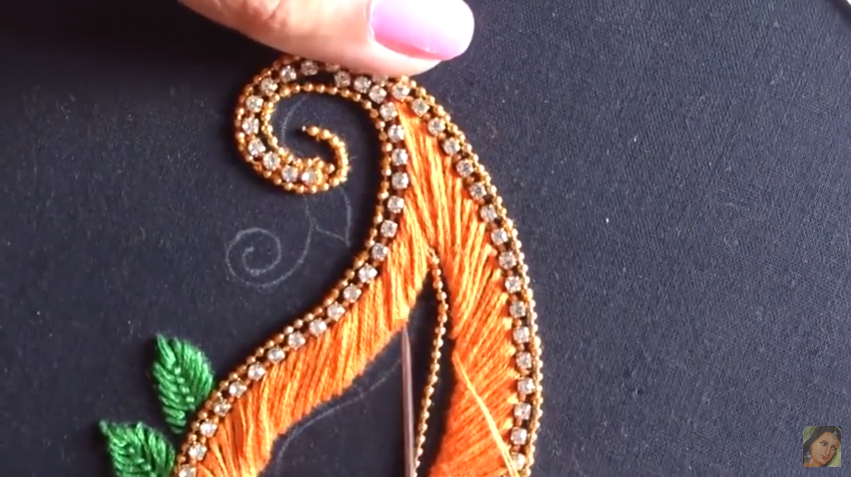
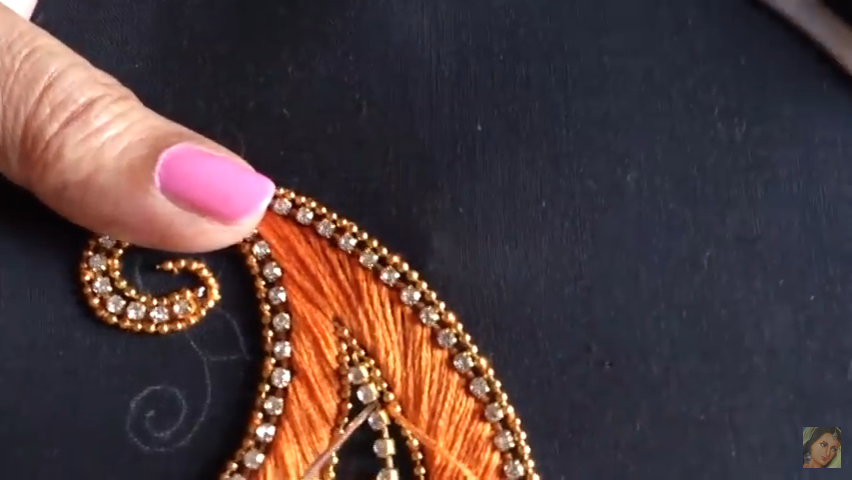
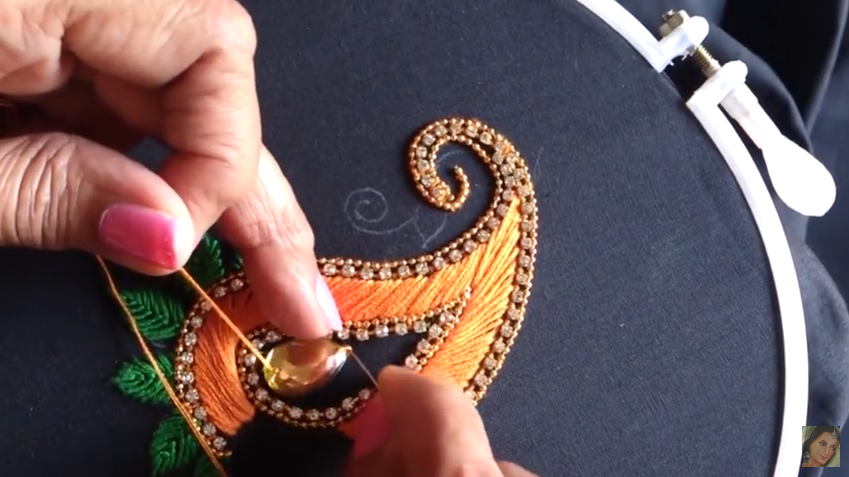
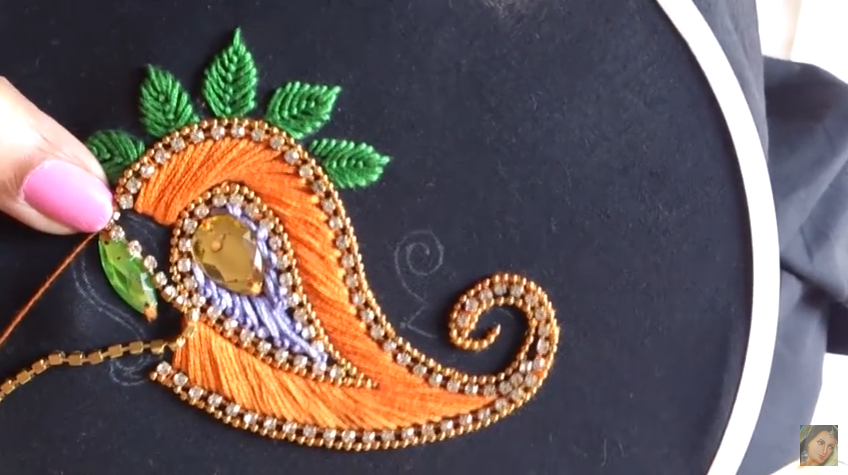
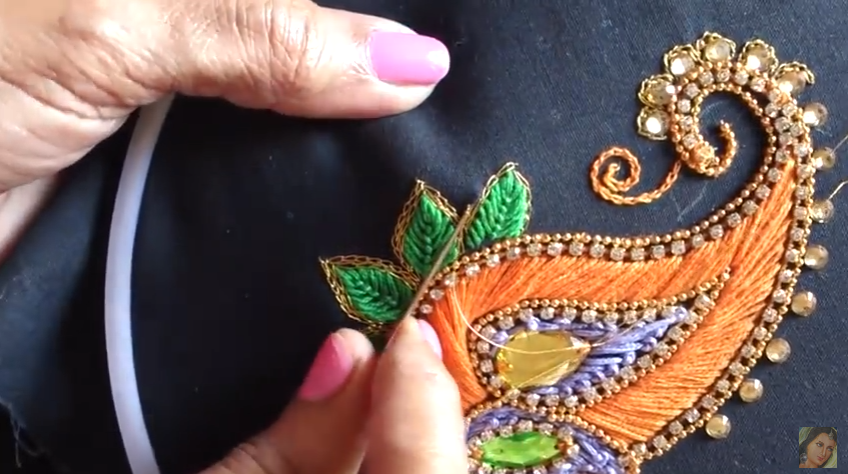
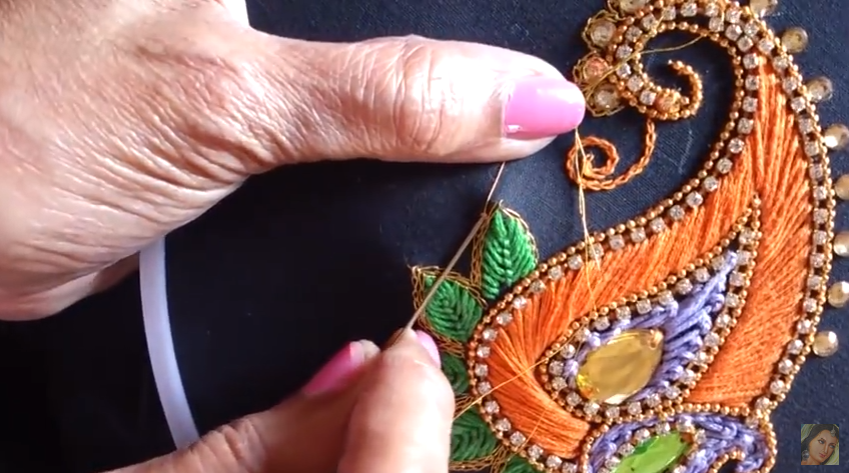
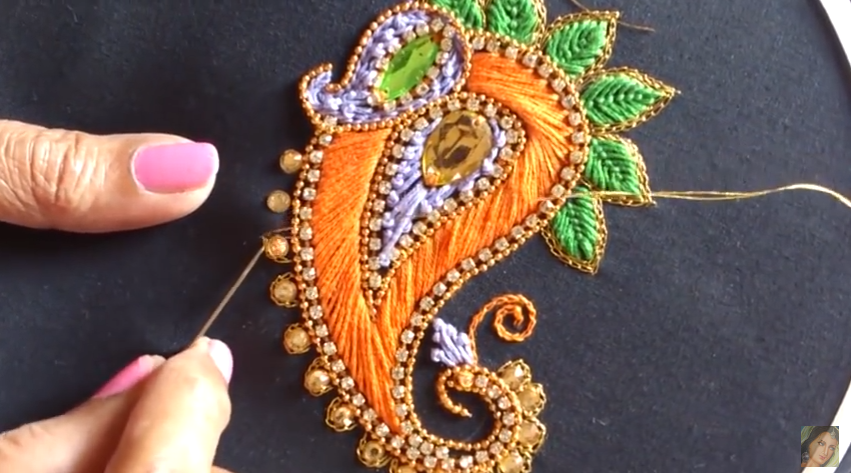
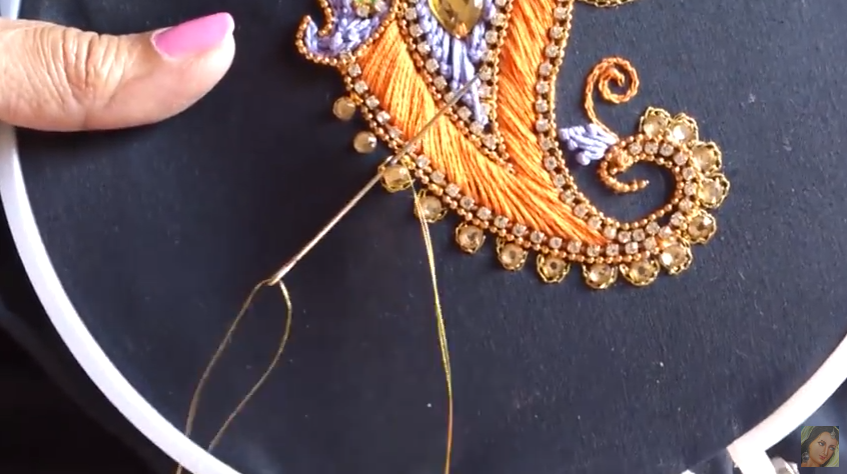
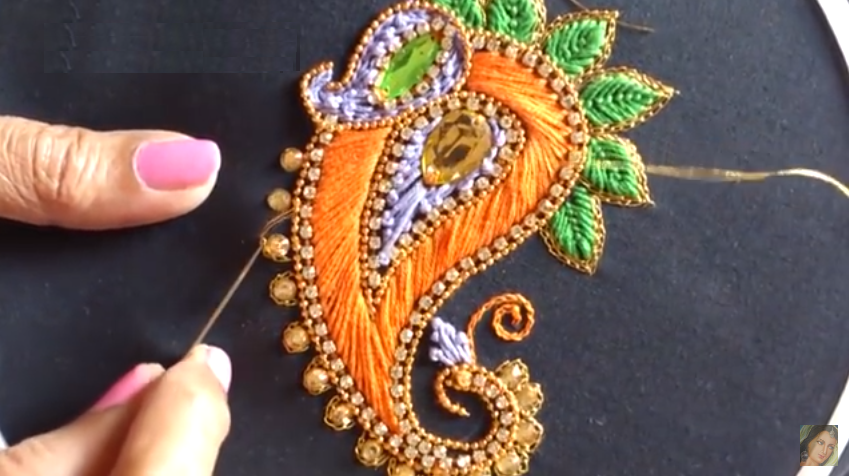
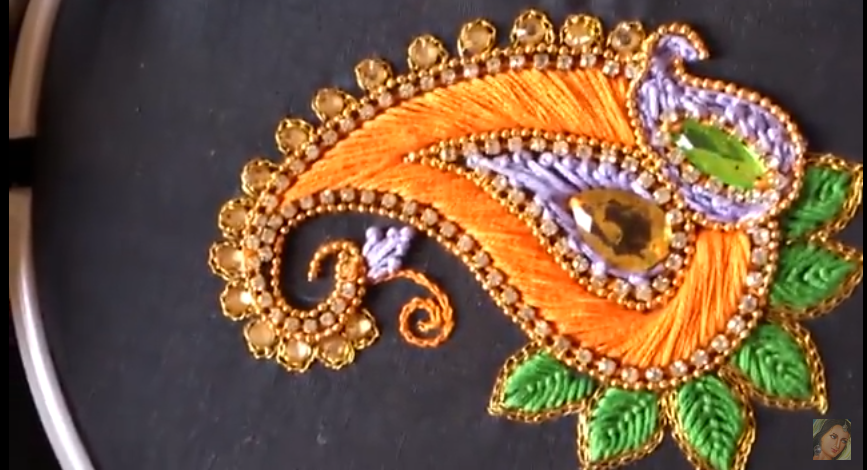
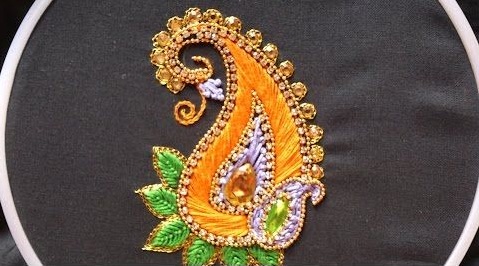
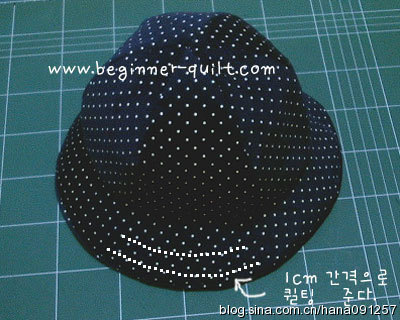
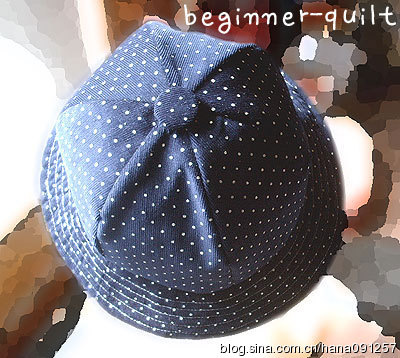
Hand embroidery designs .Aari style embroidery for ghagras, dresses, blouses and sarees.
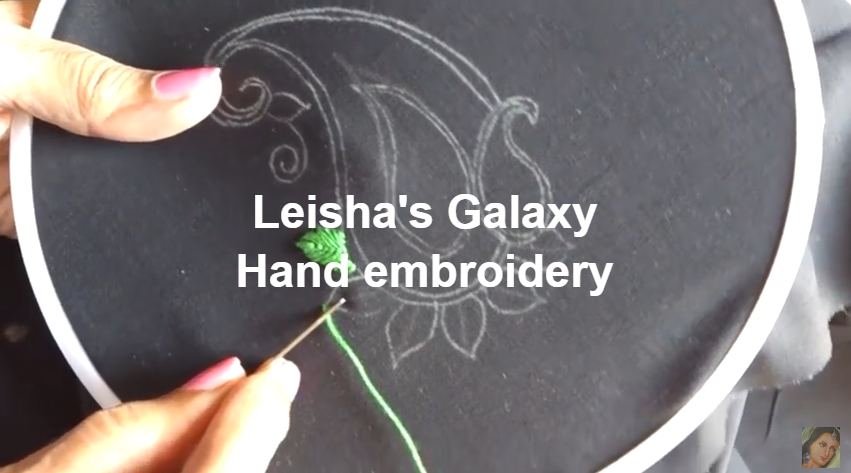
 (Photo: Leisha’s Galaxy)
Aari Style Hand Embroidery Designs
Get Daily Art and Crafts Ideas & Tutorials…
Hand embroidery designs .Aari style embroidery for ghagras, dresses, blouses and sarees. (Photo: Leisha’s Galaxy)
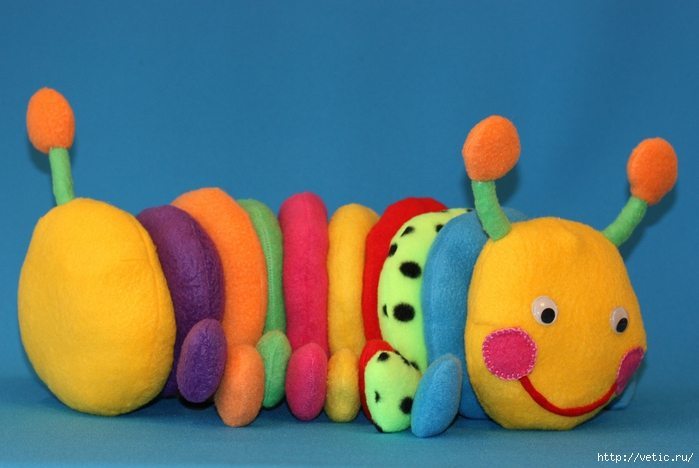
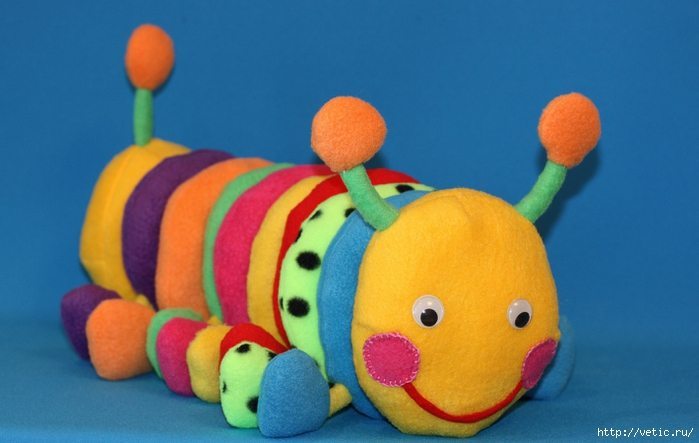
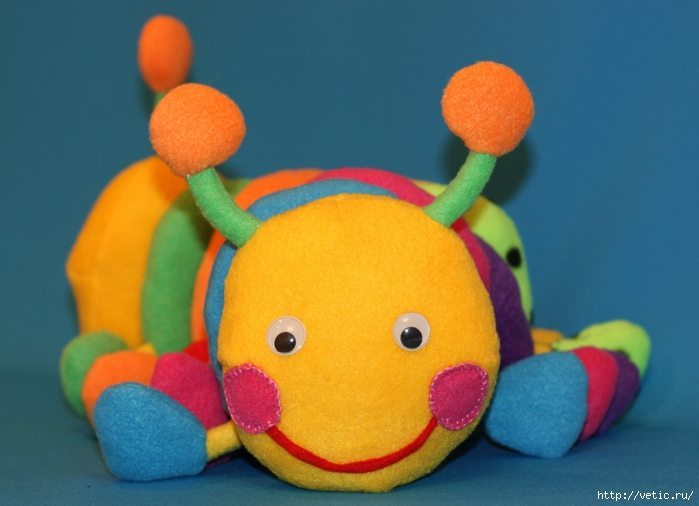
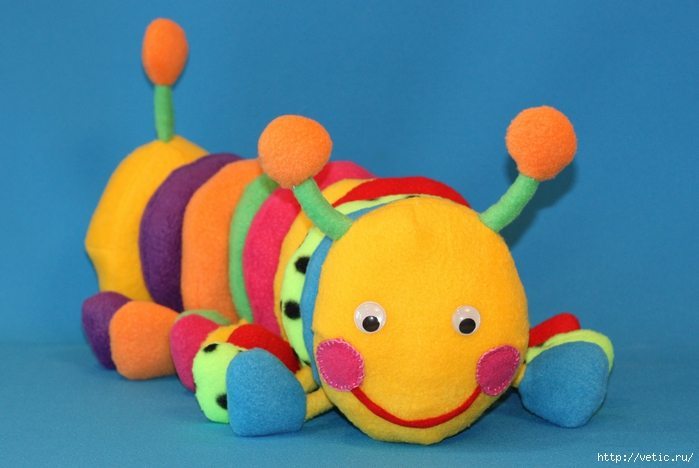
If this is a nice, friendly creature had to your taste, I tell you details about all the stages of its creation.
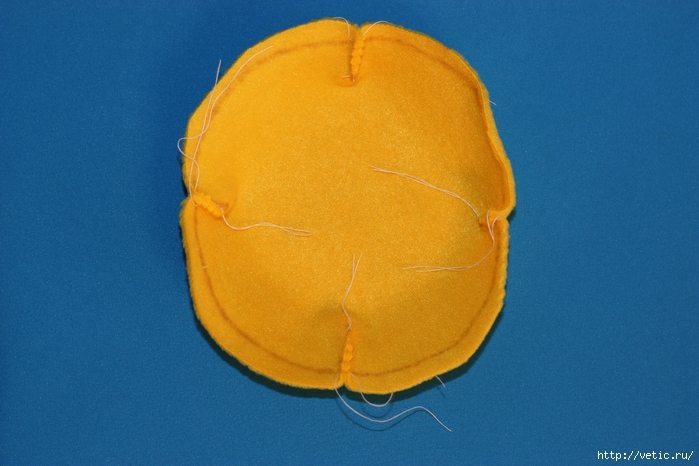
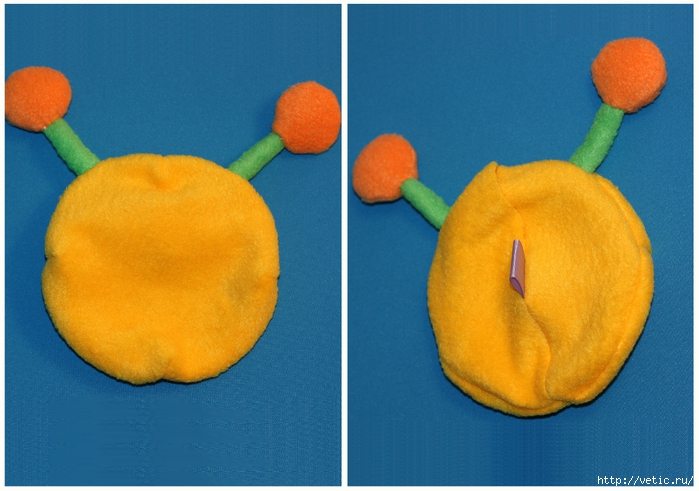
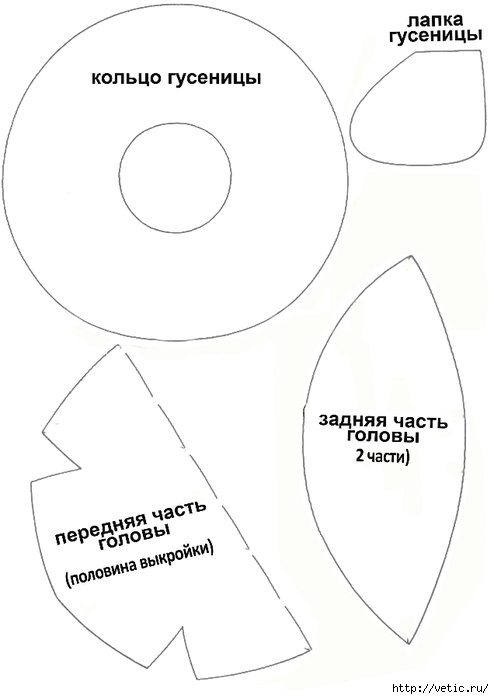
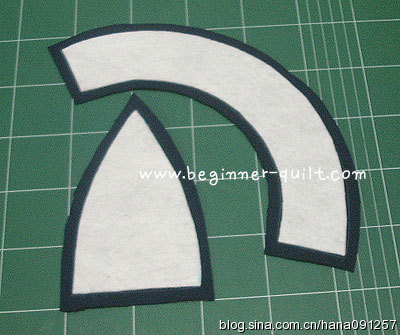
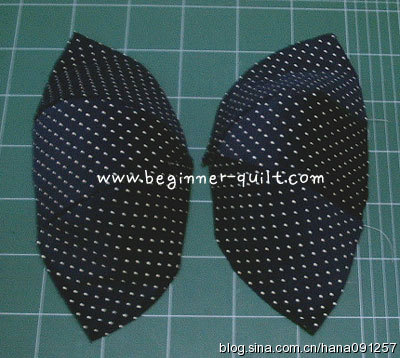
First I cut the pattern head caterpillar (the final segment of the body sewn on the pattern of the same) and scribbling darts.
Then determine the height of horns, cut them out of the fabric, wrenched and stuffed with synthetic padding.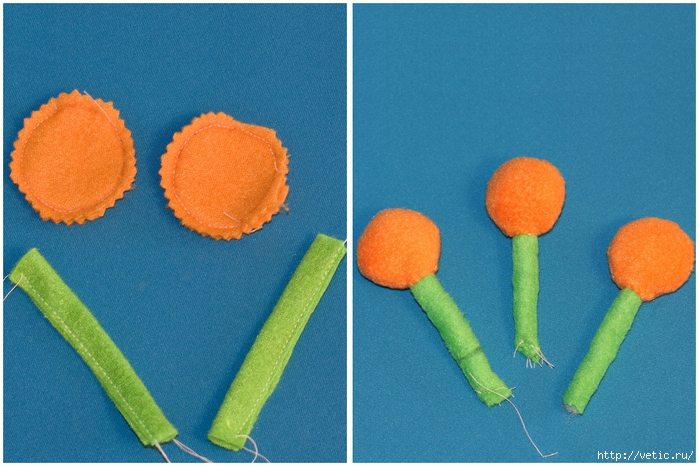
Pins cemented horns on the front side of the head and the tissue along the contour of the pattern sewn two back of the head segment.

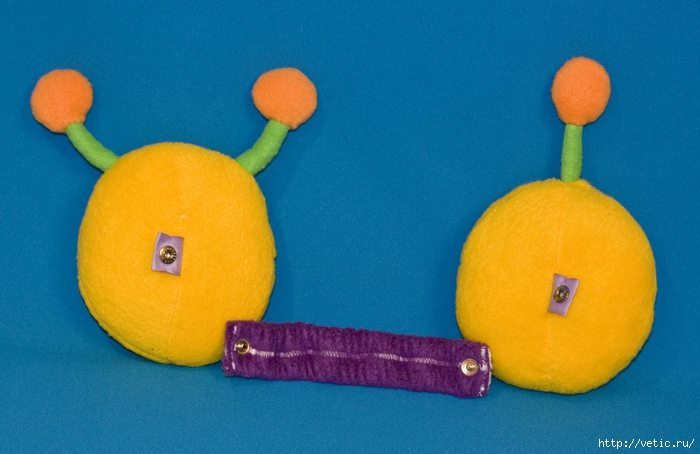
As the loops, which is tacked to the trunk, I used rep tape. Subsequently, the eyelet is attached buckle, so it is very important to select the material for it was strong and does not stretch. It will be subjected to high loads. Loops should be sewn into the center of the hole for eversion. loop size is arbitrary, it is selected empirically.
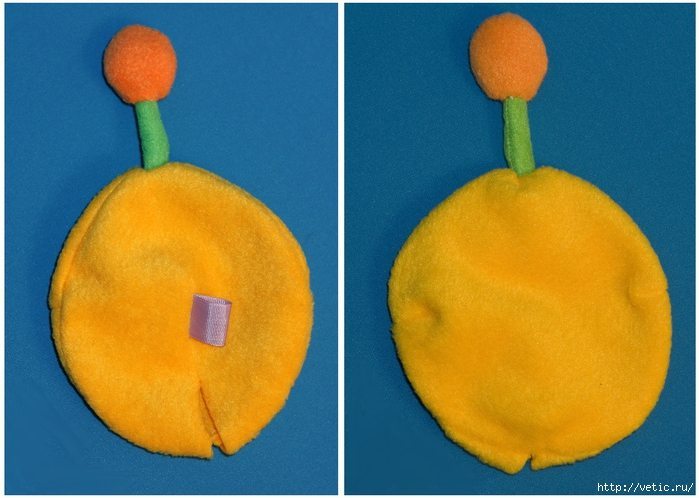
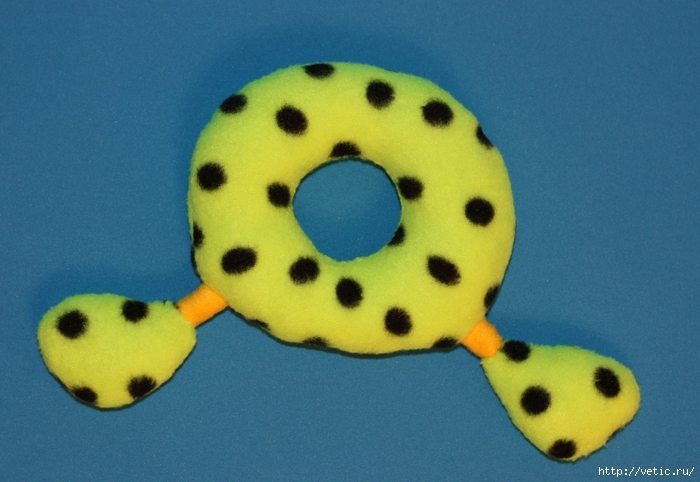
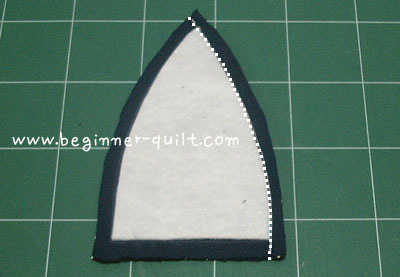
It looks like the head of a caterpillar.
And this is – the final segment of the torso.
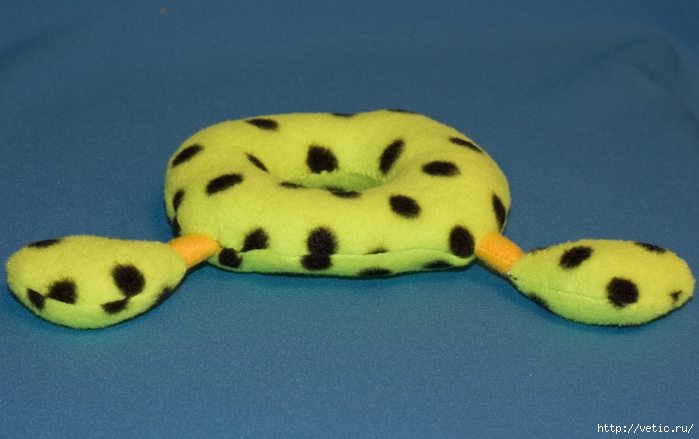
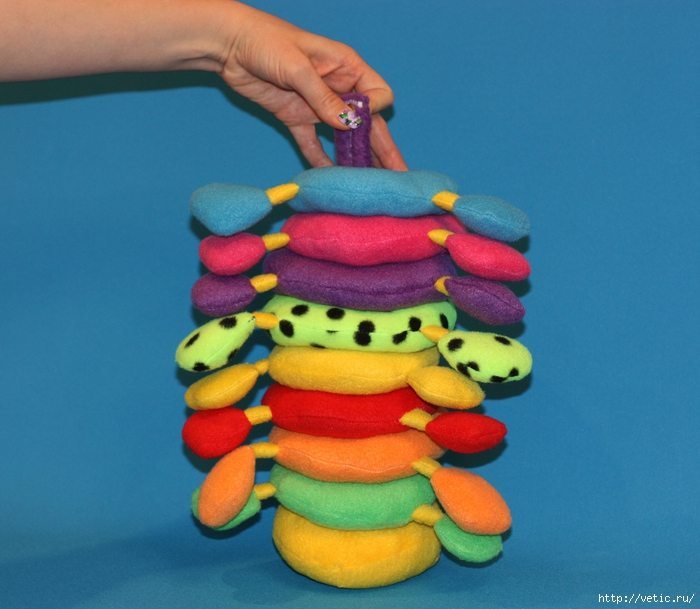
I decided it would be more convenient if the segments of the body tracks are worn on a wide elastic band. Elastic good stretches and shrinks. its compression effect do a good job in keeping with caterpillars bull ring. Porous surfaces fleece will not let slip rings and gum will firmly push the segments to each other and do not give them to fall apart in different directions. Taurus will look unified and whole.
To the kid was nice to keep the gum in his hands, I sheathed her fleece. As an attachment, it was decided to stay on the buttons. They are quite durable and reliable. Besides the buttons fasten the child more comfortable and faster than buttons or hooks.
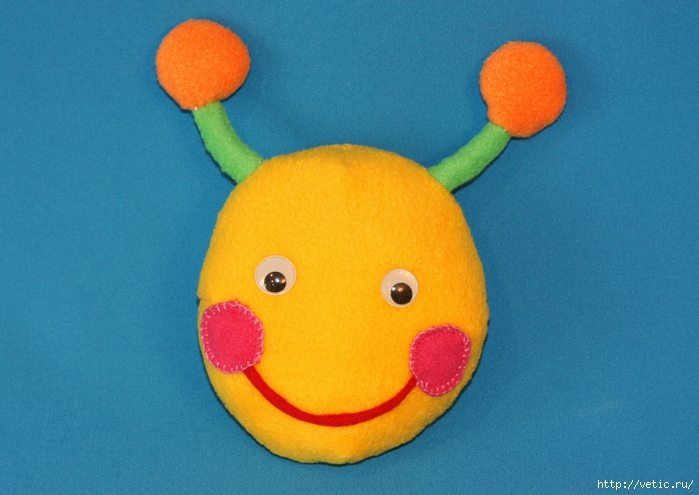
To caterpillar expression face constantly changing, I decided to stay at the plastic with little eyes darting pupils. Eyes glued, and blush, and mouth sewn securely.
During the crosslinking-ring segments, I was faced with the unexpected difficulties that had to be overcome by experience. The challenge was to maintain the shape of a circular segment, even after tamping, despite the ability to stretch fleece in different directions. As well as avoiding unnecessary seams are also tightening the fleece. Having tried a few options, I stopped at the next.
Be prepared to foot tracks of the same color as the ring to which they will be sewn. Decide which direction extends fleece. It is important to make all ring patterns so as to keep the same direction of the traction material, otherwise ready to ring skewed in opposite directions.
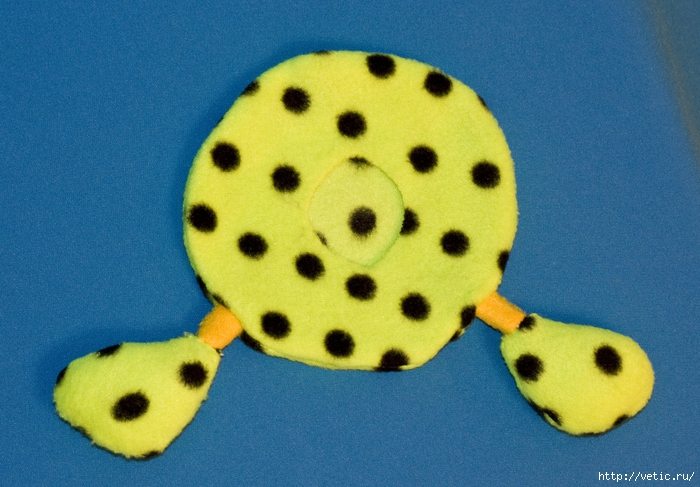
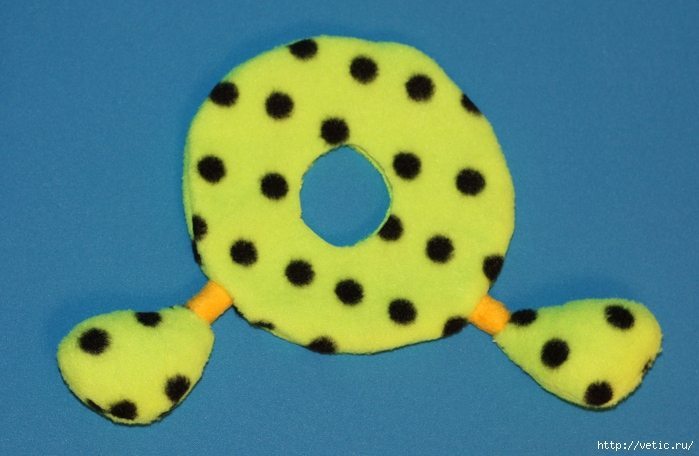
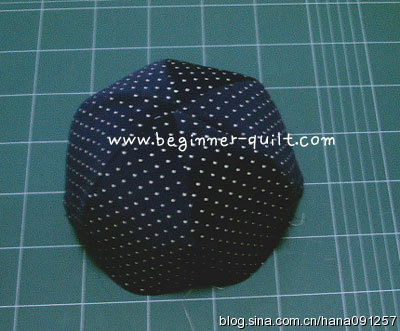
Cut fabric ring with one hole in the center (the same as in the pattern). On the front side of the fabric, place the foot. After trying a few different options, I determined that the best distance between the legs of 12 cm and kept it on all the rings. Secure the legs on the fabric using pins. Cut a second ring, but without a central opening. Apply the pattern face down on the first lap with legs. Fully sew the two circles on the outside to the outer contour.
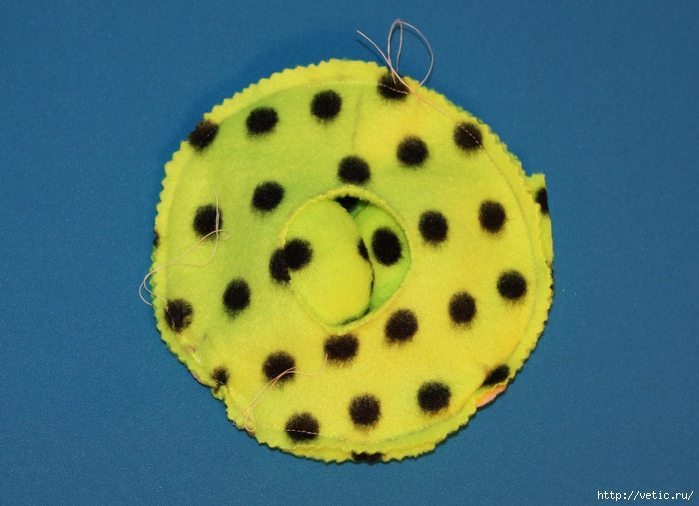
Remove the work piece through the central hole.
The marker on the fabric circle contour of the central opening in the second round, and cut it out.
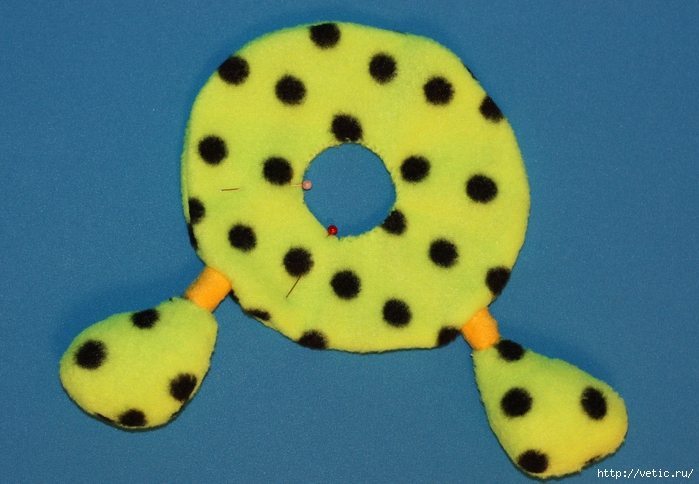
Note the pin segment, through which you will fill the workpiece and sew a hidden seam contour of the inner circle.
Firmly tamp the filler workpiece and sew the remaining hole.
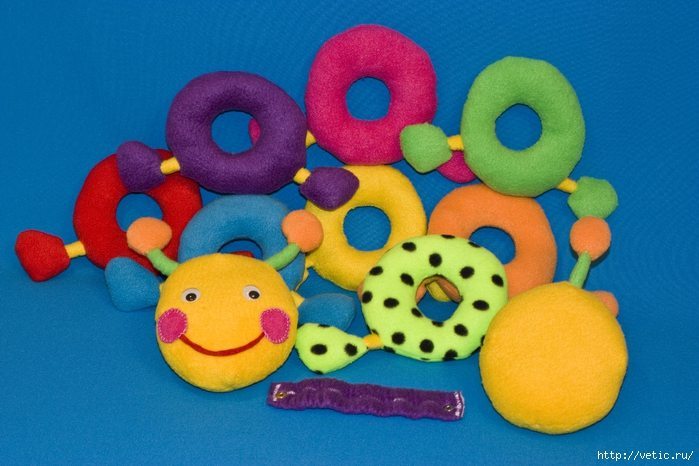
Prepare multiple rings of different colors.
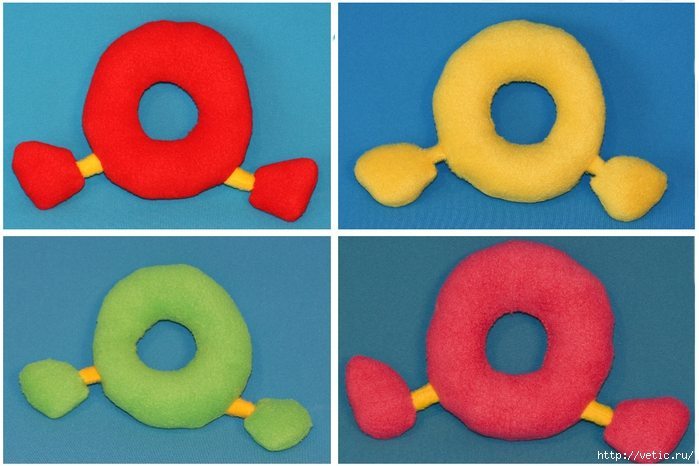
It seemed to me that for a given size of the tracks (including a slight compression rubber rings) will be the most appropriate 8 rings.
 Still needed caterpillar. One end of the gum is tacked to the final segment. All subsequent rings are put on it in random order.
Pristegnёm head and the game can begin!
Due to the unfastened segments of the caterpillar’s body can squirm.
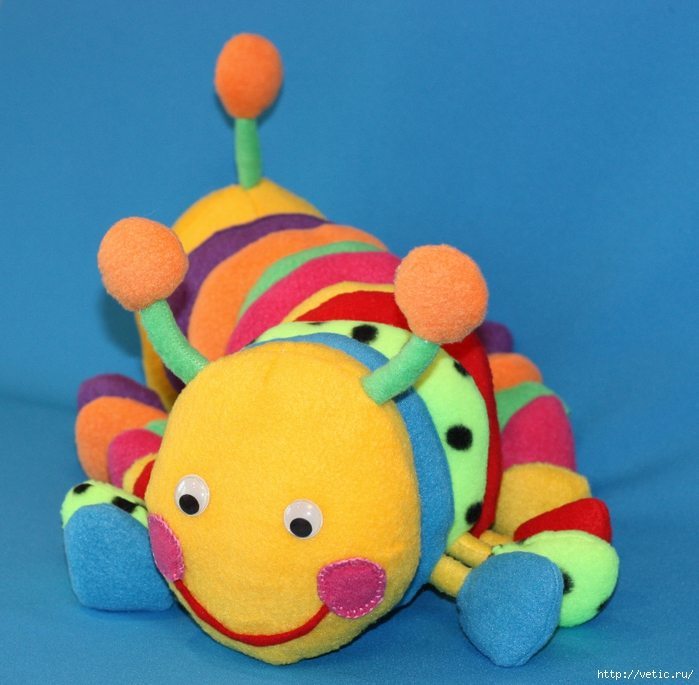 This sweet creature becomes not just a good kid and a soft toy. From caterpillar fun to learn colors, to determine their sequence, change the order of colored rings. You can try to count them, to learn of the caterpillar body and come up with a lot of other fun games.
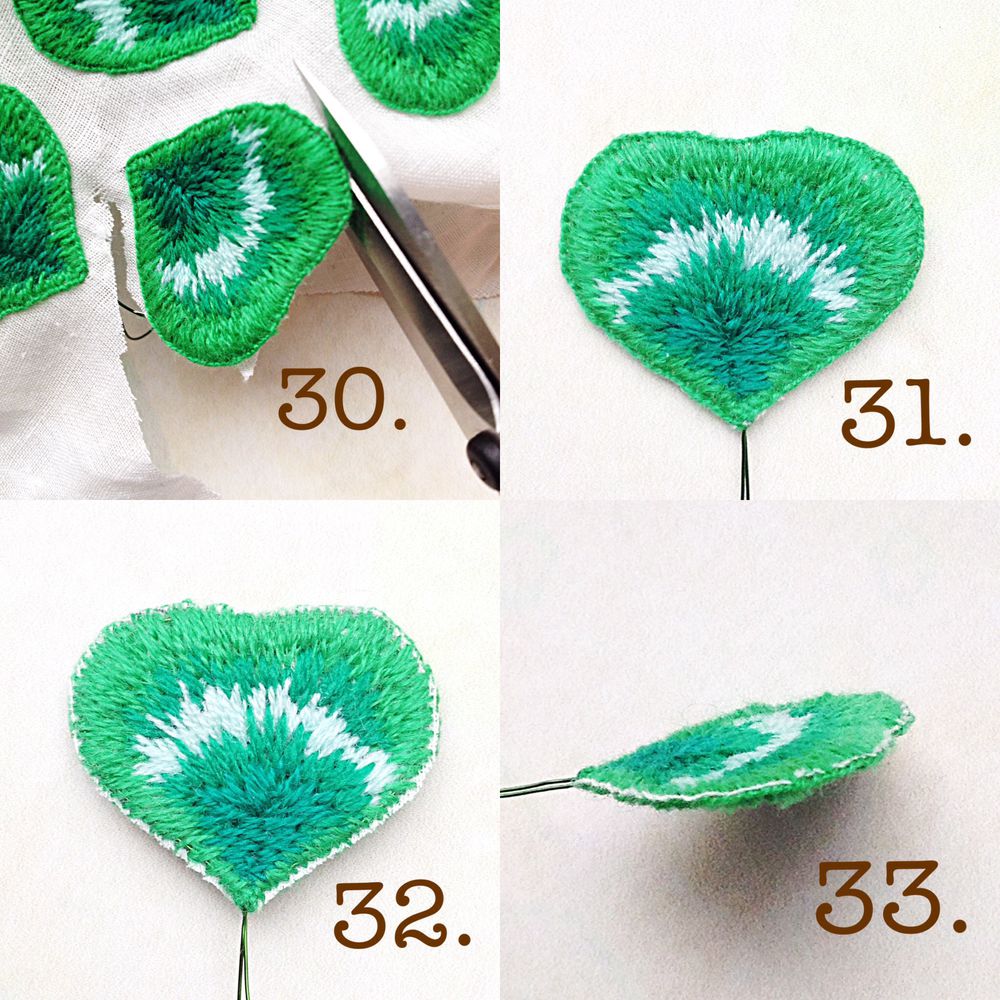

If you like the track as well as I do, I suggest you the pattern that I borrowed from a Japanese magazine and slightly modified for more smooth and round rings.


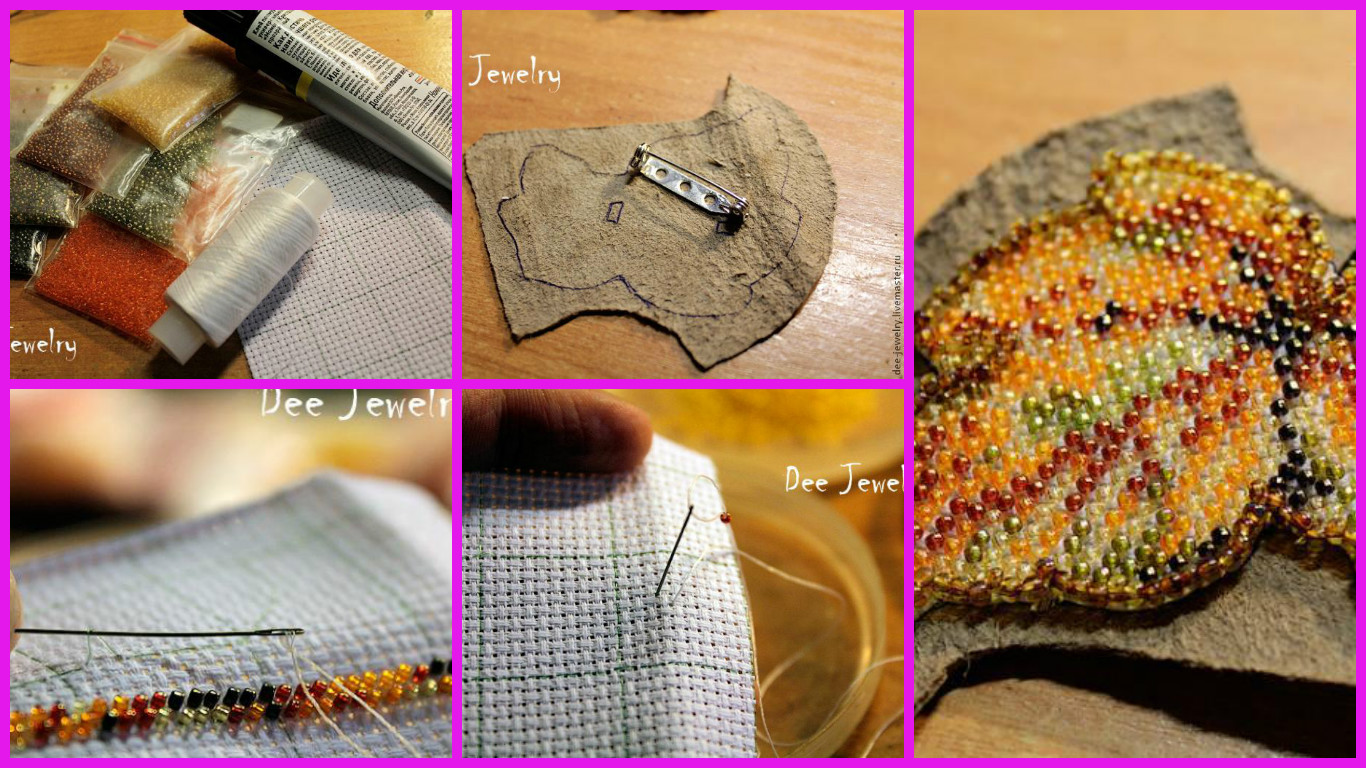
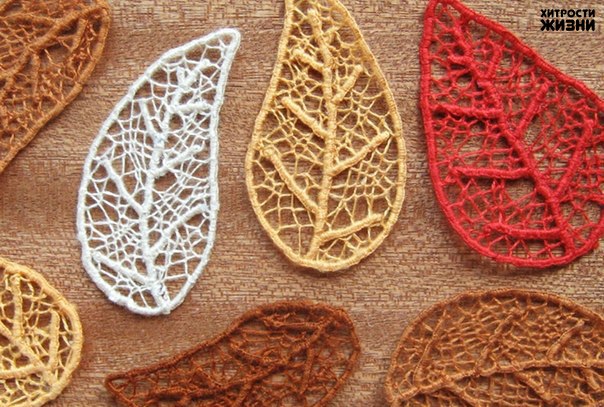
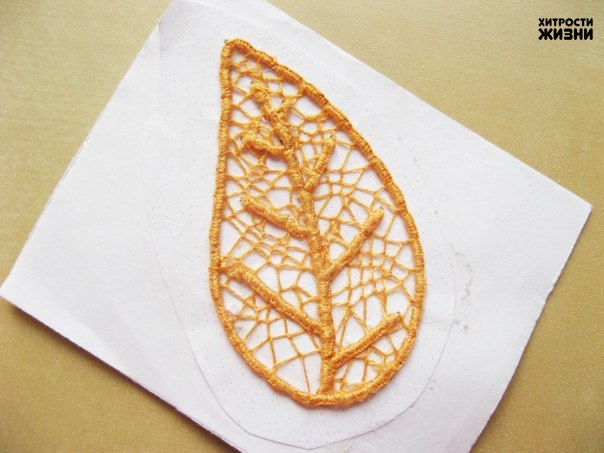
Embroider autumn) Bead work on an outline – autumn leaves.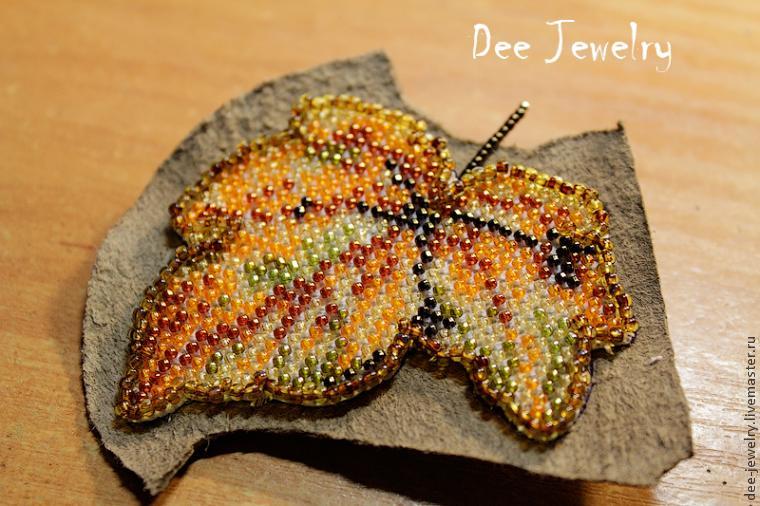
Today we are going to learn to embroider beads on canvas by the example of brooch “Autumn, fall …”. Embroidery on canvas – it is quite simple and fast, and fun! 🙂
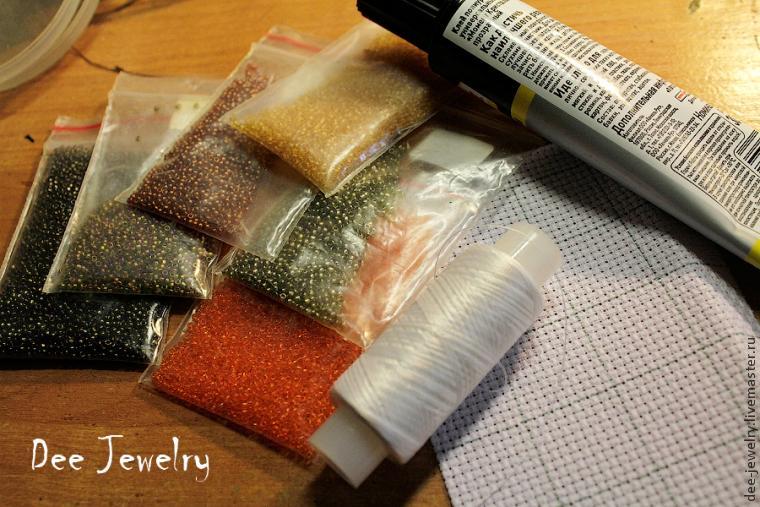
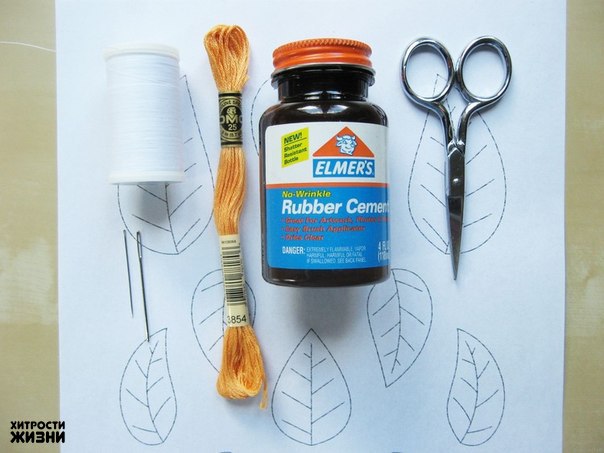
And for this we need:
1. Japanese Toho beads size 15 shades of 10B, 83, 459, 457, 329 and 2. If you use different beads, then pick up the shades themselves, you need to be colored dark brown, yellow, orange, red, green tea , yellow-brown.
2. Japanese Toho beads size 11 shades Y301 and 162B (brown and yellow), you will need it for a number of skin and the dead end of the series.
3. Canvas, I Aida 14, but it is better to take smaller, 12th or 18th. Modern canvas is sufficiently rigid so that the hoop will not be needed, only an outline.
4. A piece of white felt, piece of thick paper and a piece of genuine leather
5. A pin and brooches basis for the size of 3 cm.
6. Scissors, thread (I always lavsanovaja), glue chip time.
 Embroidery bead size will be 15. For the base, I took the scheme of this ornament:
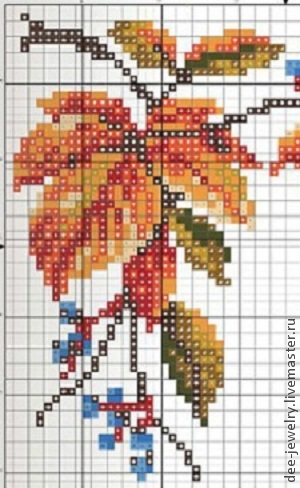
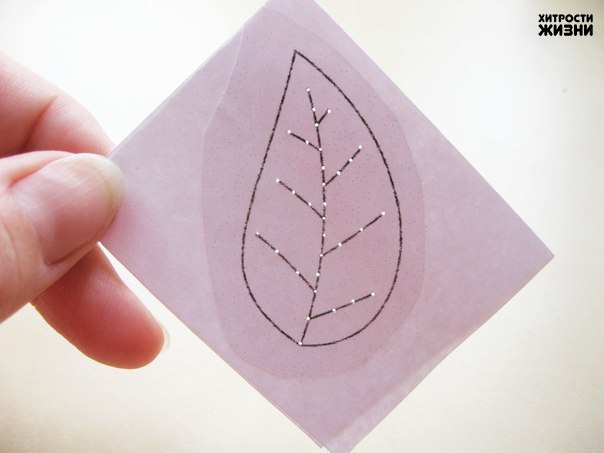
Remove all unnecessary and only embroidered leaf.
Canvas I take the fishing line once lined into squares, it’s easier to navigate. We need a piece of size 3,5h4 square. Canvas size bigger scheme necessary because at the end of the finished embroidery will cut the size of a millimeter to more than 2 beaded pattern.
And begin. Mark up the scheme in a convenient location, close to the middle. I mark up on her screen with the movie player that listens during operation.
 We pass through the canvas from the inside, we collect a number of the first bead.
 And from the inside anchoring thread on a triple knot.
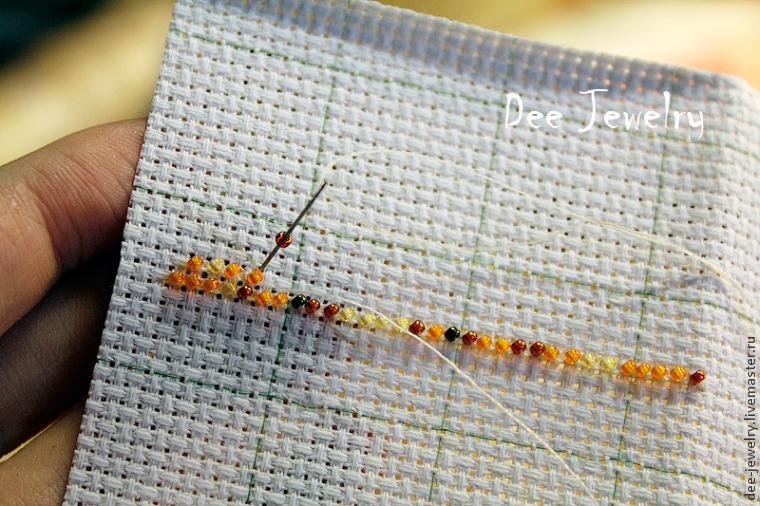
 Go back to the right side and sew the first bead for another stitch.
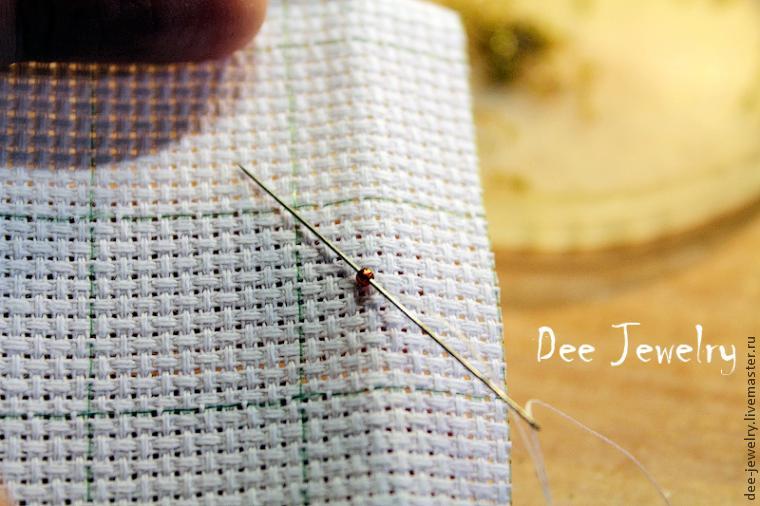 The stitches will be here in half-cross diagonally. The scheme presented in the half-cross technique.
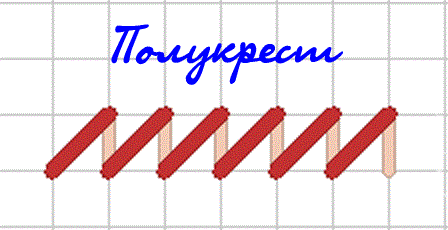 Embroidered number on the end and the final bead on again stitched two stitches.
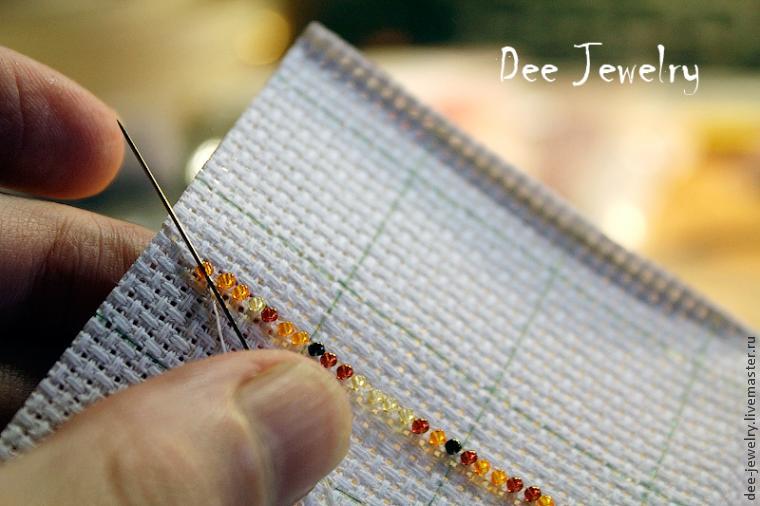 The first row is finished with the procedure, go to the number above.
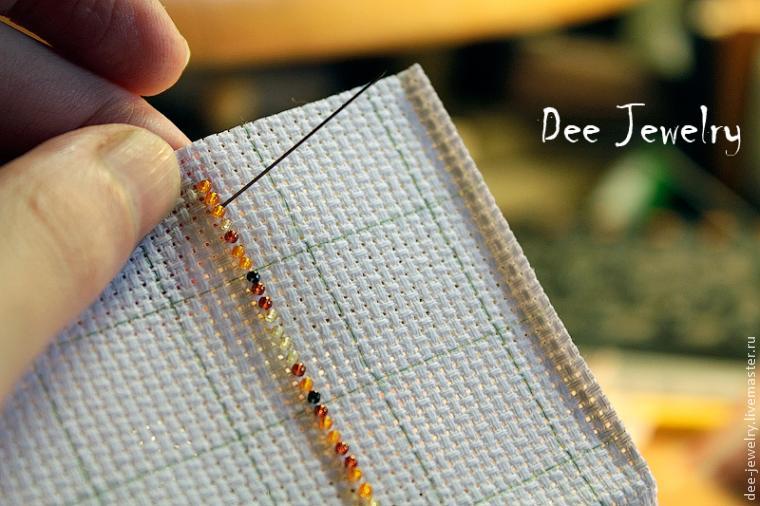 And the first number again bead stitched two stitches.
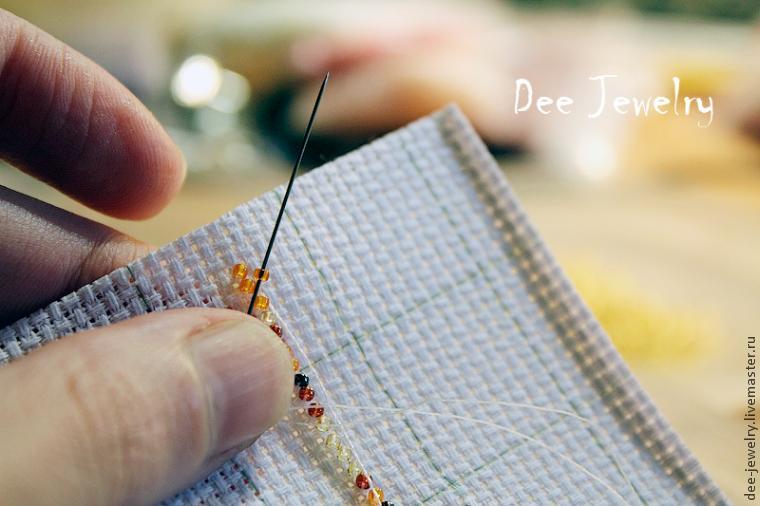
Remember this point: every first and last bead of each row necessarily stitched two stitches!
And we continue to embroidery, beads should be on the same diagonal of each other, moving on the canvas, following the pattern from right to left and left to right.
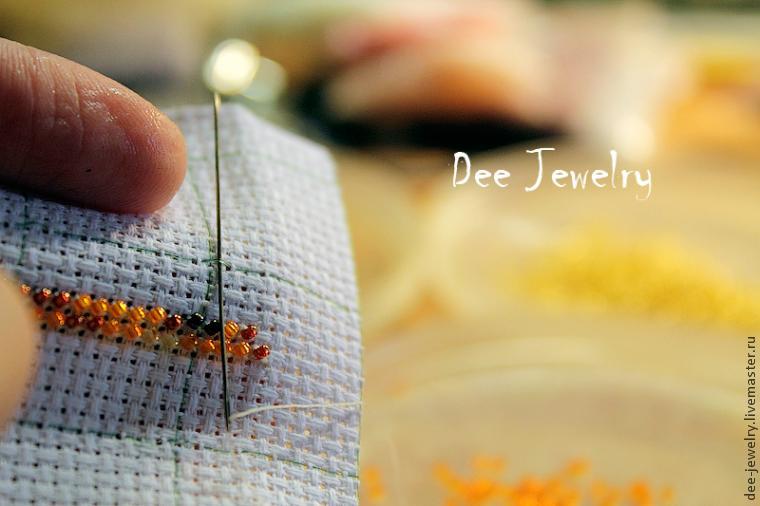
Two rows were done, you can now remove razlinovku of fishing line. I had never been to delete at once, it is easier to navigate, with a place to start embroidery.
We pick up the line and pull the needle. Not all at once, in stages.
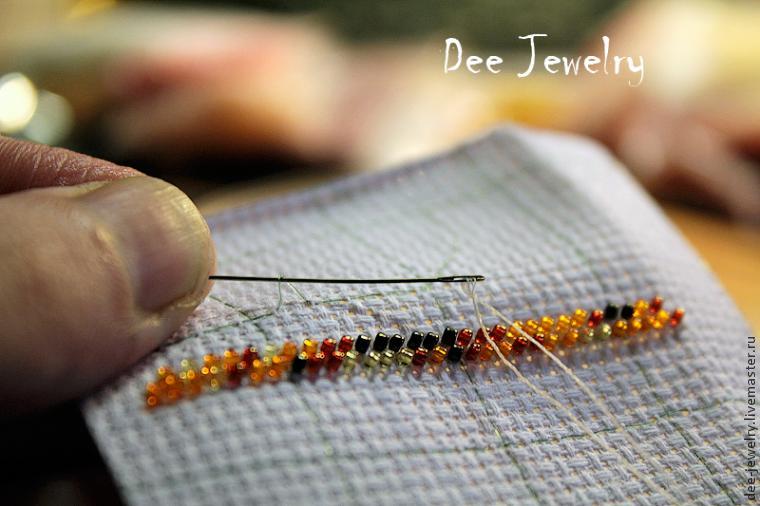 Continue embroidery. As it comes to the matter in the scheme of projections, projections embroider entirely separately, then you can always go back.
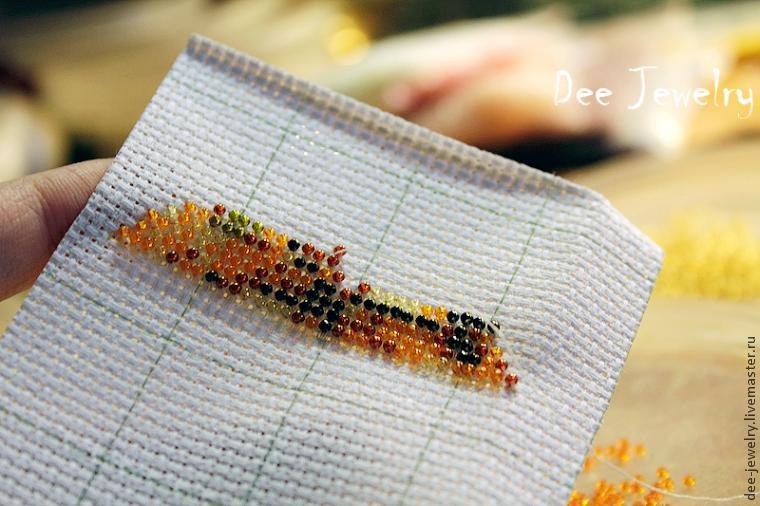 And half of our leaf is ready!
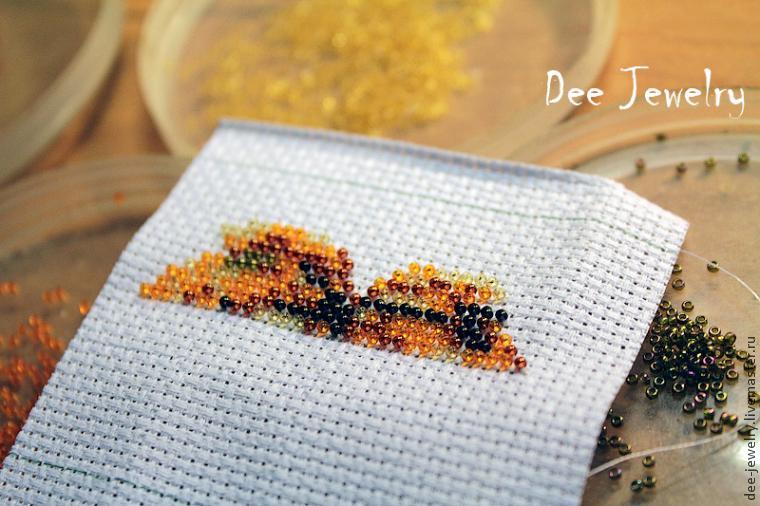 We go back to the middle of the embroidery stitches passing through the canvas cubes. Do not be afraid, these stitches will not be visible.
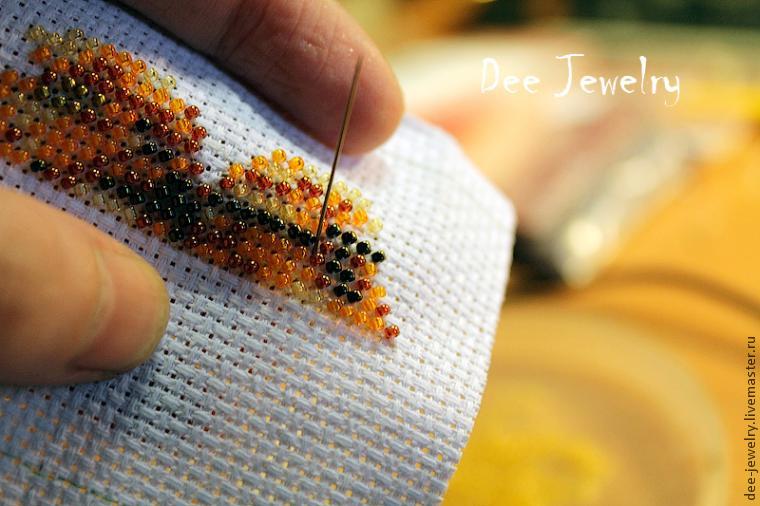
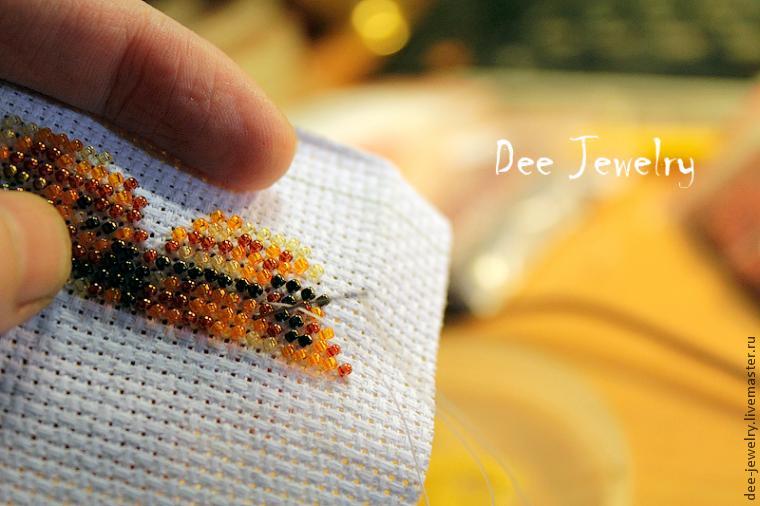 Scheme respectively overturn, too, we find in it a number from which to start, focus, and continue to embroider leaf.
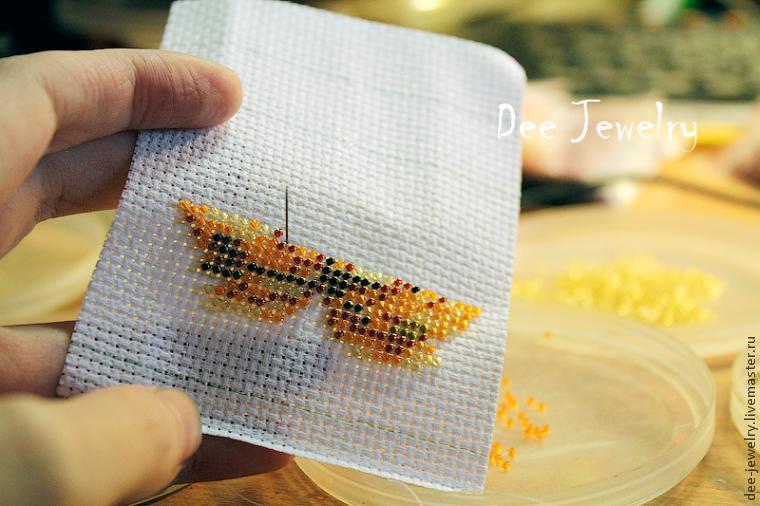 And pretty soon he’s ready!
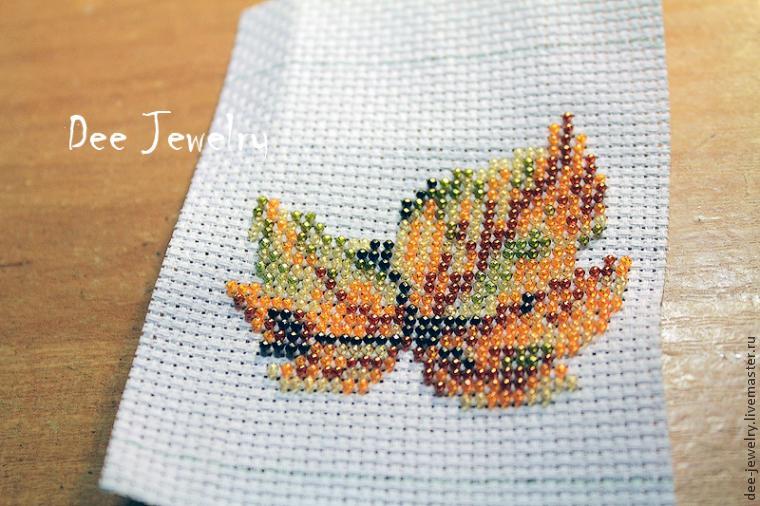 Wrong side:
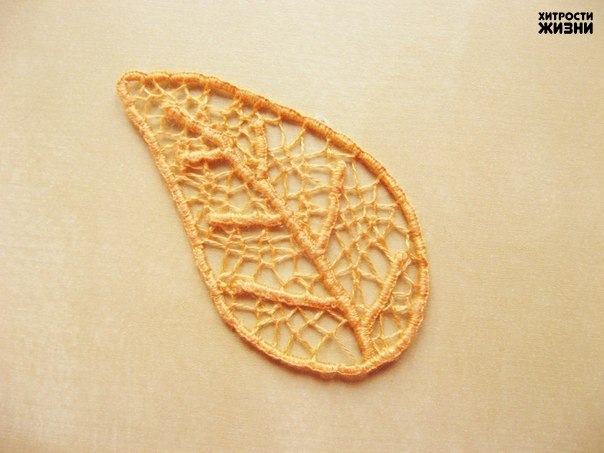
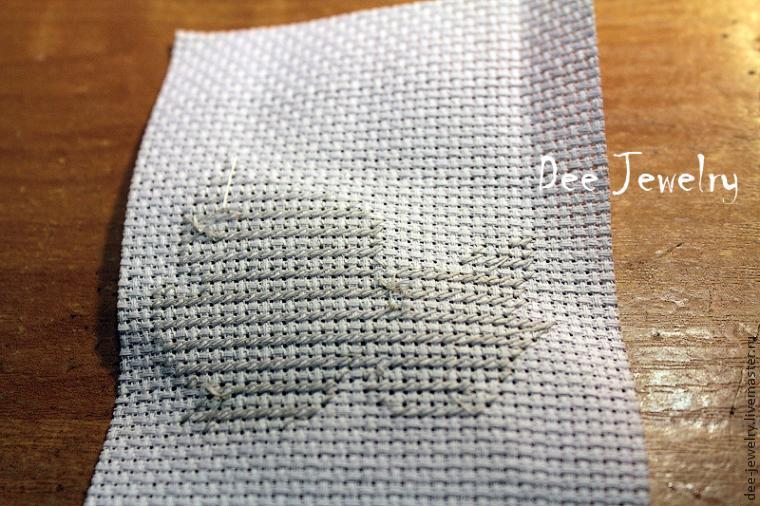 Carefully cut out our leaf, leaving a blank canvas embroidery around two millimeters allowance.
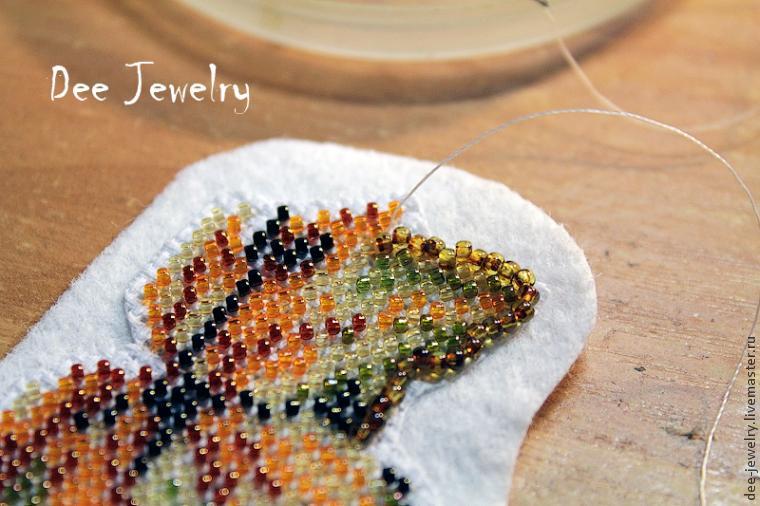
 Coat with glue inside out.
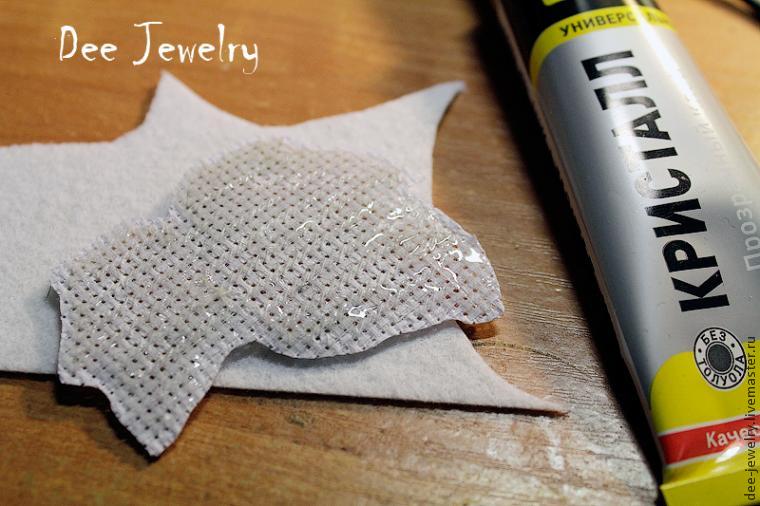 Planting on the felt.
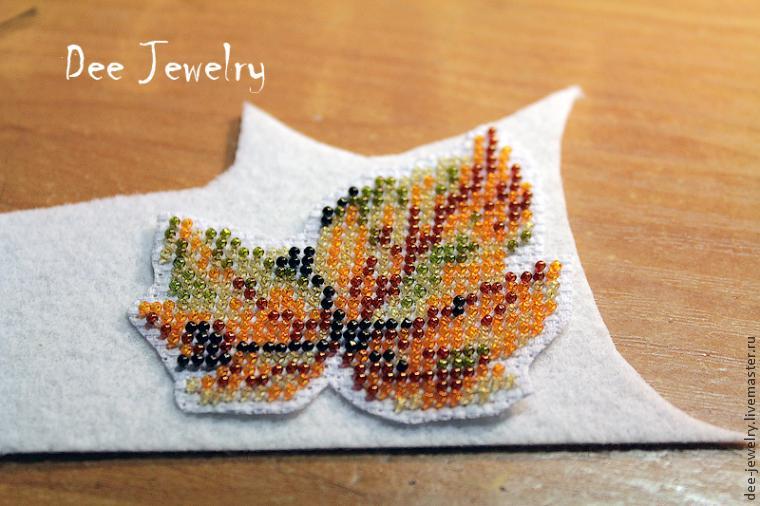
And put under the press minutes to half an hour. Longer possible less – no. As the press is perfect for any weighty book.
Half an hour passed, we take out our embroidery, cut off the excess felt (I recommend a slightly rounded strip all sharp corners, the lower thread will cling). And we start sheathing, for this, we need the shade of size 11 beads Y301 (brown). Withdraw the needle from the wrong side on the front side, leaving a tail of thread on the wrong side, and sew the first bead.
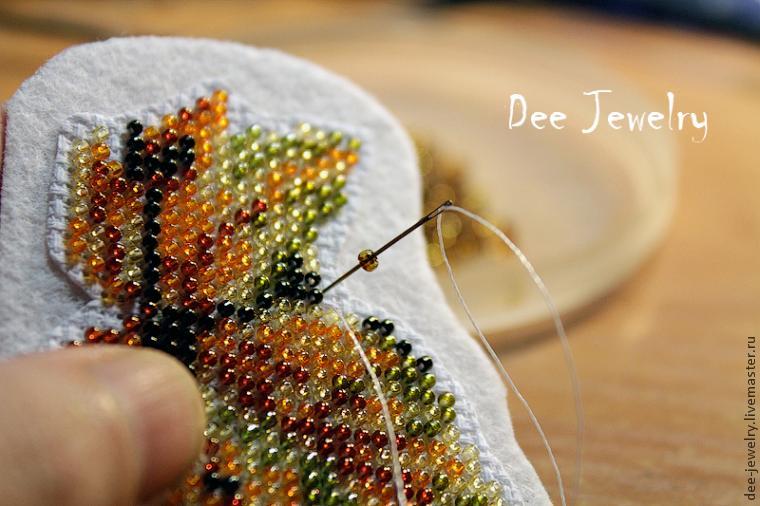 And back to the thread inside out and fasten it there a triple junction.
 We withdraw the needle behind the first hemmed beads, pass through the bead.
 Hemming two more beads, trying to sew them as closely as possible to the extreme rows of our embroidery.
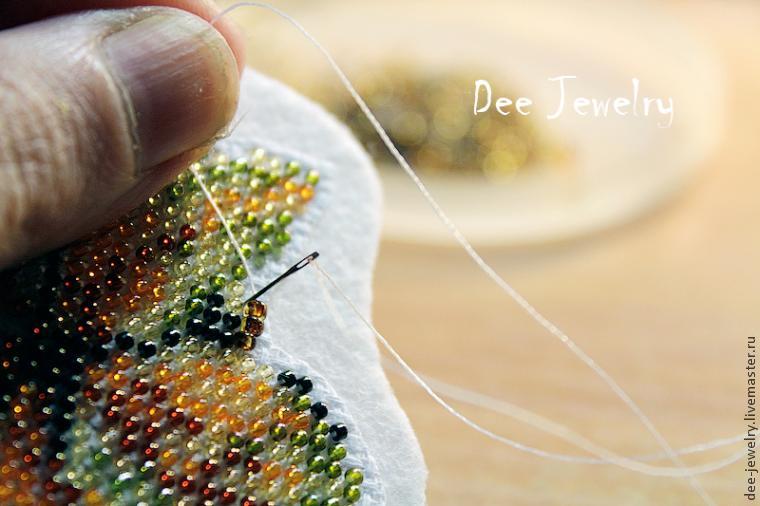 And back to the wrong side on the front side of one bead back.
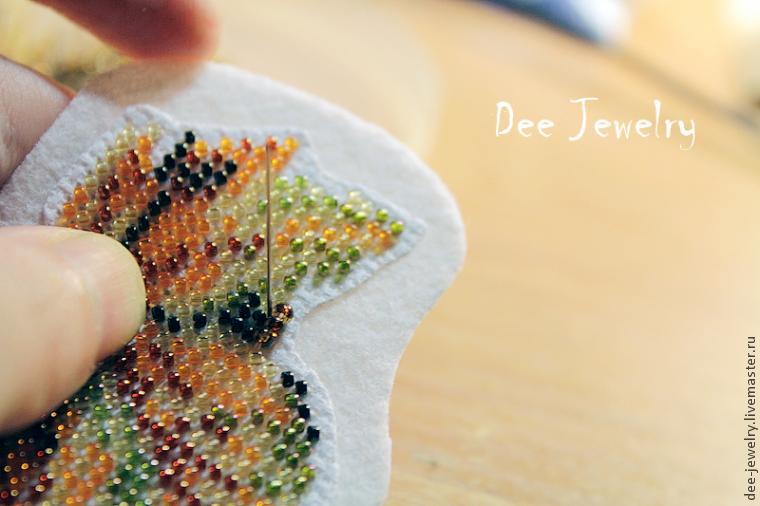 We pass through the first bead.
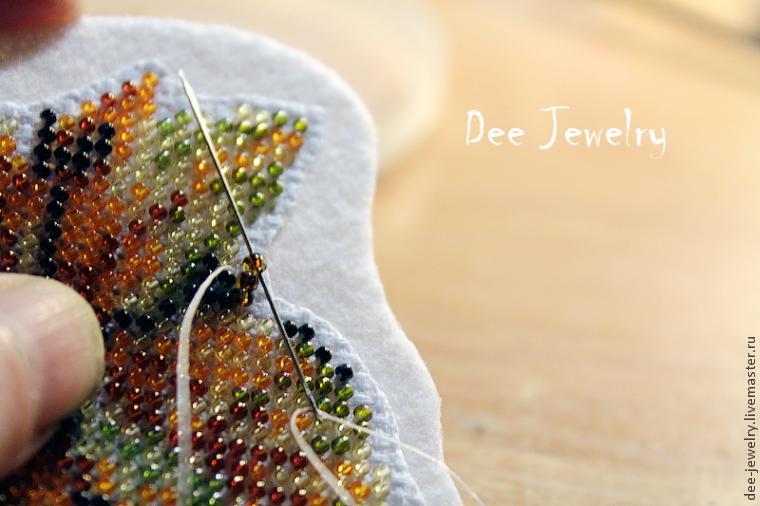
And recruit two more, and sew.
And so – two sewn, one back, passed through it, two more scored, sewn, one-back, passed through it … and to the end, pressing this number as close as possible to the embroidered pattern.
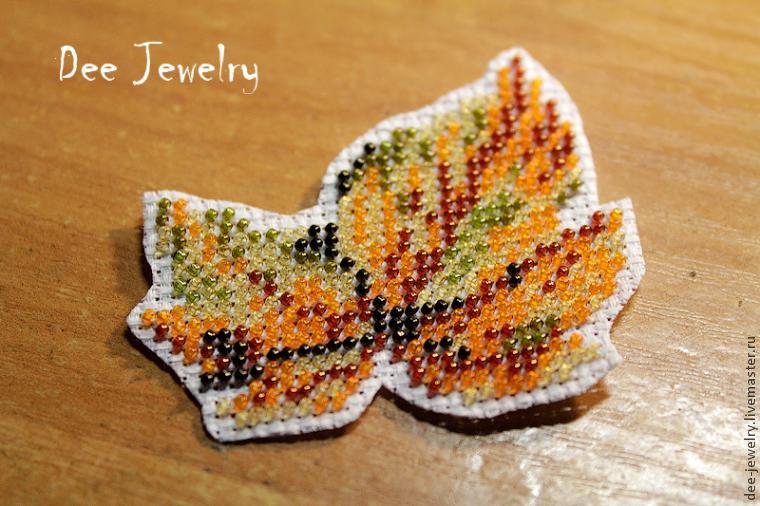
 Row over, that’s what we’ve got
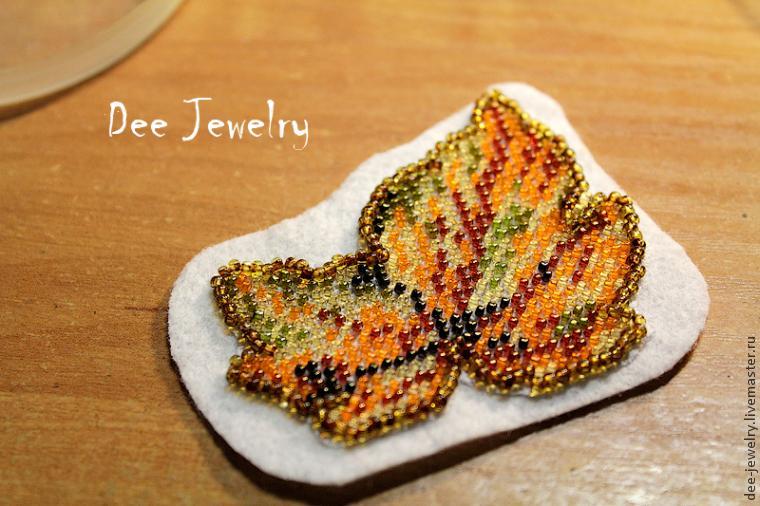 Carefully cut off the excess felt, then encircle our leaflet on thick paper.
 Cut a piece of paper and drawn once clipped him on the edge of a millimeter or two. And while putting off to the side.
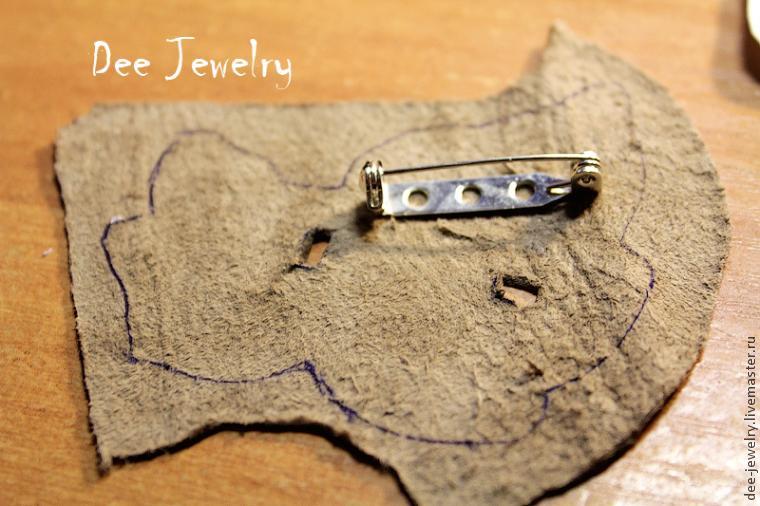
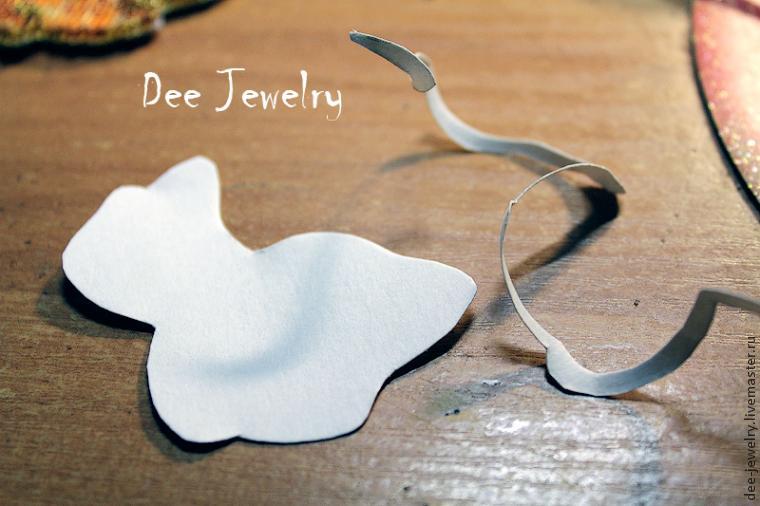 And prepares the skin for the foundation for brooches – mark up the position from which will go towards the pin, cut holes.
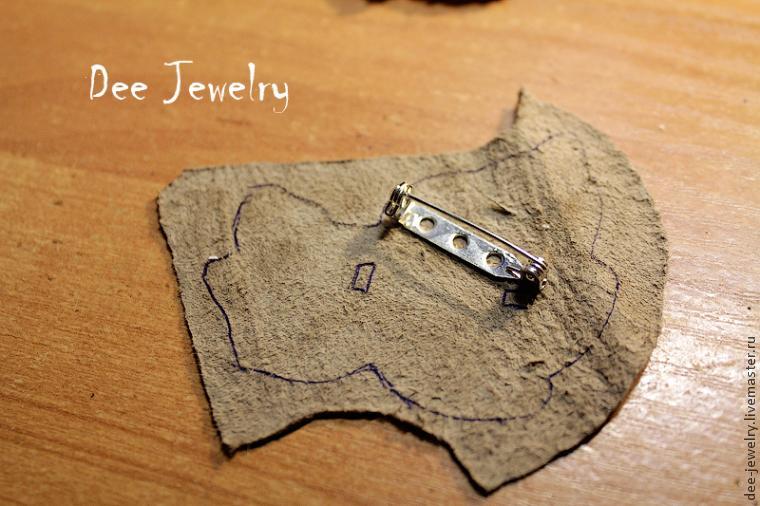
And, too, has been postponed all the way.
Take pin recruited him 13 beads size 15 color 83.
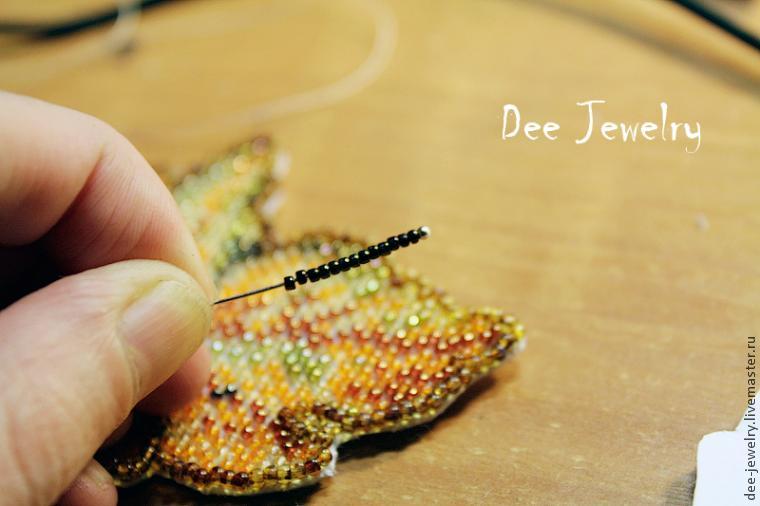
And, too, it has been postponed to the side, but close 🙂
Paper gasket coat with glue. Pins is located in the center of the leaf from the inside, pin, we will represent the leg, hold it with your fingers. The pin must be between the felt and the paper gasket.
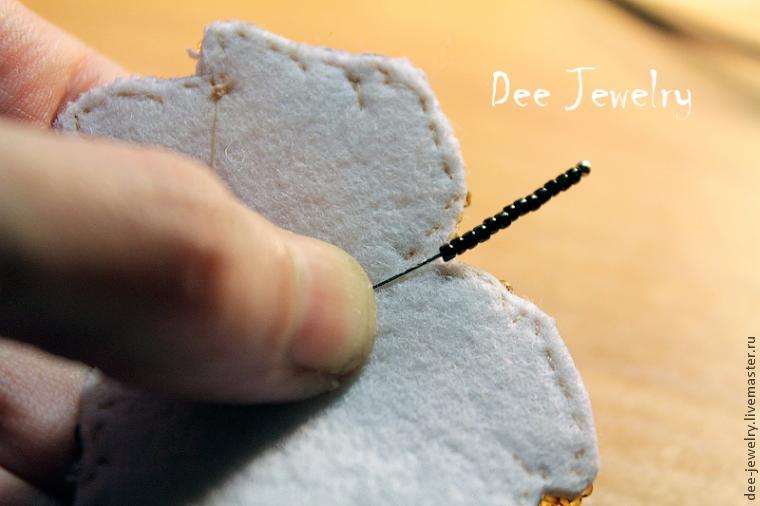 And pasted paper gasket.
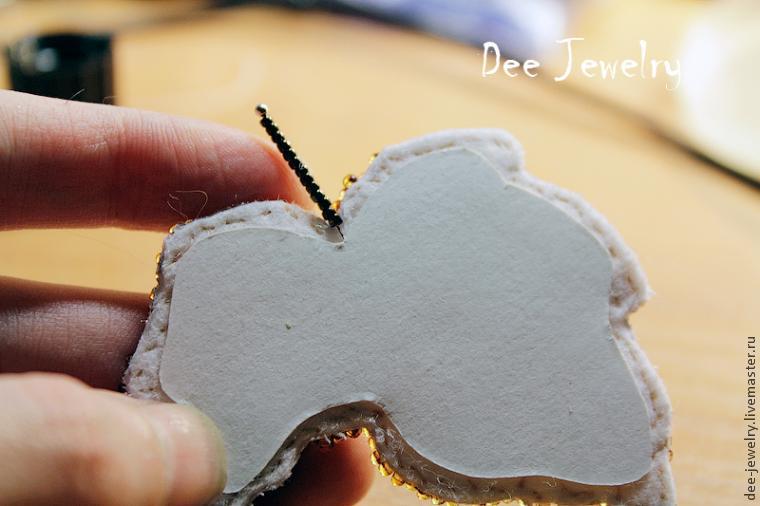 Then stitched basis for brooches, we coat the entire underside of the embroidery glue and put it on the skin.
 After an hour and a half, you can cut the excess skin and hem Termination number. Termination For a number we will take the beads 162B (yellow) color size 11 And our autumn brooch ready!
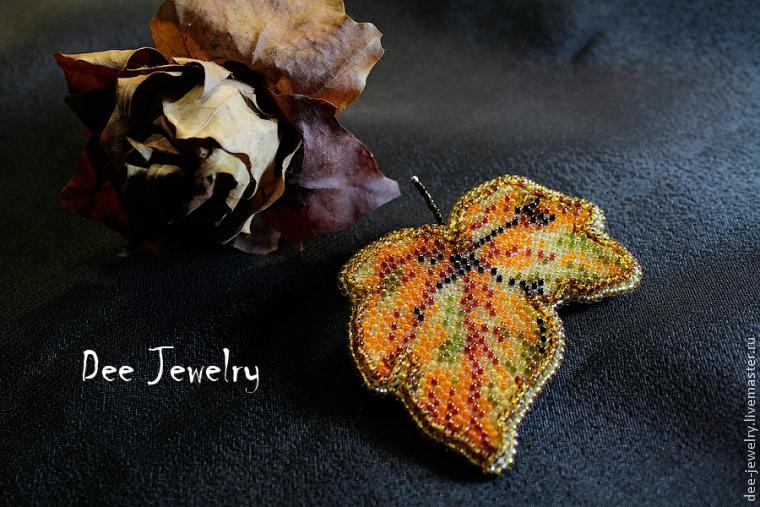 On the basis of this knowledge of the MC, you can embroider on canvas favors of any kind and size. They can be used as freely distributed schemes items for cross stitch, and make your own.

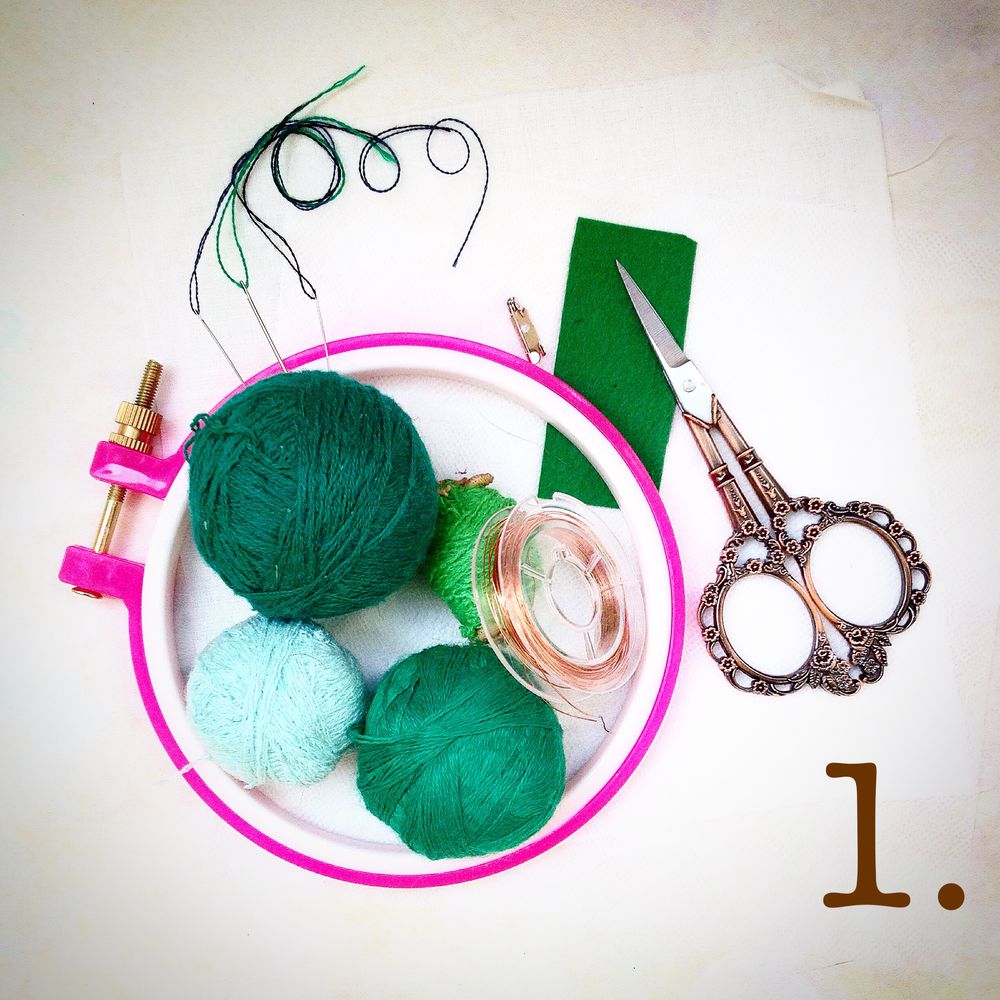
1. The need for the work:
Materials:
– A piece of the base fabric (cotton batiste white for me). You can use any plain weave fabric, thin, with a slight parting of the filaments. The thinner the warp and the weft, and less extendable, the smaller the holes and the whole embroidery is neater and more elegant;
– Thread (my grandmother acrylic 4 colors). If you are new to embroidery, it is better to take the line of the same quality and thickness;
– Copper wire 0,3mm. (. I have a green color, but you can take and conventional, uncoated, as it will be on the wrong side and closed her embroidery will not be seen);
– A piece of green felt thickness of 1 mm 2 area of 1-ruble coin;
– A piece of water-soluble non-woven fabrics of the same size as a piece of the base fabric to be able to fill in the hoop;
– Thread for basting usual (I coil plain white sewing thread);
– The basis for the brooches in the form of pins 15 mm. Or you can use any basis for brooches.
Adaptations:
– Hoop (I have a small 12 cm in diameter);
– Scissors for cutting thread;
– Scissors or clippers to trim the wire;
– Tracing;
– copy paper;
– Needle Embroidery (select based on the thickness of the yarn and fabric);
– Pen or pencil.
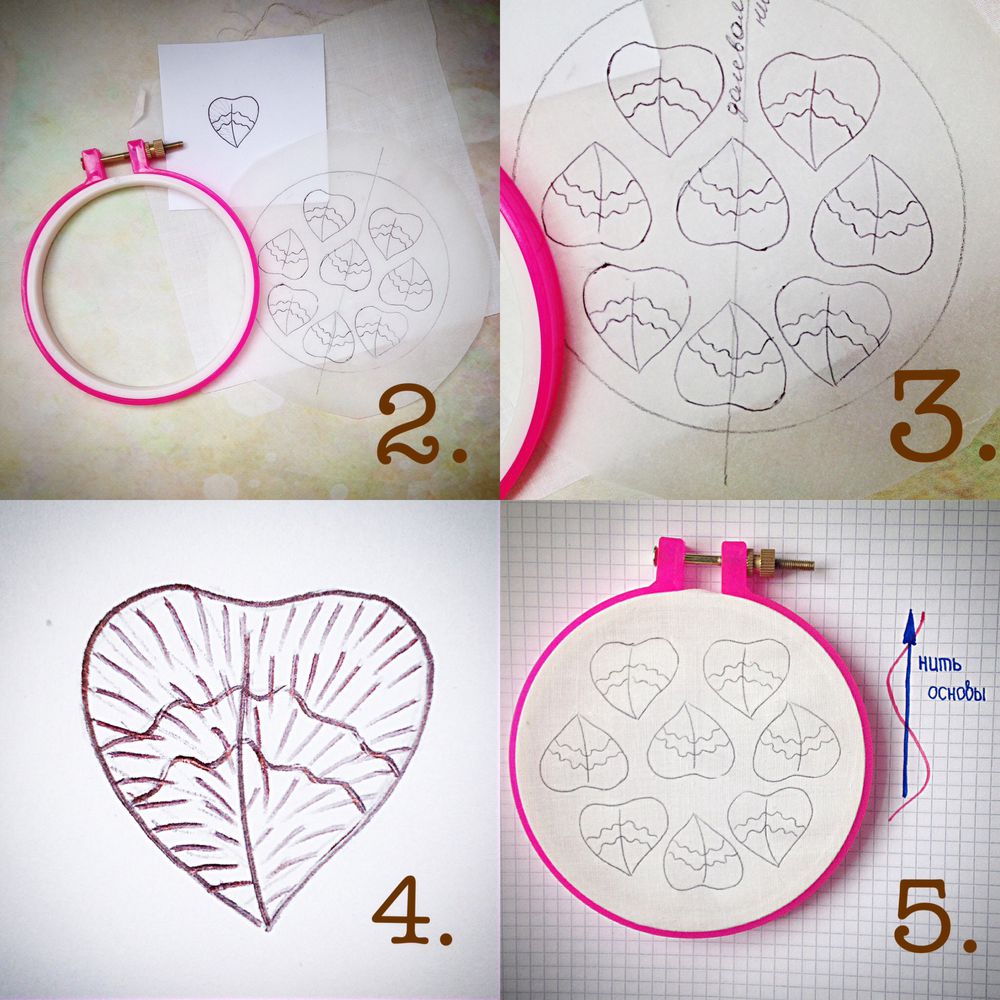
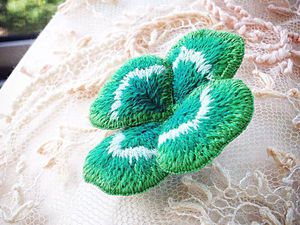
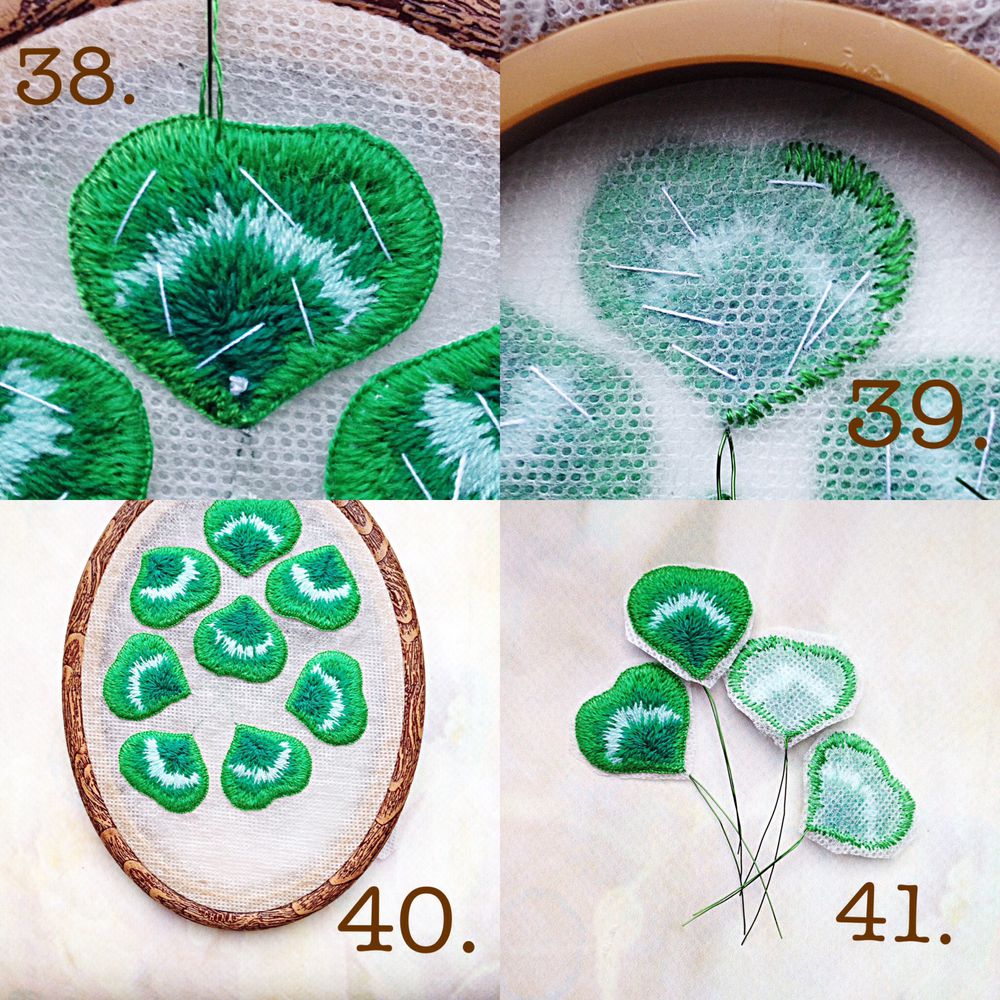
2, 3. Figure. There are no secrets there special. Draw leaves like anyone and anything. I draw on a standard sheet of paper. On tracing paper marks the boundary (obvozhu hoop), designate an equity thread and relative to translate all the leaves in one direction. If the leaves are arranged in a chaotic manner, they will not be the same. Figure embroidery process deforms differently. Clover although this is not critical, the plant must not be perfectly rovnenko.
4. Drawing a leaf. dashed line – this line of embroidery stitches. I imagine them on the fabric does not always draw. Who doubts in the forces – draw.
5. Switch the pattern on the fabric and dressed with fabric in the hoop. I translate using carbon paper. Folding the paper so that the image transferred to and from the front and the reverse side. The hoop dressed with fabric in such a way that there are no distortions of warp yarns of fabric (blue line in the figure is correct, the red is not.)

6, 7. Starting to embroider shade number 2.
8. Fix the end of the thread. A few small stitches across the floor of the future.
9. Perform one stitch back, sticking a needle in a thread, as if splitting it. All that now it will be fixed and will not go anywhere.

10. Getting flooring laid with stitches of different lengths at different levels. Stitch length not exceeding 7 mm. gaps between the stitches do not need to, they must lie close to each other, but do not “run down” on each other so that the flooring is not Bouguereau. In principle, the gaps can be filled by returning back, but then will turn to the wrong side and the wrong side of the diagonal broach get less accurate. Ideally, it is not necessary to go back at all, then the surface of a two-way turn. The photo shows that the first row of stitches I do not stack exactly to the edge, and departing from it. Full series of stitches will be done later, along with the wire. The distance from the first row to the contour line should not exceed 7 mm in all areas.
11. Continue to embroider the first row.
12 13. Fasten the thread along the same lines as in the beginning, but in reverse order.
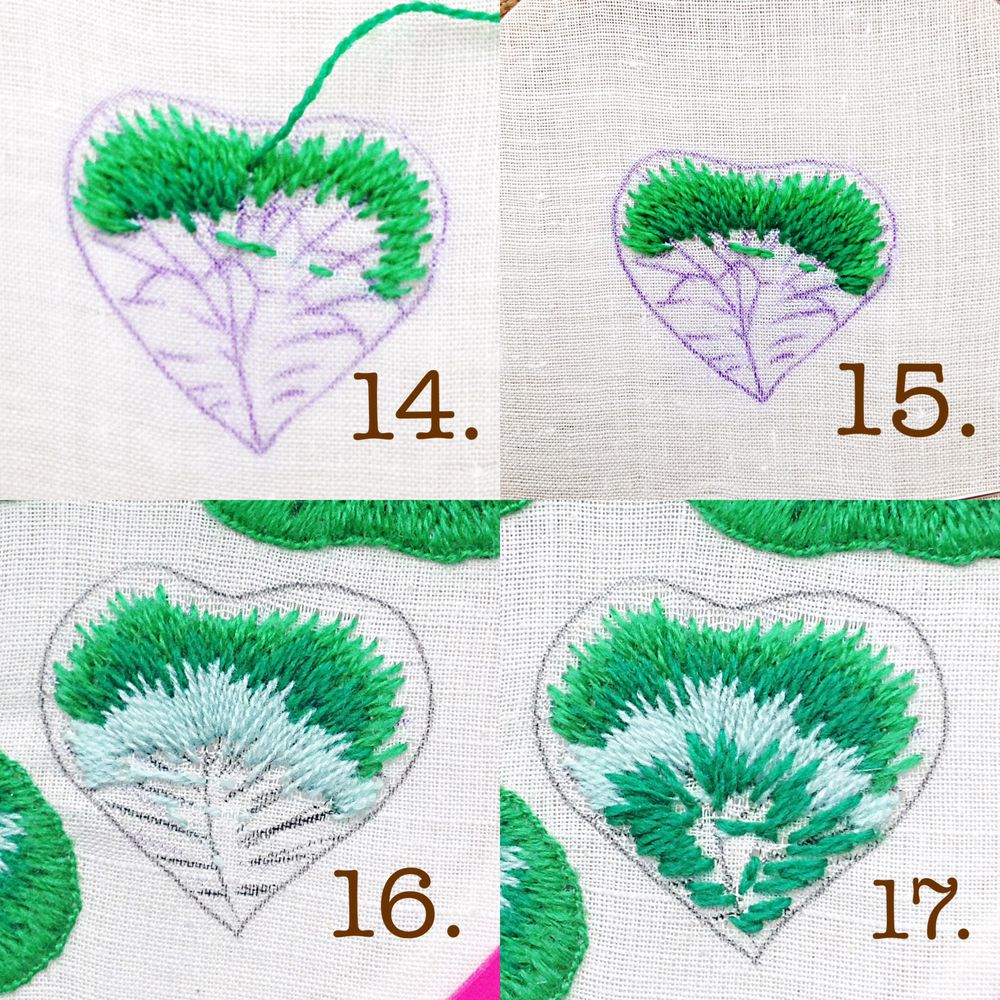
14. Take the thread color number 3 and begin to embroider the second row, second stitch – continuation of the first, that is, you need a needle stick is not the end of the hole, and from the first stitch, and, splitting thread, just going to the stitch. It is a guarantee that there will be holes in the finished embroidery, regardless of the quality of the fabric.
15. The same number of stitches of the second lengths. “Pour” one color to another.
16. The third row execute thread color number 1.
17. Again, take the shade of thread number 3.
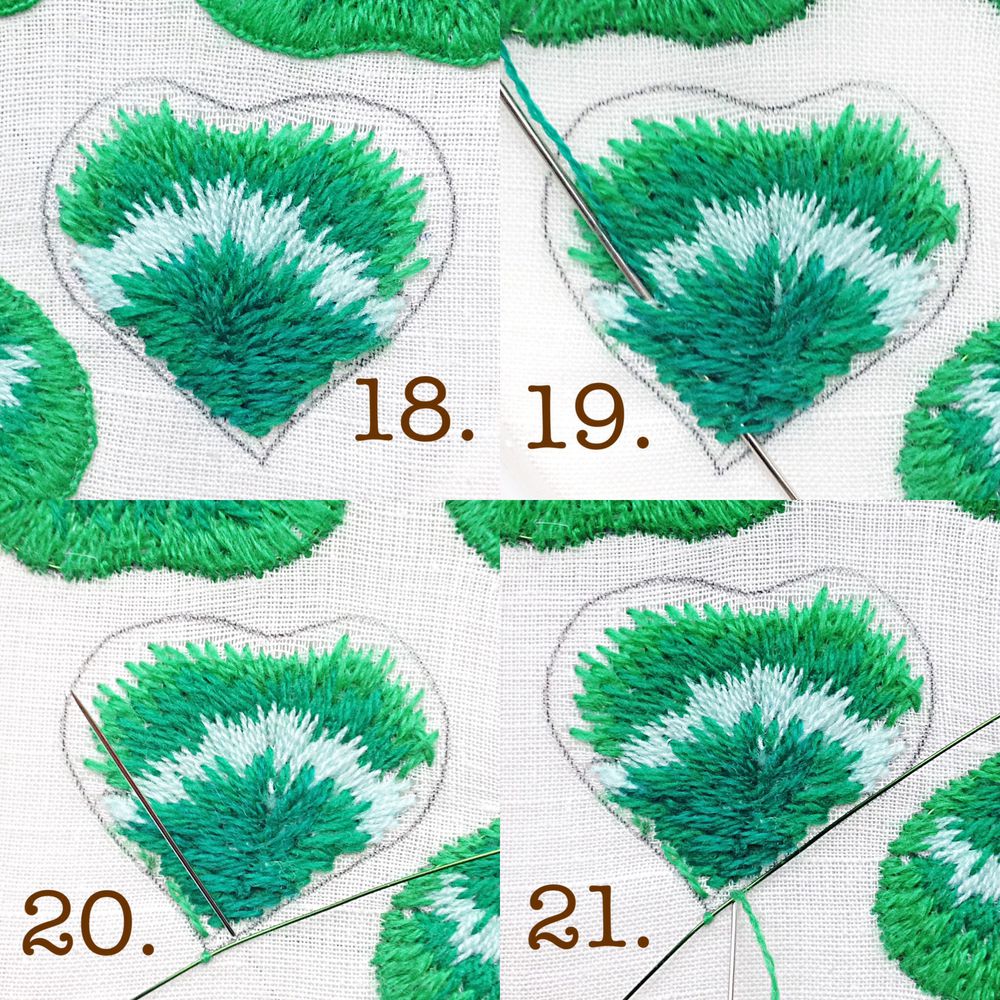
18. Shade number 4 finish embroider leaf.
Shades, their number and location are recommendatory in character. Do so, as required by your imagination, skill and vision of beauty 🙂
19.Pryachem ends of thread on the wrong side under the flooring.
20. Overturn embroidery on the wrong side (pull out of the hoop, and then dressed with a pre, but the wrong side up). Cut the piece of wire. The free ends are too long, you should not do – 2-3 cm is enough.
21. sew thread color number 2 couched stitch technique zero stitch. That is, a needle is stuck there, where pulled out, rounded the wire at the same time. The picture is clear, like. The distance between the stitches can be varied. the stronger the bending, the more stitches. But not more than 6 mm.
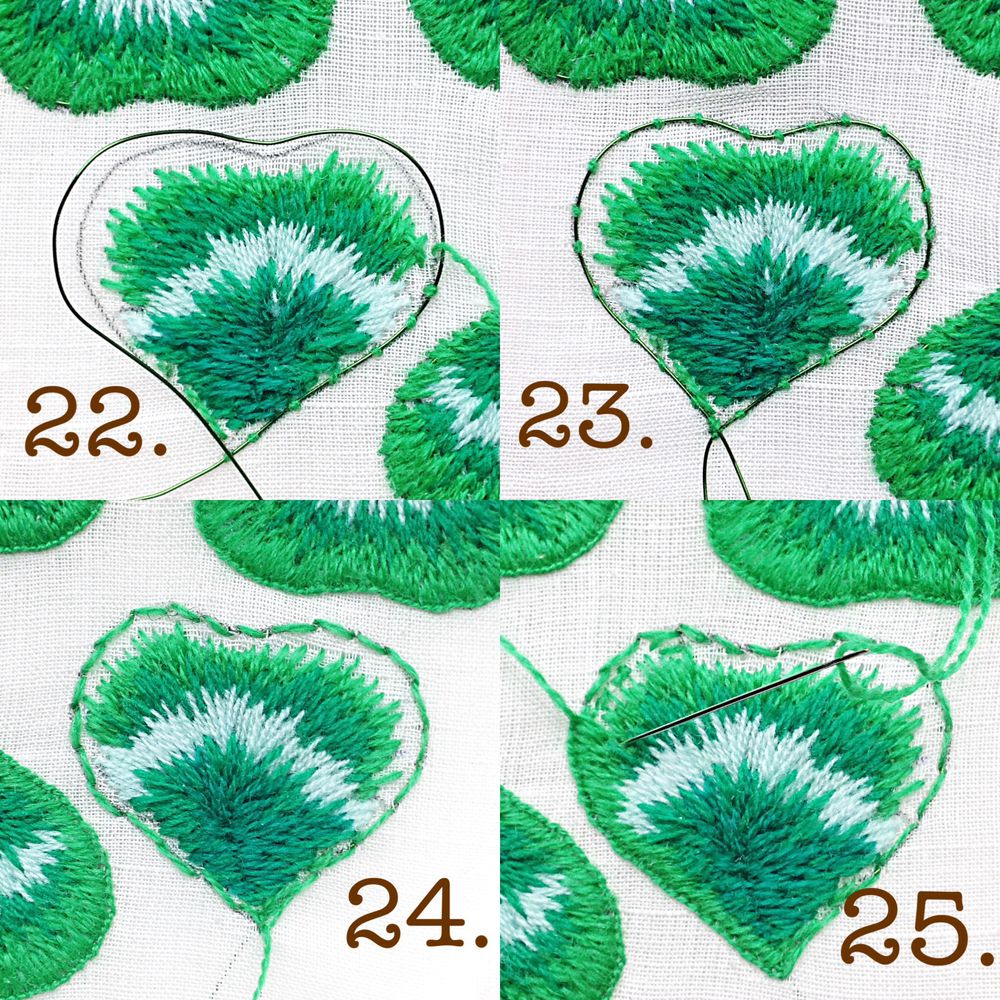
22. The wire should be laid on the contour line, which we have translated and inside out too. Remember? I sew the wire at this stage, when the main embroidery is ready to wire ends do not interfere.
How many saw all do it at the very beginning – to embroidery. Treat the first stitch the edges together with wire and then embroider the center. On the one hand it is clear – embroidery less deformed. But it is not convenient. The wire sticking out – a thread for it cling irritate 🙂 Take your pick.
23. The wire sewn. Threads I was not cut, but simply deduce the front of the embroidery – then come in handy.
24. Type of wire sewn embroidery on the front side.
25, 26. Again turn over embroidery. On the front side. And buttonhole stitches embroider edge of leaf color thread number 2. Technology is the same – to stick a needle in the previous stitch in thread, rather than next to it.
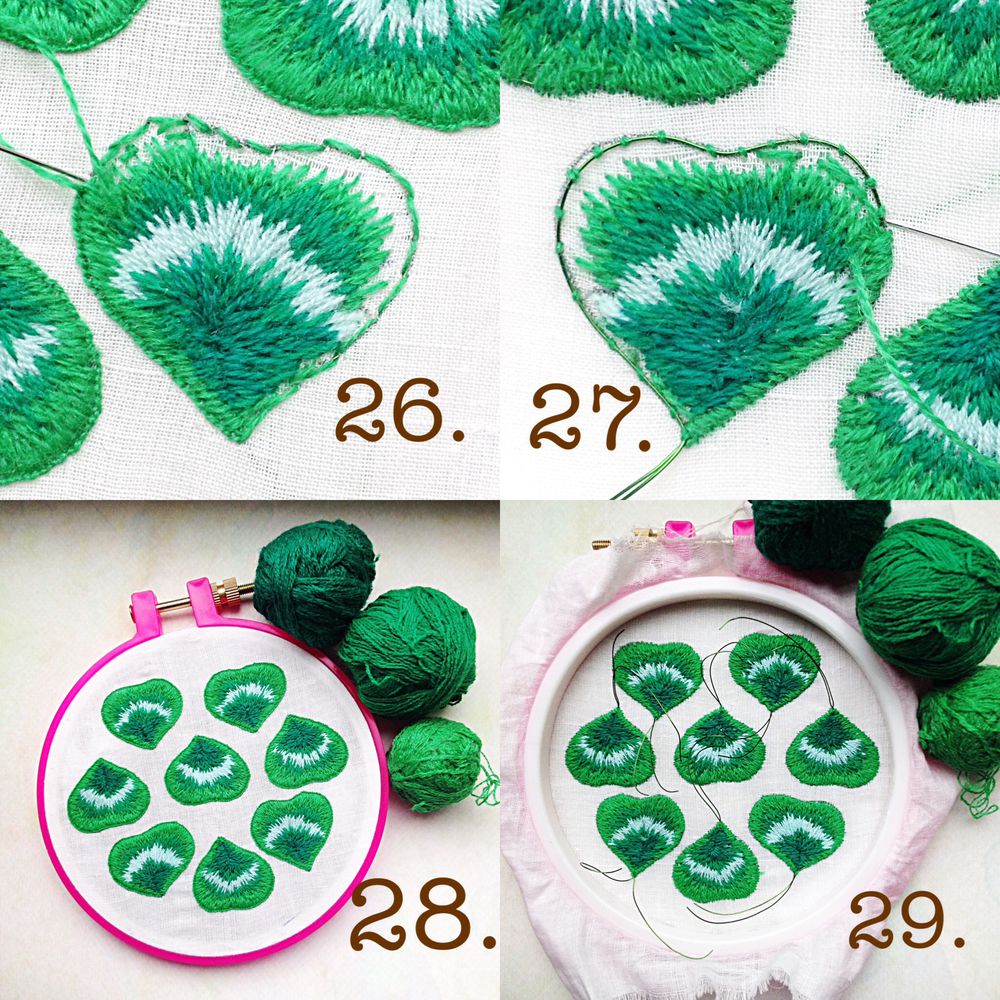
27. On the reverse side the needle comes very close to the wire on the outer edge. In order to get exactly, embroidery turn is not necessarily, the wire is well detectable. Or a needle leading to the center of the leaf on the fabric, and it rests on the wire, make a puncture. The stitches should be laid close to each other. If the gaps are formed, do not worry, later we will close them.
28. The front side of the embroidery with a loop suture treated leaves.
29. Wrong side stitch.
30. Take out the embroidery of the embroidery frame. Small sharp scissors cut out the leaves as close to the pigtail hinge joint. Cut holding embroidery facing up. If you’re on the wrong side of cut 100% damage the thread on the edge. Read Tips If slice the thread, then immediately fall onto nail varnish or glue in place “injury.” I is not never embroidery stabbed.
31. The cut sheet of paper from the front side. Remnants of the base fabric is almost not visible.
32. The cut sheet of paper from the wrong side. Here the base fabric is already very well visible and it looks sloppy.
33. The edge of a leaf. Visible white rim tissue osnovy.Vot stripes from this, we will get rid of using a water-soluble non-woven fabrics.

34. We put in a water-soluble nonwoven hoop. Wire tails skip through the fabric inside out so as not to interfere with work.
35. Regular sewing thread of any color, basting stitches slanting leaf on interlining, that in the course of work will not run away.
36. Baste leaf. View from the inside out.
37, 38. And now again looped stitches of different lengths, thread color number 2 runs along the edge. Fill the gaps, if sinned in the previous step. From the edge of the sheet is not retreat much, ideal to do the very edge of the sheet. If you are going away to recede, the region will be fuzzy, loose and wavy. This effect can also be used, for example, in colors. The end of the thread at the beginning and end of the hide under the floor.
39. View from the wrong side.
40.Vynimaem basting thread leaves.
41.vynimaem of embroidery hoop. Cut leaves. You can not very gently, important not to damage the embroidery.
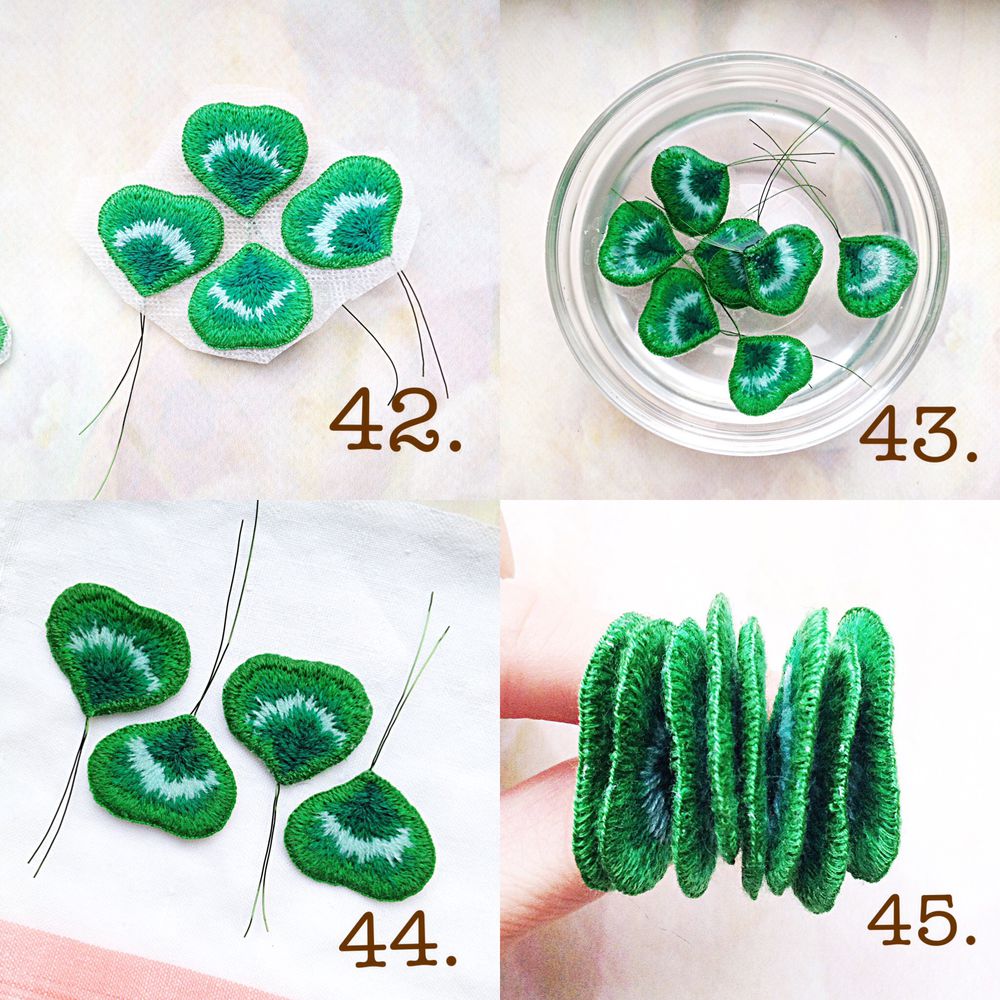
42. If it is absolutely unbearable, or laziness, they can be generally one does not cut, and entirely with the whole piece of nonwoven lowered into the water. All the same, it will dissolve, but I prefer to cut and then spend less time in the tap water.
43. Put the leaves in a bowl of water at room temperature. Fleece can be different, and dissolved over different time. See specifications. I is 2 minutes in a bowl. I then I wash the leaves under running water until complete washout nonwoven.
44. We spread the leaves on a towel or rag, blotted the excess moisture. Dry them. I dry, wrapped in a towel, directly on the battery.
45. The result of applying a water-soluble nonwoven’s such a beautiful, neat edge without a fringe and protruding threads, which is not exactly osypetsya. And interlining nakrahmalivaet little embroidery.
Can I do without it?
Mmozhno!
– If you do not particularly bother with accuracy;
– If the edges of negligence fits into the image, character and style of your product;
– It is possible to select as the base fabric is not white, and green, and then the warp is hardly seen from the end;
– Paint over the contour of the base fabric marker or paint the color of the thread edge. Then, too, the fabric will not be seen;
– Walk along the edge of a loop seam without interlining, just holding leaf in hand. In this case, the edge will be more loose and not very smooth, but as an option is well suited.
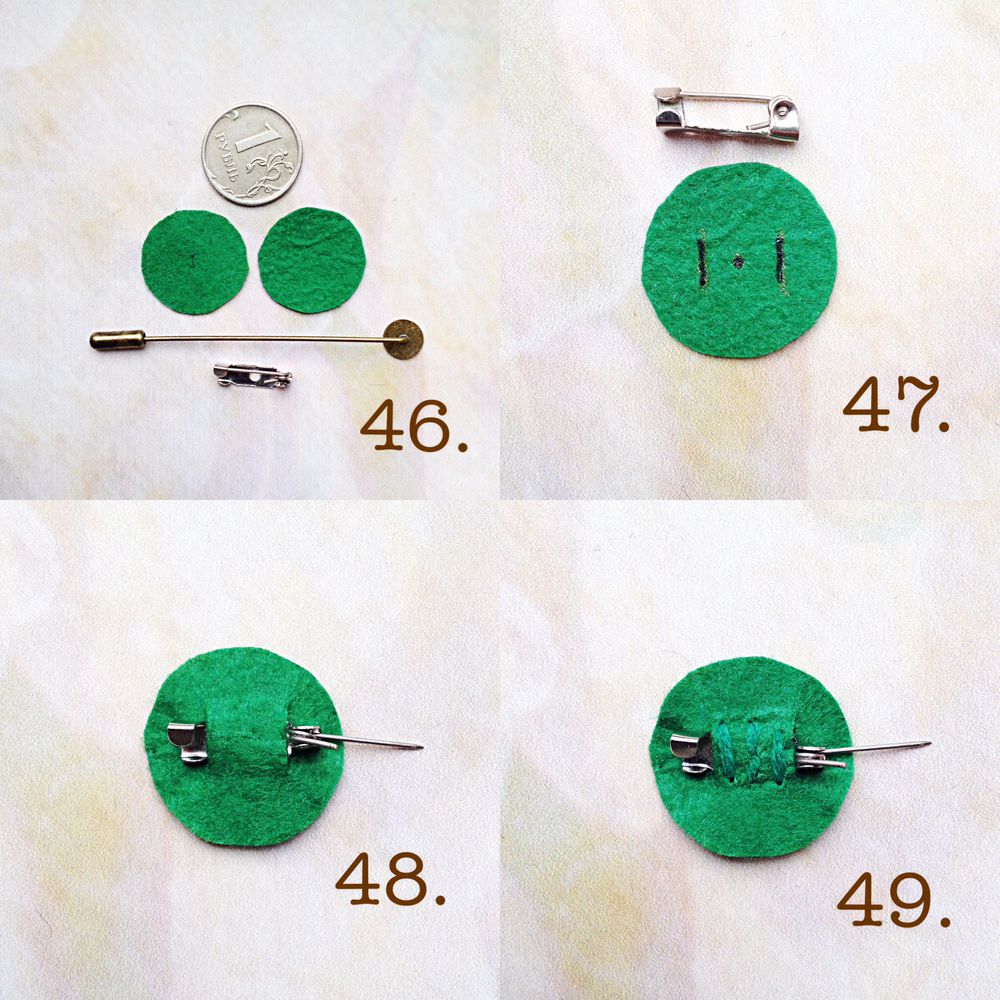
46. Cut the green felt two thin slices the size of a 1-ruble coin. It may be any fastener in the form of pins, needles, and other.
47. Mark up on one circle to the cutting line on the size of a pin. cut length of 5 mm. In general, depending on pin size. Cut.
48. Insert the pin in the hole.
49. Firmly sew thread in tone.
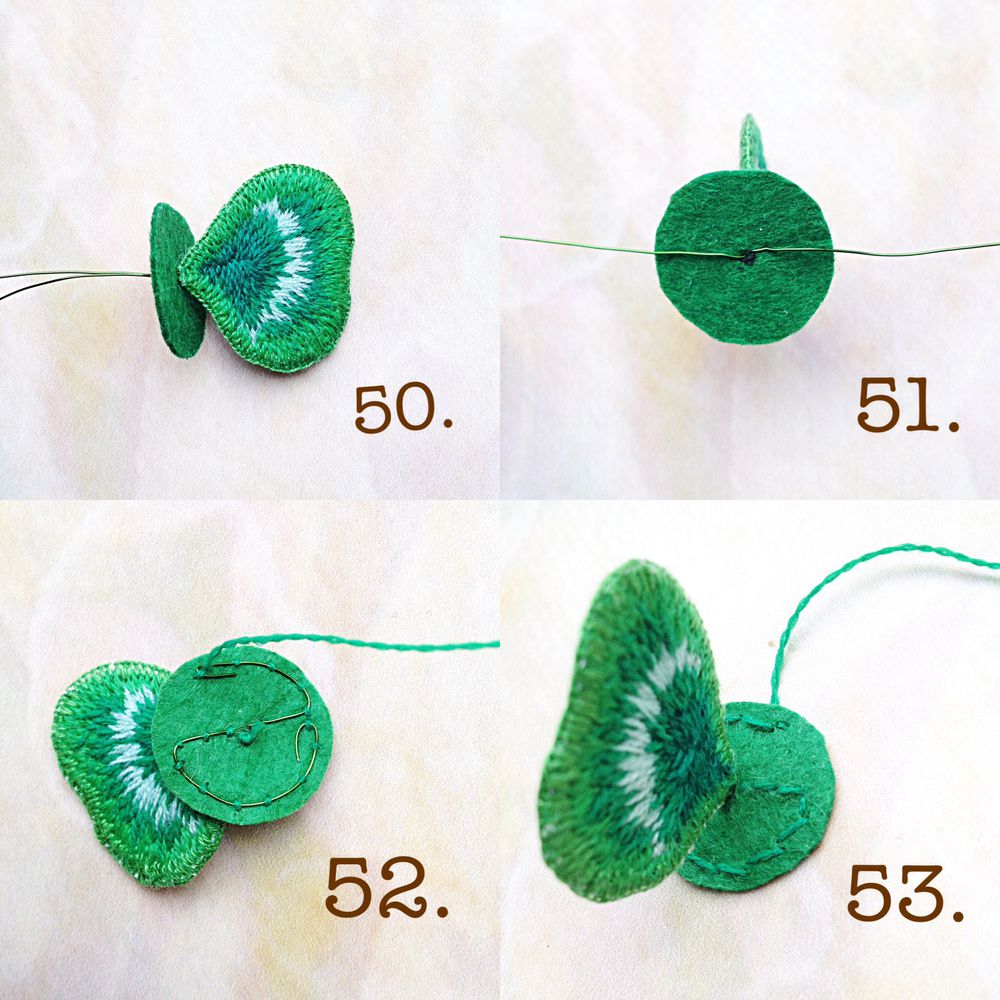
50. Take the second felt circle. Pierces the middle of the hole and insert the wire ends from the first leaf to stop.
51. unbent wire antennae.
52.nitkami color of felt sewn wire. Required Fold the tip of the wire loop.
53. The view from the front side of the felt circle.
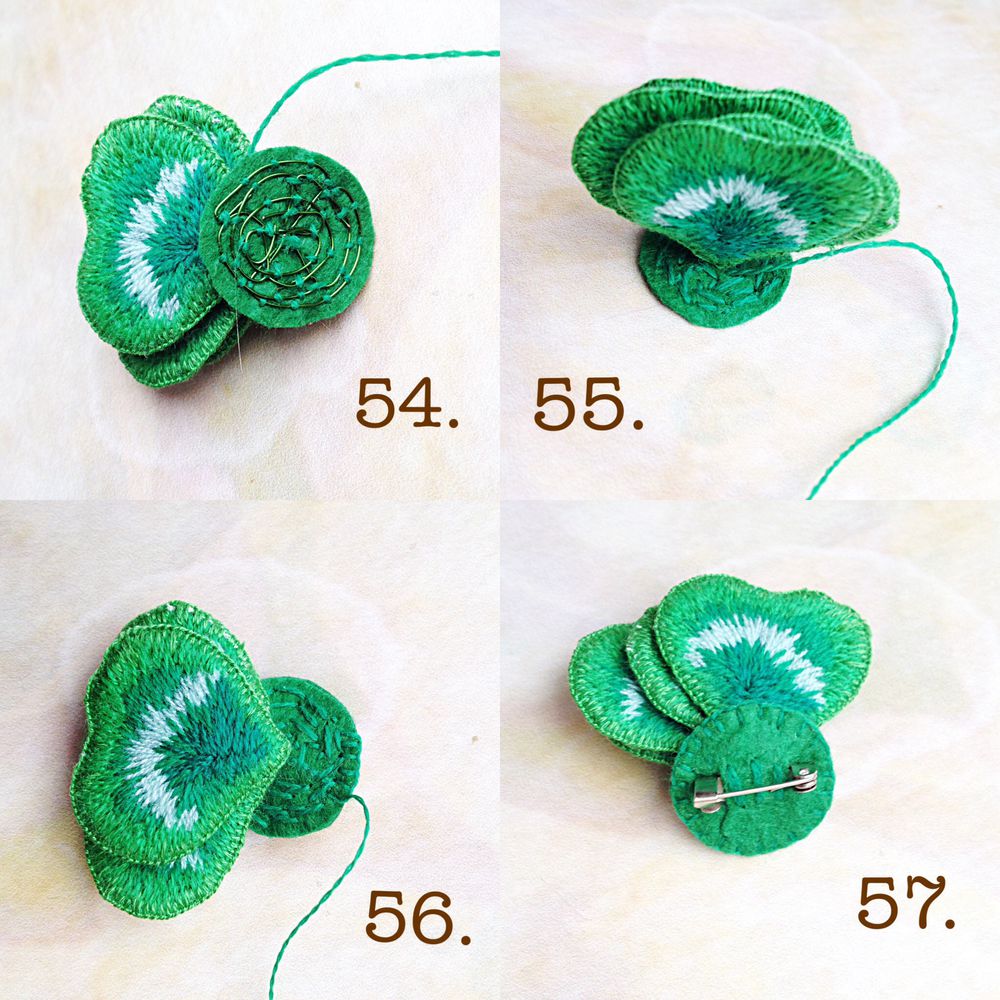
54. secure all the leaves and all the ends of the wire.
55. The view from the front side. You can leave and so, and you can embroider the felt circle further. For example, the French knots.
56. Take the second circle with a buckle. You can drop into the center of the adhesive. I use the glue gun. And you can not stick at all. A loop seam is sewn over the edge of one circle to another.
57. The underside of the brooch with buckle.
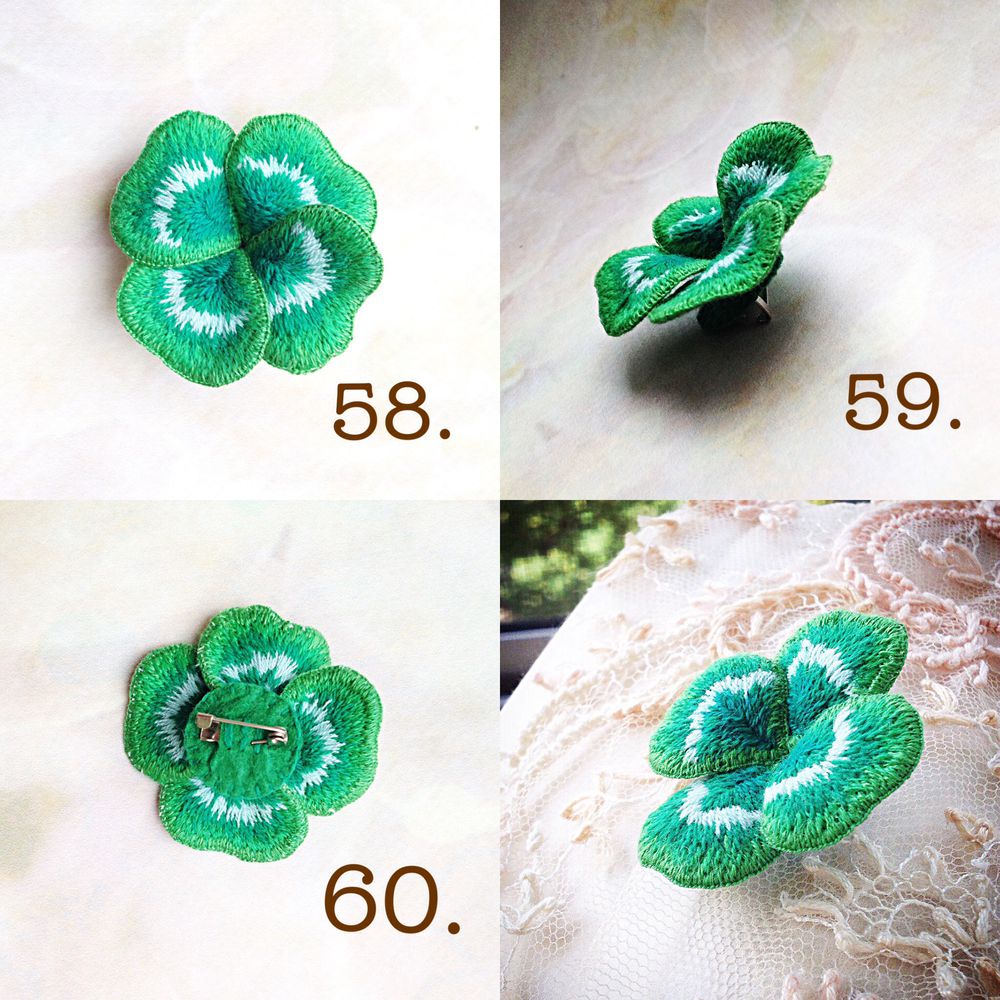
58 59.Raspravlyaem folds and leaves to your liking.
60. Wrong side brooches.
Done! Be creative, try.
Thank you for attention.
Initially as shishy, mirrors are used instead of mica pieces, and later fine pieces of broken glass. Poor people even sewed shining wings of beetles.
Nowadays, there are a small mirror on the open market. If you are going to use them, make sure their edges are well oshlifovany.
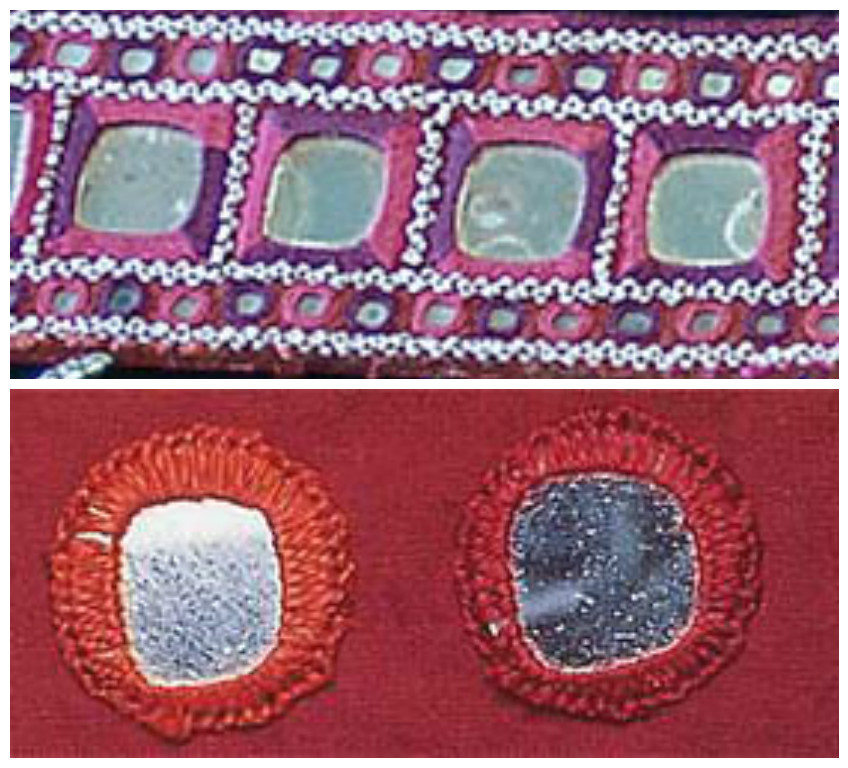
Instead, you can use the mirror sequins – the sequins large with a small hole in the side. They are very light, not sharp, and are available in wide range of colors. Some are experimenting with CD-discs – breaking open them to pieces, grind the edges and sew in place zekalts.
So, step by step guide to embroidery.
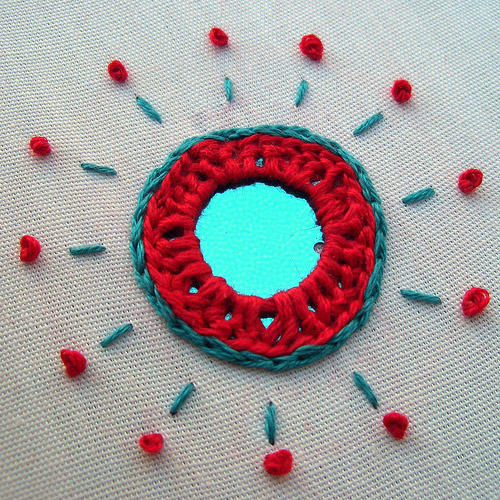 Prepare all materials. For embroidery you will need: cotton, silk or wool fabric with a tight weave structure of the fabric yarns, hoop, needle sharp, mirror-shisha (or sequins, or coins) and thread for embroidery (silk, cotton, metallic thread).
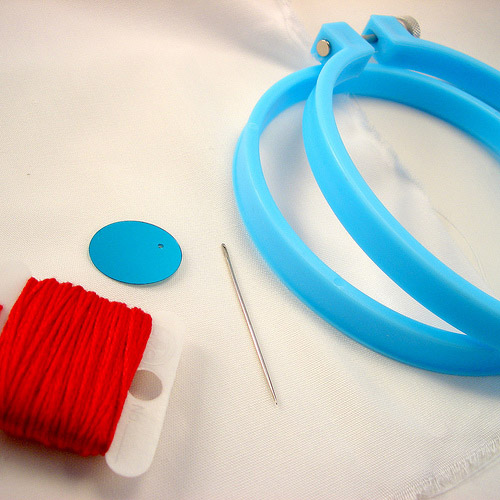 Tightly secure the fabric in the hoop. Insert the thread a needle and tie a knot at the end of the thread.
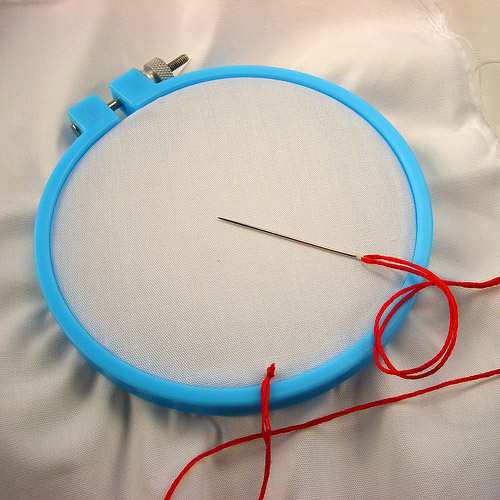 Place shisha on the fabric and sew basic cross stitches. The basic stitches are not necessary to be very careful. But they must be tight, and arrange them should not be too close to the edge of sequins – or shisha simply fall out.
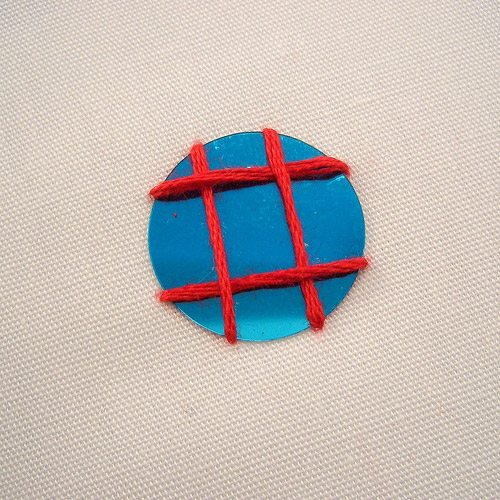 Now repeat the basic stitches, but by turning them by 45 degrees, as in the photo.
 You should have this:
 Now you can leave everything as it is, and sew the next shisha. This is already well fixed and looks nice. But if you want to create a tight box around the shisha – continue. Pierce the fabric with a needle near a mirror from the inside face. Then, insert the needle under the basic stitches from the center to the edge.
 Pull the thread and tighten the stitch, then make one stitch in the fabric next to the mirror.
 Now, following the stitches should be the same as odeyalnye stitches. Again, thread the needle under the basic stitches from the center to the edge, but make sure that the thread forms a loop under the needle when tightening the stitch.
 From now on, when you make a stitch on the cloth after odeyalnogo stitch, you make sure that puncture the needle through the previous stitch in the fabric. So you make a nice chain around your shisha.
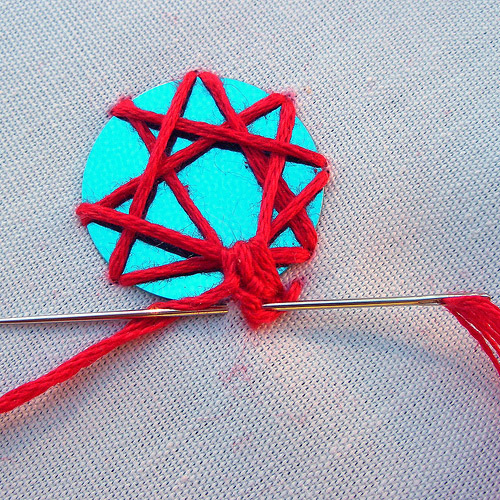 At this point, you can take out of the embroidery hoop, but not necessarily. Continue with steps 7 and 8 around the mirrors.
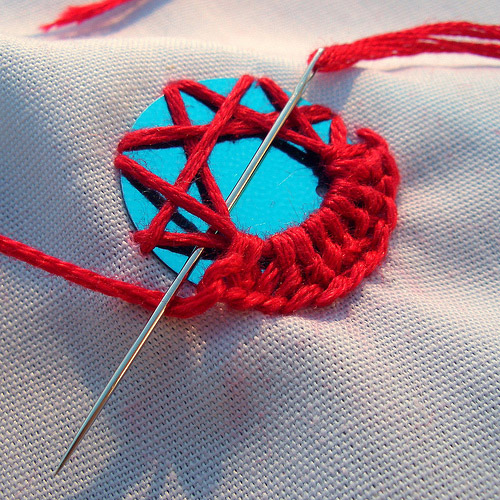 If removed from the embroidery hoop, will be able to slightly bend the substrate and better control of the stitches on the fabric.
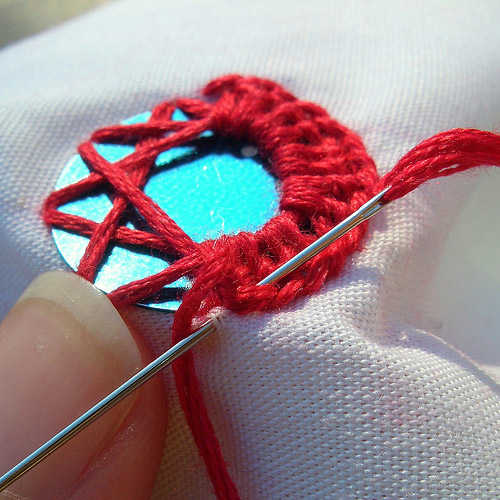 Continue until you reach the end!
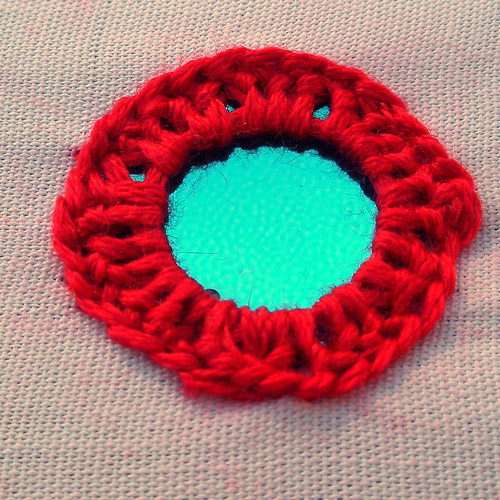 You can stop at this point, or do embroidery even more interesting. Follow the edging of turquoise chain stitch in tone sequins.
 Then follow the stitches-rays of your shisha and shine like the sun!
 Shut down the lovely French knots.
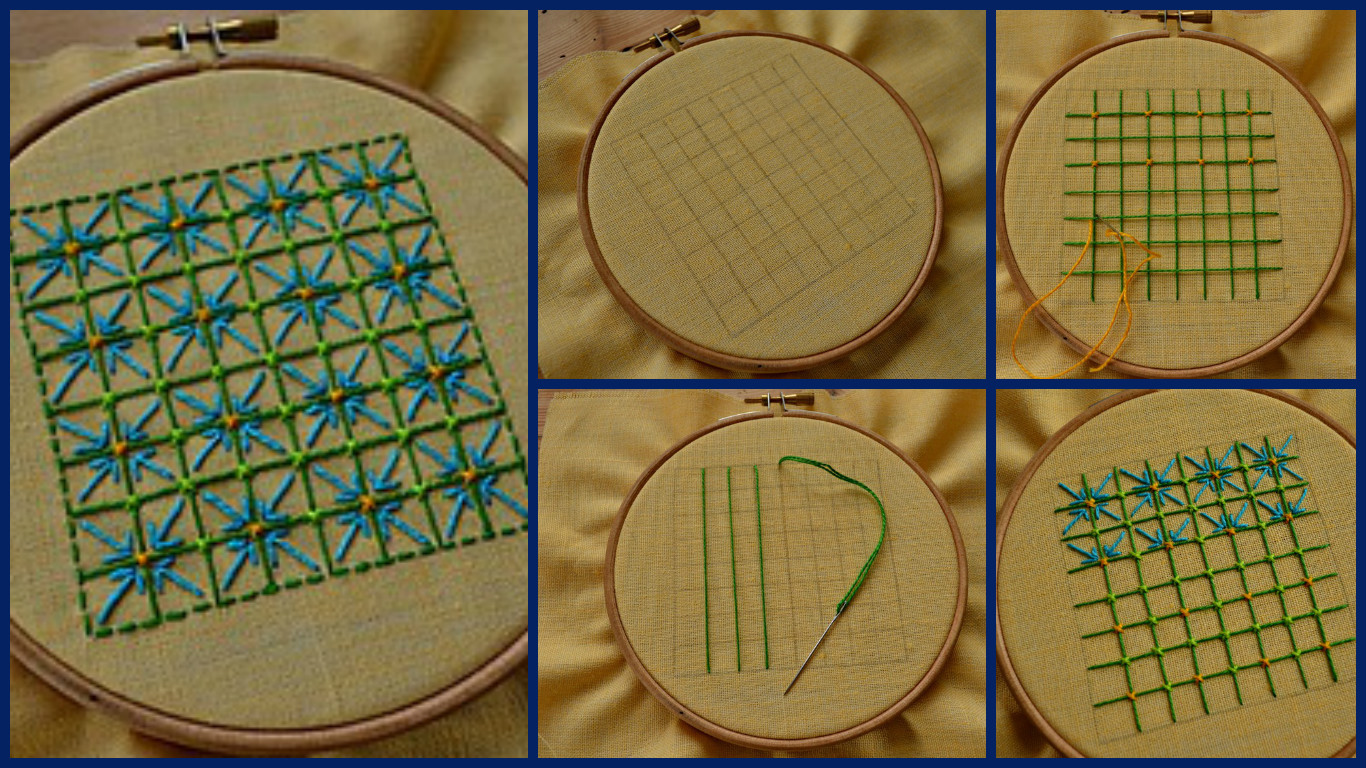
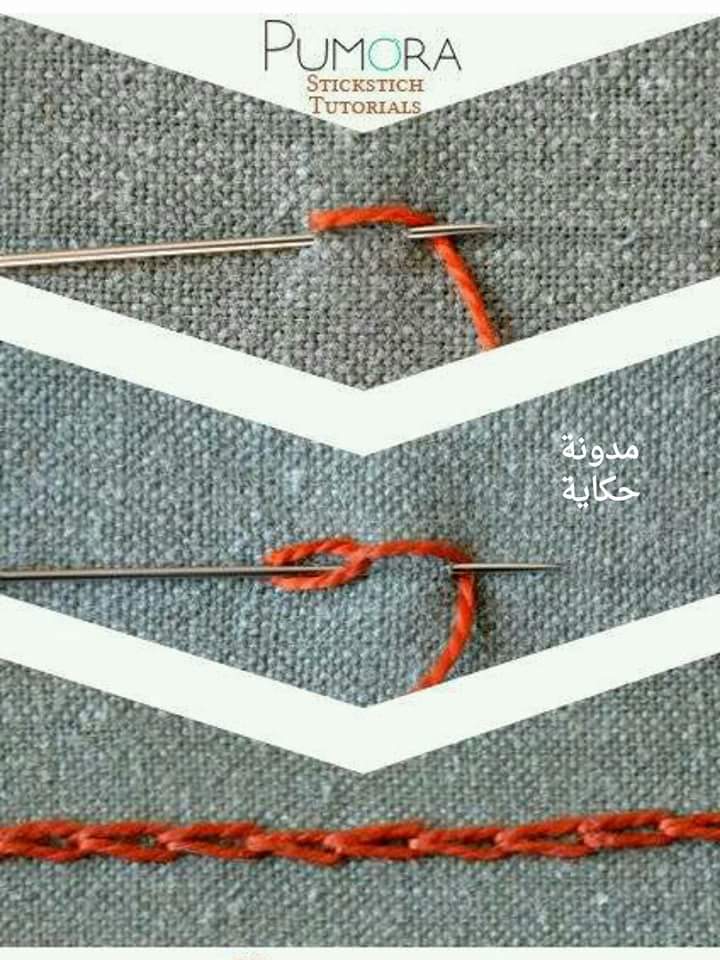
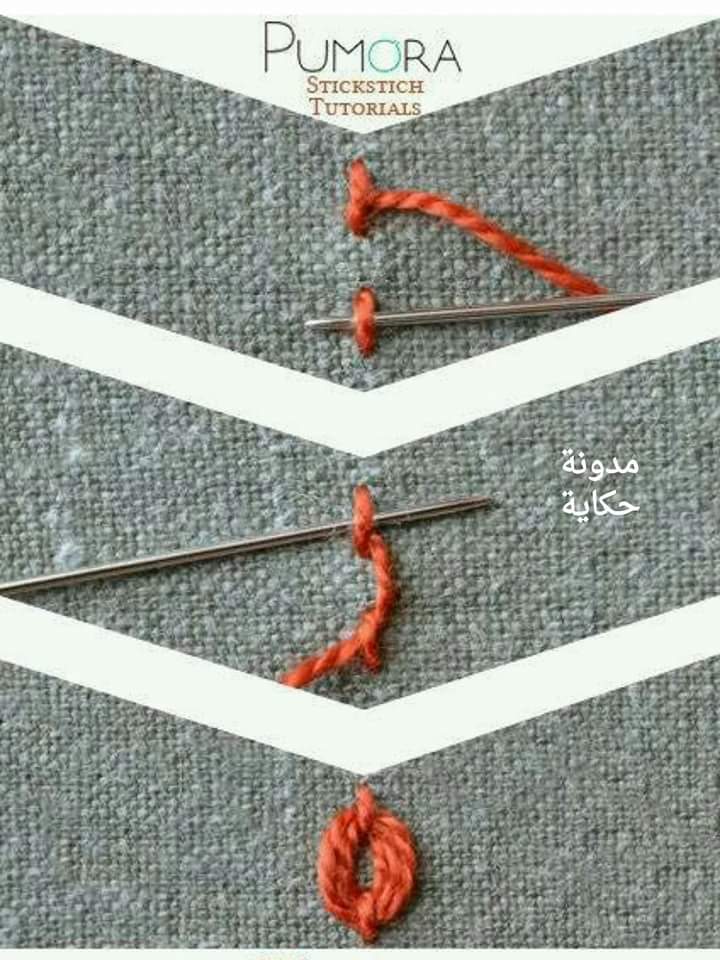
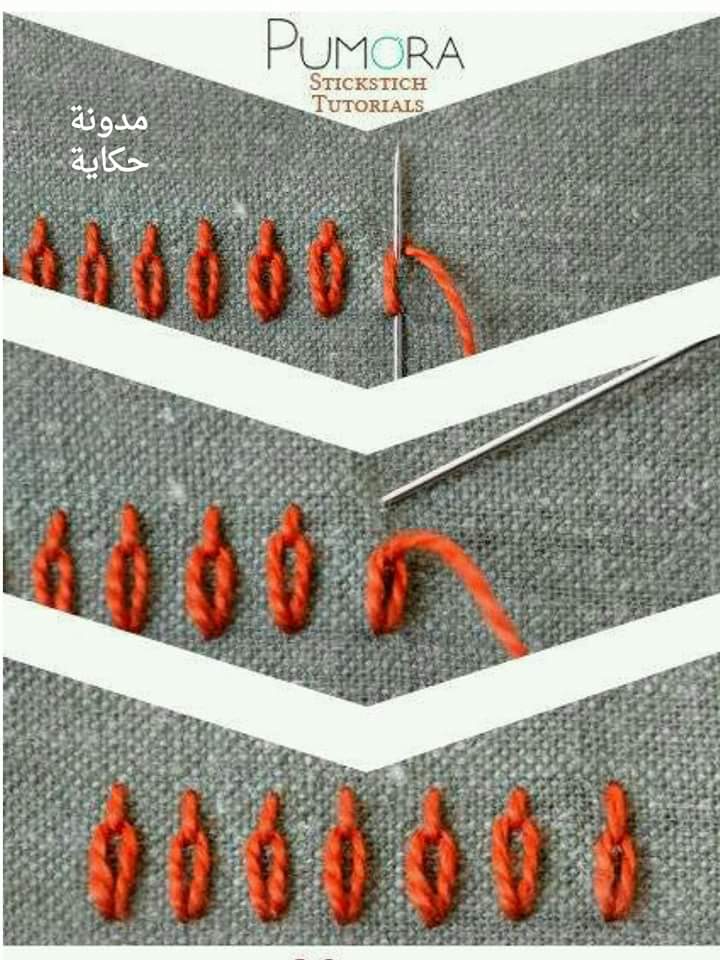
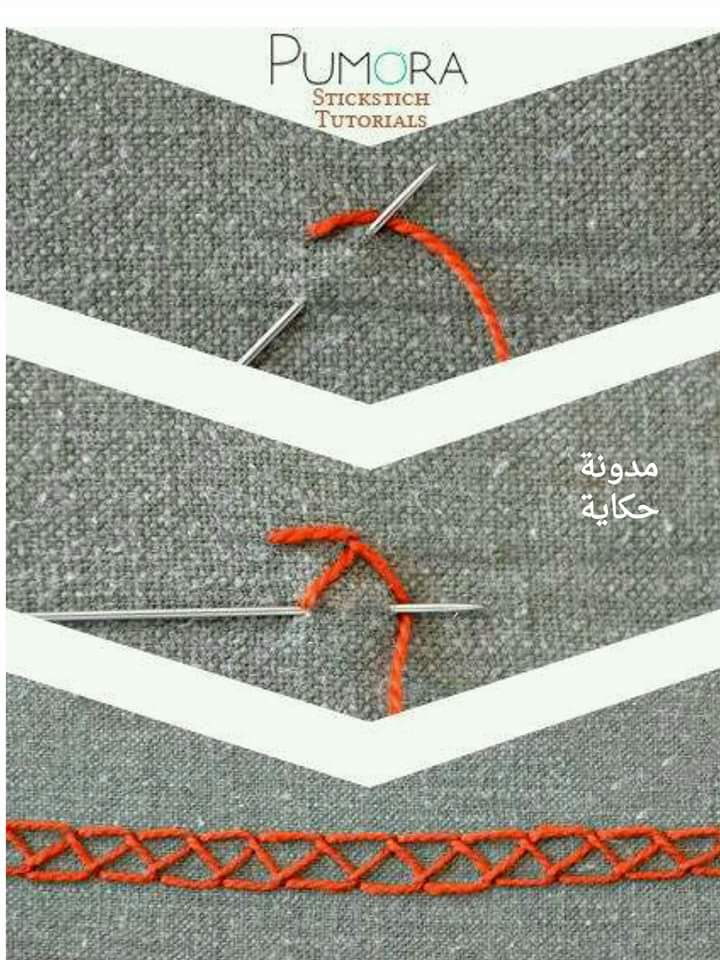
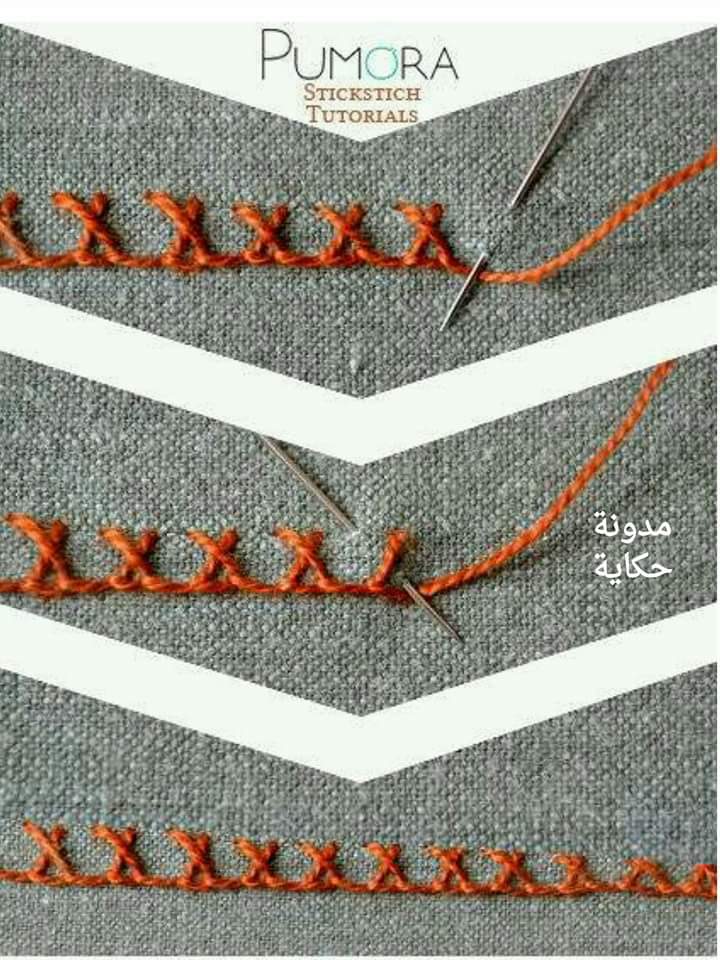
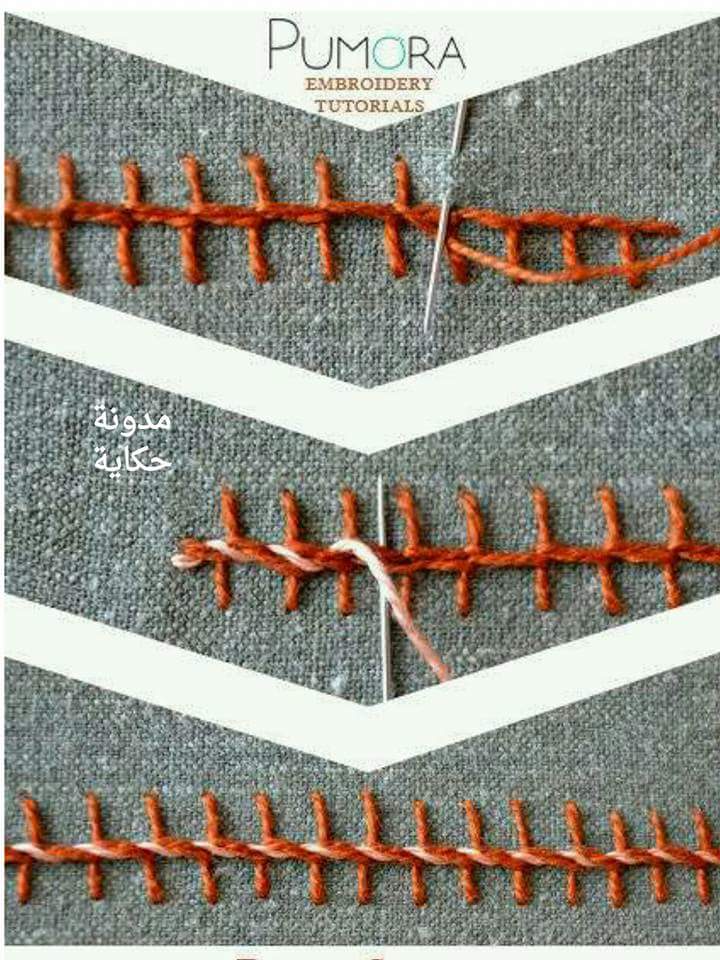
I offer you a simple series of master classes in embroidery technique “fine mesh” or as dubbed this kind of embroidery is my friend, “the cross for the lazy” 🙂
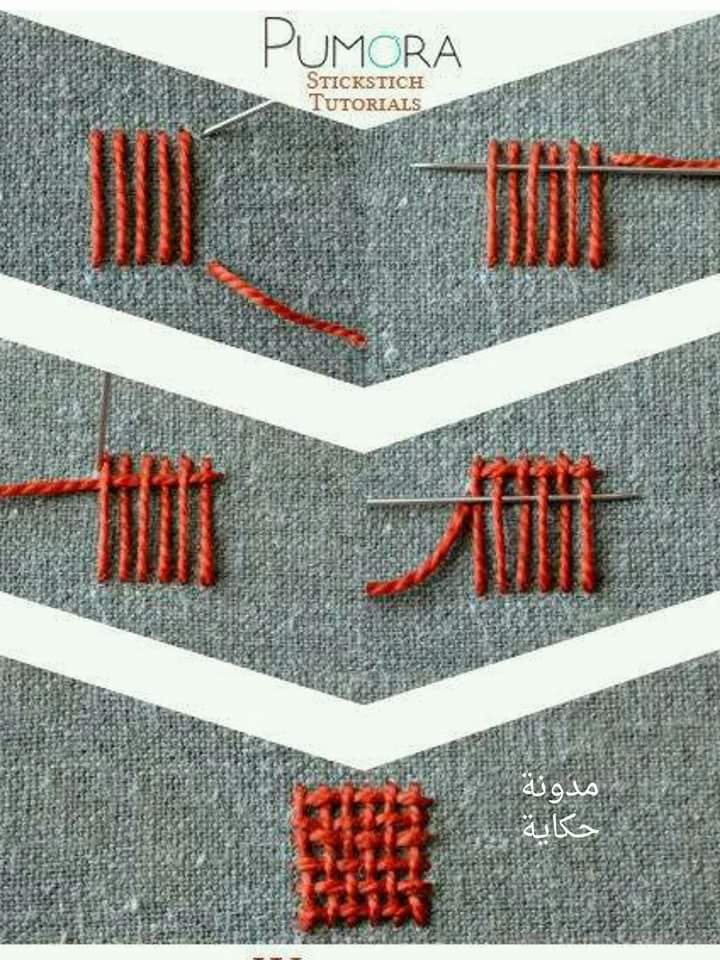
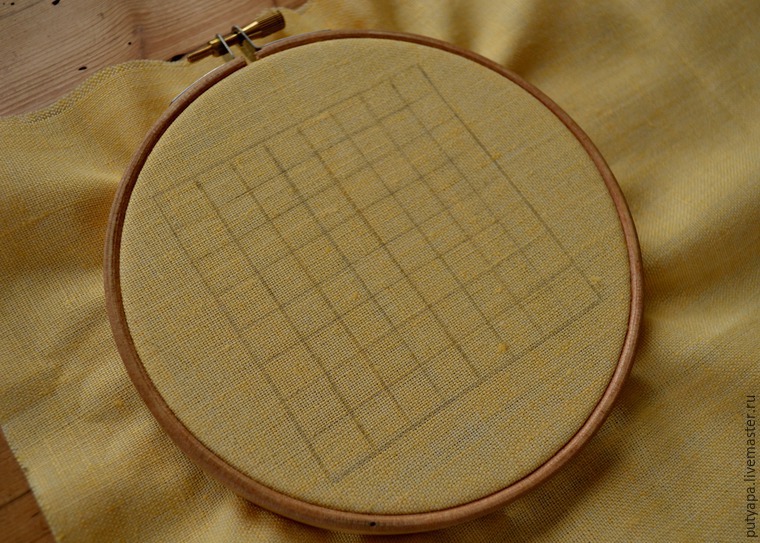
This technique is quite simple and the power of novice needlewomen. Within the loop stretched mesh, which may be straight or diamond. yarn crossing locations are attached to the fabric “clips” that can be in the form of direct or oblique stitches crosses. The resulting grid cells filled with a variety of stitches laid in different directions in a certain way. These stitches – suture knots and rococo, with loops to attach – called “partitions.” The circuit pattern sheathes stalk seam. The decorative grid is usually decorated with tablecloths, napkins, towels, pillows. I decorate this embroidered pouches of herbs.
For embroidery fabric, we need (in my linen), threads (floss, toffee), a needle with a wide eye pencil with a ruler, scissors, and a hoop.
Before you pull the mesh fabric on the pencil mark up the line. The size of the cells may be different – from 0.5 to 1 cm – depending on the pattern. In this case – I charted square 8 cm by 8 cm and a mark up to 1 cm cell.
 Further along the planned lines stretch yarn from left to right, then top to bottom (or vice versa – does not matter). On the contour of a square thread does not stretch at the end of it seem. You get such a grid:
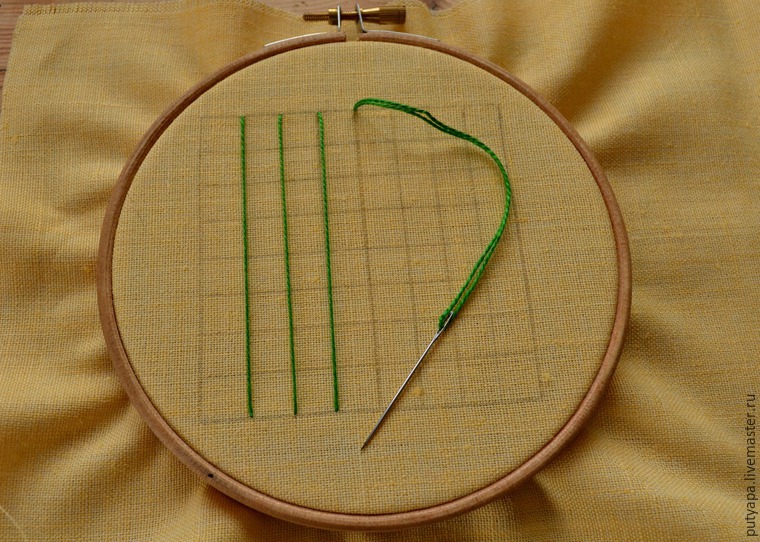
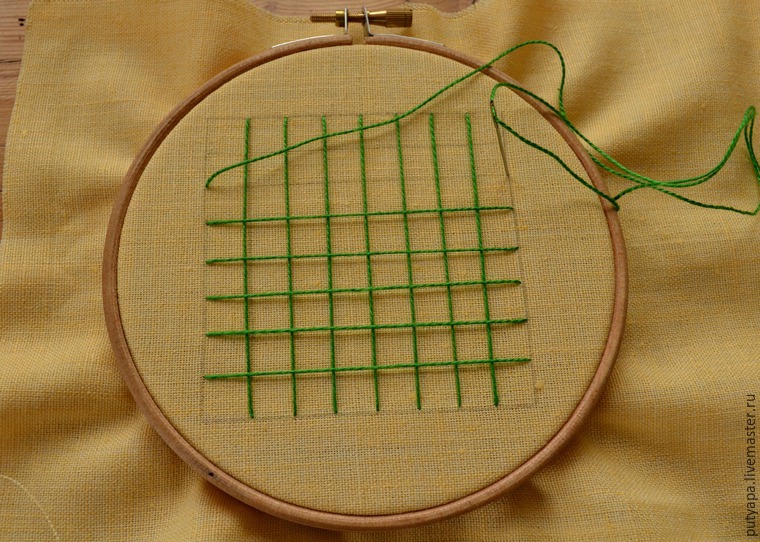
This is the basis of the pattern of the future. (Usually, the grid is performed by threads of dark tones and cutting – lighter, bright).
Next thread intersection we attach to tissue – “staples.” These stitches have not only “functional” role but also decorative, decorating grid. Stezhkami- “clips” can serve as a simple, single stitches or crosses, they can be laid in one direction or in a checkerboard pattern. Typically, these operate with thread stitches a different color (other than the mesh).
In our work, we attach the mesh stitches crosses two colors. First – yellow thread (this “midway” future florets). We carry out these stitches through cell as follows:

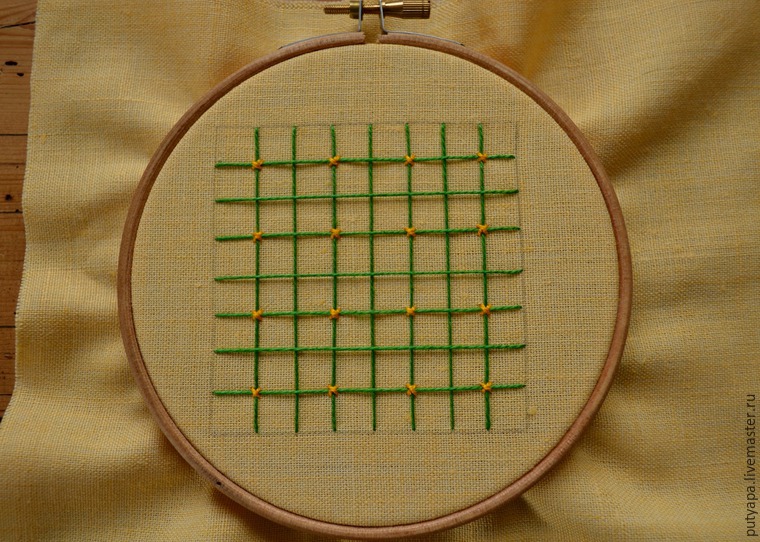 Then the rest of the crossing thread attach a cross thread of light green color. You get such a grid:
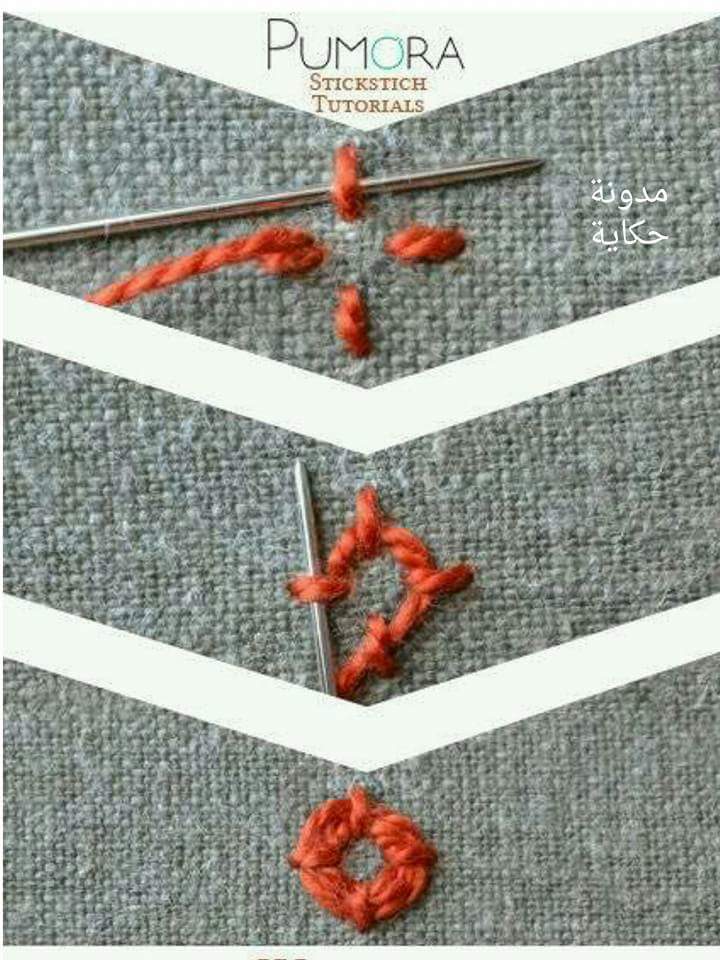
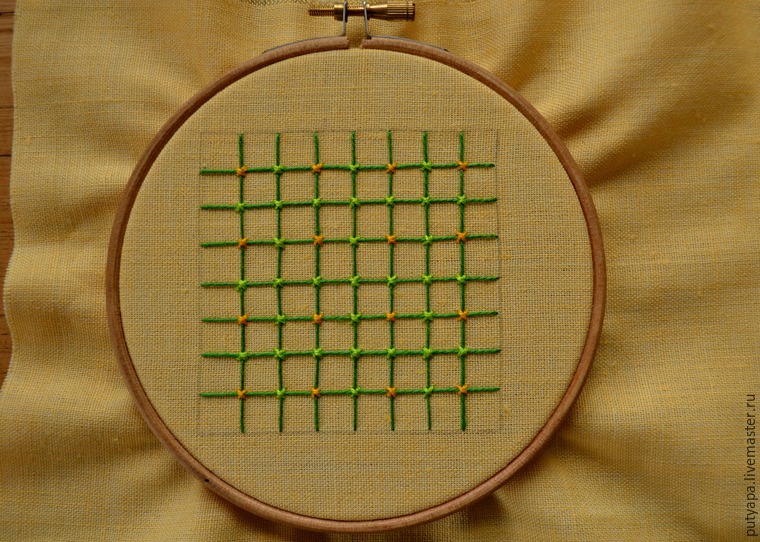 Now, in every cell of the resulting grid, we embroider cuts “legs”. This pattern is made of 3 stitches: 2 small stitches (approximately ) along the 2-sides of the square; and one stitch more – diagonally from one corner to another square. To “paws” to look nice and smooth, we make sure that all 3 stitches joined at one point.
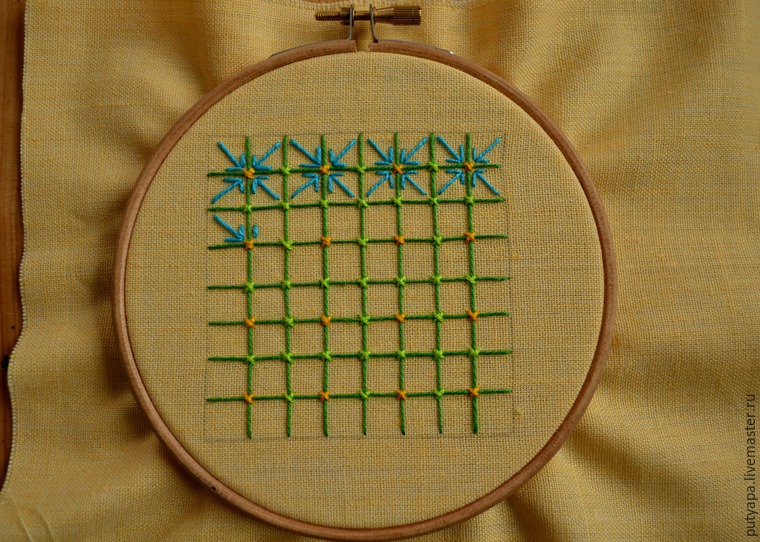
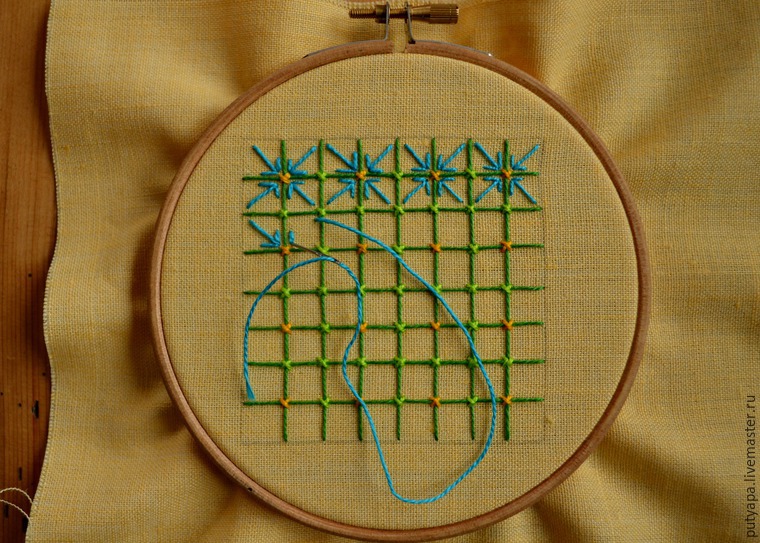
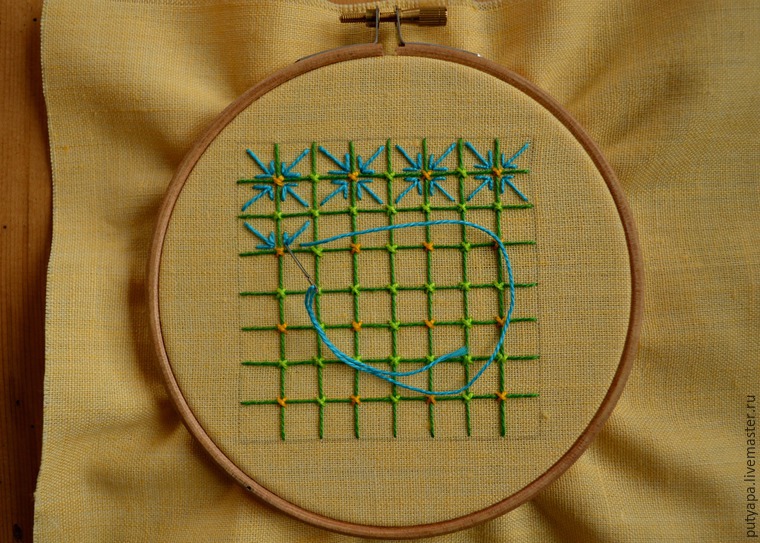 Fill cells “tabs” from left to right, top row first flowers future, then lower.
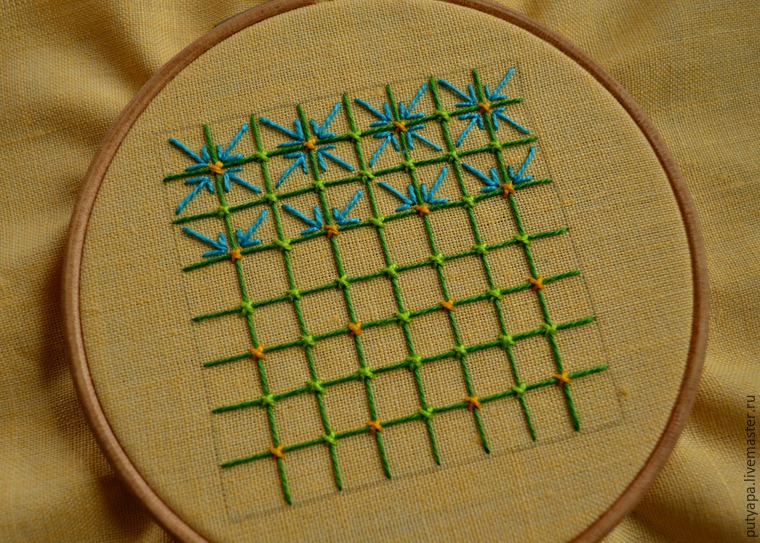
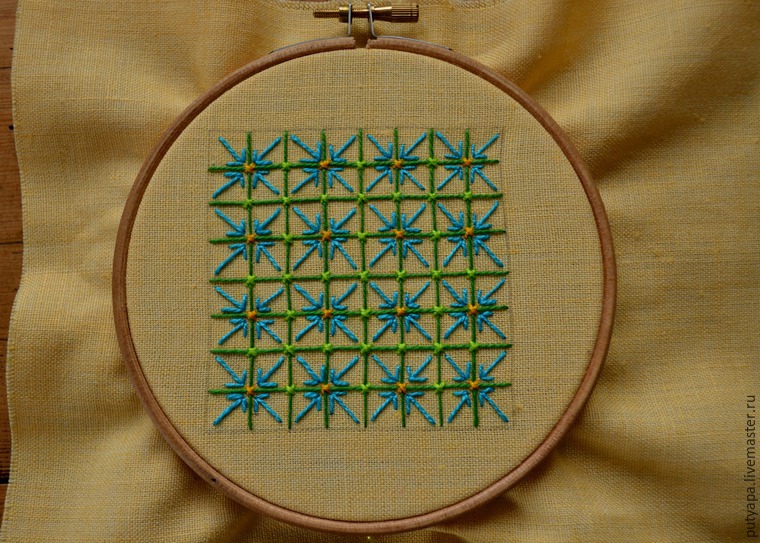 At the end of our work we are sheathed circuit stalk seam or seam “forward needle”. So, our job is ready:
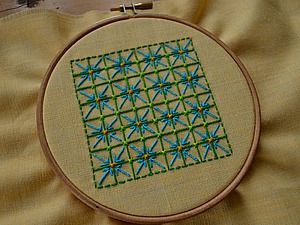
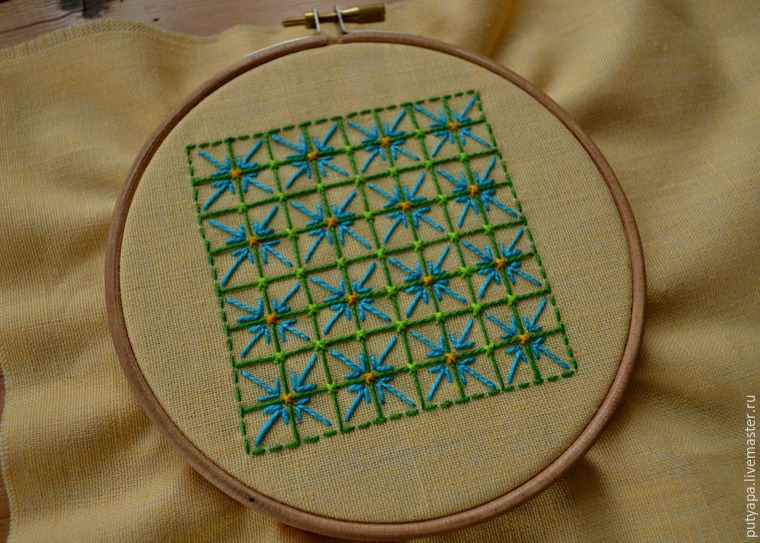 Here is an example of the finished product using this pattern – delicate daisies.
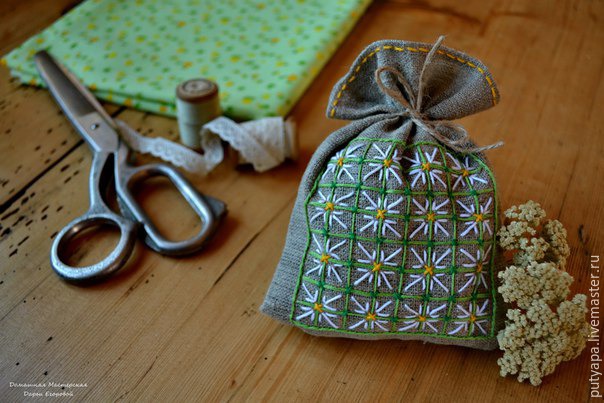 I hope my master class was someone interesting and useful. To be continued, Until we meet again!
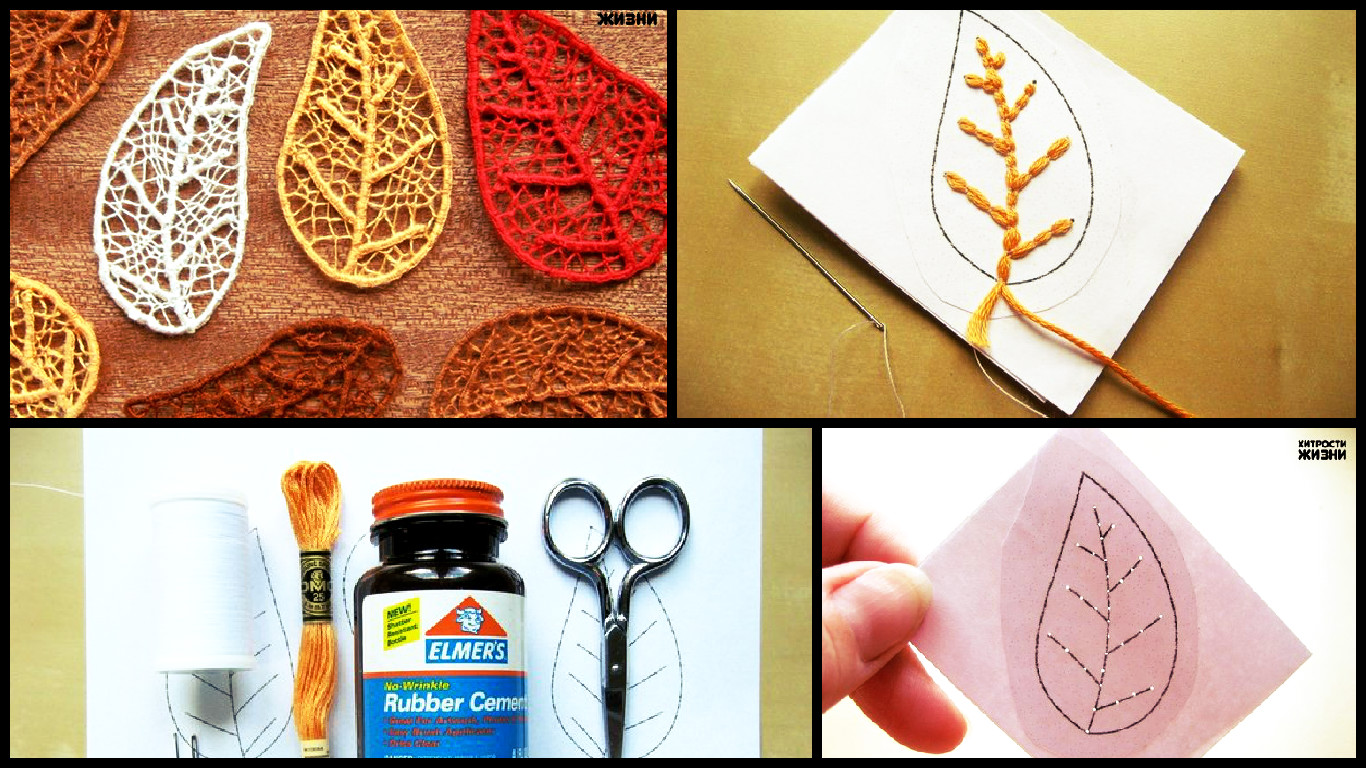
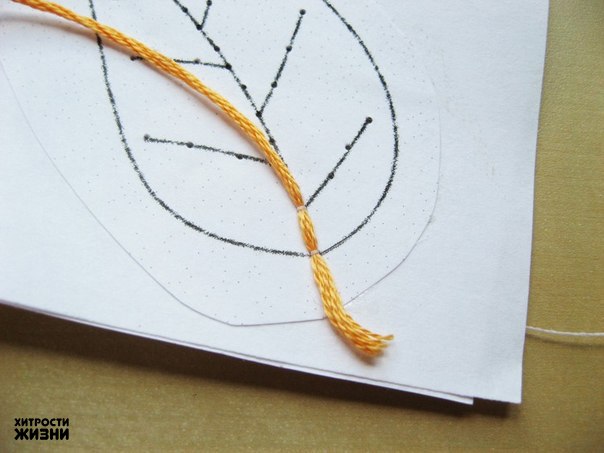
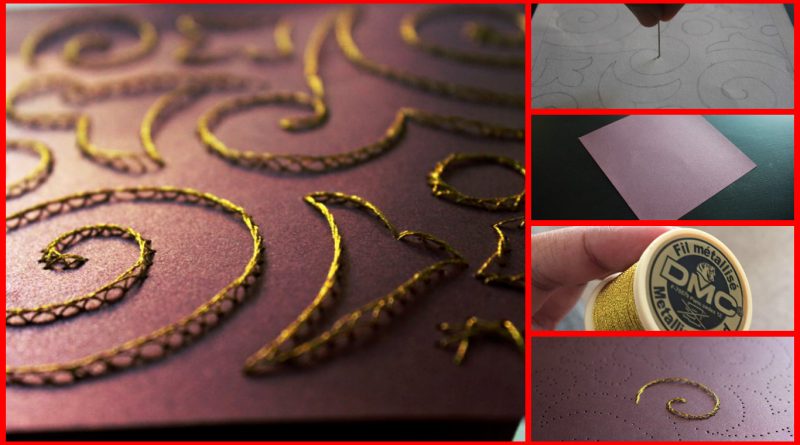
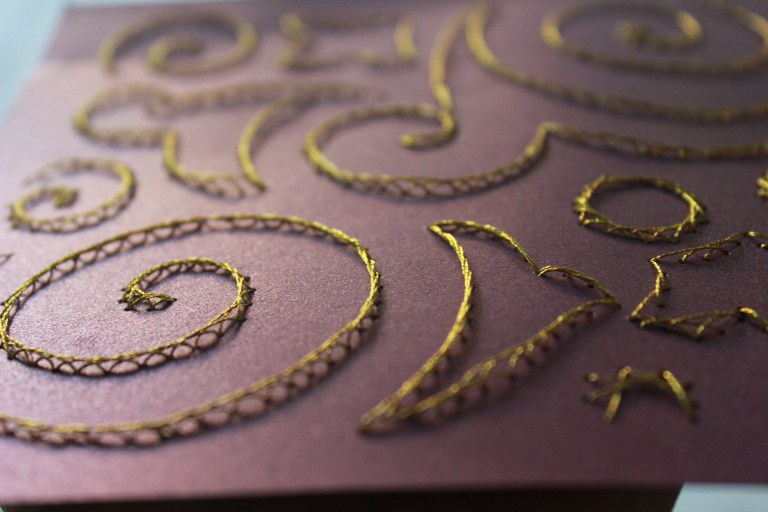
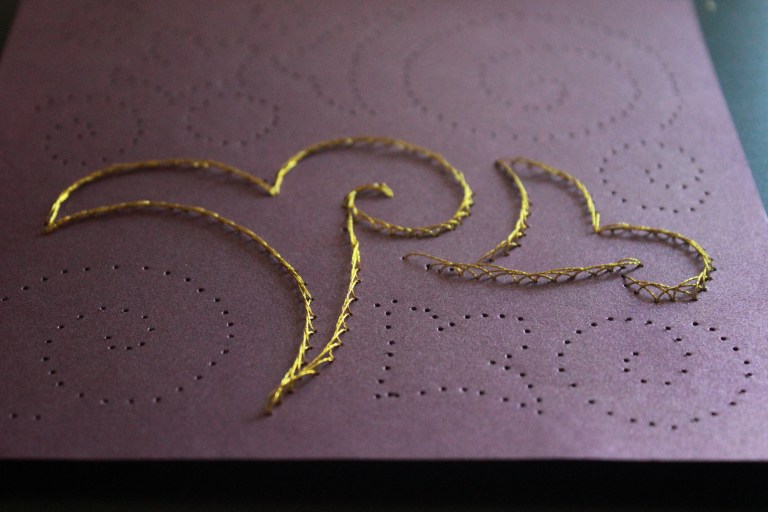
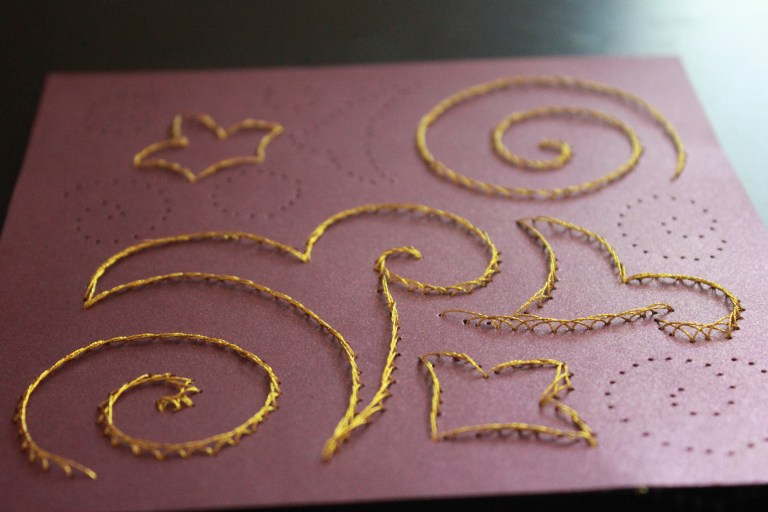
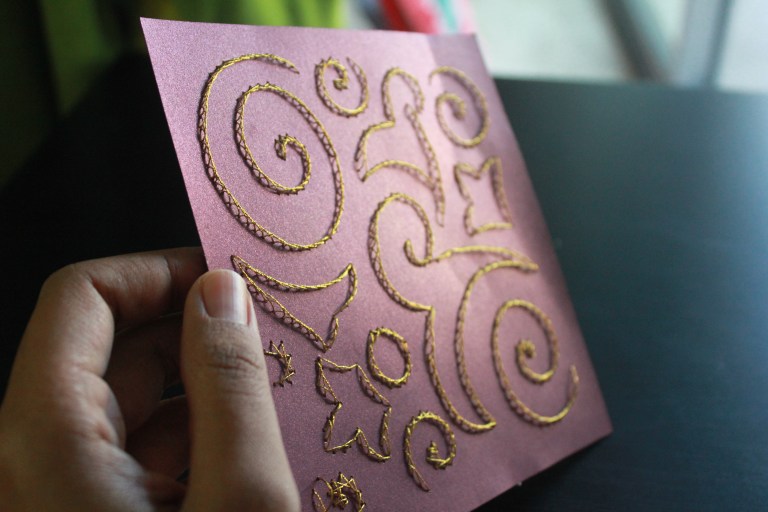
For today’s paper embroidery project I have used a wine colored card stock paper with shimmer and a metallic gold thread to embroider on it. This embroidered piece of paper can be used to make beautiful holiday cards. Slightly shiny paper and metallic thread give a holiday effect to the card. It is definitely not a quick project, it took me almost 3 days to embroider a 6″x6″ piece of paper. But when I looked at my little masterpiece, it was a moment of pure joy!
Make it for someone dear, show them you care!
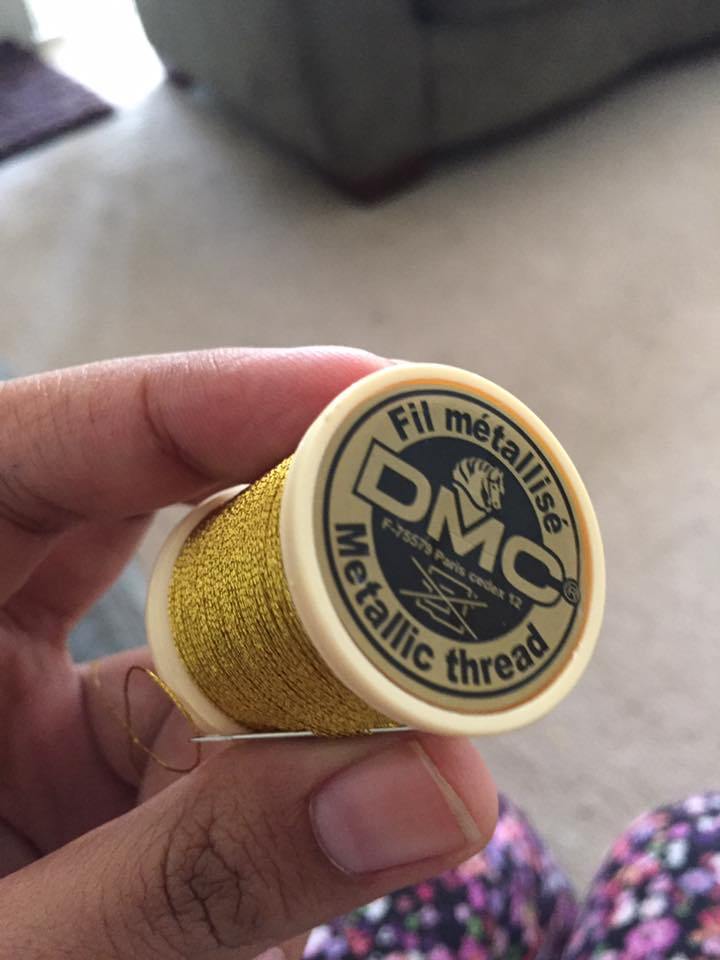
Material:
 Procedure:
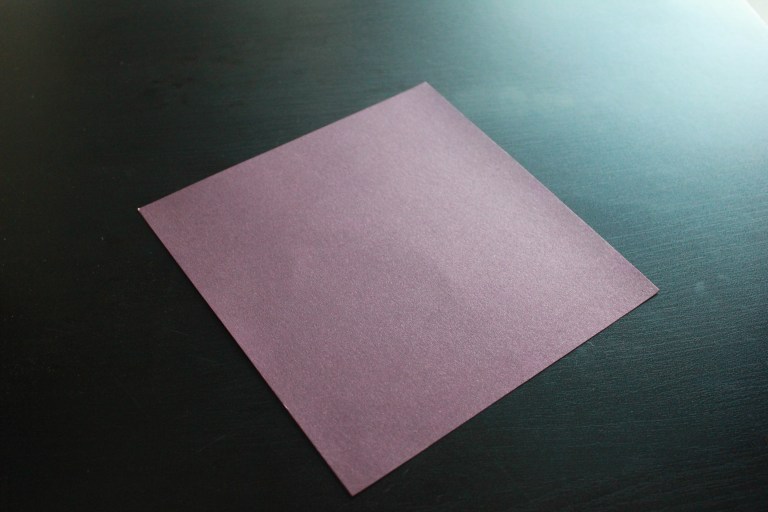
Cut a 6″x6″ square from wine card stock paper. You can cut any size you like.
 Cut 2 squares of equal size from foam board
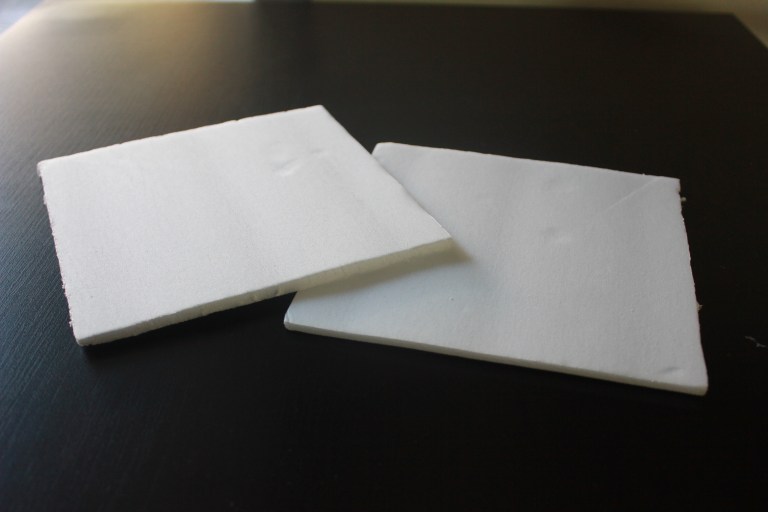 Draw a pattern to be embroidered on a paper. You can find patterns online. A lot of holiday patterns are available for purchase on Etsy. Some designer craft papers also come with beautiful printed patterns.
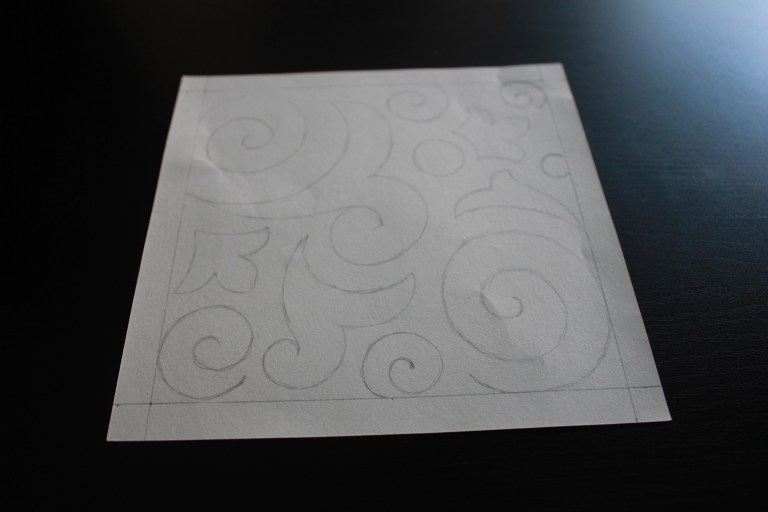 Stack up a foam board square, wine card stock paper and another foam board square on the top. Place the paper with design pattern on the top of the stack. Make sure everything is aligned and use adhesive tape to secure everything in place. This makes a perfect piercing mat!
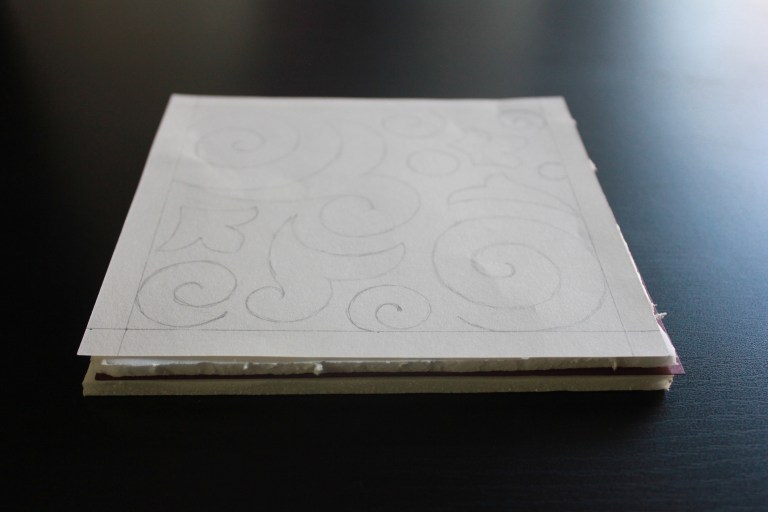 Start piercing along the lines using a piercing tool or a needle. If you are using a needle, protect your fingers while piercing.
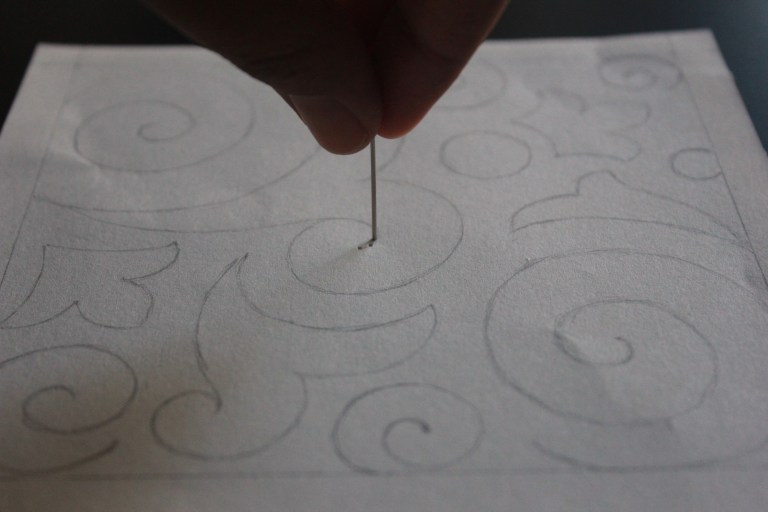
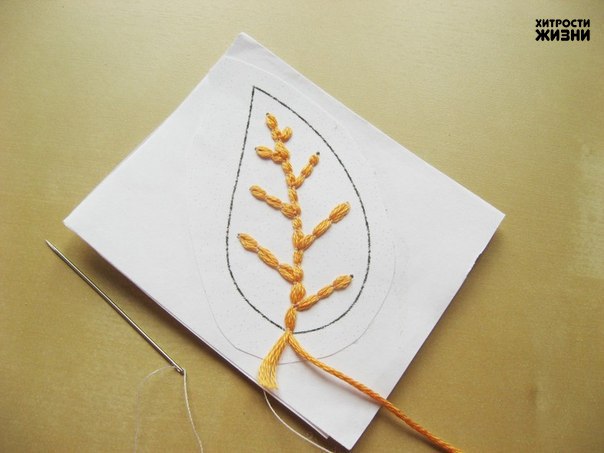
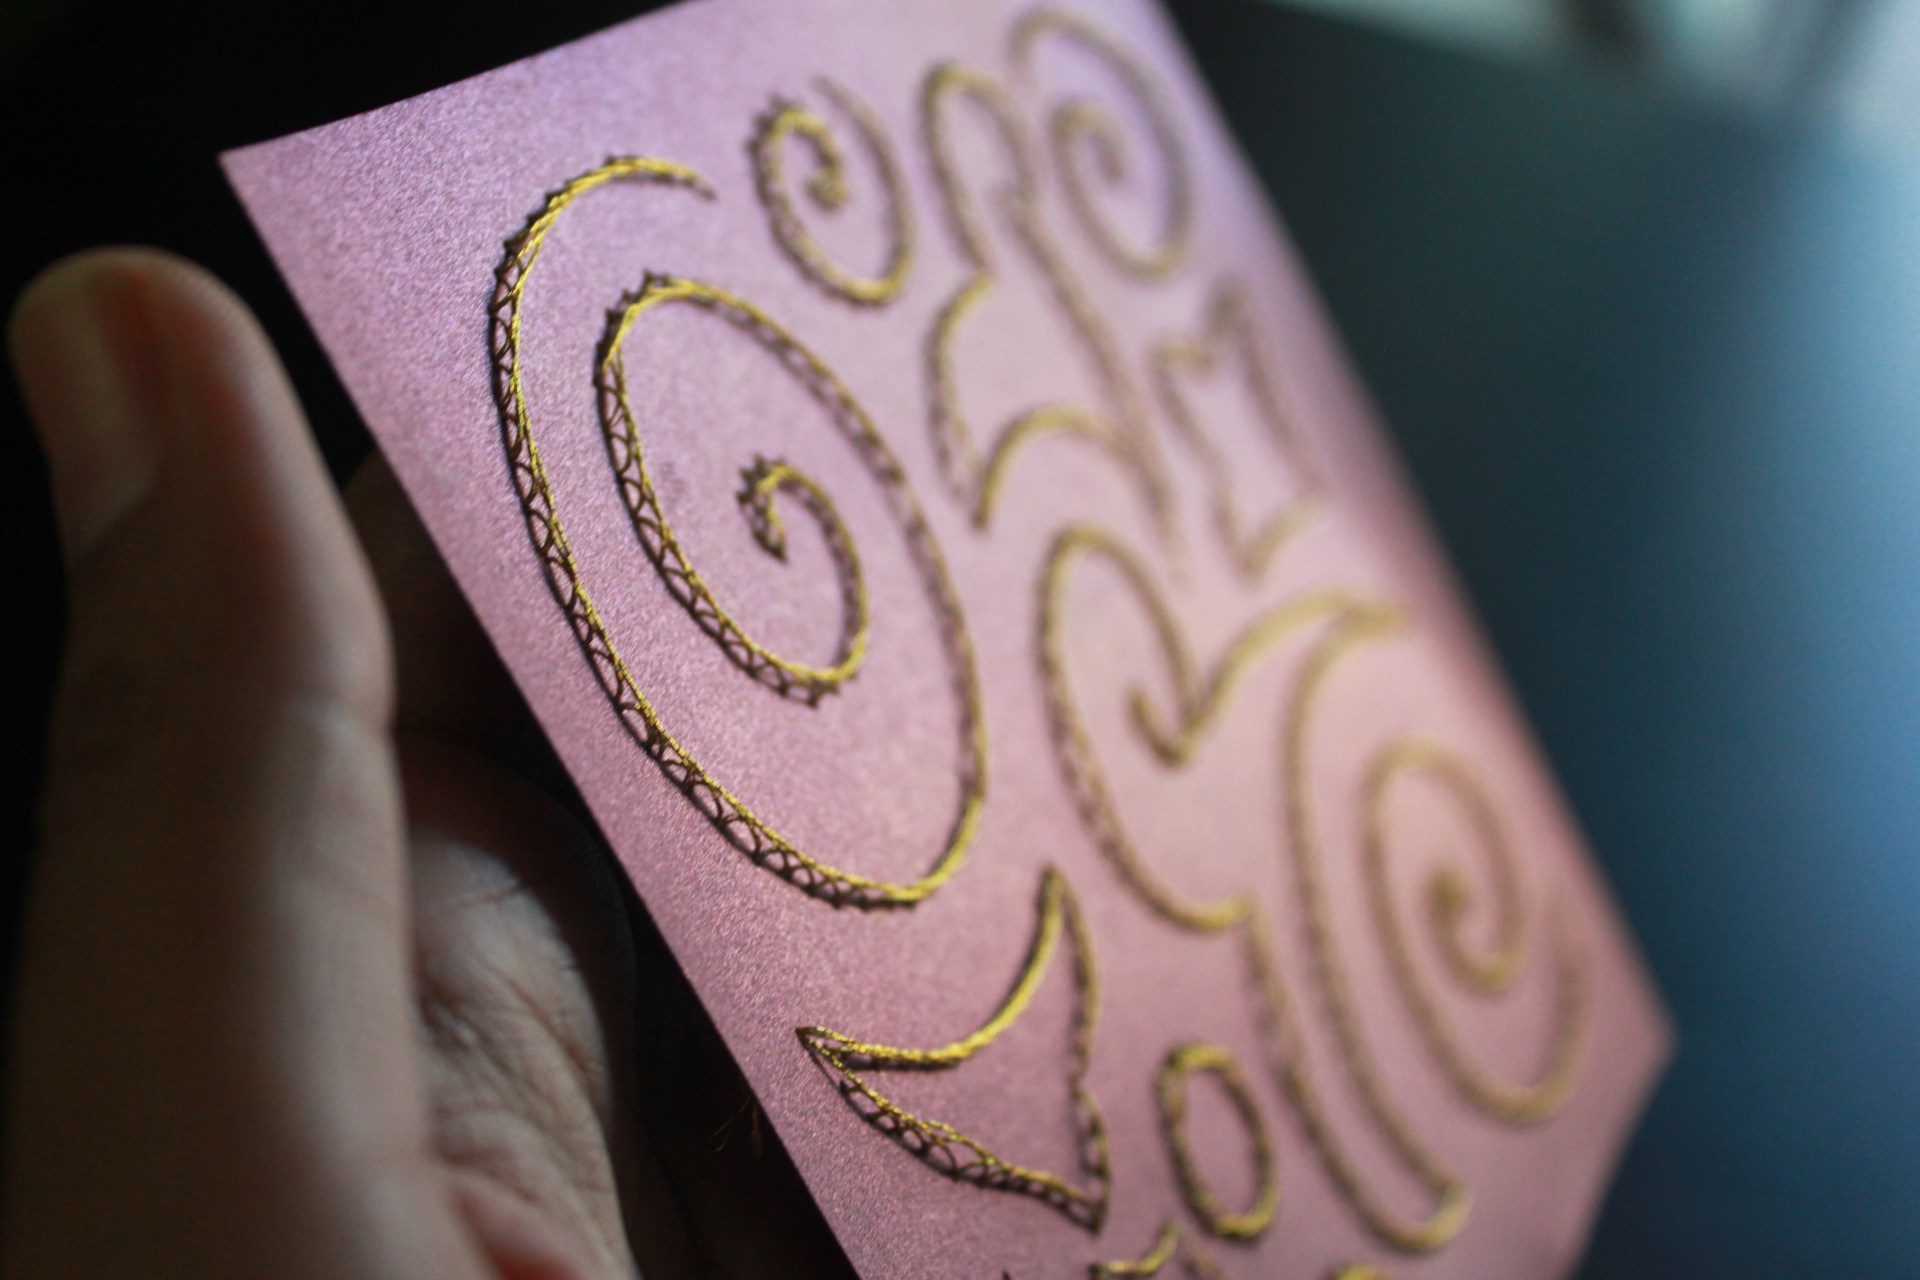
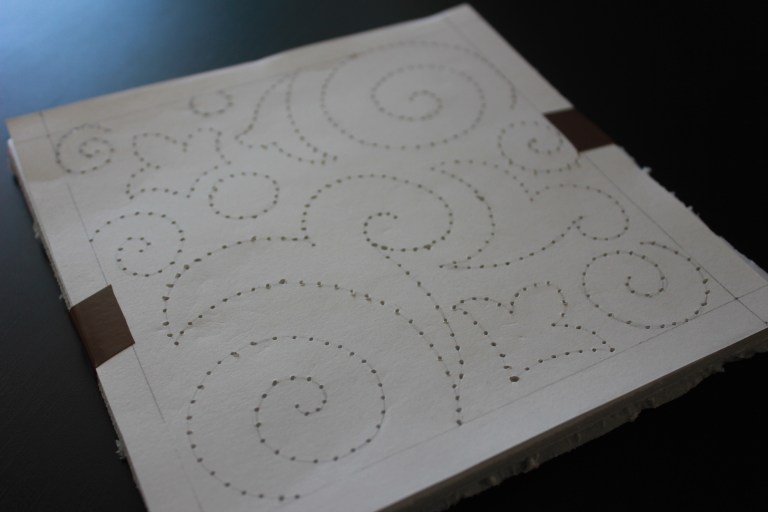 Once the complete pattern is pierced, open the adhesive tape and separate the perfectly pierced cardstock paper. Hold it against the source of light to make sure you did not miss any part of design.
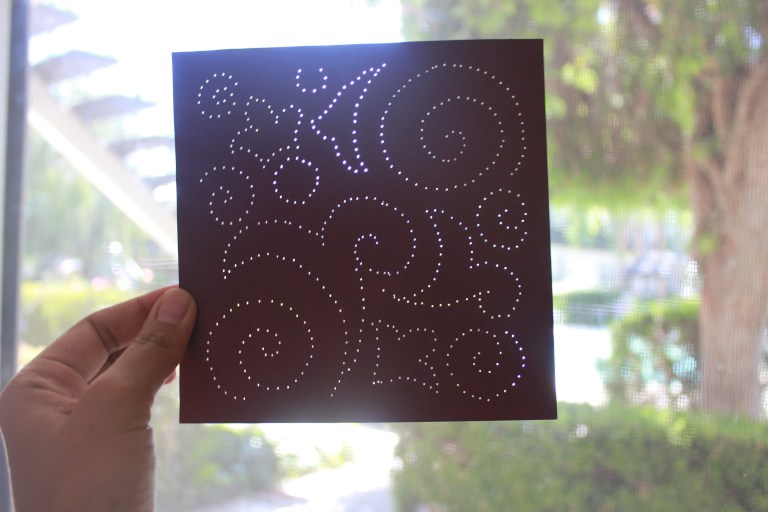 Next, we need to stitch on the paper. There are several different ways to stitch on paper. I am not an expert in stitching, so I have used a very simple stitching method. Start by threading a strand of floss into the eye of a needle.
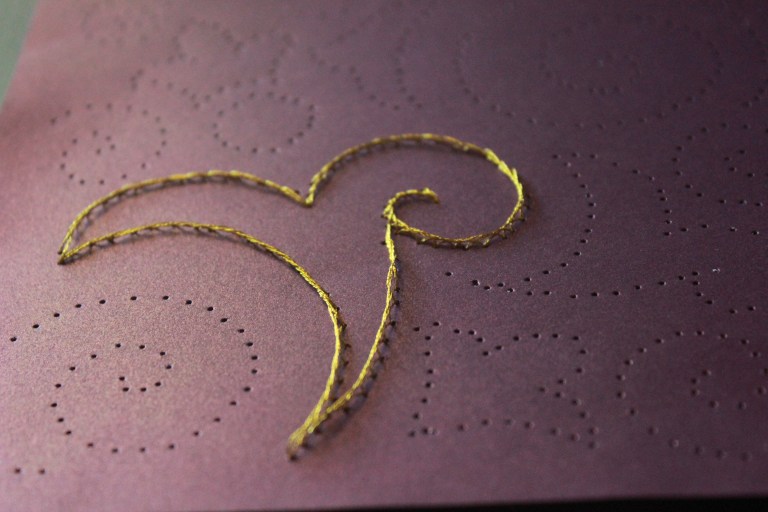
Insert the needle from the back of the card to the front and pull the thread through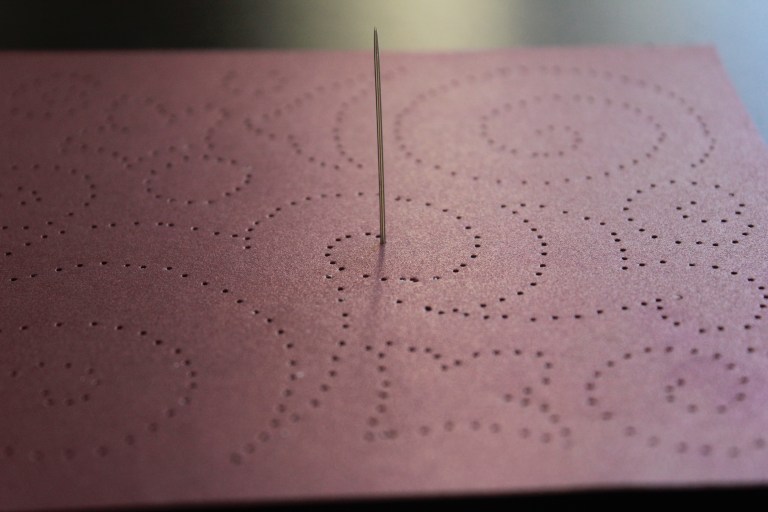 Skip next two holes and go down from the third hole.
Flip the paper. Go in the backward direction. Skip one hole and come up again from the next hole.
Go down through next open hole and repeat the previous step.
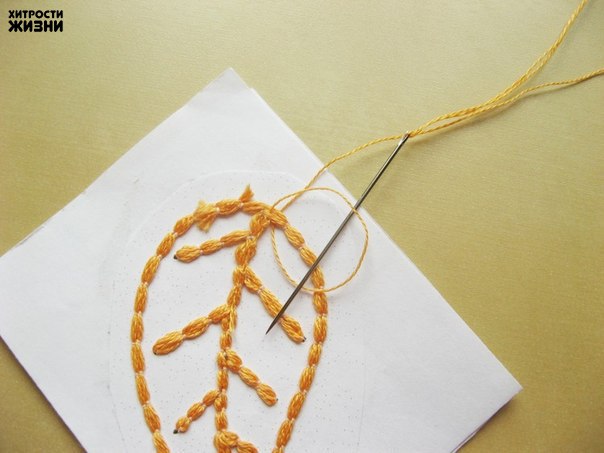
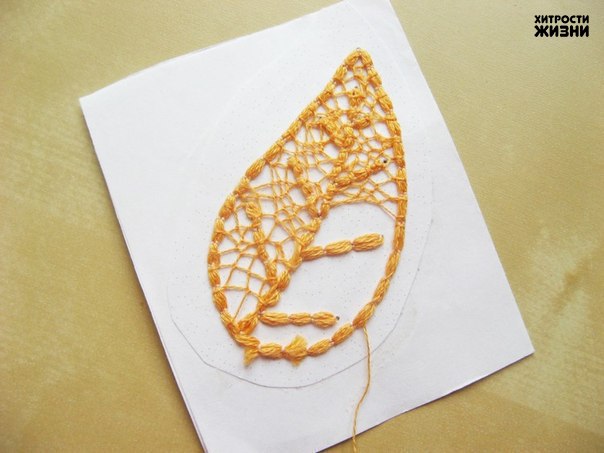
The tutorial video (posted above) might make it more clear
Here are some more pictures of embroidery in progress: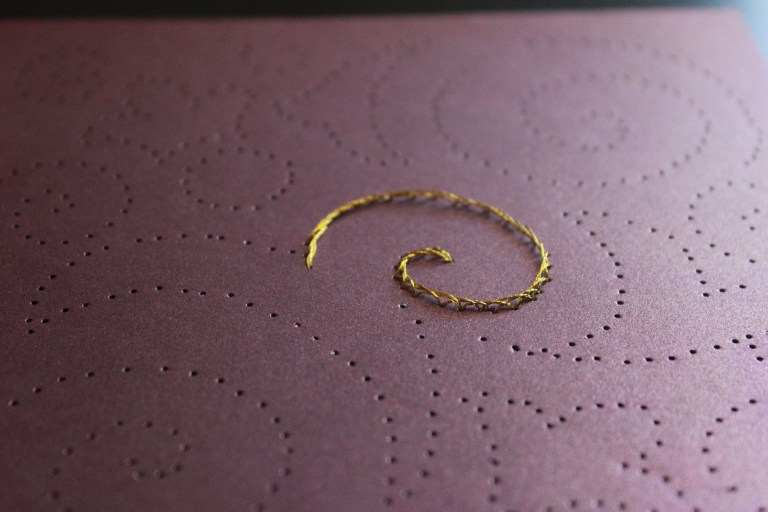

 Thank you for visiting! We really appreciate